2014 Lancia Thema lights
[x] Cancel search: lightsPage 166 of 332

INSTRUMENT CLUSTER
DESCRIPTIONS
1. Tachometer
This gauge measures engine
revolutions-per-minute (RPM x
1000).
2. Park/Headlight ON IndicatorThis indicator will illumi-
nate when the park lights or
headlights are turned on.
3. Turn Signal Indicators The arrow will flash with
the exterior turn signal
when the turn signal lever is
operated.
If the vehicle electronics sense that the
vehicle is driven more than 1.6 km
with either turn signal on, a continu-
ous chime will sound to alert you to
turn the signals off. If either indicator
flashes at a rapid rate, check for a
defective outside light bulb. 4. Front Fog Light Indicator
This indicator will illumi-
nate when the front fog
lights are on.
5. Rear Fog Light Indicator
This indicator will illuminate
when the rear fog lights are
on.
6. High Beam Indicator
This indicator shows that the
high beam headlights are on.
Push the multifunction lever forward
to switch the headlights to high beam,
and pull toward yourself (normal po-
sition) to return to low beam.
7. Odometer Display / Electronic
Vehicle Information Center (EVIC)
Display
Odometer Display
The odometer display shows the total
distance the vehicle has been driven. Electronic Vehicle Information Cen-
ter (EVIC) Display
The Electronic Vehicle Information
Center (EVIC) features a driver-
interactive display that is located in
the instrument cluster. For further in-
formation, refer to “Electronic Ve-
hicle Information Center (EVIC)”.
The Shift Lever Indicator is self-
contained within the EVIC display. It
displays the gear position of the auto-
matic transmission.
NOTE:
You must apply the brakes be-
fore shifting from PARK.
The highest available transmis- sion gear is displayed in the
lower right corner of the Elec-
tronic Vehicle Information Cen-
ter (EVIC) whenever the Elec-
tronic Range Select (ERS)
feature is active. Use the +/- se-
lector on the shift lever to acti-
vate ERS (for versions/markets,
where provided). Refer to “Auto-
matic Transmission” in “Start-
ing And Operating” for further
information.
160
Page 173 of 332

3. The reconfigurable telltales sec-
tion.
The main display area will normally
display the main menu or the screens
of a selected feature of the main
menu. The main display area also dis-
plays "pop up" messages that consist
of approximately 60 possible warning
or information messages. These pop
up messages fall into several catego-
ries:
Five Second Stored Messages
When the appropriate conditions oc-
cur, this type of message takes control
of the main display area for five sec-
onds and then returns to the previous
screen. Most of the messages of this
type are then stored (as long as the
condition that activated it remains ac-
tive) and can be reviewed from the
"Messages" main menu item. As long
as there is a stored message, an "i"
will be displayed in the EVIC's
compass/outside temp line. Examples
of this message type are "Right Front
Turn Signal Lamp Out" and "Low
Tire Pressure". Unstored Messages
This message type is displayed indefi-
nitely or until the condition that acti-
vated the message is cleared. Ex-
amples of this message type are "Turn
Signal On" (if a turn signal is left on)
and "Lights On" (if driver leaves the
vehicle).
Unstored Messages Until RUN
This message type is displayed until
the ignition is in the RUN state. An
example of this message type is "Press
Brake Pedal and Push Button to
Start".
Five Second Unstored Messages
When the appropriate conditions oc-
cur, this type of message takes control
of the main display area for five sec-
onds and then returns to the previous
screen. Examples of this message type
are "Memory System Unavailable -
Not in Park" and "Automatic High
Beams On".
The Reconfigurable Telltales section
is divided into the white telltales area
on the right, amber telltales in the
middle, and red telltales on the left.EVIC WHITE TELLTALES
This area will show reconfigurable
white caution telltales. These telltales
include:
Shift Lever Status — Diesel Only
The selected AutoStick gear is dis-
played as D1, D2, D3, D4, D5 and
indicate the Electronic Range Select
(ERS) feature has been engaged and
the gear selected is displayed. For fur-
ther information on Autostick, refer
to “Starting And Operating”.
Electronic Speed Control ON
This telltale will illuminate
when the electronic speed
control is ON. For further
information, refer to “Elec-
tronic Speed Control” in “Under-
standing The Features Of Your
Vehicle.”
Electronic Speed Control SET
This telltale will illuminate
when the electronic speed
control is SET. For further
167
Page 181 of 332
HARD-KEYS
Hard-Keys are located below the
Uconnect® system in the center of the
instrument panel. In addition, there is
a Scroll/Enter control knob located on
the right side of the Climate Controls
in the center of the instrument panel.
Turn the control knob to scroll
through menus and change settings
(i.e., 30, 60, 90), press the center of
the control knob one or more times to
select or change a setting (i.e., ON,
OFF).
SOFT-KEYS
Soft-Keys are accessible on the
Uconnect® touchscreen.
CUSTOMER
PROGRAMMABLE
FEATURES — Uconnect®
8.4 SETTINGS
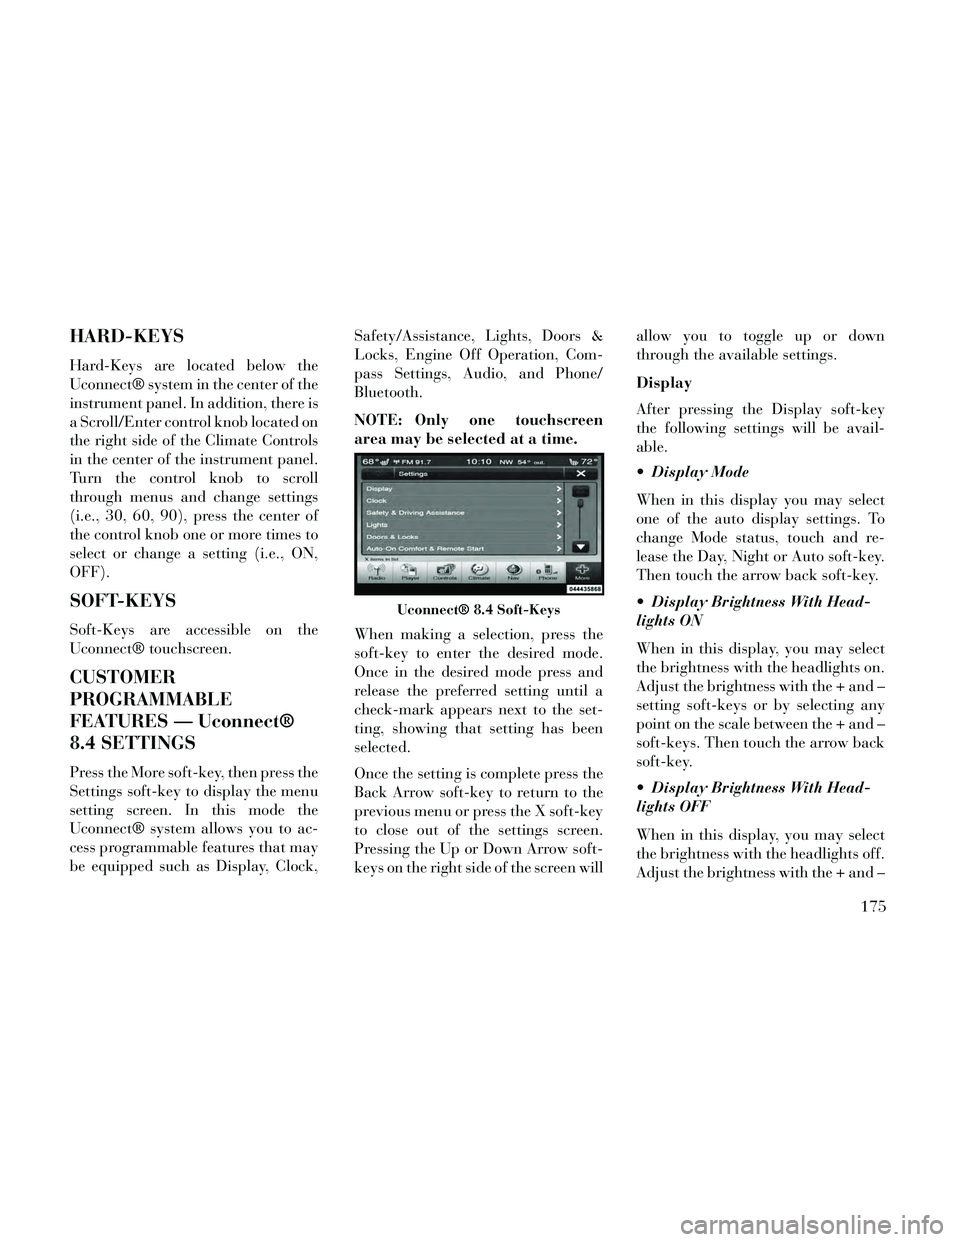
Press the More soft-key, then press the
Settings soft-key to display the menu
setting screen. In this mode the
Uconnect® system allows you to ac-
cess programmable features that may
be equipped such as Display, Clock,Safety/Assistance, Lights, Doors &
Locks, Engine Off Operation, Com-
pass Settings, Audio, and Phone/
Bluetooth.
NOTE: Only one touchscreen
area may be selected at a time.
When making a selection, press the
soft-key to enter the desired mode.
Once in the desired mode press and
release the preferred setting until a
check-mark appears next to the set-
ting, showing that setting has been
selected.
Once the setting is complete press the
Back Arrow soft-key to return to the
previous menu or press the X soft-key
to close out of the settings screen.
Pressing the Up or Down Arrow soft-
keys on the right side of the screen willallow you to toggle up or down
through the available settings.
Display
After pressing the Display soft-key
the following settings will be avail-
able.
Display Mode
When in this display you may select
one of the auto display settings. To
change Mode status, touch and re-
lease the Day, Night or Auto soft-key.
Then touch the arrow back soft-key.
Display Brightness With Head-
lights ON
When in this display, you may select
the brightness with the headlights on.
Adjust the brightness with the + and –
setting soft-keys or by selecting any
point on the scale between the + and –
soft-keys. Then touch the arrow back
soft-key.
Display Brightness With Head-
lights OFF
When in this display, you may select
the brightness with the headlights off.
Adjust the brightness with the + and –
Uconnect® 8.4 Soft-Keys
175
Page 184 of 332
than 18 km/h. The system can be
enabled with Sound Only, Sound and
Display, or turned OFF. To change the
Park Assist status, touch and release
the OFF, Sound Only or Sounds and
Display button. Then touch the arrow
back soft-key. Refer to “ParkSense®
Rear Park Assist” in “Understanding
The Features Of Your Vehicle” for
system function and operating
information.
Tilt Mirrors In Reverse (for
versions/markets, where provided)
When this feature is selected, the out-
side sideview mirrors will tilt down-
ward when the ignition is in the RUN
position and the transmission shift le-
ver is in the REVERSE position. The
mirrors will move back to their previ-
ous position when the transmission is
shifted out of REVERSE. To make
your selection, touch the Tilt Mirrors
In Reverse soft-key, until a check-
mark appears next to setting, showing
that setting has been selected. Touch
the back arrow soft-key to return to
the previous menu. Blind Spot Alert (for versions/
markets, where provided)
When this feature is selected, the
Blind Spot Alert feature can be set to
Off, Lights or Lights and Chime. The
Blind Spot Alert feature can be acti-
vated in “Lights” mode. When this
mode is selected, the Blind Spot Moni-
tor (BSM) system is activated and will
only show a visual alert in the outside
mirrors. When “Lights & Chime”
mode is activated, the Blind Spot
Monitor (BSM) will show a visual
alert in the outside mirrors as well as
an audible alert when the turn signal
is on. When “Off” is selected, the
Blind Spot Monitor (BSM) system is
deactivated. To change the Blind Spot
Alert status, touch the Off, Lights or
Lights & Chime soft-key. Then touch
the arrow back soft-key.
NOTE: If your vehicle has expe-
rienced any damage in the area
where the sensor is located, even if
the fascia is not damaged, the sen-
sor may have become misaligned.
Take your vehicle to an authorized
dealer to verify sensor alignment.Having a sensor that is misaligned
will result in the BSM not operat-
ing to specification.
ParkView® Backup Camera (for
versions/markets, where provided)
Your vehicle may be equipped with
the ParkView® Rear Back Up Cam-
era that allows you to see an on-screen
image of the rear surroundings of
your vehicle whenever the shift lever
is put into REVERSE. The image will
be displayed on the radio touchscreen
display along with a caution note to
“check entire surroundings” across
the top of the screen. After five sec-
onds, this note will disappear. The
ParkView® camera is located on the
rear of the vehicle above the rear Li-
cense plate. To make your selection,
touch the ParkView® Backup Cam-
era soft-key, until a check-mark ap-
pears next to setting, showing that
setting has been selected. Touch the
back arrow soft-key to return to the
previous menu.
178
Page 185 of 332
Rain Sensing Auto Wipers (for
versions/markets, where provided)
When this feature is selected, the sys-
tem will automatically activate the
windshield wipers if it senses moisture
on the windshield. To make your se-
lection, touch the Rain Sensing soft-
key, until a check-mark appears next
to setting, showing that setting has
been selected. Touch the back arrow
soft-key to return to the previous
menu.
Hill Start Assist
When this feature is selected, the Hill
Start Assist (HSA) system is active.
Refer to “Electronic Brake Control
System” in “Starting And Operating”
for system function and operating in-
formation. To make your selection,
touch the Hill Start Assist soft-key,
until a check-mark appears next to
setting, showing that setting has been
selected. Touch the back arrow soft-
key to return to the previous menu.
Lights
After pressing the Lights soft-key the
following settings will be available. Headlight Off Delay
When this feature is selected, the
driver can choose to have the head-
lights remain on for 0, 30, 60, or 90
seconds when exiting the vehicle. To
change the Headlight Off Delay status
touch the 0, 30, 60 or 90 soft-key.
Then touch the arrow back soft-key.
Headlight Illumination On Ap-
proach
When this feature is selected, the
headlights will activate and remain on
for 0, 30, 60, or 90 seconds when the
doors are unlocked with the Remote
Keyless Entry (RKE) transmitter. To
change the Illuminated Approach sta-
tus, touch the + or - soft-key to select
your desired time interval. Touch the
back arrow soft-key to return to the
previous menu.
Headlights With Wipers (for
versions/markets, where provided)
When this feature is selected, and the
headlight switch is in the AUTO posi-
tion, the headlights will turn on ap-
proximately 10 seconds after the wip-
ers are turned on. The headlights willalso turn off when the wipers are
turned off if they were turned on by
this feature. To make your selection,
touch the Headlights With Wipers
soft-key, until a check-mark appears
next to setting, showing that setting
has been selected. Touch the back ar-
row soft-key to return to the previous
menu.
Auto Dim High Beams “Smart-
Beam™” (for versions/markets,
where provided)
When this feature is selected, the high
beam headlights will deactivate auto-
matically under certain conditions. To
make your selection, touch the Auto
High Beams soft-key, until a check-
mark appears next to setting, showing
that setting has been selected. Touch
the back arrow soft-key to return to
the previous menu. Refer to “Lights/
SmartBeam™ (for versions/markets,
where provided)” in “Understanding
The Features Of Your Vehicle” for
further information.
179
Page 186 of 332
Daytime Running Lights (for
versions/markets, where provided)
When this feature is selected, the
headlights will turn on whenever the
engine is running. To make your se-
lection, touch the Daytime Running
Lights soft-key, until a check-mark
appears next to setting, showing that
setting has been selected. Touch the
back arrow soft-key to return to the
previous menu.
Steering Directed Lights (for
versions/markets, where provided)
When this feature is selected, the
headlights turn relative to a change in
direction of the steering wheel. To
make your selection, touch the Steer-
ing Directed Lights soft-key, until a
check-mark appears next to setting,
showing that setting has been se-
lected. Touch the back arrow soft-key
to return to the previous menu.
Headlight Dipped Beam (Traffic
Changeover) (for versions/markets,
where provided)
Low beam headlights have more con-
trol of upward light and direct most oftheir light downward and either to the
left for right hand drive countries or to
the right for left hand drive countries
to provide safe forward visibility
without excessive glare.
Doors & Locks
After pressing the Doors & Locks soft-
key the following settings will be
available.
Auto Lock
When this feature is selected, all doors
will lock automatically when the ve-
hicle reaches a speed of 24 km/h. To
make your selection, touch the Auto
Lock soft-key, until a check-mark ap-
pears next to setting, showing that
setting has been selected. Touch the
back arrow soft-key to return to the
previous menu.
Auto Unlock On Exit
When this feature is selected, all doors
will unlock when the vehicle is
stopped and the transmission is in the
PARK or NEUTRAL position and the
driver's door is opened. To make your
selection, touch the Auto Unlock On
Exit soft-key, until a check-mark ap-
pears next to setting, showing that
setting has been selected. Touch the
back arrow soft-key to return to the
previous menu.
1st Press Of Key Fob Unlocks
When 1st Press Of Key Fob Unlocks is
selected, only the driver's door will
unlock on the first press of the Remote
Keyless Entry (RKE) transmitter UN-
LOCK button. When 1st Press Of Key
Fob Unlocks is selected, you must
press the RKE transmitter UNLOCK
button twice to unlock the passenger's
doors. When Unlock All Doors On 1st
Press is selected, all of the doors will
unlock on the first press of the RKE
transmitter UNLOCK button.
NOTE: If the vehicle is pro-
grammed 1st Press Of Key Fob Un-
locks, all doors will unlock no
matter which Passive Entry
equipped door handle is grasped.
If 1st Press Of Key Fob Unlocks is
programmed, only the driver’s
door will unlock when the driver’s
door is grasped. With Passive En-
try, if 1st Press Of Key Fob Unlocks
180
Page 187 of 332
is programmed touching the
handle more than once will only
result in the driver’s door opening.
If driver door first is selected, once
the driver door is opened, the inte-
rior door lock/unlock switch can
be used to unlock all doors (or use
RKE transmitter).
Passive Entry
This feature allows you to lock and
unlock the vehicle’s door(s) without
having to press the Remote Keyless
Entry (RKE) transmitter lock or un-
lock buttons. To make your selection,
touch the Passive Entry soft-key, until
a check-mark appears next to setting,
showing that setting has been selected.
Touch the back arrow soft-key to re-
turn to the previous menu. Refer to
“Keyless Enter-N-Go” in “Things To
Know Before Starting Your Vehicle”.
Personal Settings Linked To FOB
(for versions/markets, where pro-
vided)
This feature provides automatic
driver seat positioning to enhance
driver mobility when entering and ex-
iting the vehicle. To make your selec-
tion, touch the Personal SettingsLinked To FOB soft-key, until a
check-mark appears next to setting,
showing that setting has been se-
lected. Touch the back arrow soft-key
to return to the previous menu.
NOTE: The seat will return to the
memorized seat location (if Recall
Memory with Remote Key Unlock
is set to ON) when the Remote Key-
less Entry (RKE) transmitter is
used to unlock the door. Refer to
“Driver Memory Seat” in “Under-
standing The Features Of Your Ve-
hicle” for further information.
Engine Off Options
After pressing the Engine Off Options
soft-key the following settings will be
available.
Easy Exit Seat (for versions/
markets, where provided)
This feature provides automatic
driver seat positioning to enhance
driver mobility when entering and ex-
iting the vehicle. To make your selec-
tion, touch the Easy Exit Seats soft-
key, until a check-mark appears next
to setting, showing that setting has
been selected. Touch the back arrow
soft-key to return to the previous
menu.
Engine Off Power Delay (for
versions/markets, where provided)
When this feature is selected, the
power window switches, radio,
Uconnect® phone system (for
versions/markets, where provided),
DVD video system (for versions/
markets, where provided), power
sunroof (for versions/markets, where
provided), and power outlets will re-
main active for up to 10 minutes after
the ignition is cycled to OFF. Opening
either front door will cancel this fea-
ture. To change the Engine Off Power
Delay status touch the 0 seconds, 45
seconds, 5 minutes or 10 minutes
soft-key. Then touch the arrow back
soft-key.
Headlight Off Delay
When this feature is selected, the
driver can choose to have the head-
lights remain on for 0, 30, 60, or 90
seconds when exiting the vehicle. To
change the Headlight Off Delay status
touch the + or - soft-key to select your
181
Page 205 of 332

WARNING!(Continued)
Do not attempt to push or towyour vehicle to get it started. Ve-
hicles equipped with an auto-
matic transmission cannot be
started this way. Unburned fuel
could enter the catalytic con-
verter and once the engine has
started, ignite and damage the
converter and vehicle.
If the vehicle has a discharged battery, booster cables may be
used to obtain a start from a
booster battery or the battery in
another vehicle. This type of start
can be dangerous if done improp-
erly. Refer to “Jump Starting” in
“What To Do In Emergencies” for
further information.
Clearing A Flooded Engine (Using
ENGINE START/STOP Button)
If the engine fails to start after you
have followed the “Normal Starting”
or “Extreme Cold Weather" proce-
dures, it may be flooded. To clear any
excess fuel:
1. Press and hold the brake pedal. 2. Press the accelerator pedal all the
way to the floor and hold it.
3. Press and release the ENGINE
START/STOP button once.
The starter motor will engage auto-
matically, run for 10 seconds, and
then disengage. Once this occurs, re-
lease the accelerator pedal and the
brake pedal, wait 10 to 15 seconds,
then repeat the “Normal Starting”
procedure.
AFTER STARTING
The idle speed is controlled automati-
cally and it will decrease as the engine
warms up.
NORMAL STARTING –
DIESEL ENGINE
Observe the following when the en-
gine is operating.
All message center lights are off.
Malfunction Indicator Light (MIL)
is off.
Low Oil Pressure Light is off. Cold Weather Precautions
If the outside temperature is very low,
the diesel fuel thickens due to the
formation of parrafin clots and could
clog the diesel filter. In order to avoid
these problems, different types of die-
sel fuel are distributed according to
the season: summer type, winter type
and arctic type (cold, mountainous
areas).
If refuelling with diesel fuel whose
specifications are not suitable for the
outside temperature, it is advisable to
mix TUTELA DIESEL ART additive
in the proportions shown on the con-
tainer with the fuel. Pour the additive
into the tank before the fuel.
When using or parking the vehicle for
a long time in the mountains or cold
areas, it is advisable to refuel using
locally available diesel. In this case, it
is also advisable to keep the tank over
50% full.
199