2014 KIA Sportage instrument cluster
[x] Cancel search: instrument clusterPage 317 of 457
Driving your vehicle
40
5
✽
✽
NOTICE
• When operating the vehicle on a
dynamometer, ensure that the
ESC is turned off (ESC OFF light
illuminated). If the ESC is left on,
it may prevent the vehicle speed
from increasing, and result in false
diagnosis.
• Turning the ESC off does not affect ABS or brake system opera-
tion.
Vehicle stability management
(VSM) (if equipped)
This system provides further
enhancements to vehicle stability
and steering responses when a vehi-
cle is driving on a slippery road or a
vehicle detected changes in coeffi-
cient of friction between right wheels
and left wheels when braking.
VSM operation
When the VSM is in operation, ESC
indicator light ( ) blinks.
When the vehicle stability manage-
ment is operating properly, you can
feel a slight pulsation in the vehicle
and/or abnormal steering responses
(EPS). This is only the effect of brake
and EPS control and indicates noth-
ing unusual. The VSM does not operate when:
Driving on bank road such as gra-
dient or incline
Driving rearward
ESC OFF indicator light ( ) remains on the instrument
cluster
EPS indicator light remains on the instrument cluster
Page 323 of 457
Driving your vehicle
46
5
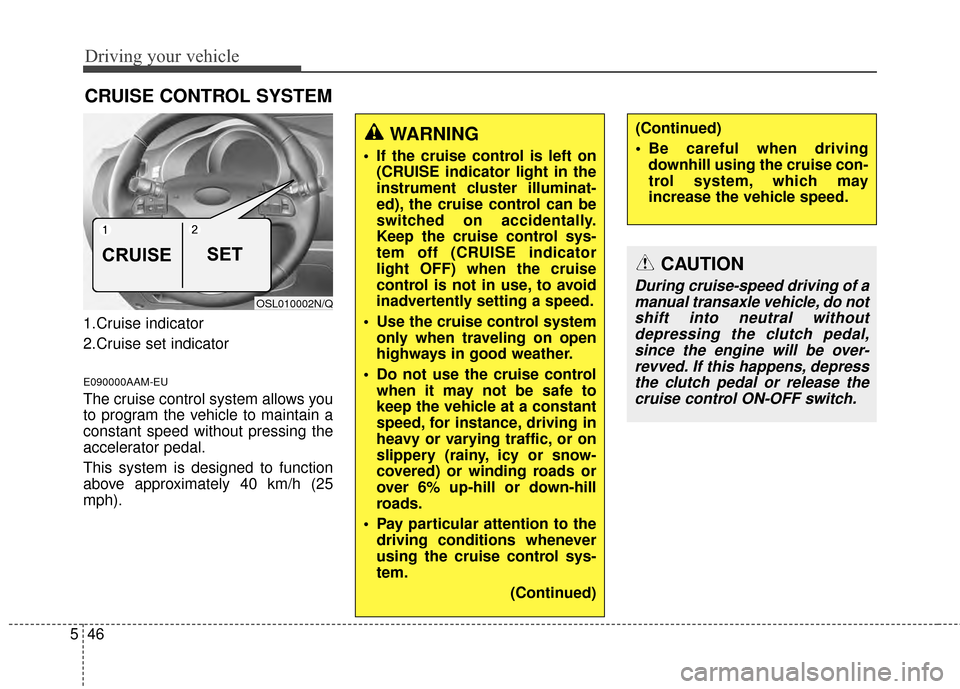
1.Cruise indicator
2.Cruise set indicator
E090000AAM-EU
The cruise control system allows you
to program the vehicle to maintain a
constant speed without pressing the
accelerator pedal.
This system is designed to function
above approximately 40 km/h (25
mph).
CRUISE CONTROL SYSTEM
WARNING
If the cruise control is left on
(CRUISE indicator light in the
instrument cluster illuminat-
ed), the cruise control can be
switched on accidentally.
Keep the cruise control sys-
tem off (CRUISE indicator
light OFF) when the cruise
control is not in use, to avoid
inadvertently setting a speed.
Use the cruise control system only when traveling on open
highways in good weather.
Do not use the cruise control when it may not be safe to
keep the vehicle at a constant
speed, for instance, driving in
heavy or varying traffic, or on
slippery (rainy, icy or snow-
covered) or winding roads or
over 6% up-hill or down-hill
roads.
Pay particular attention to the driving conditions whenever
using the cruise control sys-
tem.
(Continued)
(Continued)
Be careful when drivingdownhill using the cruise con-
trol system, which may
increase the vehicle speed.
CAUTION
During cruise-speed driving of amanual transaxle vehicle, do notshift into neutral withoutdepressing the clutch pedal,since the engine will be over-revved. If this happens, depressthe clutch pedal or release thecruise control ON-OFF switch.
OSL010002N/Q
CRUISE SET
Page 324 of 457
547
Driving your vehicle
✽
✽NOTICE
• During normal cruise control
operation, when the SET switch is
activated or reactivated after
applying the brakes, the cruise
control will energize after approx-
imately 3 seconds. The delay is
normal.
• To activate cruise control, depress the brake pedal at least once after
turning the ignition switch to the
ON position or starting the engine.
This is to check if the brake switch
which is important part to cancel
cruise control is in normal condi-
tion.
E090100AUN-KM
To set cruise control speed:
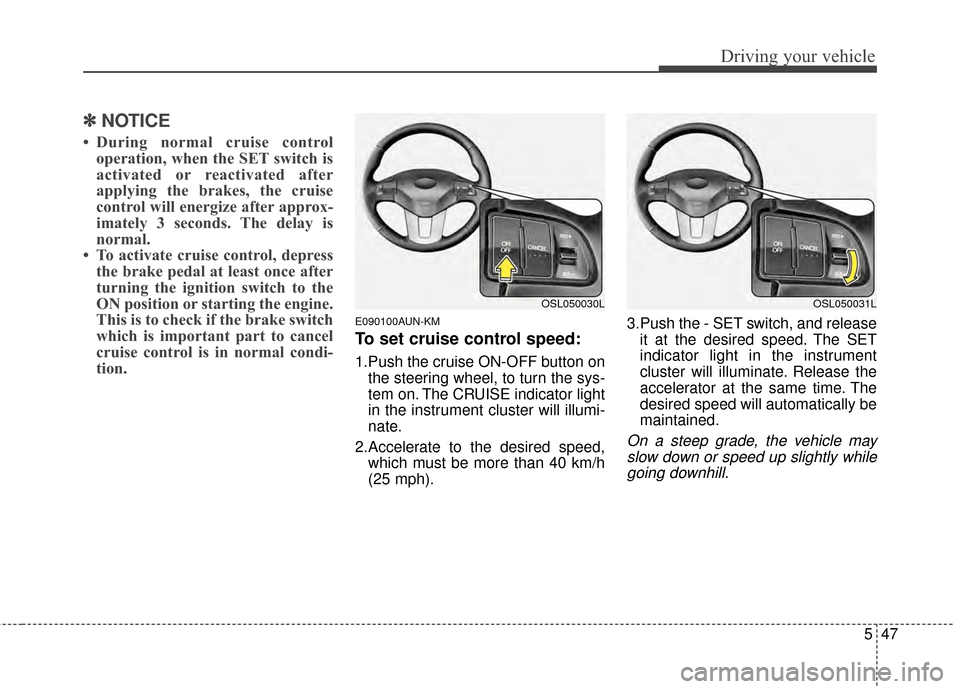
1.Push the cruise ON-OFF button on
the steering wheel, to turn the sys-
tem on. The CRUISE indicator light
in the instrument cluster will illumi-
nate.
2.Accelerate to the desired speed, which must be more than 40 km/h
(25 mph). 3.Push the - SET switch, and release
it at the desired speed. The SET
indicator light in the instrument
cluster will illuminate. Release the
accelerator at the same time. The
desired speed will automatically be
maintained.
On a steep grade, the vehicle mayslow down or speed up slightly whilegoing downhill.
OSL050030LOSL050031L
Page 327 of 457
Driving your vehicle
50
5
E090700AUN-KM
To turn cruise control off, do
one of the following:
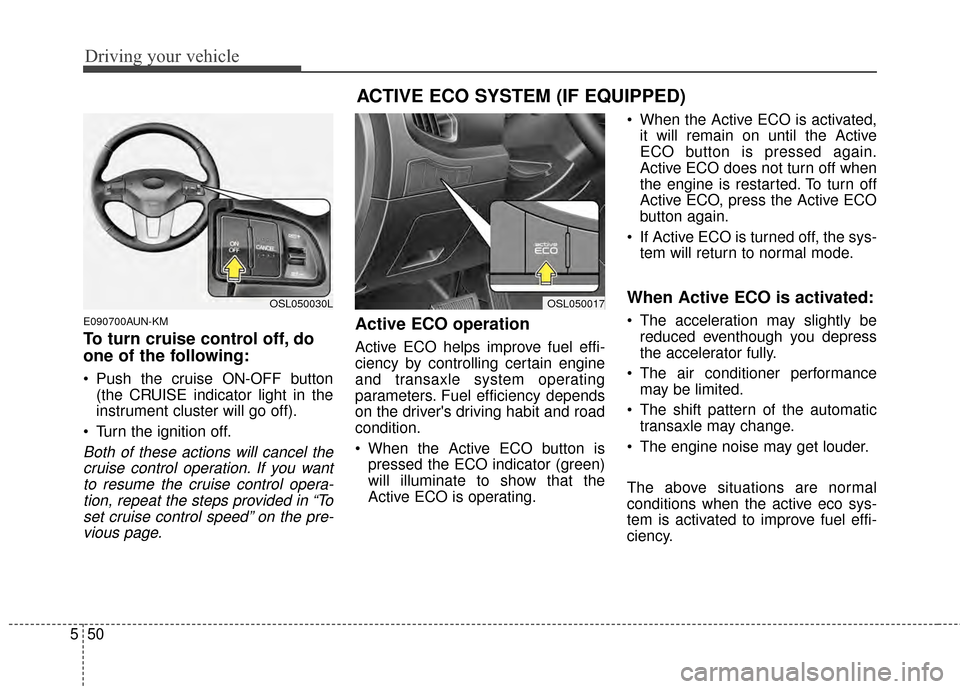
Push the cruise ON-OFF button
(the CRUISE indicator light in the
instrument cluster will go off).
Turn the ignition off.
Both of these actions will cancel the cruise control operation. If you wantto resume the cruise control opera-tion, repeat the steps provided in “Toset cruise control speed” on the pre-vious page.
Active ECO operation
Active ECO helps improve fuel effi-
ciency by controlling certain engine
and transaxle system operating
parameters. Fuel efficiency depends
on the driver's driving habit and road
condition.
When the Active ECO button is pressed the ECO indicator (green)
will illuminate to show that the
Active ECO is operating. When the Active ECO is activated,
it will remain on until the Active
ECO button is pressed again.
Active ECO does not turn off when
the engine is restarted. To turn off
Active ECO, press the Active ECO
button again.
If Active ECO is turned off, the sys- tem will return to normal mode.
When Active ECO is activated:
The acceleration may slightly bereduced eventhough you depress
the accelerator fully.
The air conditioner performance may be limited.
The shift pattern of the automatic transaxle may change.
The engine noise may get louder.
The above situations are normal
conditions when the active eco sys-
tem is activated to improve fuel effi-
ciency.
ACTIVE ECO SYSTEM (IF EQUIPPED)
OSL050030LOSL050017
Page 428 of 457
755
Maintenance
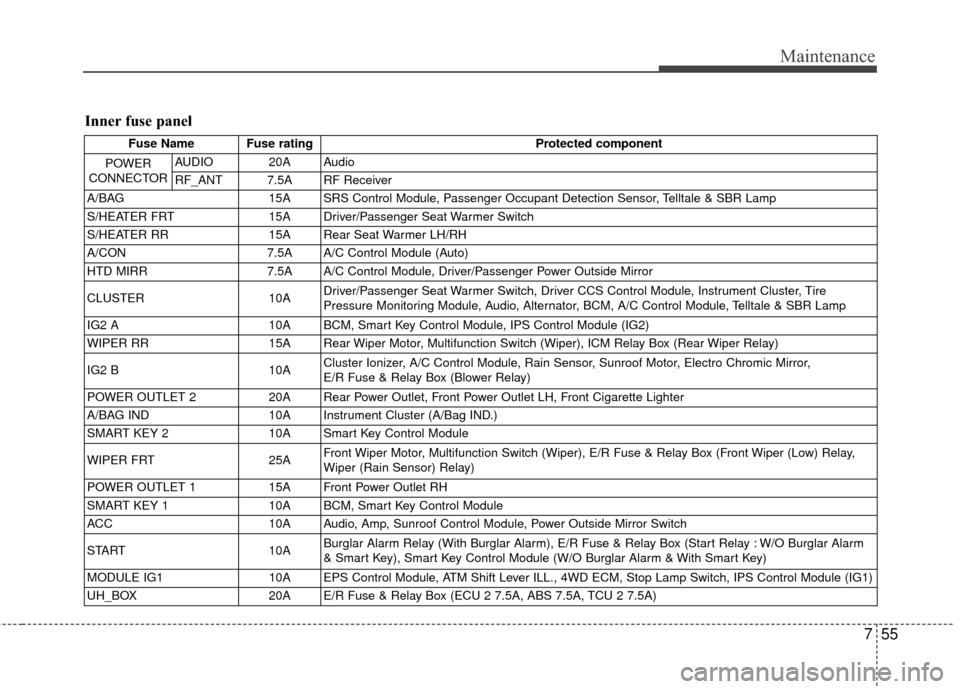
Inner fuse panel
Fuse Name Fuse ratingProtected component
POWER
CONNECTOR
AUDIO 20A Audio
RF_ANT 7.5A RF Receiver
A/BAG 15A SRS Control Module, Passenger Occupant Detection Sensor, Telltale & SBR Lamp
S/HEATER FRT 15A Driver/Passenger Seat Warmer Switch
S/HEATER RR 15A Rear Seat Warmer LH/RH
A/CON 7.5A A/C Control Module (Auto)
HTD MIRR 7.5A A/C Control Module, Driver/Passenger Power Outside Mirror
CLUSTER 10A Driver/Passenger Seat Warmer Switch, Driver CCS Control Module, Instrument Cluster, Tire
Pressure Monitoring Module, Audio, Alternator, BCM, A/C Control Module, Telltale & SBR Lamp
IG2 A 10A BCM, Smart Key Control Module, IPS Control Module (IG2)
WIPER RR 15A Rear Wiper Motor, Multifunction Switch (Wiper), ICM Relay Box (Rear Wiper Relay)
IG2 B 10A Cluster Ionizer, A/C Control Module, Rain Sensor, Sunroof Motor, Electro Chromic Mirror,
E/R Fuse & Relay Box (Blower Relay)
POWER OUTLET 2 20A Rear Power Outlet, Front Power Outlet LH, Front Cigarette Lighter
A/BAG IND 10A Instrument Cluster (A/Bag IND.)
SMART KEY 2 10A Smart Key Control Module
WIPER FRT 25A Front Wiper Motor, Multifunction Switch (Wiper), E/R Fuse & Relay Box (Front Wiper (Low) Relay,
Wiper (Rain Sensor) Relay)
POWER OUTLET 1 15A Front Power Outlet RH
SMART KEY 1 10A BCM, Smart Key Control Module
ACC 10A Audio, Amp, Sunroof Control Module, Power Outside Mirror Switch
START 10A Burglar Alarm Relay (With Burglar Alarm), E/R Fuse & Relay Box (Start Relay : W/O Burglar Alarm
& Smart Key), Smart Key Control Module (W/O Burglar Alarm & With Smart Key)
MODULE IG1 10A EPS Control Module, ATM Shift Lever ILL., 4WD ECM, Stop Lamp Switch, IPS Control Module (IG1)
UH_BOX 20A E/R Fuse & Relay Box (ECU 2 7.5A, ABS 7.5A, TCU 2 7.5A)
Page 429 of 457
Maintenance
56
7
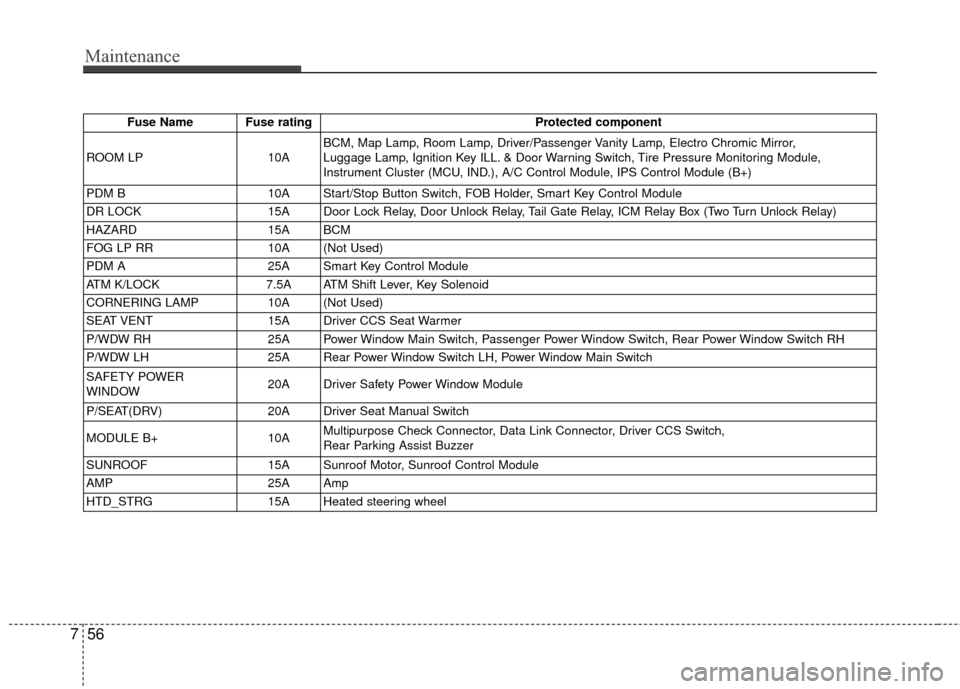
Fuse Name Fuse rating Protected component
ROOM LP 10ABCM, Map Lamp, Room Lamp, Driver/Passenger Vanity Lamp, Electro Chromic Mirror,
Luggage Lamp, Ignition Key ILL. & Door Warning Switch, Tire Pressure Monitoring Module,
Instrument Cluster (MCU, IND.), A/C Control Module, IPS Control Module (B+)
PDM B 10A Start/Stop Button Switch, FOB Holder, Smart Key Control Module
DR LOCK 15A Door Lock Relay, Door Unlock Relay, Tail Gate Relay, ICM Relay Box (Two Turn Unlock Relay)
HAZARD 15A BCM
FOG LP RR 10A (Not Used)
PDM A 25A Smart Key Control Module
ATM K/LOCK 7.5A ATM Shift Lever, Key Solenoid
CORNERING LAMP 10A (Not Used)
SEAT VENT 15A Driver CCS Seat Warmer
P/WDW RH 25A Power Window Main Switch, Passenger Power Window Switch, Rear Power Window Switch RH
P/WDW LH 25A Rear Power Window Switch LH, Power Window Main Switch
SAFETY POWER
WINDOW 20A Driver Safety Power Window Module
P/SEAT(DRV) 20A Driver Seat Manual Switch
MODULE B+ 10AMultipurpose Check Connector, Data Link Connector, Driver CCS Switch,
Rear Parking Assist Buzzer
SUNROOF 15A Sunroof Motor, Sunroof Control Module
AMP 25A Amp
HTD_STRG 15A Heated steering wheel
Page 454 of 457
Index
4I
If the engine will not start . . . . . . . . . . . . . . . . . . . . . . . 6-3If engine dose not turn over or turns over slowly . . . 6-3
If engine turns over normally but does not start . . . . 6-3
If you have a flat tire . . . . . . . . . . . . . . . . . . . . . . . . . . . 6-7 Changing tires . . . . . . . . . . . . . . . . . . . . . . . . . . . . . . 6-8
Jack and tools . . . . . . . . . . . . . . . . . . . . . . . . . . . . . . . 6-8
Removing and storing the spare tire . . . . . . . . . . . . . 6-8
In case of an emergency while driving . . . . . . . . . . . . . . 6-2 If engine stalls while driving . . . . . . . . . . . . . . . . . . . 6-3
If the engine stalls at a crossroad or crossing . . . . . . 6-2
If you have a flat tire while driving . . . . . . . . . . . . . . 6-2
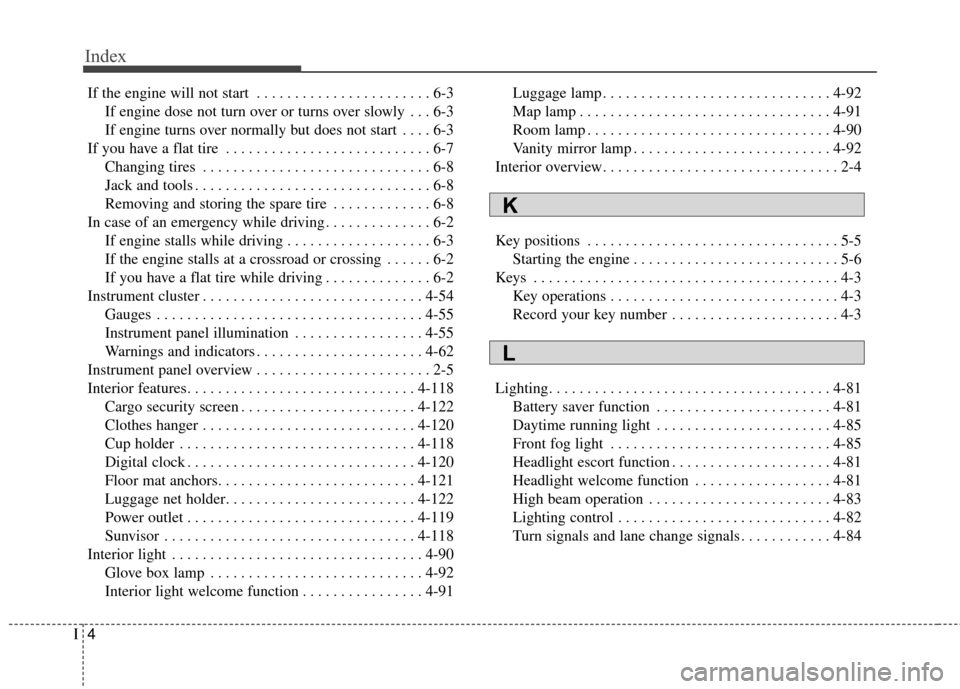
Instrument cluster . . . . . . . . . . . . . . . . . . . . . . . . . . . . . 4-54 Gauges . . . . . . . . . . . . . . . . . . . . . . . . . . . . . . . . . . . 4-\
55
Instrument panel illumination . . . . . . . . . . . . . . . . . 4-55
Warnings and indicators . . . . . . . . . . . . . . . . . . . . . . 4-62
Instrument panel overview . . . . . . . . . . . . . . . . . . . . . . . 2-5
Interior features. . . . . . . . . . . . . . . . . . . . . . . . . . . . . . 4-118 Cargo security screen . . . . . . . . . . . . . . . . . . . . . . . 4-122
Clothes hanger . . . . . . . . . . . . . . . . . . . . . . . . . . . . 4-120
Cup holder . . . . . . . . . . . . . . . . . . . . . . . . . . . . . . . 4-118
Digital clock . . . . . . . . . . . . . . . . . . . . . . . . . . . . . . 4-120
Floor mat anchors. . . . . . . . . . . . . . . . . . . . . . . . . . 4-121
Luggage net holder. . . . . . . . . . . . . . . . . . . . . . . . . 4-122
Power outlet . . . . . . . . . . . . . . . . . . . . . . . . . . . . . . 4-119
Sunvisor . . . . . . . . . . . . . . . . . . . . . . . . . . . . . . . . . 4-118
Interior light . . . . . . . . . . . . . . . . . . . . . . . . . . . . . . . . . 4-90 Glove box lamp . . . . . . . . . . . . . . . . . . . . . . . . . . . . 4-92
Interior light welcome function . . . . . . . . . . . . . . . . 4-91 Luggage lamp . . . . . . . . . . . . . . . . . . . . . . . . . . . . . . 4-92
Map lamp . . . . . . . . . . . . . . . . . . . . . . . . . . . . . . . . . 4-91
Room lamp . . . . . . . . . . . . . . . . . . . . . . . . . . . . . . . . 4-90
Vanity mirror lamp . . . . . . . . . . . . . . . . . . . . . . . . . . 4-92
Interior overview. . . . . . . . . . . . . . . . . . . . . . . . . . . . . . . 2-4
Key positions . . . . . . . . . . . . . . . . . . . . . . . . . . . . . . . . . 5-5 Starting the engine . . . . . . . . . . . . . . . . . . . . . . . . . . . 5-6
Keys . . . . . . . . . . . . . . . . . . . . . . . . . . . . . . . . . . . . \
. . . . 4-3 Key operations . . . . . . . . . . . . . . . . . . . . . . . . . . . . . . 4-3
Record your key number . . . . . . . . . . . . . . . . . . . . . . 4-3
Lighting. . . . . . . . . . . . . . . . . . . . . . . . . . . . . . . . . . . . \
. 4-81 Battery saver function . . . . . . . . . . . . . . . . . . . . . . . 4-81
Daytime running light . . . . . . . . . . . . . . . . . . . . . . . 4-85
Front fog light . . . . . . . . . . . . . . . . . . . . . . . . . . . . . 4-85
Headlight escort function . . . . . . . . . . . . . . . . . . . . . 4-81
Headlight welcome function . . . . . . . . . . . . . . . . . . 4-81
High beam operation . . . . . . . . . . . . . . . . . . . . . . . . 4-83
Lighting control . . . . . . . . . . . . . . . . . . . . . . . . . . . . 4-82
Turn signals and lane change signals . . . . . . . . . . . . 4-84
K
L