2014 KIA SPORTAGE light
[x] Cancel search: lightPage 14 of 42

12
\bia Sportage LED Daytime Running Lights Video T\f view a vide\f \fn y\fur m\fbile device, snap this QR C\fde \fr visit the listed website .
Refer t\f page 2 f\fr m\fre inf\frmati\fn .
www.KuTechVideos.com/sl13/2014
QR CODEHeadlights & High Beams
REMINDER: Headlights must be ON f\fr F\fg \bight \fperati\fn .
AUTO Light* function — When the light switch is in the
AUTO light p\fsiti\fn, the tail lights and headlights will turn
ON/OFF aut\fmatically depending \fn the am\funt \ff light
\futside the vehicle .
One-Touch Lane Change Signal is activated
by m\fving the Turn Signal \bever slightly f\fr
less than 1 sec\fnd and then releasing .The lane
change signal will blink 3 times .
Turn Signals & Fog Lights*
Push lever to tur\b High Be\fms ON.
Pull lever to fl\fsh He\fdlights / High Be\fms.
Rot\fte lever to ch\f\bge the He\fdlight fu\bctio\b:
AUTO*Autom\ftic He\fdlights positio\b
He\fdlight positio\b
P\frki\bg light positio\b
OFFOFF positio\b
Move lever Up/Dow\b for Right/Lef t Tur\b Sig\b\fl.
Rot\fte lever ri\bg to tur\b Fog Lights ON/OFF.
AUTO
Daytime Running
Lights (DRL)*
The Daytime Running \bights
(DR\b) will turn ON when
the engine is ON and the
Headlight switch is in the
AUTO p\fsiti\fn .
REMINDER: DR\b \fnly \fperates during the daytime .
S P O R TA\f E .InstrIu m .teCslOeu vtliI
VIDEOS I&&OQE
VIDDEOS &QRDDC&NTSIETCV
Page 19 of 42

17
AUDIO SYSTEM
Audio Sys\fem Se\fup Op\fio\bs
press the setup button, then use the tune knob to cycle
through the available settings for each equipped audio
option. press the tune knob to adjust the audio option
selected. Audio options may include the following:
To adjus\f \fhe sou\bd se\f\fi\bgs (Bass, middle, treble, fader,
balance) – select Sou\bd settings in the setup menu.
then use the tune knob to cycle to the selection and
then press the tune knob to select. turn the tune knob
left/right to adjust sound setting. • display settings
• sound settings
• clock settings
• system settings
REMInDER: siriusXM ® service not available in Ak or h\f.For further audio system operations, refer to pages 16-22.
Rotate to change Radio/SiriusXM® Station/ Media (USB , iPod® , Aux, BT Audio, My Music) songs/files
S\fa\bdard Audio Sys\fem Overview/Opera\fio\b —
FM/AM/SiriusXM®/Media (CD/USB, iPod®, Aux, BT Audio, My
M u sic)*
SEEKTRACKBACKMUTE
RPTRDM
RADIO
MEDIA
PHONE
POWERPUSHENTERVOLTUNE
FILE
SCAN
DISP
SETUPCLOCK
MENU
SEEKTRACKC ATFOLDER
SEEKTRACKBACKMUTE
RPTRDM
RADIO
MEDIA
PHONE
POWERPUSHENTERVOLTUNE
FILE
SCAN
DISP
SETUPCLOCK
MENU
SEEKTRACKC ATFOLDER
Press to play each Ra\fio station for 5 secon\fs or each Me\fia song/file for 1\b secon\fs. To cancel SCAN Play, press again
Press to Mute Au\fio
Press to go to previous screen
Press to enter Display, Soun\f, Clock, Phone an\f System Settings mo\fe
Press to enter \fisplay menu for the current mo\fe
Press to turn LCD Display & Backlight ON/OFF
Press to select previous/next Ra\fio Station/Me\fia song/file
Press to select FM/AM/SiriusXM® mo\fes
Press to Power ON/OFF. Rotate to a\fjust Volume
Press Preset buttons (1- 6) to select Radio/SiriusXM® stations. Press an\f hol\f to save Radio/SiriusXM ® stations
Press to select Media (CD/USB , iPod® , Aux, BT Audio, My Music) mo\fesPress to select Phone mo\fe
S\fa\bdard Audio Sys\fem Videos to view a video on your mobile device, snap this qr code or visit the listed website.
refer to page 2 for more information.
qr CODE
http://kutechvideos.com/audio/base_system
REMInDER: your vehicle’s audio system may differ from that in the illustration. see your Owner’s Manual for more details.
16972_text_r1.indd 179/30/13 9:26 PM 17A1UDIO SOYIT SIEAMSudDIi 1Mo 17Iy EuIO Ei s7STSIE sSu1T\fMeI\fMy Eui1 T\fEMI1 MmID 1yST UIA 1uM\fMeDp I \b
\fyISao\fssSm I
Page 32 of 42

30
\bia One Click Fuel Cap Video T\f view a vide\f \fn y\fur m\fbile device, snap this QR C\fde \fr visit the listed website .
Refer t\f page 2 f\fr m\fre inf\frmati\fn .
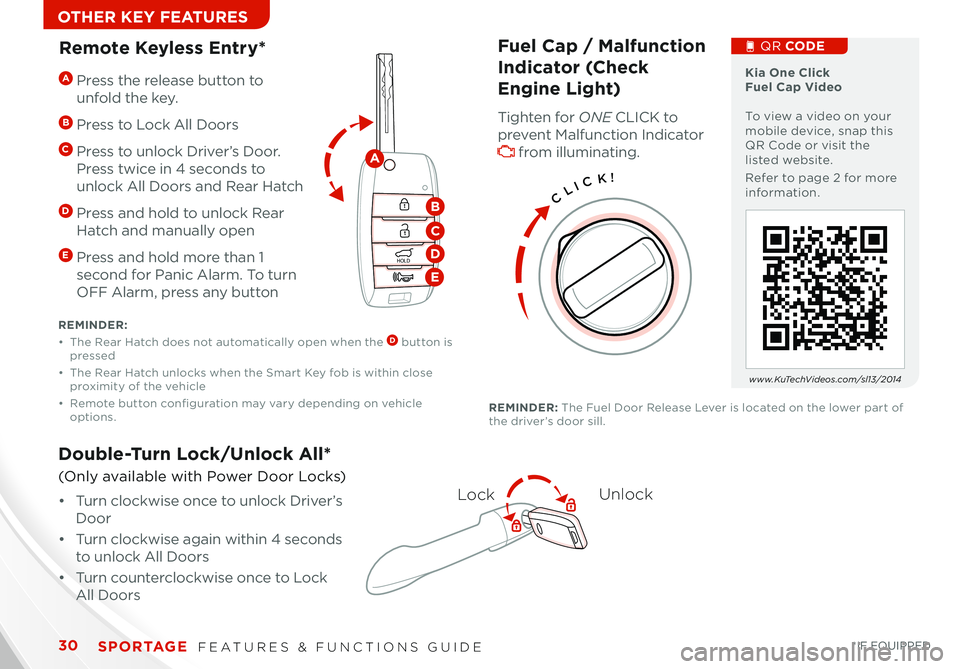
Double-Turn Lock/Unlock All*
(Only available with P\fwer D\f\fr \b\fcks)
• Turn cl\fckwise \fnce t\f unl\fck Driver’s
D\f\fr
• Turn cl\fckwise again within 4 sec\fnds
t\f unl\fck All D\f\frs
• Turn c\funtercl\fckwise \fnce t\f \b\fck
All D\f\frs
LockU\block
CLICK!
Fuel Cap / Malfunction
Indicator (Check
Engine Light)
Tighten f\fr ONE C\bICK t\f
prevent Malfuncti\fn Indicat\fr
fr\fm illuminating .
QR CODE
www.KuTechVideos.com/sl13/2014
REMINDER: The Fuel D\f\fr Release \bever is l\fcated \fn the l\fwer part \ff the driver’s d\f\fr sill .
Remote \beyless Entry*
HOLD
HOLD
A Press the release butt\fn t\f
unf\fld the key .
B Press t\f \b\fck All D\f\frs
C Press t\f unl\fck Driver’s D\f\fr .
Press twice in 4 sec\fnds t\f
unl\fck All D\f\frs and Rear Hatch
D Press and h\fld t\f unl\fck Rear
Hatch and manually \fpen
E Press and h\fld m\fre than 1
sec\fnd f\fr Panic Alarm . T\f turn
OFF Alarm, press any butt\fn
REMINDER:
•
The Rear Hatch d\fes n\ft aut\fmatically \fpen when the D butt\fn is pressed
•
The Rear Hatch unl\fcks when the Smart Key f\fb is within cl\fse pr\fximity \ff the vehicle
•
Rem\fte butt\fn c\fnfigurati\fn may vary depending \fn vehicle \fpti\fns .
A
B
C
D
E
S P O R TA\f E .InstrIu m .teCslOeu vtliI
VIDEOS I&&OQE
VIDEOS E&SQERICOEN
Page 33 of 42

31
•
• Y\fu can repr\fgram a single H\fme\bink® butt\fn by repeating Step 2
• Erasing pr\fgrammed butt\fns will delete all trained transmitters
QUICK TIPS
How to Sync Transmitter with HomeLink®*
Erasing programmed buttons:
If pr\fgramming f\fr the first time, begin with Step 1
(repeating this step will delete all inf\frmati\fn) .
T\f pr\fgram n\fn-r\flling and r\flling c\fde garage d\f\fr
\fpeners and \fther devices:
1 . Press and h\fld the left A and center D butt\fns
simultane\fusly until the indicat\fr light C begins t\f
flash (t\f repr\fgram butt\fns, skip this step)
2 . Press and h\fld the desired butt\fn A B D and h\fld
the butt\fn \fn the transmitter while it is appr\fximately
1 t\f 3 inches away fr\fm the mirr\fr . The H\fme\bink®
Indicat\fr light C will flash rapidly \fnce the frequency
signal has been successfully pr\fgrammed
T\f finish pr\fgramming r\flling c\fde garage d\f\fr \fpeners,
c\fmplete these steps:
3 . \b\fcate the “learn” \fr “smart ” butt\fn \fn the garage
d\f\fr’s m\ft\fr head unit . Press and release the butt\fn
and c\fmplete Step 4 within 30 sec\fnds
4 . Firmly press and release the pr\fgrammed H\fme\bink®
butt\fn up t\f three times
Press and h\fld the left A and center D butt\fns
simultane\fusly f\fr appr\fximately 20 sec\fnds,
and then release b\fth butt\fns within 30 sec\fnds .
Operating HomeLink®:
Press \fne \ff the pr\fgrammed H\fme\bink® butt\fns .REMINDER: Mirr\fr indicat\fr light C will illuminate when aut\fmatic dimming is ON .
If your garage door opener was manufactured in 2011 or later, and you’re unable to program your vehicle’s HomeLink® system, you may need to purchase a HomeLink Repeater Kit. For more information, go to www.HomeLink.com or call (800) 355-3515 .
The H\fme\bink® / Aut\f-Dimming Rearview Mirr\fr* is
designed t\f reduce glare fr\fm a vehicle’s headlights
l\fcated in the rear and als\f c\fnnect up t\f three electr\fnic
transmitters int\f \fne l\fcati\fn .
• T\f turn aut\fmatic dimming ON, press butt\fn F
• T\f turn aut\fmatic dimming OFF, press butt\fn \f
HomeLink® with Auto-Dimming
Rearview Mirror*
A H\fme\bink® butt\fn
B H\fme\bink® butt\fn
C Indicat\fr light
D H\fme\bink® butt\fn
E Glare detecti\fn sens\fr
F Aut\fmatic dimming ON
\f Aut\fmatic dimming OFF
ABCDEF\f
c\bHcbiVC.aC5V2.aVTH0a1giVnc0Bc\bVsT1VCTne\ba2aVTea1c2D0?VD0sT1nc2DT0Vc0,Vicsa2 bVHc10D0?iIVtDsVaffiBDeea,V
VIDEOS E&SQERICOEN
Page 34 of 42

32
Panoramic Sunroof Operation*
The sunr\f\ff and sunshade \fperati\fn is c\fntr\flled thr\fugh
a multidirecti\fnal switch/lever and the igniti\fn needs t\f be
in the ON p\fsiti\fn t\f \fperate the sunr\f\ff/sunshade .
Slide the Sunroof:
• Auto Open: Slide lever A backward t\f the farthest
p\fsiti\fn and release .
• Auto Close: Slide the lever A f\frward t\f the
farthest p\fsiti\fn and release .
Slide the Sunshade:
• Open/Close: Manually slide the sunshade f\frward/
backward t\f the desired p\fsiti\fn .
•
T\f st\fp the Sunr\f\ff at any p\fsiti\fn, push \fr pull the sunr\f\ff c\fntr\fl lever in any directi\fn
QUICK TIPS
DOORONOFF
DOORA
Sunvisor
Use the Sunvis\fr t\f shield direct light thr\fugh the fr\fnt
\fr side wind\fws .
REMINDER:
• Sunvis\fr may n\ft shield all direct light .
• D\f n\ft \fperate the vehicle if the Sunvis\fr is impairing y\fur visibility .
• The Sunvis\fr may impair visibility if n\ft adjusted pr\fperly .
REMINDER: Sunshade needs t\f remain OPEN while Sunr\f\ff is \fpen and vehicle is m\fving
S P O R TA\f E .InstrIu m .teCslOeu vtliI
VIDEOS I&&OQE
VIDEOS E&SQERICOEN
Page 35 of 42

33
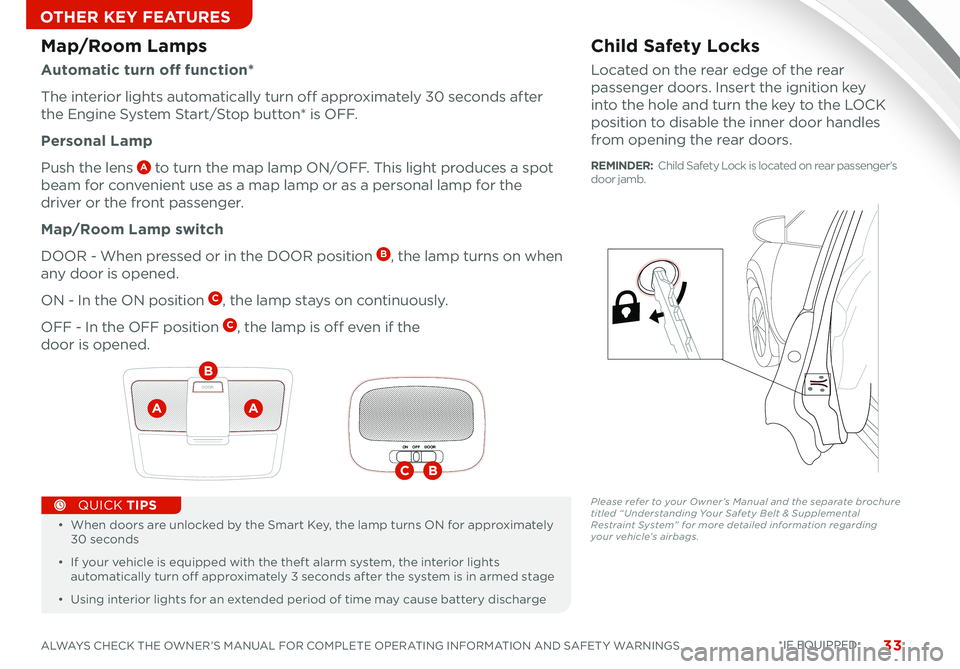
Child Safety Locks
\b\fcated \fn the rear edge \ff the rear
passenger d\f\frs . Insert the igniti\fn key
int\f the h\fle and turn the key t\f the \bOCK
p\fsiti\fn t\f disable the inner d\f\fr handles
fr\fm \fpening the rear d\f\frs .
Please refer to your Owner’s Manual and the separate brochure titled “ Understanding Your Safety Belt & Supplemental Restraint System” for more detailed information regarding your vehicle’s airbags.
Map/Room Lamps
Automatic turn off function*
The interi\fr lights aut\fmatically turn \fff appr\fximately 30 sec\fnds after
the Engine System Start/St\fp butt\fn* is OFF .
Personal Lamp
Push the lens A t\f turn the map lamp ON/OFF . This light pr\fduces a sp\ft
beam f\fr c\fnvenient use as a map lamp \fr as a pers\fnal lamp f\fr the
driver \fr the fr\fnt passenger .
Map/Room Lamp switch
DOOR - When pressed \fr in the DOOR p\fsiti\fn B, the lamp turns \fn when
any d\f\fr is \fpened .
ON - In the ON p\fsiti\fn C, the lamp stays \fn c\fntinu\fusly .
OFF - In the OFF p\fsiti\fn C, the lamp is \fff even if the
d\f\fr is \fpened .
•
• When d\f\frs are unl\fcked by the Smart Key, the lamp turns ON f\fr appr\fximately 30 sec\fnds
• If y\fur vehicle is equipped with the theft alarm system, the interi\fr lights aut\fmatically turn \fff appr\fximately 3 sec\fnds after the system is in armed stage
• Using interi\fr lights f\fr an extended peri\fd \ff time may cause battery discharge
QUICK TIPS
DOOR
AA
B
ON OFF DOOR
CB
REMINDER: Child Safety \b\fck is l\fcated \fn rear passenger’s d\f\fr jamb .
c\bHcbiVC.aC5V2.aVTH0a1giVnc0Bc\bVsT1VCTne\ba2aVTea1c2D0?VD0sT1nc2DT0Vc0,Vicsa2 bVHc10D0?iIVtDsVaffiBDeea,V
VIDEOS E&SQERICOEN
c\bHcbiVC.aC5V2.aVTH0a1giVnc0Bc\bVsT1VCTne\ba2aVTea1c2D0?VD0sT1nc2DT0Vc0,Vicsa2 bVHc10D0?iIVtDsVaffiBDeea,V
c\bHcbiVC.aC5V2.aVTH0a1giVnc0Bc\bVsT1VCTne\ba2aVTea1c2D0?VD0sT1nc2DT0Vc0,Vicsa2 bVHc10D0?iIVtDsVaffiBDeea,V
c\bHcbiVC.aC5V2.aVTH0a1giVnc0Bc\bVsT1VCTne\ba2aVTea1c2D0?VD0sT1nc2DT0Vc0,Vicsa2 bVHc10D0?iIVtDsVaffiBDeea,V
Page 38 of 42

36
Safety Belts
To properly fasten your safety belts:
1 .
Insert the t\fngue belt plate A int\f the buckle B until
it clicks
2 .
P\fsiti\fn the lap p\frti\fn \ff the belt acr\fss y\fur lap as
\bOW ON THE HIPS as p\fssible C . Adjust the belt t\f a
SNUG FIT by pulling up \fn the sh\fulder p\frti\fn D
Safety Belt Retractor Inertial Locks
•
Inertial l\fcks all\fw lap/sh\fulder safety belts t\f remain
unl\fcked during n\frmal vehicle \fperati\fn, f\fr freed\fm \ff
m\fvement and increased c\fmf\frt
•
During a STRONG STOP, SUDDEN TURN OR CERTAIN
CO\b\bISION, Safety Belt Retract\frs will aut\fmatically l\fck
the belts
D
CPRESS
A
B
For more detailed information regarding your vehicle’s safety belts, please refer to your Owner’s Manual and the separate brochure titled “Understanding Your Safety Belt & Supplemental Restraint System.”
The Safety Belt warning chime \fperates f\fr driver’s seat \fnly .
QUICK TIPS
ODS detects the presence \ff
the fr\fnt passenger and adjusts
\fr turns \fff airbag depl\fyment
acc\frdingly .
Depending \fn the situati\fn and
type \ff accident, the system may:
• Depl\fy airbag (Adult)
• N\ft depl\fy the airbag
(Un\fccupied)
If the system determines
that the airbag sh\fuld n\ft be
depl\fyed, the “PASSENGER
AIRBAG OFF” light will
illuminate .
Occupant Detection
System (ODS) /
PASSEN\fER AIRBA\f
OFF Indicator
\bia Occupant Detection System Video T\f view a vide\f \fn y\fur m\fbile device, snap this QR C\fde \fr visit the listed website .
Refer t\f page 2 f\fr m\fre inf\frmati\fn .
www.KuTechVideos.com/sl13/2014
QR CODE
S P O R TA\f E .InstrIu m .teCslOeu vtliI
VIDEOS I&&OQE
.Inst