2014 KIA Sorento fuel fill door release
[x] Cancel search: fuel fill door releasePage 12 of 508

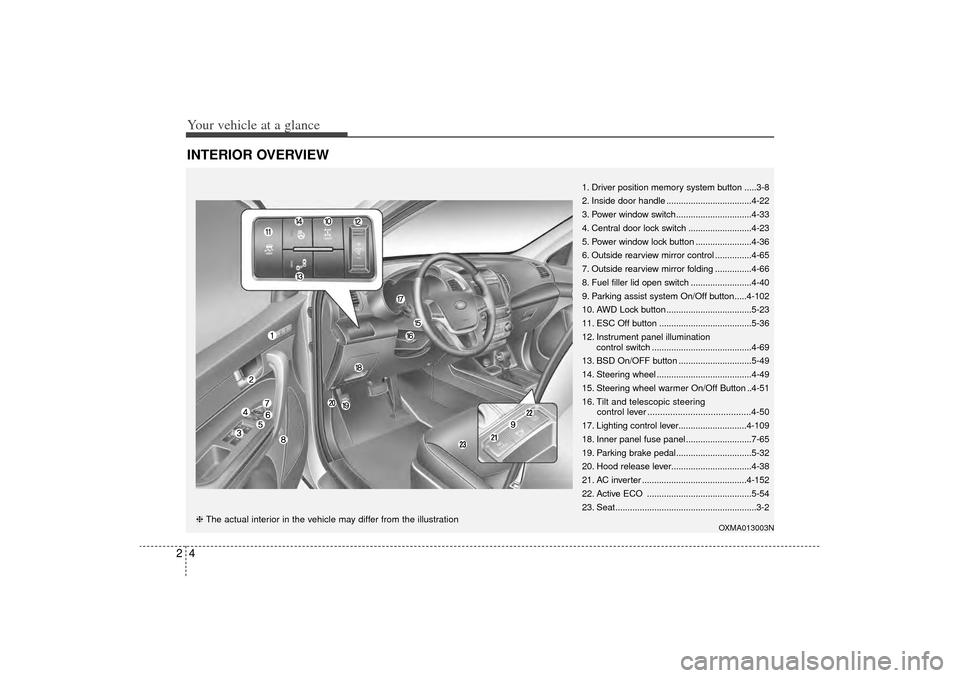
Your vehicle at a glance42INTERIOR OVERVIEW
1. Driver position memory system button .....3-8
2. Inside door handle ...................................4-22
3. Power window switch...............................4-33
4. Central door lock switch ..........................4-23
5. Power window lock button .......................4-36
6. Outside rearview mirror control ...............4-65
7. Outside rearview mirror folding ...............4-66
8. Fuel filler lid open switch .........................4-40
9. Parking assist system On/Off button.....4-102
10. AWD Lock button ...................................5-23
11. ESC Off button ......................................5-36
12. Instrument panel illuminationcontrol switch .........................................4-69
13. BSD On/OFF button ..............................5-49
14. Steering wheel .......................................4-49
15. Steering wheel warmer On/Off Button ..4-51
16. Tilt and telescopic steering control lever .........................................4-50
17. Lighting control lever............................4-109
18. Inner panel fuse panel ...........................7-65
19. Parking brake pedal...............................5-32
20. Hood release lever.................................4-38
21. AC inverter ...........................................4-152
22. Active ECO ...........................................5-54
23. Seat..........................................................3-2
OXMA013003N
❈ The actual interior in the vehicle may differ from the illustration
XM(FL) CAN(ENG) 2.QXP 1/23/2013 3:21 PM Page 4
Page 92 of 508

Features of your vehicleFolding key . . . . . . . . . . . . . . . . . . . . . . . . . . . . . . . . 4-4• Record your key number . . . . . . . . . . . . . . . . . . . . . . . 4-4
• Key operations . . . . . . . . . . . . . . . . . . . . . . . . . . . . . . . . 4-4
• Transmitter precautions . . . . . . . . . . . . . . . . . . . . . . . . 4-6
• Battery replacement . . . . . . . . . . . . . . . . . . . . . . . . . . . 4-7
• Immobilizer system . . . . . . . . . . . . . . . . . . . . . . . . . . . . 4-8Smart key . . . . . . . . . . . . . . . . . . . . . . . . . . . . . . . . 4-11• Record your key number . . . . . . . . . . . . . . . . . . . . . . 4-11
• Smart key function . . . . . . . . . . . . . . . . . . . . . . . . . . . 4-11
• Loss of the smart key . . . . . . . . . . . . . . . . . . . . . . . . . 4-15
• Smart key precautions . . . . . . . . . . . . . . . . . . . . . . . . 4-15
• Smart key immobilizer system . . . . . . . . . . . . . . . . . . 4-16
• Battery replacement . . . . . . . . . . . . . . . . . . . . . . . . . . 4-18Theft-alarm system . . . . . . . . . . . . . . . . . . . . . . . . 4-19• Armed stage . . . . . . . . . . . . . . . . . . . . . . . . . . . . . . . . . 4-19
• Theft-alarm stage . . . . . . . . . . . . . . . . . . . . . . . . . . . . 4-20
• Disarmed stage. . . . . . . . . . . . . . . . . . . . . . . . . . . . . . . 4-20Door locks . . . . . . . . . . . . . . . . . . . . . . . . . . . . . . . . 4-21• Operating door locks from outside the vehicle . . . . 4-21
• Operating door locks from inside the vehicle . . . . . . 4-22
• Impact sensing door unlock system . . . . . . . . . . . . . . 4-24
• Auto door lock/unlock feature (Automatic transaxle) . 4-24
• Child-protector rear door lock. . . . . . . . . . . . . . . . . . 4-24Tailgate . . . . . . . . . . . . . . . . . . . . . . . . . . . . . . . . . . 4-25\
• Opening the tailgate . . . . . . . . . . . . . . . . . . . . . . . . . . 4-25• Closing the tailgate . . . . . . . . . . . . . . . . . . . . . . . . . . . 4-25
• Power tailgate . . . . . . . . . . . . . . . . . . . . . . . . . . . . . . . 4-26
• Emergency tailgate safety release . . . . . . . . . . . . . . . 4-32
Windows . . . . . . . . . . . . . . . . . . . . . . . . . . . . . . . . 4-33• Power windows . . . . . . . . . . . . . . . . . . . . . . . . . . . . . . 4-34Hood. . . . . . . . . . . . . . . . . . . . . . . . . . . . . . . . . . . . \
. 4-38• Opening the hood . . . . . . . . . . . . . . . . . . . . . . . . . . . . 4-38
• Closing the hood . . . . . . . . . . . . . . . . . . . . . . . . . . . . . 4-38Fuel filler lid . . . . . . . . . . . . . . . . . . . . . . . . . . . . . . 4-40• Opening the fuel filler lid . . . . . . . . . . . . . . . . . . . . . . 4-40
• Closing the fuel filler lid . . . . . . . . . . . . . . . . . . . . . . . 4-40
• Emergency fuel filler lid release . . . . . . . . . . . . . . . . 4-43Panoramic sunroof . . . . . . . . . . . . . . . . . . . . . . . . . 4-44• Sunroof open warning. . . . . . . . . . . . . . . . . . . . . . . . . 4-45
• Sliding the sunroof . . . . . . . . . . . . . . . . . . . . . . . . . . . 4-45
• Tilting the sunroof . . . . . . . . . . . . . . . . . . . . . . . . . . . . 4-46
• Sunshade . . . . . . . . . . . . . . . . . . . . . . . . . . . . . . . . . . . 4-\
47
• Resetting the sunroof . . . . . . . . . . . . . . . . . . . . . . . . . 4-48Steering wheel . . . . . . . . . . . . . . . . . . . . . . . . . . . . . 4-49• Electric power steering (EPS) . . . . . . . . . . . . . . . . . . 4-49
• Tilt and telescopic steering . . . . . . . . . . . . . . . . . . . . 4-50
• Heated steering wheel . . . . . . . . . . . . . . . . . . . . . . . . . 4-51
• Horn . . . . . . . . . . . . . . . . . . . . . . . . . . . . . . . . . . . . \
. . . 4-51
• Flex steer . . . . . . . . . . . . . . . . . . . . . . . . . . . . . . . . . . . 4-\
52
4
XM(FL) CAN(ENG) 4a(~158).QXP 1/23/2013 3:46 PM Page 1
Page 131 of 508

Features of your vehicle40
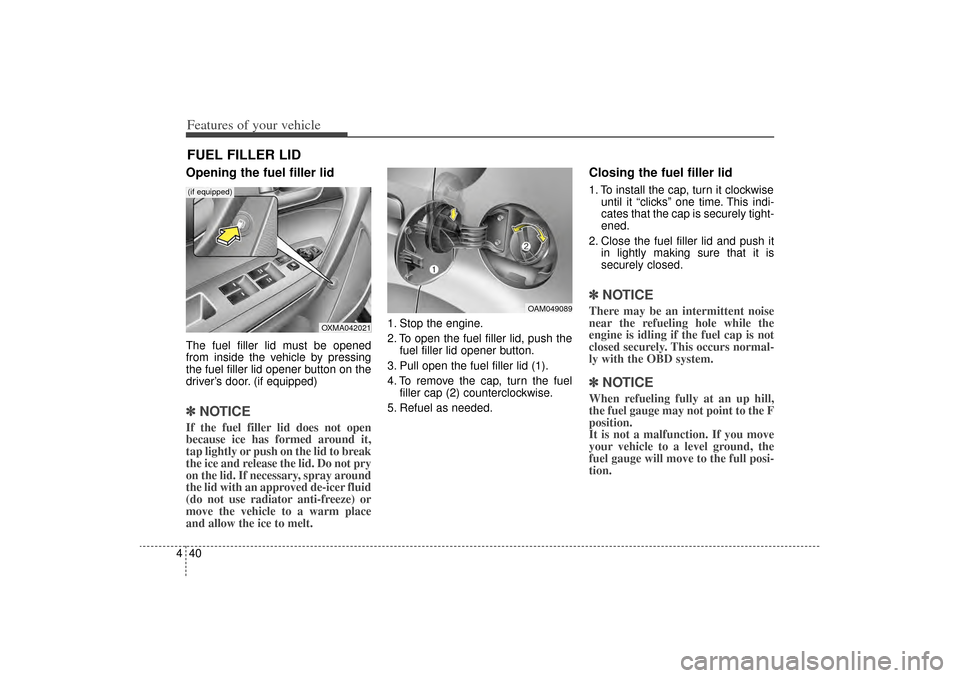
4Opening the fuel filler lidThe fuel filler lid must be opened
from inside the vehicle by pressing
the fuel filler lid opener button on the
driver’s door. (if equipped)✽ ✽
NOTICEIf the fuel filler lid does not open
because ice has formed around it,
tap lightly or push on the lid to break
the ice and release the lid. Do not pry
on the lid. If necessary, spray around
the lid with an approved de-icer fluid
(do not use radiator anti-freeze) or
move the vehicle to a warm place
and allow the ice to melt.
1. Stop the engine.
2. To open the fuel filler lid, push the
fuel filler lid opener button.
3. Pull open the fuel filler lid (1).
4. To remove the cap, turn the fuel filler cap (2) counterclockwise.
5. Refuel as needed.
Closing the fuel filler lid1. To install the cap, turn it clockwise until it “clicks” one time. This indi-
cates that the cap is securely tight-
ened.
2. Close the fuel filler lid and push it in lightly making sure that it is
securely closed.✽ ✽NOTICEThere may be an intermittent noise
near the refueling hole while the
engine is idling if the fuel cap is not
closed securely. This occurs normal-
ly with the OBD system.✽ ✽NOTICEWhen refueling fully at an up hill,
the fuel gauge may not point to the F
position.
It is not a malfunction. If you move
your vehicle to a level ground, the
fuel gauge will move to the full posi-
tion.
FUEL FILLER LID
OAM049089
OXMA042021
(if equipped)
XM(FL) CAN(ENG) 4a(~158).QXP 1/23/2013 3:48 PM Page 40