Page 118 of 382

3109
Features of your vehicle
Outside rearview mirror heater (if equipped)
The outside rearview mirror heater is
actuated in connection with the rear win-
dow defroster. To heat the outside
rearview mirror glass, push the button for
the rear window defroster.
The rearview mirror heater (and rear win-
dow defroster) will not operate unless the
engine is running.
The outside rearview mirror glass will be
heated for defrosting or defogging and
will give you improved rear vision in
inclement weather conditions. Push the
button again to turn the heater off. The
outside rearview mirror heater automati-
cally turns off after 20 minutes.
Electric remote control
The electric remote control mirror switch
allows you to adjust the position of the
left and right outside rearview mirrors. To
adjust the position of either mirror, move
the lever (1) to R or L to select the right
side mirror or the left side mirror, then
press a corresponding point ( ) on the
mirror adjustment control to position the
selected mirror up, down, left or right.
After adjustment, put the lever into neu-
tral position to prevent the inadvertent
adjustment.
CAUTION
The mirrors stop moving when they reach the maximum adjust-ing angles, but the motor contin- ues to operate while the switch isdepressed. Do not depress the switch longer than necessary, themotor may be damaged.
Do not attempt to adjust the out- side rearview mirror by hand.Doing so may damage the parts.
1VQA2108
Page 119 of 382
Features of your vehicle
110
3
Inside rearview mirror
Adjust the rearview mirror to center on
the view through the rear window. Make
this adjustment before you start driving.
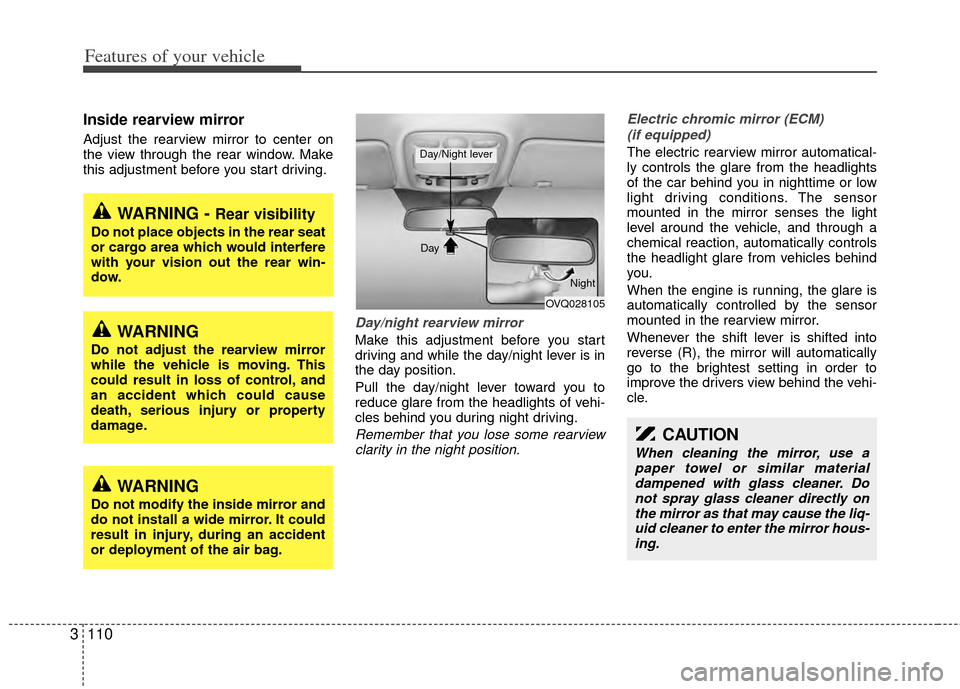
Day/night rearview mirror
Make this adjustment before you start
driving and while the day/night lever is in
the day position.
Pull the day/night lever toward you to
reduce glare from the headlights of vehi-
cles behind you during night driving.
Remember that you lose some rearview
clarity in the night position. Electric chromic mirror (ECM)
(if equipped)
The electric rearview mirror automatical-
ly controls the glare from the headlights
of the car behind you in nighttime or low
light driving conditions. The sensor
mounted in the mirror senses the light
level around the vehicle, and through a
chemical reaction, automatically controls
the headlight glare from vehicles behind
you.
When the engine is running, the glare is
automatically controlled by the sensor
mounted in the rearview mirror.
Whenever the shift lever is shifted into
reverse (R), the mirror will automatically
go to the brightest setting in order to
improve the drivers view behind the vehi-
cle.
WARNING - Rear visibility
Do not place objects in the rear seat
or cargo area which would interfere
with your vision out the rear win-
dow.
CAUTION
When cleaning the mirror, use apaper towel or similar materialdampened with glass cleaner. Do not spray glass cleaner directly onthe mirror as that may cause the liq- uid cleaner to enter the mirror hous-ing.
OVQ028105
Day
Night
Day/Night lever
WARNING
Do not adjust the rearview mirror
while the vehicle is moving. This
could result in loss of control, and
an accident which could cause
death, serious injury or property
damage.
WARNING
Do not modify the inside mirror and
do not install a wide mirror. It could
result in injury, during an accident
or deployment of the air bag.
Page 120 of 382
3111
Features of your vehicle
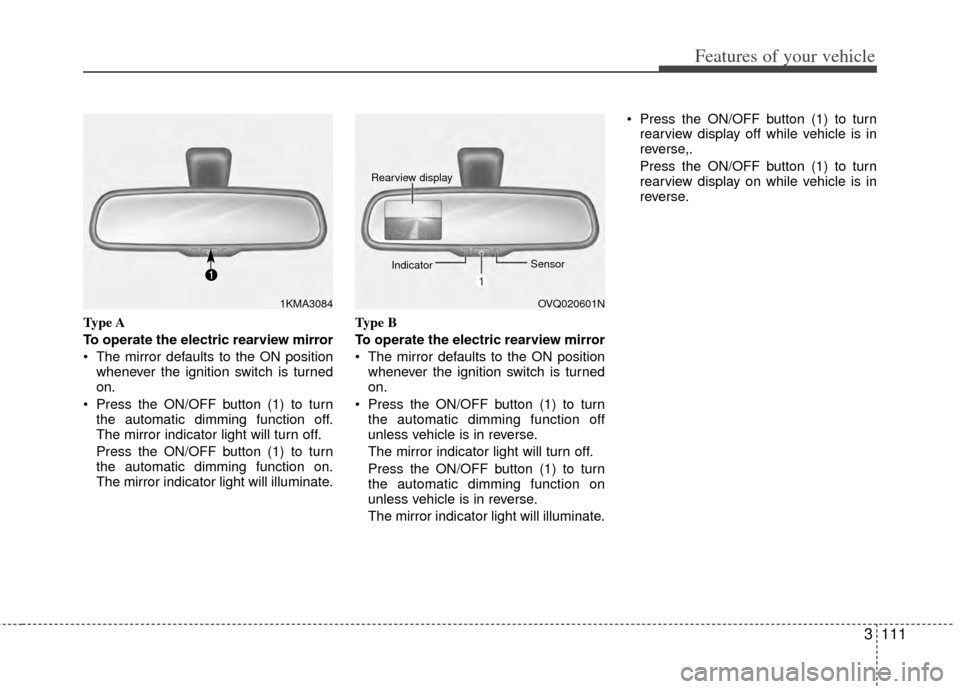
Type A
To operate the electric rearview mirror
The mirror defaults to the ON positionwhenever the ignition switch is turned
on.
Press the ON/OFF button (1) to turn the automatic dimming function off.
The mirror indicator light will turn off.
Press the ON/OFF button (1) to turn
the automatic dimming function on.
The mirror indicator light will illuminate. Type B
To operate the electric rearview mirror
The mirror defaults to the ON position
whenever the ignition switch is turned
on.
Press the ON/OFF button (1) to turn the automatic dimming function off
unless vehicle is in reverse.
The mirror indicator light will turn off.
Press the ON/OFF button (1) to turn
the automatic dimming function on
unless vehicle is in reverse.
The mirror indicator light will illuminate. Press the ON/OFF button (1) to turn
rearview display off while vehicle is in
reverse,.
Press the ON/OFF button (1) to turn
rearview display on while vehicle is in
reverse.
1KMA3084OVQ020601N
Rearview display
Indicator Sensor
Page 121 of 382
Features of your vehicle
112
3
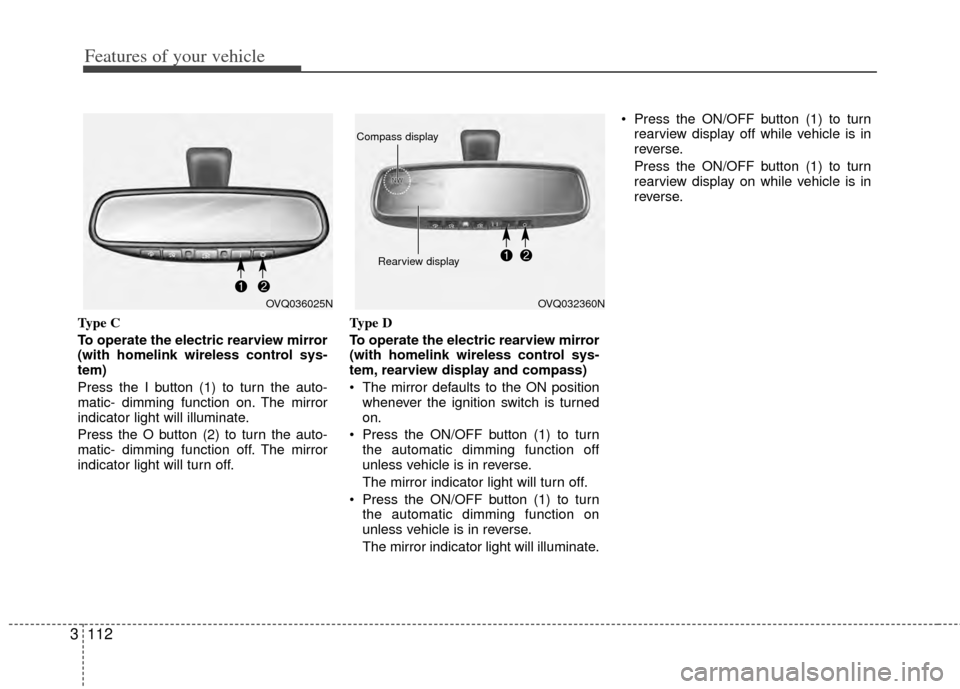
Type C
To operate the electric rearview mirror
(with homelink wireless control sys-
tem)
Press the I button (1) to turn the auto-
matic- dimming function on. The mirror
indicator light will illuminate.
Press the O button (2) to turn the auto-
matic- dimming function off. The mirror
indicator light will turn off. Type D
To operate the electric rearview mirror
(with homelink wireless control sys-
tem, rearview display and compass)
The mirror defaults to the ON position
whenever the ignition switch is turned
on.
Press the ON/OFF button (1) to turn the automatic dimming function off
unless vehicle is in reverse.
The mirror indicator light will turn off.
Press the ON/OFF button (1) to turn the automatic dimming function on
unless vehicle is in reverse.
The mirror indicator light will illuminate. Press the ON/OFF button (1) to turn
rearview display off while vehicle is in
reverse.
Press the ON/OFF button (1) to turn
rearview display on while vehicle is in
reverse.
OVQ036025NOVQ032360N
Rearview display
Compass display
Page 124 of 382
3115
Features of your vehicle
Conversation mirror
The mirror is a convenient feature to help
the front passenger talk with rear pas-
sengers without turning the head or body
rearward.
To use the mirror, push the cover and
open it.
Adjust mirror angle to the desired posi-
tion.
Close the cover after use.
WARNING
Do not adjust the mirror angle or
talk with rear passengers for a long
time while driving. You may lose
your steering control and cause
severe personal injury or accidents.
OVQ028107
Page 155 of 382
Features of your vehicle
146
3
Outside mirror defroster
(if equipped)
If your vehicle is equipped with the out-
side mirror defroster, it will be operating
at the same time when you operate the
rear window defroster.
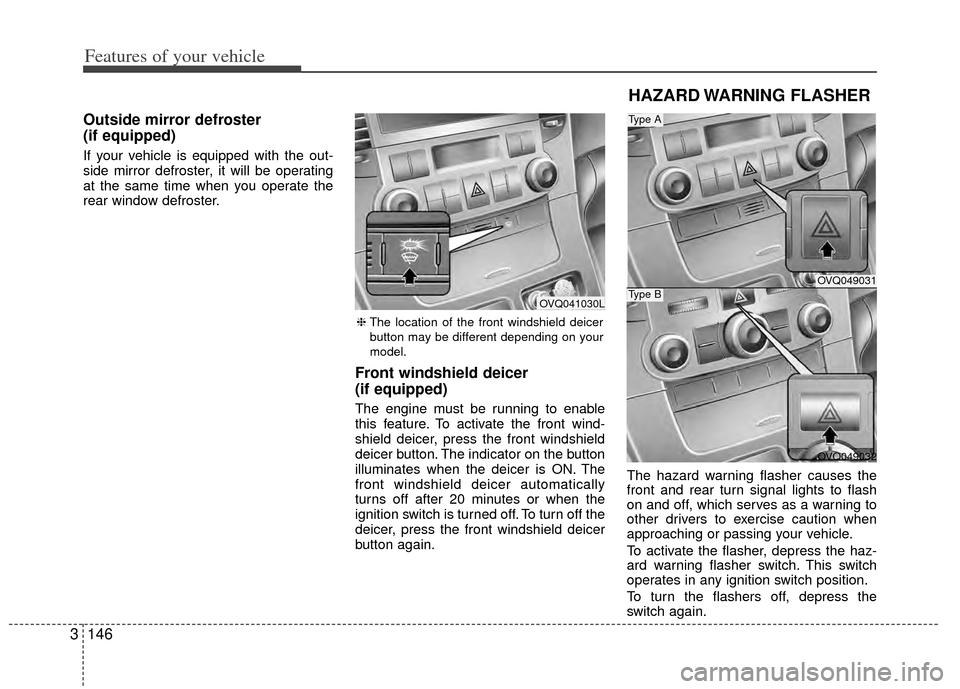
Front windshield deicer
(if equipped)
The engine must be running to enable
this feature. To activate the front wind-
shield deicer, press the front windshield
deicer button. The indicator on the button
illuminates when the deicer is ON. The
front windshield deicer automatically
turns off after 20 minutes or when the
ignition switch is turned off. To turn off the
deicer, press the front windshield deicer
button again. The hazard warning flasher causes the
front and rear turn signal lights to flash
on and off, which serves as a warning to
other drivers to exercise caution when
approaching or passing your vehicle.
To activate the flasher, depress the haz-
ard warning flasher switch. This switch
operates in any ignition switch position.
To turn the flashers off, depress the
switch again.
HAZARD WARNING FLASHER
OVQ049031
OVQ049032
Type A
Type B
❈
The location of the front windshield deicer
button may be different depending on your
model.
OVQ041030L
Page 183 of 382
Features of your vehicle
174
3
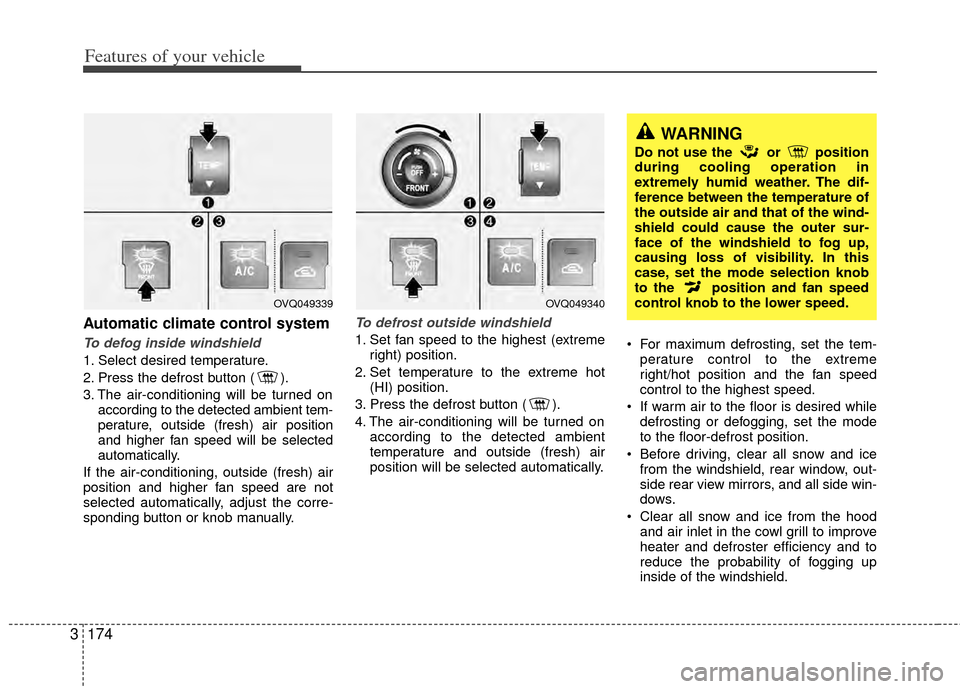
Automatic climate control system
To defog inside windshield
1. Select desired temperature.
2. Press the defrost button ( ).
3. The air-conditioning will be turned on
according to the detected ambient tem-
perature, outside (fresh) air position
and higher fan speed will be selected
automatically.
If the air-conditioning, outside (fresh) air
position and higher fan speed are not
selected automatically, adjust the corre-
sponding button or knob manually.
To defrost outside windshield
1. Set fan speed to the highest (extreme right) position.
2. Set temperature to the extreme hot (HI) position.
3. Press the defrost button ( ).
4. The air-conditioning will be turned on according to the detected ambient
temperature and outside (fresh) air
position will be selected automatically. For maximum defrosting, set the tem-
perature control to the extreme
right/hot position and the fan speed
control to the highest speed.
If warm air to the floor is desired while defrosting or defogging, set the mode
to the floor-defrost position.
Before driving, clear all snow and ice from the windshield, rear window, out-
side rear view mirrors, and all side win-
dows.
Clear all snow and ice from the hood and air inlet in the cowl grill to improve
heater and defroster efficiency and to
reduce the probability of fogging up
inside of the windshield.
WARNING
Do not use the or position
during cooling operation in
extremely humid weather. The dif-
ference between the temperature of
the outside air and that of the wind-
shield could cause the outer sur-
face of the windshield to fog up,
causing loss of visibility. In this
case, set the mode selection knob
to the position and fan speed
control knob to the lower speed.
OVQ049340OVQ049339
Page 187 of 382

Features of your vehicle
178
3
Your new mirror comes with an integrat-
ed HomeLink®Universal Transceiver,
which allows you to program the mirror to
activate your garage door(s), estate gate,
home lighting, etc. The mirror actually
learns the codes from your various exist-
ing transmitters.
* HomeLink®is a registered trademark of
Johnson Controls, Inc
Programming
Your vehicle may require the ignition
switch to be turned to the ACC position
for programming and/or operation of
HomeLink
®. It is also recommended that
a new battery be replaced in the hand-
held transmitter of the device being pro-
grammed to HomeLink
®for quicker train-
ing and accurate transmission of the
radio-frequency.
Follow these steps to train your
HomeLink
®mirror:
HOMELINK® WIRELESS CONTROL SYSTEM (IF EQUIPPED)
WARNING
When programming the HomeLink®Wireless Control
System, you may be operating a
garage door or gate operator.
Make sure that people and objects
are out of the way of the moving
door or gate to prevent potential
harm or damage.
Do not use HomeLink
®with any
garage door opener that lacks the
safety stop and reverse feature as
required by federal safety stan-
dards. (This includes any garage
door opener model manufactured
before April 1, 1982.) A garage
door opener which cannot detect
an object, signaling the door to
stop and reverse, does not meet
current federal safety standards.
Using a garage door opener with-
out these features increases risk
of serious injury or death. For
more information, call 1-800-355-
3515 or on the internet at
www.homelink.com.
(Continued)
(Continued)
Retain the original transmitter forfuture programming procedures
(i.e., new vehicle purchase). It is
also suggested that upon the sale
of the vehicle, the programmed
HomeLink
®buttons be erased for
security purposes (follow step 1
in the “Programming” portion of
this text).
OVQ036305N
Glare detection sensor
Indicator light
Homelink®buttons
