2014 KIA Rio light
[x] Cancel search: lightPage 356 of 397

Maintenance
46
7
Intended Outboard Sidewall : The
side of an asymmetrical tire, that
must always face outward when
mounted on a vehicle.
Kilopascal (kPa): The metric unit for
air pressure.
Load Index: An assigned number
ranging from 1 to 279 that corre-
sponds to the load carrying capacity
of a tire.
Maximum Inflation Pressure: The
maximum air pressure to which a
cold tire may be inflated. The maxi-
mum air pressure is molded onto the
sidewall.
Maximum Load Rating : The load
rating for a tire at the maximum per-
missible inflation pressure for that
tire.
Maximum Loaded Vehicle Weight:
The sum of curb weight; accessory
weight; vehicle capacity weight; and
production options weight.
Normal Occupant Weight: The
number of occupants a vehicle is
designed to seat multiplied by 68 kg
(150 pounds). Occupant Distribution
: Designated
seating positions.
Outward Facing Sidewall: The side
of a asymmetrical tire that has a par-
ticular side that faces outward when
mounted on a vehicle. The outward
facing sidewall bears white lettering
or bears manufacturer, brand, and/or
model name molding that is higher or
deeper than the same moldings on
the inner facing sidewall.
Passenger (P-Metric) Tire : A tire
used on passenger cars and some
light duty trucks and multipurpose
vehicles.
Recommended Inflation Pressure :
Vehicle manufacturer's recommend-
ed tire inflation pressure and shown
on the tire placard.
Radial Ply Tire : A pneumatic tire in
which the ply cords that extend to the
beads are laid at 90 degrees to the
centerline of the tread.
Rim: A metal support for a tire and
upon which the tire beads are seat-
ed.
Sidewall: The portion of a tire
between the tread and the bead. Speed Rating: An alphanumeric
code assigned to a tire indicating the
maximum speed at which a tire can
operate.
Traction: The friction between the
tire and the road surface. The
amount of grip provided.
Tread: The portion of a tire that
comes into contact with the road.
Treadwear Indicators: Narrow
bands, sometimes called "wear
bars," that show across the tread of a
tire when only 2/32 inch of tread
remains.
UTQGS: Uniform Tire Quality
Grading Standards, a tire information
system that provides consumers with
ratings for a tire's traction, tempera-
ture and treadwear. Ratings are
determined by tire manufacturers
using government testing proce-
dures. The ratings are molded into
the sidewall of the tire.
Vehicle Capacity Weight
: The num-
ber of designated seating positions
multiplied by 68 kg (150 lbs.) plus the
rated cargo and luggage load.
Page 358 of 397

Maintenance
48
7
Low aspect ratio tire
(if equipped)
Low aspect ratio tires, whose aspect ratio
is lower than 50, are provided for sporty
looks.
Because the low aspect ratio tires are
optimized for handling and braking, it
may be more uncomfortable to ride in
and there is more noise compare with
normal tires.
CAUTION
Because the sidewall of the low
aspect ratio tire is shorter thanthe normal, the wheel and tire ofthe low aspect ratio tire is easi-er to be damaged. So, follow theinstructions below.
- When driving on a rough road or off road, drive cautiouslybecause tires and wheels maybe damaged. And after driving,inspect tires and wheels.
- When passing over a pothole, speed bump, manhole, or curbstone, drive slowly so that thetires and wheels are not dam-aged.
- If the tire is impacted, we rec- ommend that you inspect thetire condition or contact anauthorized Kia dealer.
- To prevent damage to the tire, inspect the tire condition andpressure every 3,000km.
CAUTION
It is not easy to recognize the tire damage with your owneyes. But if there is the slight-est hint of tire damage, eventhough you cannot see the tiredamage with your own eyes,have the tire checked orreplaced because the tiredamage may cause air leak-age from the tire.
If the tire is damaged by driv- ing on a rough road, off road,pothole, manhole, or curbstone, it will not be covered bythe warranty.
You can find out the tire infor- mation on the tire sidewall.
Page 359 of 397

749
Maintenance
FUSES
A vehicle’s electrical system is protected
from electrical overload damage by
fuses.This vehicle has 2 fuse panels, one locat-
ed in the driver’s side panel bolster, the
other in the engine compartment near
the battery.
If any of your vehicle’s lights, acces-
sories, or controls do not work, check the
appropriate circuit fuse. If a fuse has
blown, the element inside the fuse will
melt.
If the electrical system does not work,
first check the driver’s side fuse panel.
Always replace a blown fuse with one of
the same rating.
If the replacement fuse blows, this indi-
cates an electrical problem. Avoid using
the system involved and immediately
consult an authorized Kia dealer.
Three kinds of fuses are used: blade type
for lower amperage rating, cartridge type, and multi fuse for higher amperage rat-ings.
✽ ✽ NOTICE
The actual fuse/relay panel label may
differ from equipped items.
OTA070039
Blade type
Cartridge type
Fusible link B B
B
B
l
l
l
l
o
o
o
o
w
w
w
w
n
n
n
n
B
B
B
B
l
l
l
l
o
o
o
o
w
w
w
w
n
n
n
n
B
B
B
B
l
l
l
l
o
o
o
o
w
w
w
w
n
n
n
n
WARNING - Fuse replace-
ment
Never replace a fuse with any-
thing but another fuse of the
same rating.
A higher capacity fuse could cause damage and possibly a
fire.
Never install a wire or aluminum foil instead of the proper fuse -
even as a temporary repair. It may
cause extensive wiring damage
and a possible fire.
CAUTION - Fuse replace-ment
Do not use a screwdriver or any
other metal object to remove fusesbecause it may cause a short circuit and damage the system.
Page 360 of 397

Maintenance
50
7
Instrument panel fuse replacement
1. Turn the ignition switch and all other
switches off.
2. Open the fuse panel cover.
3. Pull the suspected fuse straight out. Use the removal tool provided in the
engine compartment fuse panel.
4. Check the removed fuse; replace it if it is blown.
5. Push in a new fuse of the same rating, and make sure it fits tightly in the clips.
If it fits loosely, consult an authorized Kia
dealer.
If you do not have a spare, use a fuse of the same rating from a circuit you maynot need for operating the vehicle, suchas the cigar lighter fuse.
If the headlights or other electrical com-
ponents do not work and the fuses are
OK, check the fuse block in the engine
compartment. If a fuse is blown, it must
be replaced.
OUB071019
CAUTION
When replacing an open fuse or relay with a new one, make surethe new fuse or relay fits tightlyinto the clips. The incomplete fas-tening fuse or relay may causethe vehicle wiring and electricsystems damage and a possible fire.
Do not remove fuses, relays and terminals fastened with bolts ornuts. The fuses, relays and termi-nals may be fastened incomplete-ly, and it may cause a possiblefire. If fuses, relays and terminalsfastened with bolts or nuts areopen, consult with an authorizedKia dealer.
Do not input any other objects except fuses or relays intofuse/relay terminals such as a driver or wiring. It may cause con-tact failure and system malfunc-tion.
Page 361 of 397

751
Maintenance
Memory fuse
Your vehicle is equipped with the memo-
ry fuse to prevent battery discharge if
your vehicle is parked without being
operated for prolonged periods. Use the
following procedures before parking the
vehicle for prolonged periods.
1. Turn off the engine.
2. Turn off the headlights and tail lights.
3. Open the driver’s side panel cover andpull up the memory fuse. If the memory fuse is pulled up from the
fuse panel, the warning chime, audio,
clock and interior lamps, etc., will not
operate. Some items must be reset after
replacement. Refer to “Battery” in this
section.
Even though the memory fuse is pulled
up, the battery can still be discharged by
operation of the headlights or other elec-
trical devices.
Engine compartment panel fuse
replacement
1. Turn the ignition switch and all other switches off.
2. Remove the fuse box cover by press- ing the tap and pulling up the cover.
3. Check the removed fuse; replace it if it is blown. To remove or insert the fuse,
use the fuse puller in the engine com-
partment fuse panel.
4. Push in a new fuse of the same rating, and make sure it fits tightly in the clips.
If it fits loosely, consult an authorized
Kia dealer.
OUB071021OUB071022
■Type B
Page 365 of 397

755
Maintenance
Instrument panel fuse panel
Fuse Name Fuse ratingCircuit Protected
POWER OUTLET 15A Power Outlet
C/LIGHTER 20A Cigarette Lighter
ACC 10AFront Map Lamp, Power Outside Mirror Switch, BCM,
Low DC-DC Convertor, Smart Key Control Module, Audio,
A/V & Navigation Head Unit, Digital Clock
A/BAG IND 10A Instrument Cluster
A/BAG 10ASBR PAB Indicator, SRS Control Module
Passenger Weight Classification Sensor
MODULE 2 10A BCM
MDPS 10A EPS Control Module
WIPER RR 15A Multifunction Switch, Rear Wiper Relay, Rear Wiper Motor
HTD STRG 15A Steering Wheel Heater
FOG LAMP RR 10A -
FOG LAMP FRT 15A Front Fog Lamp Relay
MODULE 1 10A ATM Shift Lever Switch, Door Warning Switch
STOP LAMP 15AData Link Connector, Smart Key Control Module, Stop Lamp Switch
Stop Lamp Relay, PCB Fuse & Relay Box (HAC Relay)
CLUSTER 10AAudio, BCM, ATM Shift Lever ILL., Crash Pad Switch
Instrument Cluster, Tire Pressure Monitoring Module
IG1 1 10AMultipurpose Check Connector, Driver CCS Seat Warmer Module
Passenger Seat Warmer Module
With ISG : Crash Pad Switch, Low DC-DC Convertor
ABS 10ACrash Pad Switch, ESC Module
PCB Fuse & Relay Box (HAC Relay)
B/UP LAMP 10A Back-Up Lamp Switch
Page 370 of 397

Maintenance
60
7
APPEARANCE CARE
Exterior care
Exterior general caution
It is very important to follow the label
directions when using any chemical
cleaner or polish. Read all warning and
caution statements that appear on the
label.
Finish maintenance
Washing
To help protect your vehicle’s finish from
rust and deterioration, wash it thoroughly
and frequently at least once a month with
lukewarm or cold water.
If you use your vehicle for off-road driv-
ing, you should wash it after each off-
road trip. Pay special attention to the
removal of any accumulation of salt, dirt,
mud, and other foreign materials. Make
sure the drain holes in the lower edges of
the doors and rocker panels are kept
clear and clean.
Insects, tar, tree sap, bird droppings,
industrial pollution and similar deposits
can damage your vehicle’s finish if not
removed immediately.
Even prompt washing with plain water
may not completely remove all these
deposits. A mild soap, safe for use on
painted surfaces, may be used.
After washing, rinse the vehicle thor-
oughly with lukewarm or cold water. Do
not allow soap to dry on the finish. After washing the vehicle, test the brakes
while driving slowly to see if they have
been affected by water. If braking per-
formance is impaired, dry the brakes by
applying them lightly while maintaining a
slow forward speed.
Page 381 of 397

83
Specifications, Consumer information, Reporting safety defects
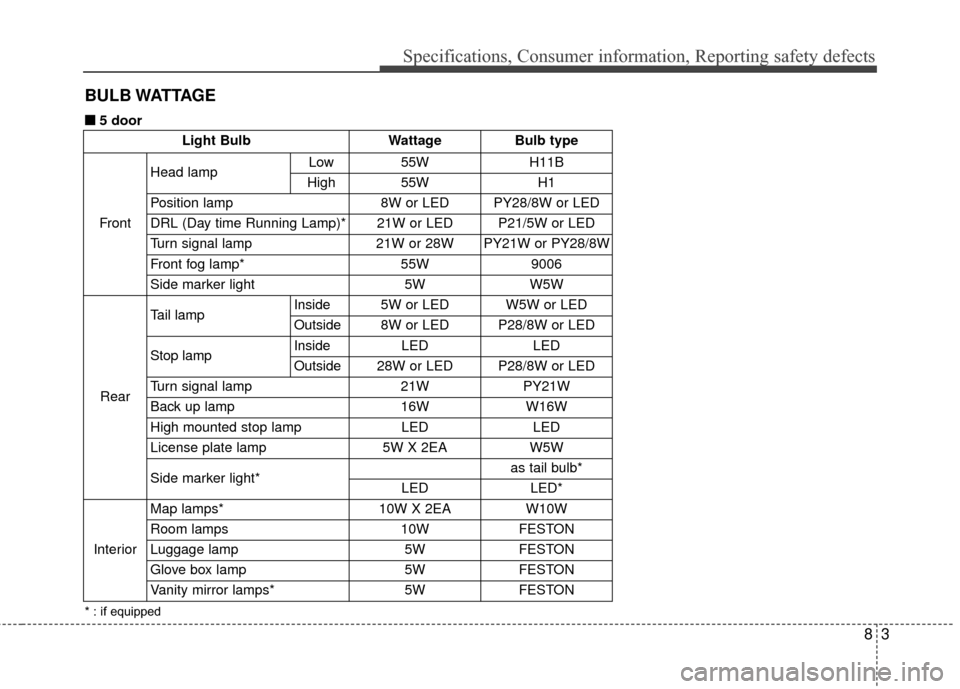
BULB WATTAGE
Light BulbWattageBulb type
Front
Head lamp Low55WH11B
High55WH1
Position lamp8W or LEDPY28/8W or LED
DRL (Day time Running Lamp)*21W or LEDP21/5W or LED
Turn signal lamp21W or 28WPY21W or PY28/8W
Front fog lamp*55W9006
Side marker light5WW5W
Rear
Tail lampInside5W or LEDW5W or LED
Outside8W or LEDP28/8W or LED
Stop lampInsideLEDLED
Outside28W or LEDP28/8W or LED
Turn signal lamp21WPY21W
Back up lamp16WW16W
High mounted stop lampLEDLED
License plate lamp5W X 2EAW5W
Side marker light*as tail bulb*
LEDLED*
Interior
Map lamps*10W X 2EAW10W
Room lamps10WFESTON
Luggage lamp5WFESTON
Glove box lamp5WFESTON
Vanity mirror lamps*5WFESTON
* : if equipped
■
■5 door