Page 328 of 446
629
What to do in an emergency
When towing your vehicle in an
emergency without wheel dollies :
1. Set the ignition switch in the ACCposition.
2. Place the transaxle shift lever in N (Neutral).
3. Release the parking brake.
Removable towing hook (front)
(if equipped)
1.Remove the towing hook from the tool case.
2.Remove the hole cover pressing the lower part of the cover on the
front bumper. 3.Install the towing hook by turning it
clockwise into the hole until it is
fully secured.
4.Remove the towing hook and install the cover after use.
CAUTION - Towing gear position
Always place the transaxle shift
lever in N (Neutral) when towingyour vehicle. Failure to place thetransaxle shift lever in N(Neutral) may cause internaldamage to the transaxle.
OUB061011
■ 4 door
■ 5 doorOUB061022K
Page 337 of 446

77
Maintenance
At least monthly:
Check the coolant level in theengine coolant reservoir.
Check the operation of all exterior lights, including the stoplights, turn
signals and hazard warning flash-
ers.
Check the inflation pressures of all tires including the spare.
At least twice a year
(i.e., every Spring and Fall) :
Check the radiator, heater and air conditioning hoses for leaks or
damage.
Check the windshield washer spray and wiper operation. Clean
the wiper blades with clean cloth
dampened with washer fluid.
Check the headlight alignment.
Check the muffler, exhaust pipes, shields and clamps.
Check the lap/shoulder belts for wear and function.
Check for worn tires and loose wheel lug nuts.
At least once a year :
Clean the body and door drainholes.
Lubricate the door hinges and checks, and hood hinges.
Lubricate the door and hood locks and latches.
Lubricate the door rubber weather- strips.
Check the air conditioning system.
Check the power steering fluid level.
Inspect and lubricate automatic transaxle linkage and controls.
Clean the battery and terminals.
Check the brake/clutch fluid level.
Page 370 of 446

Maintenance
40
7
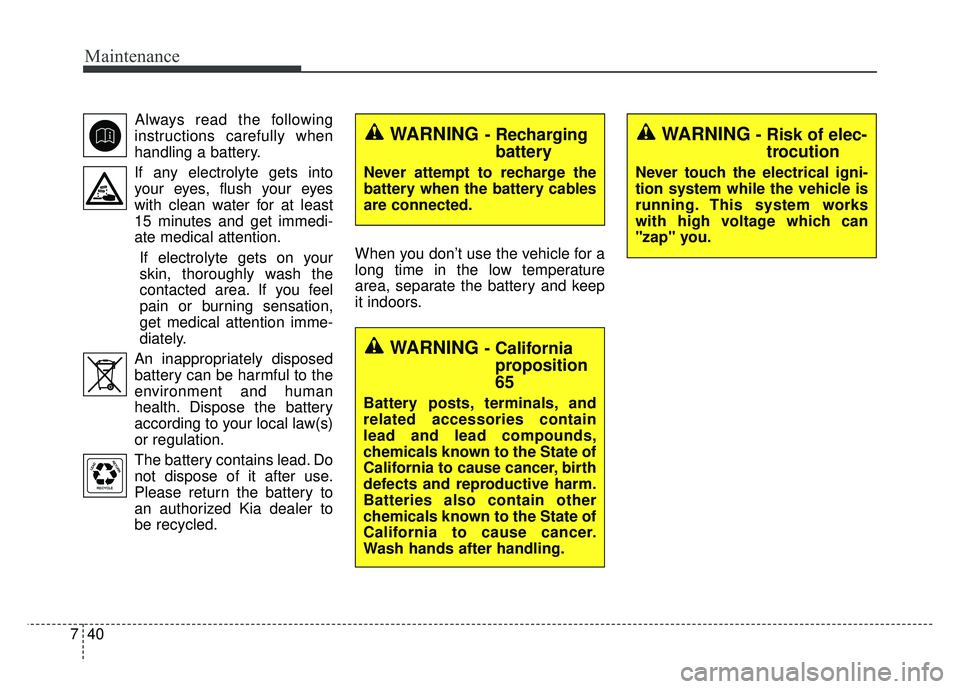
Always read the following
instructions carefully when
handling a battery.
If any electrolyte gets into your eyes, flush your eyes
with clean water for at least
15 minutes and get immedi-
ate medical attention.
If electrolyte gets on your
skin, thoroughly wash the
contacted area. If you feel
pain or burning sensation,
get medical attention imme-
diately.
An inappropriately disposed battery can be harmful to the
environment and human
health. Dispose the battery
according to your local law(s)
or regulation.
The battery contains lead. Do
not dispose of it after use.
Please return the battery to
an authorized Kia dealer to
be recycled. When you don’t use the vehicle for a
long time in the low temperature
area, separate the battery and keep
it indoors.WARNING - Recharging
battery
Never attempt to recharge the
battery when the battery cables
are connected.
WARNING - California proposition
65
Battery posts, terminals, and
related accessories contain
lead and lead compounds,
chemicals known to the State of
California to cause cancer, birth
defects and reproductive harm.
Batteries also contain other
chemicals known to the State of
California to cause cancer.
Wash hands after handling.
WARNING- Risk of elec- trocution
Never touch the electrical igni-
tion system while the vehicle is
running. This system works
with high voltage which can
"zap" you.
Page 381 of 446

751
Maintenance
Temperature -A, B & C
The temperature grades are A (the
highest), B and C representing the
tire’s resistance to the generation of
heat and its ability to dissipate heat
when tested under controlled condi-
tions on a specified indoor laboratory
test wheel.
Sustained high temperature can
cause the material of the tire to
degenerate and reduce tire life, and
excessive temperature can lead to
sudden tire failure. The grade C cor-
responds to a level of performance
which all passenger car tires must
meet under the Federal Motor
Vehicle Safety Standard No. 109.
Grades B and A represent higher
levels of performance on the labora-
tory test wheel than the minimum
required by law.Tire terminology and definitions
Air Pressure:
The amount of air
inside the tire pressing outward on
the tire. Air pressure is expressed in
pounds per square inch (psi) or kilo-
pascal (kPa).
Accessory Weight : This means the
combined weight of optional acces-
sories. Some examples of optional
accessories are, automatic
transaxle, power seats, and air con-
ditioning.
Aspect Ratio : The relationship of a
tire's height to its width.
Belt: A rubber coated layer of cords
that is located between the plies and
the tread. Cords may be made from
steel or other reinforcing materials.
Bead: The tire bead contains steel
wires wrapped by steel cords that
hold the tire onto the rim.
Bias Ply Tire : A pneumatic tire in
which the plies are laid at alternate
angles less than 90 degrees to the
centerline of the tread. Cold Tire Pressure: The amount of
air pressure in a tire, measured in
pounds per square inch (psi) or kilo-
pascals (kPa) before a tire has built
up heat from driving.
Curb Weight: This means the weight
of a motor vehicle with standard and
optional equipment including the
maximum capacity of fuel, oil and
coolant, but without passengers and
cargo.
DOT Markings: A code molded into
the sidewall of a tire signifying that
the tire is in compliance with the U.S.
Department of Transportation motor
vehicle safety standards. The DOT
code includes the Tire Identification
Number (TIN), an alphanumeric des-
ignator which can also identify the
tire manufacturer, production plant,
brand and date of production.
GVWR: Gross Vehicle Weight Rating
GAWR FRT: Gross Axle Weight
Rating for the Front Axle.
GAWR RR: Gross Axle Weight
Rating for the Rear axle.
Page 392 of 446

Maintenance
62
7
Instrument panel fuse panel
Fuse Name Fuse rating Circuit Protected
POWER OUTLET 15A Power Outlet
C/LIGHTER 20A Cigarette Lighter
ACC 10AFront Map Lamp, Power Outside Mirror Switch, BCM,
Low DC-DC Convertor, Smart Key Control Module, Audio,
A/V & Navigation Head Unit, Digital Clock
A/BAG IND 10A Instrument Cluster
A/BAG 10ASBR PAB Indicator, SRS Control Module
Passenger Weight Classification Sensor
MODULE 2 10A BCM
MDPS 10A EPS Control Module
WIPER RR 15A Multifunction Switch, Rear Wiper Relay, Rear Wiper Motor
HTD STRG 15A Steering Wheel Heater
FOG LAMP RR 10A -
FOG LAMP FRT 15A Front Fog Lamp Relay
MODULE 1 10A ATM Shift Lever Switch, Door Warning Switch
STOP LAMP 15AData Link Connector, Smart Key Control Module, Stop Lamp Switch
Stop Lamp Relay, PCB Fuse & Relay Box (HAC Relay)
CLUSTER 10AAudio, BCM, ATM Shift Lever ILL., Crash Pad Switch
Instrument Cluster, Tire Pressure Monitoring Module
IG1 1 10AMultipurpose Check Connector, Driver CCS Seat Warmer Module
Passenger Seat Warmer Module
With ISG : Crash Pad Switch, Low DC-DC Convertor
ABS 10ACrash Pad Switch, ESC Module
PCB Fuse & Relay Box (HAC Relay)
B/UP LAMP 10A Back-Up Lamp Switch
Page 393 of 446

763
Maintenance
Fuse Name Fuse ratingCircuit Protected
IG1 2 10AVehicle Speed Sensor, Stop Lamp Switch, Inverter
A/C Control Module
HAZARD 15A Hazard Switch, BCM
PDM 1 25A Smart Key Control Module
SUNROOF 15A Sunroof Motor
PDM 2 10AImmobilizer Module, Start/Stop Button Switch,
Smart Key Control Module
ECU 15ASmart Key Control Module, Immobilizer Module,
ECM/PCM, Transaxle Range Switch
IGN COIL 15A Ignition Coil #1/#2/#3/#4, Condenser
IG2 10ABCM, Smart Key Control Module, Driver CCS Seat Warmer Module
Cluster Ionizer, Rain Sensor, A/C Control Module, Sunroof Motor
PCB Fuse & Relay Box (Blower Relay, Head Lamp (HI) Relay,
Fuel Pump #1 Relay)
WIPER FRT 25AMultifunction Switch, Front Wiper Motor
PCB Fuse & Relay Box (Rain Sensor Relay, Front Wiper Relay)
DOOR LOCK 20ADoor Lock/Unlock Relay, Tail Gate Unlock Relay,
Two Turn Unlock Relay
SAFETY POWER
WINDOW 25A Driver Safety Power Window Module
S/HEATER 15ASeat Warmer Switch, Driver CCS Seat Warmer Module,
Passenger Seat Warmer Module
FOLD'G MIRR 10A Power Outside Mirror Switch
ROOM LAMP 10ABCM, Door Warning Switch, Tire Pressure Monitoring Module
Instrument Cluster, Digital Clock, A/C Control Module
Luggage Lamp
Page 398 of 446
Maintenance
68
7
Headlight, position light, turn
signal light, side marker light
and front fog light bulb
replacement
(1) Headlight (High/Low)
(2) Position light
(3) Front turn signal light
(4) Front fog light*
(1) Headlight (High)
(2) Headlight (Low)
(3) Front turn signal light
(4) Position light
(5) Front side marker
(6) Front fog light*
* : if equipped
Headlight bulb
OHD076046
WARNING- Halogen
bulbs
Handle halogen bulbs with care.
Halogen bulbs contain pressur-
ized gas that will produce flying
pieces of glass if broken.
OUB071028
■ 4 door
■ 5 doorOUB071065K
Page 399 of 446

769
Maintenance
Always handle them carefully, and
avoid scratches and abrasions. If the
bulbs are lit, avoid contact with liq-
uids. Never touch the glass with bare
hands. Residual oil may cause the
bulb to overheat and burst when lit. A
bulb should be operated only when
installed in a headlight.
If a bulb becomes damaged or
cracked, replace it immediately and
carefully dispose of it.
Wear eye protection when changing
a bulb. Allow the bulb to cool down
before handling it.1.Turn off the engine and open the
hood.
2.Remove the front bumper upper cover.
3.Remove the headlight assembly from the body of the vehicle. If you
can reach the bulb without remov-
ing the headlight assembly, you do
not need to do step 2 and 3.
4.Disconnect the power connector(s) from the back of the headlight
assembly. Headlight(High/Low)
4 door
5.Remove the headlight bulb cover by turning it counterclockwise.
6.Unsnap the headlight bulb retain- ing wire by depressing the end and
pushing it right ward.
7.Pull the bulb out of the socket.
8.Insert a new bulb into the socket.
9.Install the socket in the assembly by aligning the shape on the bulb
housing in the assembly. Pushing
the spring holder in to the slot.
10. Install the headlight bulb cover by turning it clockwise
OUB071073