2014 KIA RIO HATCHBACK reset
[x] Cancel search: resetPage 196 of 446
4125
Features of your vehicle
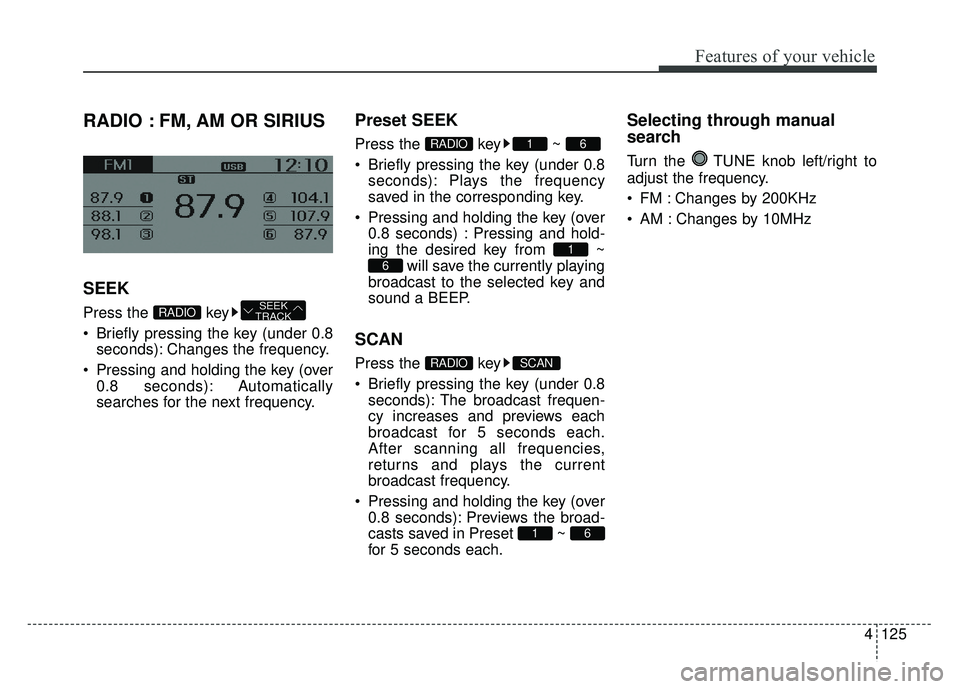
RADIO : FM, AM OR SIRIUS
SEEK
Press the key
Briefly pressing the key (under 0.8seconds): Changes the frequency.
Pressing and holding the key (over 0.8 seconds): Automatically
searches for the next frequency.
Preset SEEK
Press the key ~
Briefly pressing the key (under 0.8seconds): Plays the frequency
saved in the corresponding key.
Pressing and holding the key (over 0.8 seconds) : Pressing and hold-
ing the desired key from ~ will save the currently playing
broadcast to the selected key and
sound a BEEP.
SCAN
Press the key
Briefly pressing the key (under 0.8 seconds): The broadcast frequen-
cy increases and previews each
broadcast for 5 seconds each.
After scanning all frequencies,
returns and plays the current
broadcast frequency.
Pressing and holding the key (over 0.8 seconds): Previews the broad-
casts saved in Preset ~
for 5 seconds each.
Selecting through manual
search
Turn the TUNE knob left/right to
adjust the frequency.
FM : Changes by 200KHz
AM : Changes by 10MHz
61
SCANRADIO
6
1
61RADIO
SEEK
TRACKRADIO
Page 200 of 446
4129
Features of your vehicle
❈If channel is selected by selecting
category, then the “CATEGORY”
icon is displayed at the top of the
screen.
Preset
Press the key ~
Shortly pressing the key (under 0.8
seconds): Plays the frequency
saved in the corresponding key.
Pressing and holding the key (over 0.8 seconds): Pressing and holding
the desired key from ~
will save the current broadcast to
the selected key and sound a
BEEP.
✽ ✽ Troubleshooting
1. Antenna Error
If this message is displayed, the
antenna or antenna cable is bro-
ken or unplugged. Please consult
with your Kia dealership.
2. Acquiring Signal If this message is displayed, it
means that the antenna is covered
and that the SIRIUS Satellite
Radio signal is not available.
Ensure the antenna is uncovered
and has a clear view of the sky.
Tune
Rotate TUNE knob : Changes
the channel number or scrolls cate-
gory list.
Press TUNE knob : Selects the menu.
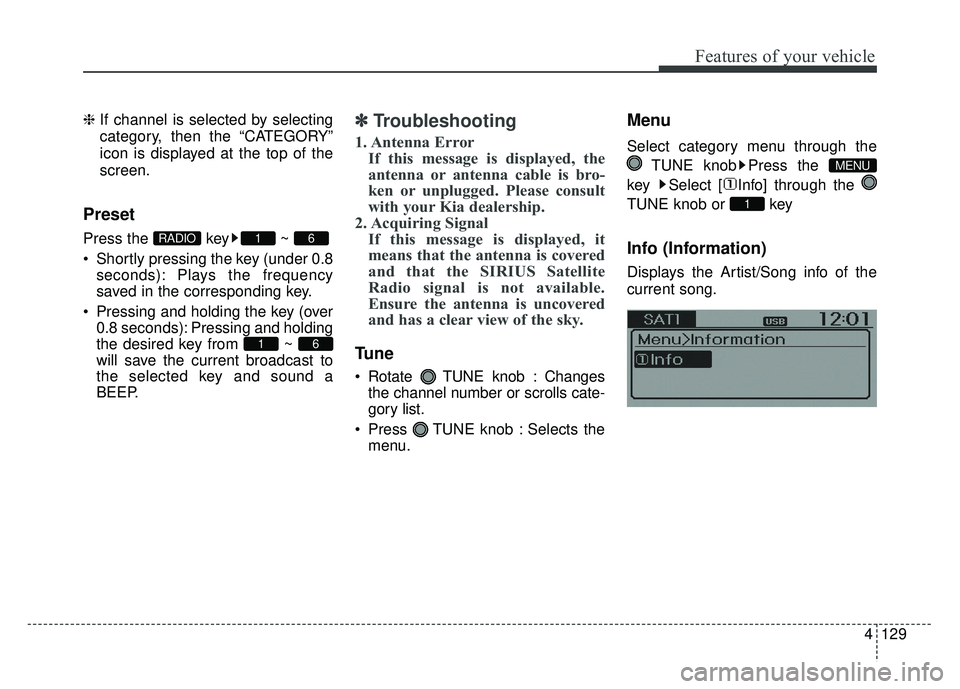
Menu
Select category menu through the
TUNE knob Press the
key Select [ Info] through the
TUNE knob or key
Info (Information)
Displays the Artist/Song info of the
current song.
1
MENU
61
61RADIO
Page 207 of 446
![KIA RIO HATCHBACK 2014 Owners Manual Features of your vehicle
136
4
MENU : iPod®
In iPod®mode, press the key
to set the Repeat, Random,
Information and Search features.
Repeat
Press the key Set [ RPT]
through the
TUNEknob or
key to KIA RIO HATCHBACK 2014 Owners Manual Features of your vehicle
136
4
MENU : iPod®
In iPod®mode, press the key
to set the Repeat, Random,
Information and Search features.
Repeat
Press the key Set [ RPT]
through the
TUNEknob or
key to](/manual-img/2/57980/w960_57980-206.png)
Features of your vehicle
136
4
MENU : iPod®
In iPod®mode, press the key
to set the Repeat, Random,
Information and Search features.
Repeat
Press the key Set [ RPT]
through the
TUNEknob or
key to repeat the current song.
❈ Press RPT again to turn repeat
off.
Album Random
Press the key Set [ Alb.RDM]
through the TUNEknob or key.
Plays albums within the currently
playing category in random order.
❈Press Alb.RDM again to turn off.
All Random
Press the key Set [ A.RDM]
through the TUNEknob or
key.
Plays all songs within the currently
playing category in random order.
❈ Press A.RDM again to turn off.
Information
Press the key Set [ Info]
through the
TUNEknob or
key.
Displays information of the current
song.
❈ Press the key to turn off
info display.
Some iPod
®models may not sup-
port all communication protocols
which will result in some files that
not playing properly.
Supported iPod
®models:
- iPod Mini
®
- iPod 4th(Photo) ~ 6th(Classic) generation
- iPod Nano
®1st~4th generation - iPod Touch
®1st~2nd generation
The order of search or playback of songs in the iPod
®can be different
from the order searched in the
audio system.
If the iPod
®is disabled due to its
own malfunction, reset the iPod®.
(Reset: Refer to iPod®manual)
An iPod
®may not operate normal-
ly when the battery is low.
Some iPod
®devices, such as the
iPhone®, can be connected
through Bluetooth. The device
must have audio
Bluetooth®
Wireless Technologycapability
(such as for stereo headphone
Bluetooth®Wireless Technology).
The device may play, but it will not
be controlled by the audio system.
To use the iPod
®features through the
audio system, use the cable that was
provided with of the iPod
®.
Skipping or improper operation may occur depending on the characteris-
tics of your iPod
®/iPhone®device.
MENU
4
MENU
3
MENU
2
MENU
1
MENU
MENU
Page 219 of 446
![KIA RIO HATCHBACK 2014 Owners Manual Features of your vehicle
148
4
Pairing through [PHONE]
Setup
Press the key Select
[Phone] Select [Pair Phone]
Select TUNE knob
1. The following steps are the same
as the steps described in the
“W KIA RIO HATCHBACK 2014 Owners Manual Features of your vehicle
148
4
Pairing through [PHONE]
Setup
Press the key Select
[Phone] Select [Pair Phone]
Select TUNE knob
1. The following steps are the same
as the steps described in the
“W](/manual-img/2/57980/w960_57980-218.png)
Features of your vehicle
148
4
Pairing through [PHONE]
Setup
Press the key Select
[Phone] Select [Pair Phone]
Select TUNE knob
1. The following steps are the same
as the steps described in the
“When No Devices have been
Paired” section.
Bluetooth®Wireless Technology
features supported within the vehi-
cle are as follows. Some features
may not be supported depending
on your
Bluetooth®Wireless
Technology device.
- Outgoing/Incoming Handsfree calls
- Operations during a call (Switch to Private, Switch to call waiting,
MIC on/off)
- Downloading Call History
- Downloading Mobile Contacts
-
Bluetooth®Wireless Technology
device auto connection
- Bluetooth Audio Streaming
Bluetooth®Wireless
Technology devices can be paired
to the Car Handsfree system.
Bluetooth®device can be
connected at a time.
one
Bluetooth®Wireless
Technology device can be connect-
ed at a time.
while a
Bluetooth®Wireless
Technology device is connected.
Bluetooth®Wireless
Technology Handsfree and
Bluetooth audio related features
are supported.
possible only within devices that
support Handsfree or audio fea-
tures, such as a
Bluetooth®
Wireless Technology mobile phone
or a Bluetooth audio device.
Bluetooth®Wireless
Technology device becomes dis-
connected due to being out of com-
munication range, turning the
device OFF, or a
Bluetooth®
Wireless Technology communica-
tion error, corresponding
Bluetooth®
Wireless Technology devices are
automatically searched and recon-
nected.
due to communication errors
between the car Handsfree and the
Bluetooth®Wireless Technology
device, reset the device by turning
off and back on again. Upon reset-
ting
Bluetooth®Wireless
Technology device, the system will
be restored.
SETUP
Page 233 of 446
Features of your vehicle
162
4
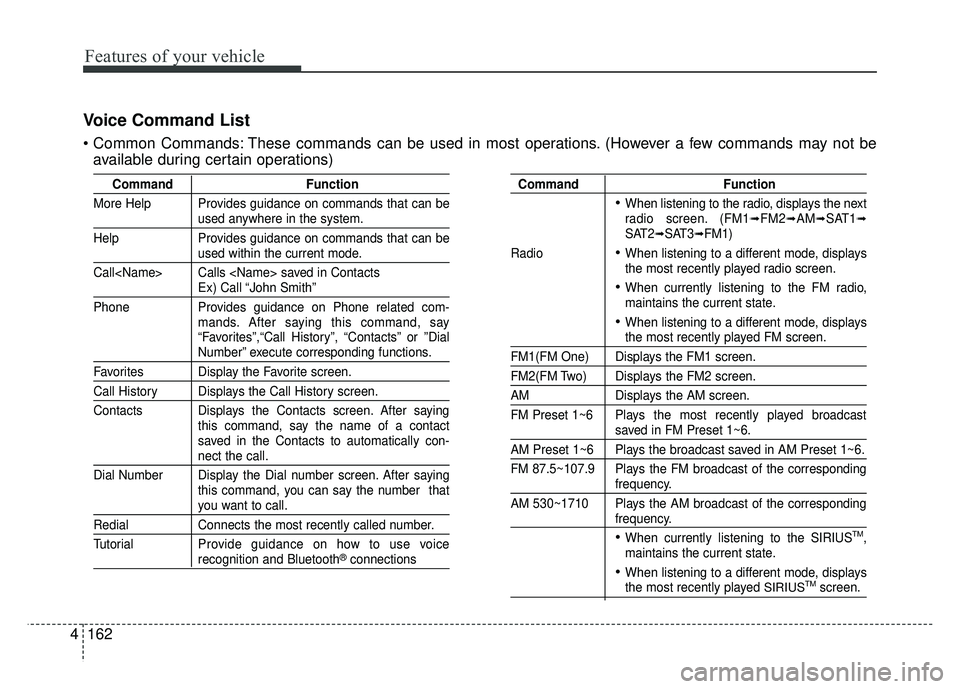
Voice Command List
These commands can be used in most operations. (However a few commands may not be
available during certain operations)
Command Function
More Help Provides guidance on commands that can be
used anywhere in the system.
Help Provides guidance on commands that can be
used within the current mode.
Call
Ex) Call “John Smith”
Phone Provides guidance on Phone related com- mands. After saying this command, say
“Favorites”,“Call History”, “Contacts” or ”Dial
Number” execute corresponding functions.
Favorites Display the Favorite screen.
Call History Displays the Call History screen.
Contacts Displays the Contacts screen. After sayingthis command, say the name of a contact
saved in the Contacts to automatically con-
nect the call.
Dial Number Display the Dial number screen. After saying this command, you can say the number that
you want to call.
RedialConnects the most recently called number.
Tutorial Pro vide guidance on how to use voice
recognition and Bluetooth®connections
Command Function
When listening to the radio, displays the next
radio screen. (FM1➟FM2➟AM➟SAT1➟SAT2➟SAT3➟FM1)
Radio
When listening to a different mode, displays
the most recently played radio screen.
When currently listening to the FM radio,
maintains the current state.
When listening to a different mode, displaysthe most recently played FM screen.
FM1(FM One) Displays the FM1 screen.
FM2(FM Two) Displays the FM2 screen.
AM Displays the AM screen.
FM Preset 1~6 Plays the most recently played broadcast
saved in FM Preset 1~6.
AM Preset 1~6 Plays the broadcast saved in AM Preset 1~6.
FM 87.5~107.9 Plays the FM broadcast of the corresponding
frequency.
AM 530~1710 Plays the AM broadcast of the corresponding
frequency.
When currently listening to the SIRIUSTM,
maintains the current state.
When listening to a different mode, displaysthe most recently played SIRIUSTMscreen.
Page 235 of 446
Features of your vehicle
164
4
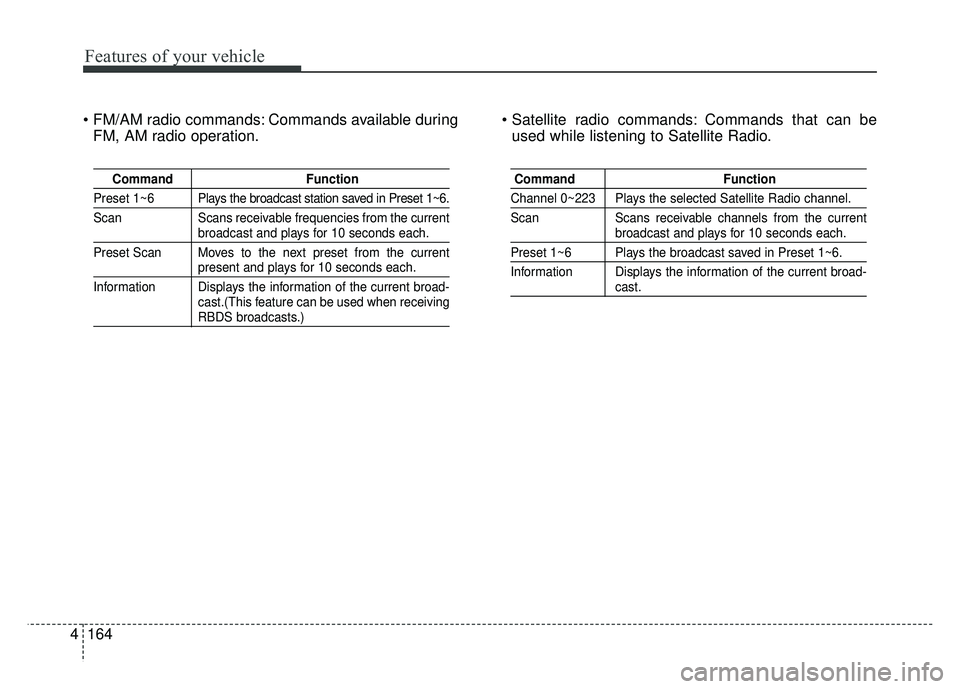
Commands available during
FM, AM radio operation. Commands that can be
used while listening to Satellite Radio.
Command Function
Preset 1~6 Plays the broadcast station saved in Preset 1~6.
Scan Scans receivable frequencies from the current
broadcast and plays for 10 seconds each.
Preset Scan Moves to the next preset from the current
present and plays for 10 seconds each.
Information Displays the information of the current broad- cast.(This feature can be used when receiving
RBDS broadcasts.)
Command Function
Channel 0~223 Plays the selected Satellite Radio channel.
Scan Scans receivable channels from the current
broadcast and plays for 10 seconds each.
Preset 1~6 Plays the broadcast saved in Preset 1~6.
Information Displays the information of the current broad-
cast.
Page 276 of 446
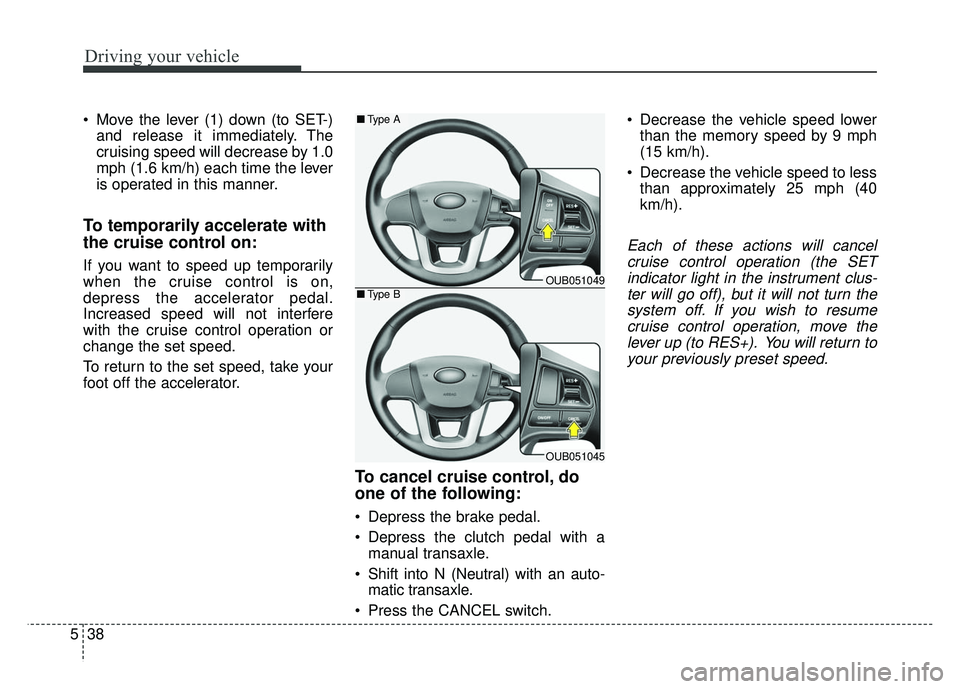
Driving your vehicle
38
5
Move the lever (1) down (to SET-)
and release it immediately. The
cruising speed will decrease by 1.0
mph (1.6 km/h) each time the lever
is operated in this manner.
To temporarily accelerate with
the cruise control on:
If you want to speed up temporarily
when the cruise control is on,
depress the accelerator pedal.
Increased speed will not interfere
with the cruise control operation or
change the set speed.
To return to the set speed, take your
foot off the accelerator.
To cancel cruise control, do
one of the following:
Depress the brake pedal.
Depress the clutch pedal with amanual transaxle.
Shift into N (Neutral) with an auto- matic transaxle.
Press the CANCEL switch. Decrease the vehicle speed lower
than the memory speed by 9 mph
(15 km/h).
Decrease the vehicle speed to less than approximately 25 mph (40
km/h).
Each of these actions will cancelcruise control operation (the SETindicator light in the instrument clus-ter will go off), but it will not turn thesystem off. If you wish to resumecruise control operation, move thelever up (to RES+). You will return toyour previously preset speed.
OUB051049
OUB051045
■ Type A
■Type B
Page 371 of 446

741
Maintenance
Battery recharging
Your vehicle has a maintenance-free,
calcium-based battery.
If the battery becomes dischargedin a short time (because, for exam-
ple, the headlights or interior lights
were left on while the vehicle was
not in use), recharge it by slow
charging (trickle) for 10 hours.
If the battery gradually discharges because of high electric load while
the vehicle is being used, recharge
it at no more than 20-30A for two
hours. When recharging the battery,
observe the following precautions:
The battery must be removed from
the vehicle and placed in an area
with good ventilation.
Watch the battery during charging, and stop or reduce the charging
rate if the battery cells begin
gassing (boiling) violently or if the
temperature of the electrolyte of
any cell exceeds 120°F (49°C).
Wear eye protection when check- ing the battery during charging.
Disconnect the battery charger in the following order.
1. Turn off the battery charger main switch.
2. Unhook the negative clamp from the negative battery terminal.
3. Unhook the positive clamp from the positive battery terminal.
Before performing maintenance or recharging the battery, turn off all
accessories and stop the engine.
The negative battery cable must be removed first and installed last
when the battery is disconnected.
Reset items
Items should be reset after the bat-
tery has been discharged or the bat-
tery has been disconnected.
Auto down window (See section 4)
Sunroof (See section 4)
Trip computer (See section 4)
Climate control system (See section 4)
Clock (See section 4)
Audio (See section 4)