Page 156 of 446
485
Features of your vehicle
Luggage room lamp
The luggage room lamp comes on
when the trunk (tailgate) is opened.
To prevent unnecessary charging
system drain, close the trunk (tail-
gate) securely after using the lug-
gage room.
Vanity mirror lamp
(if equipped)
Push the switch to turn the light on or
off.
: The lamp will turn on if thisbutton is pressed.
: The lamp will turn off if this button is pressed.
Always have the switch in the off
position when the vanity mirror lamp
is not in use. If the sunvisor is closed
without the lamp off, it may discharge
the battery or damage the sunvisor.
Glove box lamp
The glove box lamp comes on when
the glove box is opened.
To prevent unnecessary charging
system drain, close the glove box
securely after using the glove box.
OLM049105OUB041100
ORBC040059
OUB041099
■ 4 door
■5 door
Page 168 of 446

497
Features of your vehicle
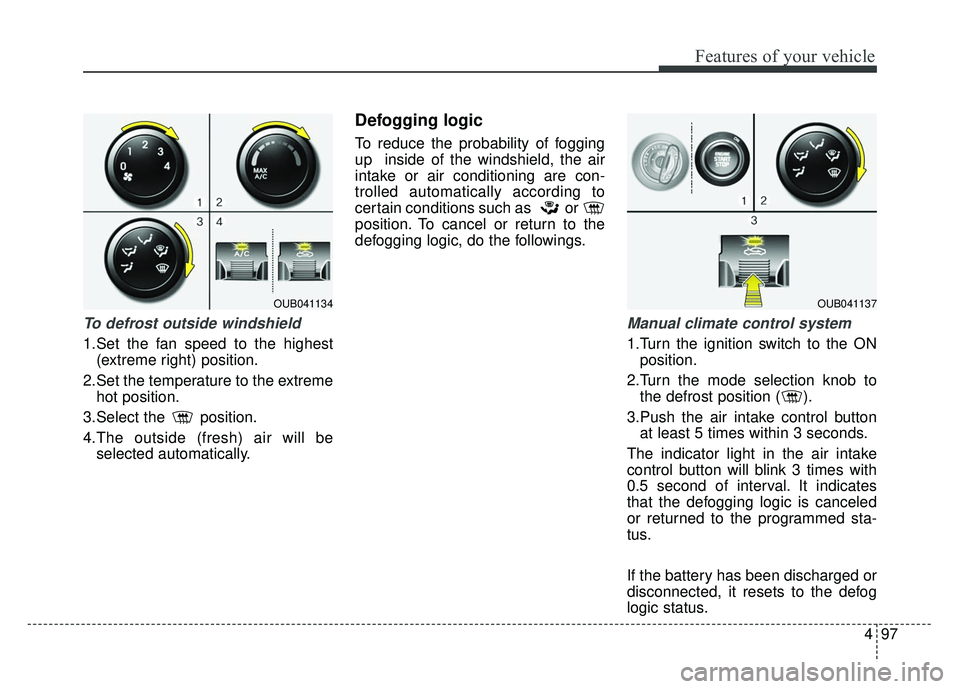
To defrost outside windshield
1.Set the fan speed to the highest(extreme right) position.
2.Set the temperature to the extreme hot position.
3.Select the position.
4.The outside (fresh) air will be selected automatically.
Defogging logic
To reduce the probability of fogging
up inside of the windshield, the air
intake or air conditioning are con-
trolled automatically according to
certain conditions such as or
position. To cancel or return to the
defogging logic, do the followings.
Manual climate control system
1.Turn the ignition switch to the ONposition.
2.Turn the mode selection knob to the defrost position ( ).
3.Push the air intake control button at least 5 times within 3 seconds.
The indicator light in the air intake
control button will blink 3 times with
0.5 second of interval. It indicates
that the defogging logic is canceled
or returned to the programmed sta-
tus.
If the battery has been discharged or
disconnected, it resets to the defog
logic status.
OUB041134OUB041137
Page 175 of 446

Features of your vehicle
104
4
Photo frame (if equipped)
If you want to insert the photo in the
frame,
1.Press the cover and the photo
frame will come out.
2.Insert the photo into the slit at the top of the photo frame.
3.Push the cover to fix the photo frame in it's original place.
The information card is in the photo
frame.
If you want to resize your digital pic-
ture to fit the photo frame, access the
QR code or web address on the
information card.
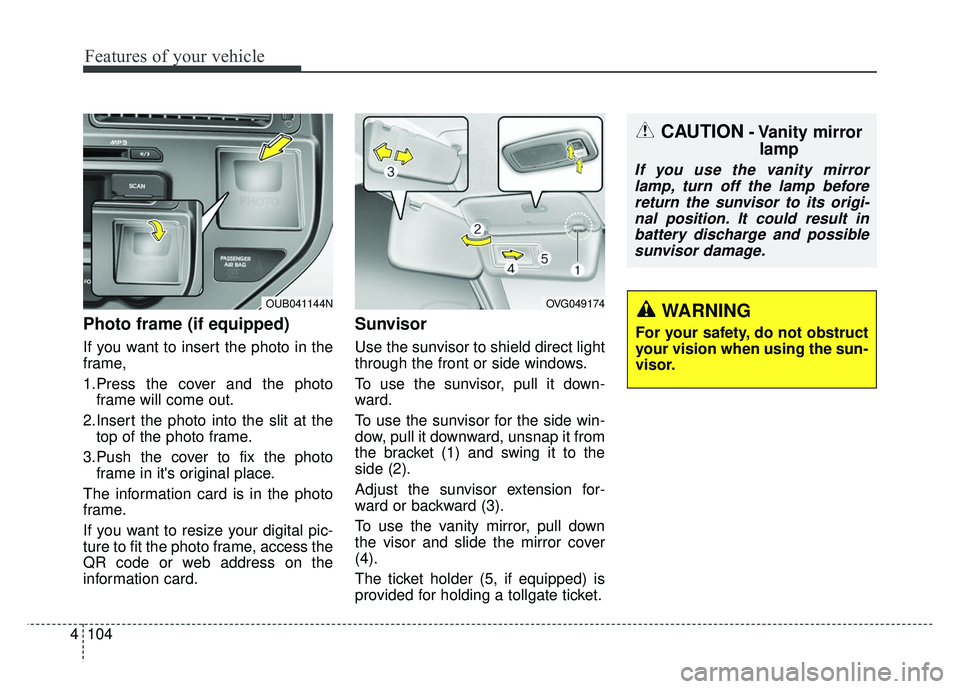
Sunvisor
Use the sunvisor to shield direct light
through the front or side windows.
To use the sunvisor, pull it down-
ward.
To use the sunvisor for the side win-
dow, pull it downward, unsnap it from
the bracket (1) and swing it to the
side (2).
Adjust the sunvisor extension for-
ward or backward (3).
To use the vanity mirror, pull down
the visor and slide the mirror cover
(4).
The ticket holder (5, if equipped) is
provided for holding a tollgate ticket.
OUB041144N
CAUTION- Vanity mirror lamp
If you use the vanity mirror
lamp, turn off the lamp beforereturn the sunvisor to its origi-nal position. It could result inbattery discharge and possiblesunvisor damage.
WARNING
For your safety, do not obstruct
your vision when using the sun-
visor.
OVG049174
Page 176 of 446

4105
Features of your vehicle
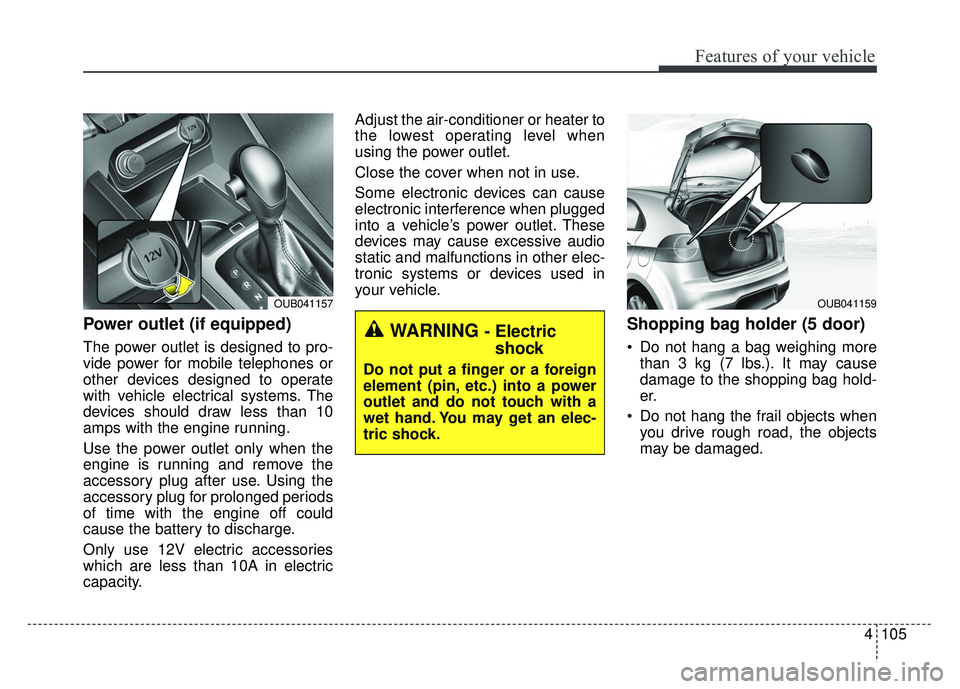
Power outlet (if equipped)
The power outlet is designed to pro-
vide power for mobile telephones or
other devices designed to operate
with vehicle electrical systems. The
devices should draw less than 10
amps with the engine running.
Use the power outlet only when the
engine is running and remove the
accessory plug after use. Using the
accessory plug for prolonged periods
of time with the engine off could
cause the battery to discharge.
Only use 12V electric accessories
which are less than 10A in electric
capacity.Adjust the air-conditioner or heater to
the lowest operating level when
using the power outlet.
Close the cover when not in use.
Some electronic devices can cause
electronic interference when plugged
into a vehicle’s power outlet. These
devices may cause excessive audio
static and malfunctions in other elec-
tronic systems or devices used in
your vehicle.
Shopping bag holder (5 door)
Do not hang a bag weighing more
than 3 kg (7 lbs.). It may cause
damage to the shopping bag hold-
er.
Do not hang the frail objects when you drive rough road, the objects
may be damaged.
OUB041157
WARNING - Electricshock
Do not put a finger or a foreign
element (pin, etc.) into a power
outlet and do not touch with a
wet hand. You may get an elec-
tric shock.
OUB041159
Page 177 of 446
Features of your vehicle
106
4
Digital clock and calendar
(if equipped)
Whenever the battery terminals or
related fuses are disconnected, you
must reset the clock and the calen-
dar.
When the ignition switch is in the
ACC or ON position, the clock but-
tons operate as follows:
Setup the clock and calender
With audio off
1.Press the [SETUP] or [Clock] but-
ton (1) until the clock of the display
blinks.
2.Set the clock by turning the knob (2) and press it. With audio on
1.Press the [SETUP] or [Clock] but-
ton (1) until the clock adjust mode
displayed.
2.Set the clock by turning the knob (2) and press it.
OUB041161N
WARNING - Clock setting
Do not adjust the clock while
driving. You may lose your
steering control.
Page 207 of 446
![KIA RIO HATCHBACK 2014 Owners Manual Features of your vehicle
136
4
MENU : iPod®
In iPod®mode, press the key
to set the Repeat, Random,
Information and Search features.
Repeat
Press the key Set [ RPT]
through the
TUNEknob or
key to KIA RIO HATCHBACK 2014 Owners Manual Features of your vehicle
136
4
MENU : iPod®
In iPod®mode, press the key
to set the Repeat, Random,
Information and Search features.
Repeat
Press the key Set [ RPT]
through the
TUNEknob or
key to](/manual-img/2/57980/w960_57980-206.png)
Features of your vehicle
136
4
MENU : iPod®
In iPod®mode, press the key
to set the Repeat, Random,
Information and Search features.
Repeat
Press the key Set [ RPT]
through the
TUNEknob or
key to repeat the current song.
❈ Press RPT again to turn repeat
off.
Album Random
Press the key Set [ Alb.RDM]
through the TUNEknob or key.
Plays albums within the currently
playing category in random order.
❈Press Alb.RDM again to turn off.
All Random
Press the key Set [ A.RDM]
through the TUNEknob or
key.
Plays all songs within the currently
playing category in random order.
❈ Press A.RDM again to turn off.
Information
Press the key Set [ Info]
through the
TUNEknob or
key.
Displays information of the current
song.
❈ Press the key to turn off
info display.
Some iPod
®models may not sup-
port all communication protocols
which will result in some files that
not playing properly.
Supported iPod
®models:
- iPod Mini
®
- iPod 4th(Photo) ~ 6th(Classic) generation
- iPod Nano
®1st~4th generation - iPod Touch
®1st~2nd generation
The order of search or playback of songs in the iPod
®can be different
from the order searched in the
audio system.
If the iPod
®is disabled due to its
own malfunction, reset the iPod®.
(Reset: Refer to iPod®manual)
An iPod
®may not operate normal-
ly when the battery is low.
Some iPod
®devices, such as the
iPhone®, can be connected
through Bluetooth. The device
must have audio
Bluetooth®
Wireless Technologycapability
(such as for stereo headphone
Bluetooth®Wireless Technology).
The device may play, but it will not
be controlled by the audio system.
To use the iPod
®features through the
audio system, use the cable that was
provided with of the iPod
®.
Skipping or improper operation may occur depending on the characteris-
tics of your iPod
®/iPhone®device.
MENU
4
MENU
3
MENU
2
MENU
1
MENU
MENU
Page 215 of 446

Features of your vehicle
144
4
When connecting aBluetooth®
Phone
with the mobile phone, check to
see that the mobile phone sup-
ports
Bluetooth®features.
Bluetooth®, the phone will not be
found during device searches if
the phone has been set to hidden
state or the
Bluetooth®power is
turned off. Disable the hidden
state or turn on the
Bluetooth®
power prior to searching/connect-
ing with the Head unit.
connected when the ignition on.
nection with your
Bluetooth®
device, turn off the Bluetooth®
feature within your mobile phone.
quality may differ depending on
the mobile phone.
the head unit with the mobile
phone.
Bluetooth®connection may
become intermittently discon-
nected in some mobile phones.
Follow these steps to try again.
1. Within the mobile phone, turn the
Bluetooth®function off/on
and try again.
2. Turn the mobile phone power Off/On and try again.
3. Completely remove the mobile phone battery, reboot, and then
again.
4. Reboot the
AudioSystem and
try again.
5. Delete all paired devices, pair and try again.
Handsfree call quality and volume may differ depending on the
model of your mobile phone.
Page 243 of 446

55
Driving your vehicle
Illuminated ignition switch
(if equipped)
Whenever a front door is opened, the
ignition switch will illuminate for your
convenience, provided the ignition
switch is not in the ON position. The
light will go off immediately when the
ignition switch is turned on. It will
also go off after about 30 seconds
when the door is closed.
Ignition switch position
LOCK
The steering wheel locks to protect
against theft. The ignition key can be
removed only in the LOCK position.
When turning the ignition switch to
the LOCK position, push the key
inward at the ACC position and turn
the key toward the LOCK position.
The anti-theft steering column lock is
not a substitute for the parking brake.
Before leaving the driver’s seat,
always make sure the shift lever is
engaged in 1st gear for the manual
transaxle or P (Park) for automatic
transaxle, set the parking brake fully
and shut the engine off.
ACC (Accessory)
The steering wheel is unlocked and
electrical accessories are operative.
If difficulty is experienced turning the
ignition switch to the ACC position,
turn the key while turning the steer-
ing wheel right and left to release the
tension.
ON
The warning lights can be checked
before the engine is started. This is
the normal running position after the
engine is started.
Do not leave the ignition switch ON ifthe engine is not running to preventbattery discharge.
START
Turn the ignition switch to the START
position to start the engine. The
engine will crank until you release
the key; then it returns to the ON
position. The brake warning light can
be checked in this position.
KEY POSITIONS
OTD059016OUB051001