Page 53 of 446
Safety features of your vehicle
36
3
Upon deployment, tear seams mold-
ed directly into the pad covers will
separate under pressure from the
expansion of the air bags. Further
opening of the covers then allows full
inflation of the air bags. A fully inflated air bag, in combina-
tion with a properly worn seat belt,
slows the driver's or the passenger's
forward motion, reducing the risk of
head and chest injury.
After complete inflation, the air bag
immediately starts deflating,
enabling the driver to maintain for-
ward visibility and the ability to steer
or operate other controls.
B240B05L
Passenger’s front air bag
B240B03L
Driver’s front air bag (3)
WARNING - Air bag
obstructions
Do not install or place any
accessories on the steering
wheel, instrument panel, or on
the front passenger's panel
above the glove box in a vehicle
Such objects may become dan-
gerous projectiles if the air bag
deploys.
B240B02L
Driver’s front air bag (2)
Page 54 of 446

337
Safety features of your vehicle
✽
✽
NOTICE
Before you replace a fuse or discon-
nect a battery terminal, turn the
ignition switch to the LOCK posi-
tion and remove the ignition key.
Never remove or replace the air bag
related fuse(s) when the ignition
switch is in the ON position. Failure
to heed this warning will cause the
SRS air bag warning light to illumi-
nate.
Occupant detection system
Your vehicle is equipped with an
occupant detection system in the
front passenger's seat.
The occupant detection system is
designed to detect the presence of a
properly-seated front passenger and
determine if the passenger's front air
bag should be enabled (may inflate)
or not. The driver's front air bag is not
affected or controlled by the occu-
pant detection system.
Main components of occupant
detection system
A detection device located within the front passenger seat track.
Electronic system to determine whether passenger air bag sys-
tems should be activated or deac-
tivated.
An indicator light located on the instrument panel which illuminates
the words PASSENGER AIR BAG
“OFF” indicating the front passen-
ger air bag system is deactivated.
The instrument panel air bag warn- ing light is interconnected with the
occupant detection system.
OUB031037N
Page 111 of 446

Features of your vehicle
40
4
Tilt and telescoping
(if equipped) steering
Tilt steering allows you to adjust the
steering wheel before you drive. You
can also raise it to give your legs
more room when you exit and enter
the vehicle.
The steering wheel should be posi-
tioned so that it is comfortable for
you to drive, while permitting you to
see the instrument panel warning
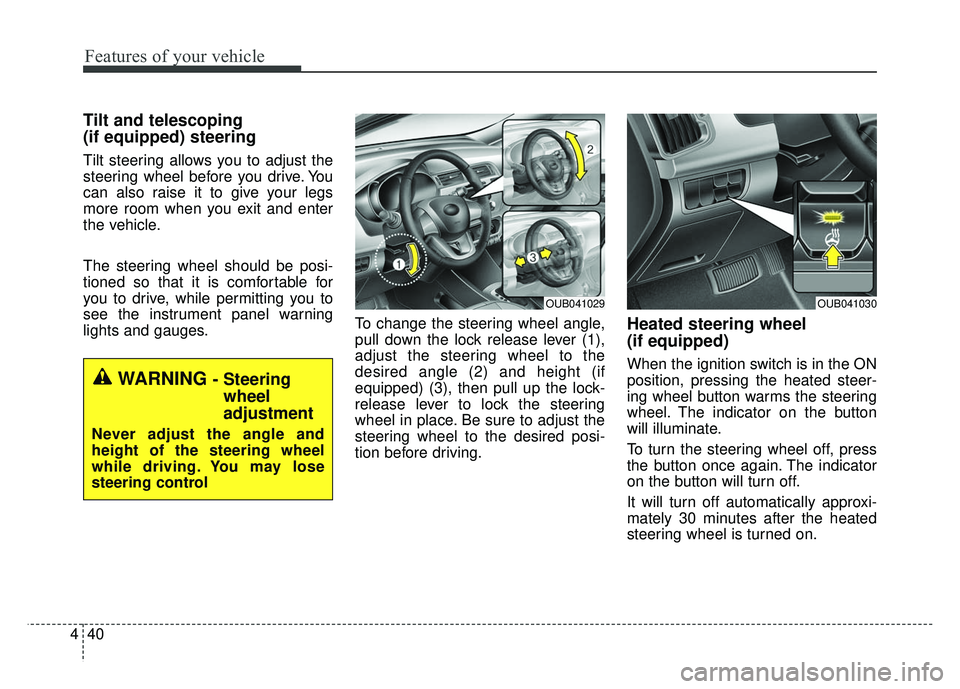
lights and gauges. To change the steering wheel angle,
pull down the lock release lever (1),
adjust the steering wheel to the
desired angle (2) and height (if
equipped) (3), then pull up the lock-
release lever to lock the steering
wheel in place. Be sure to adjust the
steering wheel to the desired posi-
tion before driving.
Heated steering wheel
(if equipped)
When the ignition switch is in the ON
position, pressing the heated steer-
ing wheel button warms the steering
wheel. The indicator on the button
will illuminate.
To turn the steering wheel off, press
the button once again. The indicator
on the button will turn off.
It will turn off automatically approxi-
mately 30 minutes after the heated
steering wheel is turned on.
WARNING - Steering
wheel
adjustment
Never adjust the angle and
height of the steering wheel
while driving. You may lose
steering control
OUB041029OUB041030
Page 117 of 446

Features of your vehicle
46
4
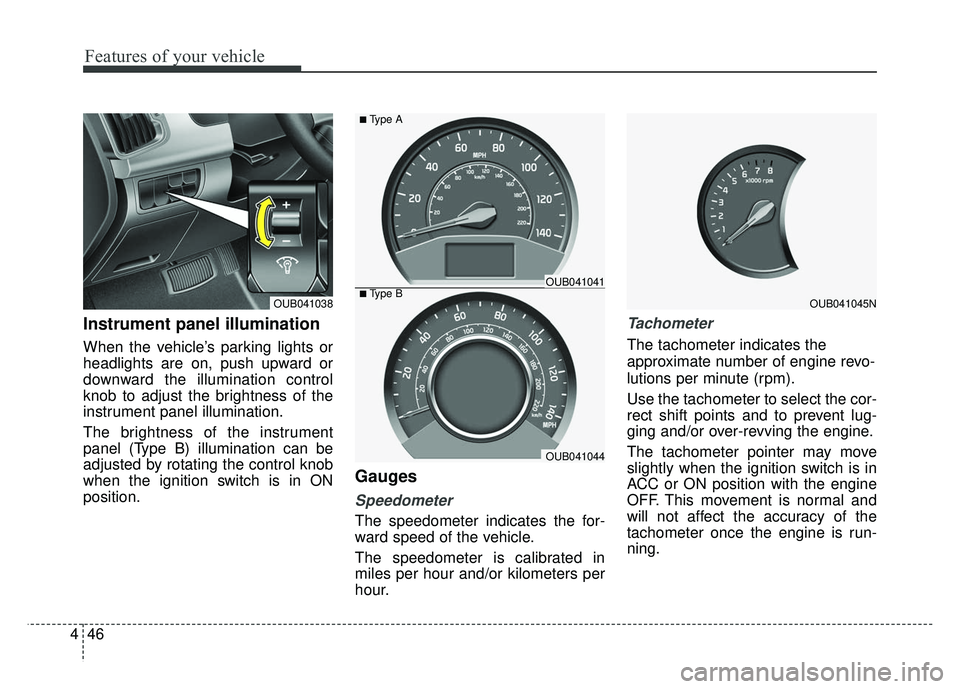
Instrument panel illumination
When the vehicle’s parking lights or
headlights are on, push upward or
downward the illumination control
knob to adjust the brightness of the
instrument panel illumination.
The brightness of the instrument
panel (Type B) illumination can be
adjusted by rotating the control knob
when the ignition switch is in ON
position.
Gauges
Speedometer
The speedometer indicates the for-
ward speed of the vehicle.
The speedometer is calibrated in
miles per hour and/or kilometers per
hour.
Tachometer
The tachometer indicates the
approximate number of engine revo-
lutions per minute (rpm).
Use the tachometer to select the cor-
rect shift points and to prevent lug-
ging and/or over-revving the engine.
The tachometer pointer may move
slightly when the ignition switch is in
ACC or ON position with the engine
OFF. This movement is normal and
will not affect the accuracy of the
tachometer once the engine is run-
ning.
OUB041045NOUB041038■Type BOUB041041
OUB041044
■Type A
Page 125 of 446
Features of your vehicle
54
4
Automatic transaxle shift posi-
tion indicator (if equipped)
The indicator displays which auto-
matic transaxle shift lever is select-
ed. Illumination intensity
The illumination intensity of the
instrument panel is shown when
adjusting it with the illumination con-
trol switch.
For more details, refer to “Instrument
panel illumination” in section 4.
User Settings (only for Type B
cluster, if equipped)
1.Stop the vehicle with the ignition
switch in the ON position or engine
running.
2.Press the TRIP button until the User setting is displayed.
3.With the User setting displayed, press the TRIP button for 2 sec-
onds.
4.You can change the item by press- ing the TRIP button and select an
item by pressing the RESET but-
ton.
OUB041177N
■Type A■Type B
OUB041062
■Type A■Type B
OUB041069
■Type B
Page 131 of 446

Features of your vehicle
60
4
If the driver's seat belt is disconnect-
ed after the ignition switch is turned
to the ON position, the seat belt
warning light will blink for approxi-
mately 6 seconds. But if it is fastened
within the 6 seconds the warning
light will turn off immediately. If the
driver's seat belt is not fastened
when the vehicle speed exceeds 6
mph (10 km/h), the seat belt warning
light and chime will operate approxi-
mately 11 times with a pattern of 6
seconds on and 24 seconds off until
the belt is fastened or the vehicle
speed decreases below 3 mph (5
km/h).Turn signal indicator
The blinking green arrows on the
instrument panel show the direction
indicated by the turn signals. If the
arrow comes on but does not blink,
blinks more rapidly than normal, or
does not illuminate at all, it indicates
a malfunction in the turn signal sys-
tem. You should consult your dealer
for repairs.
This indicator also blinks when the
hazard warning switch is turned on.
High beam indicator
This indicator illuminates when the
headlights are on and in the high
beam position or when the turn sig-
nal lever is pulled into the Flash-to-
Pass position.
Front fog light indicator
(if equipped)
The indicator illuminates when the
front fog lights ON.
Tail light indicator
This indicator illuminates when the
tail lights are on.
Page 138 of 446

467
Features of your vehicle
Electric power steering(EPS) system warninglight (if equipped)
This warning light illuminates after
the ignition key is turned to the ON
position and then it will go off when
the engine starts.
This light also comes on when the
EPS has malfunctioned. If it comes
on while driving, have your vehicle
inspected by an authorized Kia deal-
er.
Fuel cap open warningindicator
This warning light indicates the fuel
filler cap is not tighten securely.
Always make sure that the fuel filler
cap is tight.
ECOMINDER®indicator
(if equipped)
The ECOMINDER®indicator is dis-
played to help you improve fuel effi-
ciency when you are driving.
The ECOMINDER
®indicator will
turn the ECO light green on the
instrument panel when you are
driving efficiently in the ECO ON
mode.
If you don't want the indicator dis-
played, you can turn the ECO ON
mode to OFF mode by pressing
the TRIP button.
When the instant fuel consumption mode(if equipped) is displayed on
the LCD display or the system is
not working properly, the indicator
turns off. If the indicator turns off
when the instant fuel consumption
mode or ECO OFF mode is not
selected, have the system
checked by an authorized Kia deal-
er as soon as possible. Fuel efficiency depends on the dri-
ver's driving habit and road condi-
tion.
The system stops operating when the transaxle is in the P (Park), R
(Reverse), N (Neutral) position or
sports mode, or when the instant
fuel consumption mode is select-
ed.
ECO
WARNING -
ECOMINDER®indicator
Don't keep watching the “ECO”
ECOMINDER®indicator while
driving. It may distract you
while driving and cause an acci-
dent.
Page 148 of 446

477
Features of your vehicle
Parking light position ( )
When the light switch is in the park-
ing light position (1st position), the
tail, position, license and instrument
panel lights will turn ON.
Headlight position ( )
When the light switch is in the head-
light position (2nd position) the head,
tail, position, license and instrument
panel lights will turn ON.
The ignition switch must be in the ON
position to turn on the headlights.
Auto light position (if equipped)
When the light switch is in the AUTO
light position, the taillights and head-
lights will turn ON or OFF automati-
cally depending on the amount of
light outside the vehicle.
Never place anything over sensor (1)
located on the instrument panel. This
will ensure better auto-light system
control.
Don’t clean the sensor using a win-
dow cleaner. The cleaner may leave
a light film which could interfere with
sensor operation.
If your vehicle has window tint or
other types of metallic coating on the
front windshield, the Auto light sys-
tem may not work properly.
OAM049041OAM049042OFS040084