2014 KIA PICANTO clock
[x] Cancel search: clockPage 390 of 1003

765
Maintenance
Side repeater light bulb replace- ment
Type A
If the light bulb does not operate, we rec-
ommend that you checked an authorized
Kia dealer.
Type B
1. Remove the light assembly from thevehicle by prying the lens and pulling
the assembly out.
2. Disconnect the bulb electrical connec- tor.
3. Separate the socket and the lens parts by turning the socket counterclockwise
until the tabs on the socket align with
the slots on the lens part.
4. Remove the bulb by pulling it straight out.
5. Insert a new bulb in the socket.
6. Reassemble the socket and the lens part.
7. Connect the bulb electrical connector.
8. Reinstall the light assembly to the body of the vehicle. Rear combination light bulb replacement
(1) Rear turn signal light (2) Stop and tail light
(3) Rear fog light (LH side) (if equipped)
(4) Back-up light (RH side)
Stop and tail light (LED type)
(if equipped)
If the light (LED) does not operate, we
recommend that the vehicle checked by
an authorized Kia dealer.
OTA070028OTA070030OTA070029
Page 391 of 1003

Maintenance
66
7
Rear turn signal light/Stop and tail light
1. Open the tail gate.
2. Remove the rear combination light
assembly by turning the screw counter-
clockwise and removing the assembly. 3. Remove the socket from the assembly
by turning the socket counterclockwise
until the tabs on the socket align with
the slots on the assembly.
4. Remove the bulb from the socket by pressing it in and rotating it counter-
clockwise until the tabs on the bulb
align with the slots in the socket. Pull
the bulb out of the socket.
5. Insert a new bulb by inserting it into the socket and rotating it until it locks
into place.
6. Install the socket in the assembly by aligning the tabs on the socket with the
slots in the assembly. Push the socket
into the assembly and turn the socket
clockwise.
7. Reinstall the light assembly to the body of the vehicle.
Back-up light/Rear fog light
(if equipped)
1. Remove the under cover by rotating the screws.
2. Reach your hand into the back of the rear bumper.
3. Disconnect the power connector.
4. Remove the bulb-socket from the housing by turning the socket counter
clockwise until the tabs on the socketalign with the slots on the housing.
5. Install the new bulb-socket into the housing by aligning the tabs on the
socket with the slots in the housing.
Push the socket into the housing and
turn the socket clockwise.
6. Connect the power connector.
7. Reinstall the rear under cover.
OTA070031OTA070032OTA070046L
Page 413 of 1003

I3
Index
Cargo weight ..................................................................5-56
Central door lock switch ................................................4-17
Changing tires ..................................................................6-9Chains
Tire chains ................................................................5-45
Checking tire inflation pressure ......................................7-41
Child restraint system ....................................................3-28 Lap belt......................................................................3-31
Lap/shoulder belt ......................................................3-30
Child-protector rear door lock ........................................4-18
Climate control system (Automatic) ..............................4-92 Air conditioning ........................................................4-97
Automatic heating and air conditioning....................4-93
Manual heating and air conditioning ........................4-94
Climate control system (Manual) ..................................4-83 Air conditioning ........................................................4-88
Climate control air filter............................................4-90
Heating and air conditioning ....................................4-84
Cigarette lighter ............................................................4-103
Climate control air filter ........................................4-90, 7-32
Clock (Digital) ..............................................................4-106
Clothes hanger ..............................................................4-108
Combined instrument, see instrument cluster ................4-42
Coolant ............................................................................7-23
Cooling fluid, see engine coolant ..................................7-23
Crankcase emission control system ................................7-75
Cup holder ....................................................................4-104
Curtain air bag ................................................................3-52 Dashboard, see instrument cluster ..................................4-42
Daytime running light ....................................................4-69
Declaration of conformity ................................................8-8
Defogging (Windshield) ................................................4-99
Defogging logic (Windshield) ......................................4-101
Defroster (Rear window) ................................................4-82
Defrosting (Windshield) ................................................4-99
Digital clock..................................................................4-106
Dimensions ......................................................................8-2
Displays, see instrument cluster ....................................4-42
Door locks ......................................................................4-15
Central door lock switch ..........................................4-17
Child-protector rear door lock ..................................4-18
Drink holders, see cup holders ....................................4-104
Driver's air bag ................................................................3-46
Driving at night ..............................................................5-41
Driving in flooded areas ................................................5-43
Driving in the rain ..........................................................5-42D
Page 415 of 1003

I5
Index
Hazard warning flasher ..................................................4-68
Hazardous driving conditions ........................................5-40
Headlight escort function................................................4-69
Headlight leveling device................................................4-75
Headlight welcome function ..........................................4-69
Headrest ....................................................................3-5, 3-9
Heating and air conditioning ..........................................4-84
Highway driving ............................................................5-43
Hill-start assist control (HAC) ........................................5-35
Hood................................................................................4-26
Horn ................................................................................4-37
How to use this manual ....................................................1-2
Idle stop and go (ISG) system ........................................5-12
Immobilizer system ..........................................................4-4
Indicators and warnings ..................................................4-55
Indicator symbols on the instrument cluster ....................1-5
Inside rearview mirror ....................................................4-38
Instrument cluster ..........................................................4-42
Fuel gauge ................................................................4-44
Odometer ..................................................................4-45
Speedometer ..............................................................4-43
Tachometer ................................................................4-43 Trip computer ............................................................4-44
Warning and indicators ............................................4-55
Instrument panel overview................................................2-3
Interior care ....................................................................7-74
Interior features ............................................................4-103 Ashtray ....................................................................4-103
Cigarette lighter ......................................................4-103
Clothes hanger ........................................................4-108
Cup holder ..............................................................4-104
Digital clock ............................................................4-106
Floor mat anchor(s) ················································4-108
Power outlet ............................................................4-106
Sunvisor ..................................................................4-105
Vanity mirror lamp ..................................................4-105
Interior light ....................................................................4-79
Interior overview ..............................................................2-2
Jack and tools....................................................................6-8
Jump starting ....................................................................6-5
Key positions ....................................................................5-4
Keys ..................................................................................4-3
H
I
K
J
Page 516 of 1003

Features of your vehicle
24
4
Manual windows (if equipped)
To raise or lower the window, turn the
window regulator handle clockwise or
counterclockwise.
WARNING
When opening or closing the win-
dows, make sure your passenger's
arms, hands and body are safely
out of the way.
OSA028222/H
Page 519 of 1003

427
Features of your vehicle
Opening the fuel filler lid
The fuel-filler lid must be opened from
inside the vehicle by pulling up on thefuel-filler lid opener located on the front
floor area on the driver’s seat.
✽✽NOTICE
If the fuel filler lid will not open because
ice has formed around it, tap lightly or
push on the lid to break the ice and
release the lid. Do not pry on the lid. If
necessary, spray around the lid with an
approved de-icer fluid (do not use radi-
ator anti-freeze) or move the vehicle to a
warm place and allow the ice to melt.
1. Stop the engine.
2. To open the fuel filler lid, pull up the fuel filler lid opener.
3. Pull the fuel filler lid (1) out to fully open.
4. To remove the cap, turn the fuel tank cap (2) counterclockwise.
5. Refuel as needed. Closing the fuel filler lid
1. To install the cap, turn it clockwise until
it “clicks”. This indicates that the cap is securely tightened.
2. Close the fuel filler lid and push it light- ly and make sure that it is securelyclosed.
FUEL FILLER LID
OTA040020ROTA040021L
WARNING
- Refuelling
If pressurized fuel sprays out, it can cover your clothes or skin
and thus subject you to the risk
of fire and burns. Always remove
the fuel cap carefully and slowly.
If the cap is venting fuel or if you
hear a hissing sound, wait until
the condition stops before com-
pletely removing the cap.
Do not "top off" after the nozzle automatically shuts off whenrefuelling.
Always check that the fuel cap is installed securely to prevent fuel
spillage in the event of an acci-dent.
Page 596 of 1003

Features of your vehicle
104
4
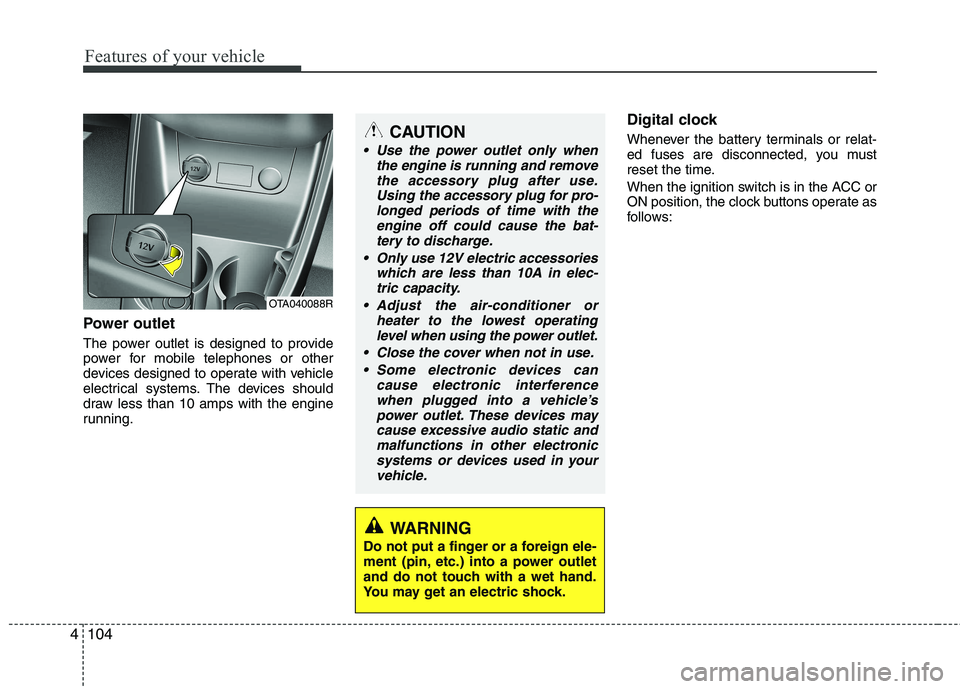
Power outlet
The power outlet is designed to provide
power for mobile telephones or other
devices designed to operate with vehicle
electrical systems. The devices should
draw less than 10 amps with the engine
running. Digital clock
Whenever the battery terminals or relat-
ed fuses are disconnected, you must
reset the time.
When the ignition switch is in the ACC or
ON position, the clock buttons operate as
follows:
CAUTION
Use the power outlet only when
the engine is running and remove
the accessory plug after use.Using the accessory plug for pro-longed periods of time with the engine off could cause the bat-
tery to discharge.
Only use 12V electric accessories which are less than 10A in elec-tric capacity.
Adjust the air-conditioner or heater to the lowest operatinglevel when using the power outlet.
Close the cover when not in use. Some electronic devices can cause electronic interference
when plugged into a vehicle’spower outlet. These devices maycause excessive audio static andmalfunctions in other electronic
systems or devices used in yourvehicle.
WARNING
Do not put a finger or a foreign ele-
ment (pin, etc.) into a power outlet
and do not touch with a wet hand.
You may get an electric shock.
OTA040088R
Page 597 of 1003
![KIA PICANTO 2014 Owners Manual 4105
Features of your vehicle
Setup the clock (Type A, Type B)
With audio off
1. Press the [SETUP] or [Clock] buttonuntil the clock of the display blinks.
2. Set the clock by turning the knob(1) and KIA PICANTO 2014 Owners Manual 4105
Features of your vehicle
Setup the clock (Type A, Type B)
With audio off
1. Press the [SETUP] or [Clock] buttonuntil the clock of the display blinks.
2. Set the clock by turning the knob(1) and](/manual-img/2/57966/w960_57966-596.png)
4105
Features of your vehicle
Setup the clock (Type A, Type B)
With audio off
1. Press the [SETUP] or [Clock] buttonuntil the clock of the display blinks.
2. Set the clock by turning the knob(1) and press it. With audio on
1. Press the [SETUP] or [Clock] button
until the clock adjust mode displayed.
2. Set the clock by turning the knob(1) and press it.
Setup the clock (Type C)
Hour:
Turn the knob to the left (H), will advance
the time displayed by one hour.
Minute:
Turn the knob to the right (M), will
advance the time displayed by one
minute.
WARNING
Do not adjust the clock whilst driv-
ing. You may lose your steering
control and cause an accident that
results in severe personal injury ordeath.
OTA040203R
■ Type C
OTA040095
OTA040089
■Type A
■Type B