2014 KIA OPTIMA display
[x] Cancel search: displayPage 18 of 46

OPTIMA
FEATURES & FUNCTIONS GUIDE
16
*IF EQUIPPED
LCD Display Controls and Modes* Press Mode button
A to scroll through different LCD Modes:
CRUISECANCEL OK
RESSET
A
(LCD Display Control buttons located
on Steering Wheel)
Ty p e B
Trip Computer Mode: Displays driving
information for tripmeter, fuel economy, etc.
Master Warning / Service Modes: Informs
on upcoming service intervals , and warning
messages related to TPMS and others
User Settings Mode: Change settings of the
doors, lamps and other features
LCD modes:
STEERING WHEEL CONTROLS
Page 21 of 46
19
ALWAYS CHECK THE OWNER’S MANUAL FOR COMPLETE OPERATING INFORMATION AND SAFET Y WARNINGS.
*IF EQUIPPED
Voice Recognition and Phone
Contact Tips
The Kia Voice Recognition System
may have difficulty understanding
some accents or uncommon names.
When using Voice Recognition to
place a call, speak in a moderate tone,
with clear pronunciation.
To maximize the use of Voice
Recognition, consider these guidelines
when storing contacts:
• Do not store single-name entries
(e.g., “Bob”, “Mom”, etc.). Instead,
always use full names (including
first and last names) for these
contacts
• Do not use special characters
(e .g . , ‘@’, ‘-’, ‘ * ’, ‘&’, etc .)
• Do not use abbreviations (i.e.,
use “Lieutenant ” instead of “Lt.”)
or acronyms (i.e., use “County
Finance Department” instead of “C. F. D.”)
• Be sure to say the name exactly as it is entered in the
contacts list
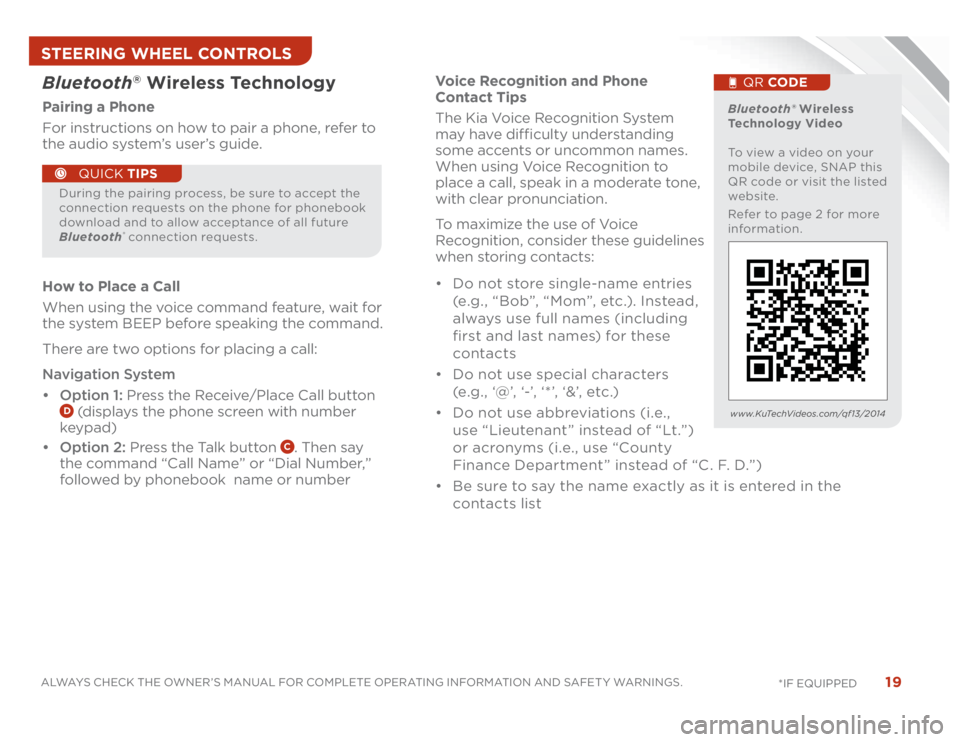
Bluetooth
® Wireless Technology
Pairing a Phone
For instructions on how to pair a phone, refer to
the audio system’s user’s guide.
How to Place a Call
When using the voice command feature, wait for
the system BEEP before speaking the command.
There are two options for placing a call:
Navigation System
• Option 1: Press the Receive/Place Call button
D (displays the phone screen with number
keypad)
• Option 2: Press the Talk button
C. Then say
the command “Call Name” or “Dial Number,”
followed by phonebook name or number
During the pairing process, be sure to accept the
connection requests on the phone for phonebook
download and to allow acceptance of all future
Bluetooth
® connection requests.
QUICK TIPS
Bluetooth® Wireless
Technology Video
To view a video on your
mobile device, SNAP this
QR code or visit the listed
website.
Refer to page 2 for more
information.
QR CODE
www.KuTechVideos.com/qf13/2014
STEERING WHEEL CONTROLS
Page 23 of 46
21
ALWAYS CHECK THE OWNER’S MANUAL FOR COMPLETE OPERATING INFORMATION AND SAFET Y WARNINGS.
*IF EQUIPPED AUDIO SYSTEM
DISP
RADIO
MEDIA
PHONESCAN
SETUP
MENU
ENTER TUNE
FILE POWER
PUSH
VOL
Bluetooth
®
12
34
56RPT RDM
SEEK
TRACKCAT
FOLDER
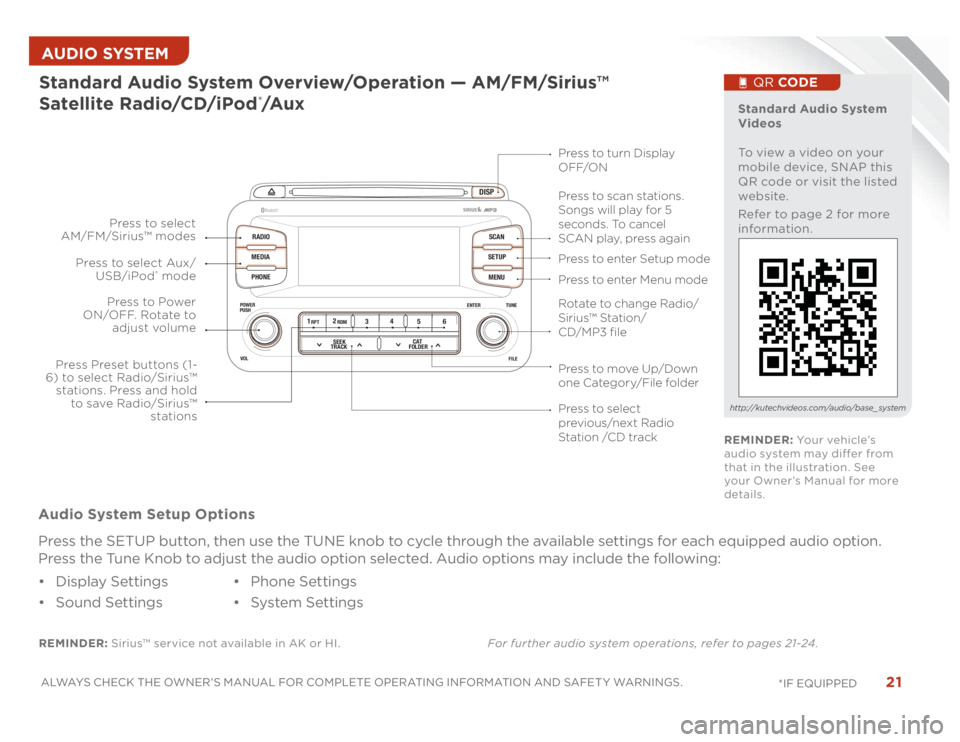
REMINDER: Sirius™ service not available in AK or HI.For further audio system operations, refer to pages 21-24 .Standard Audio System Overview/Operation — AM/FM/Sirius™
Satellite Radio/CD/iPod
®/A u x
Audio System Setup Options
Press the SETUP button, then use the TUNE knob to cycle through the available settings for each equipped audio option.
Press the Tune Knob to adjust the audio option selected. Audio options may include the following:
• Display Settings
• Sound Settings• Phone Settings
• System Settings
Standard Audio System
Videos
To view a video on your
mobile device, SNAP this
QR code or visit the listed
website.
Refer to page 2 for more
information.
QR CODE
http://kutechvideos.com/audio/base_ system
Press to move Up/Down
one Category/File folderPress to scan stations.
Songs will play for 5
seconds. To cancel
SCAN play, press again
Press to enter Setup mode
Press to enter Menu mode Press to turn Display
OFF/ON
Rotate to change Radio/
Sirius™ Station/
CD/MP3 filePress to select
previous/next Radio
Station /CD track Press to Power
ON/OFF. Rotate to
adjust volume
Press Preset buttons (1-
6) to select Radio/Sirius™
stations. Press and hold
to save Radio/Sirius™
stations Press to select Aux/
USB/iPod
® mode Press to select
AM/FM/Sirius™ modes
REMINDER: Yo u r v e h i c l e ’s
audio system may differ from
that in the illustration. See
your Owner’s Manual for more
details.
Page 24 of 46
OPTIMA
FEATURES & FUNCTIONS GUIDE
22
*IF EQUIPPED
AUDIO SYSTEM
DISP
RADIO
MEDIA
PHONESCAN
SETUP
MENU
ENTER TUNE
FILE POWER
PUSH
VOL
Bluetooth
®
12
34
56RPT RDM
SEEK
TRACKCAT
FOLDER
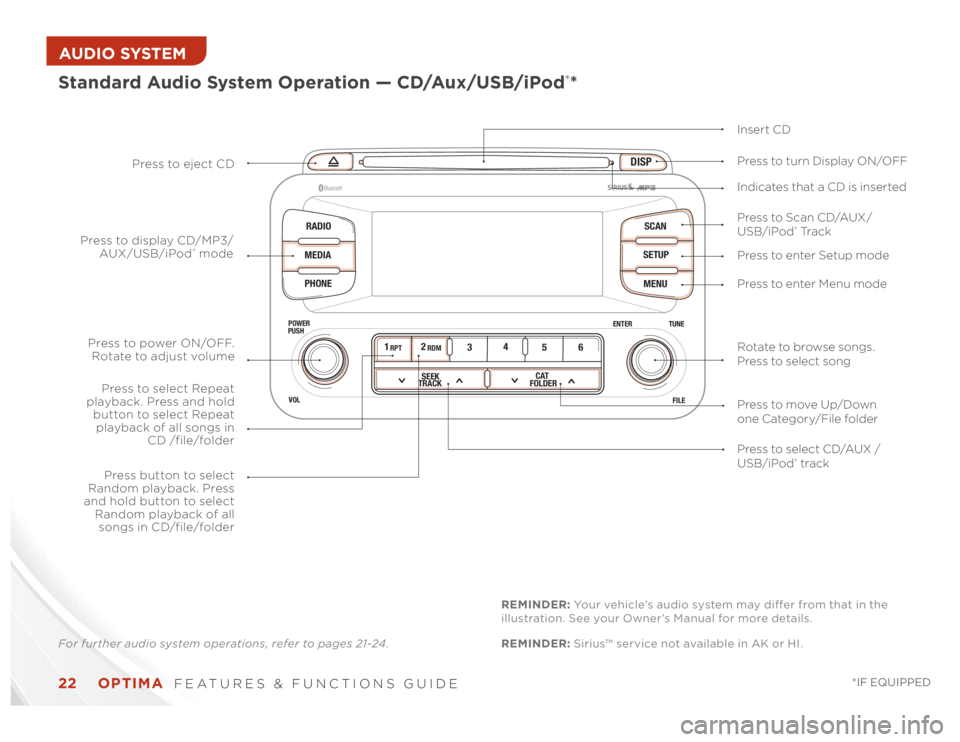
Standard Audio System Operation — CD/Aux/USB/iPod
®*
Insert CD
Press to Scan CD/AUX/
USB/iPod
® Tr a c k Press to turn Display ON/OFF
Press to enter Setup mode
Press to enter Menu mode Press to eject CD
Press to select CD/AUX /
USB/iPod® track Press to power ON/OFF.
Rotate to adjust volume
Press button to select
Random playback. Press
and hold button to select
Random playback of all
songs in CD/file/folder
Press to select Repeat
playback. Press and hold
button to select Repeat
playback of all songs in
CD /file/folder Press to display CD/MP3/
AUX/USB/iPod
® modeIndicates that a CD is inserted
Rotate to browse songs.
Press to select song
Press to move Up/Down
one Category/File folder
For further audio system operations, refer to pages 21-24 .REMINDER: Sirius™ service not available in AK or HI. REMINDER: Your vehicle’s audio system may differ from that in the
illustration. See your Owner’s Manual for more details.
Page 25 of 46
23
ALWAYS CHECK THE OWNER’S MANUAL FOR COMPLETE OPERATING INFORMATION AND SAFET Y WARNINGS.
*IF EQUIPPED AUDIO SYSTEM REMINDER: Sirius™ service not available in AK or HI.
For further navigation system operation, refer to the Digital Navigation
System User's Manual.
For further audio system operations, refer to pages 21-24 .
•
ProlongeduseoftheNavigationsysteminACCmodemaydrain
the vehicle’s battery. A warning screen may appear periodically
to remind users that the Navigation System should be operated
with the engine running to prevent battery discharge.
QUICK TIPS
When using the voice command feature, wait for
the system BEEP before speaking the command.
QUICK TIPS
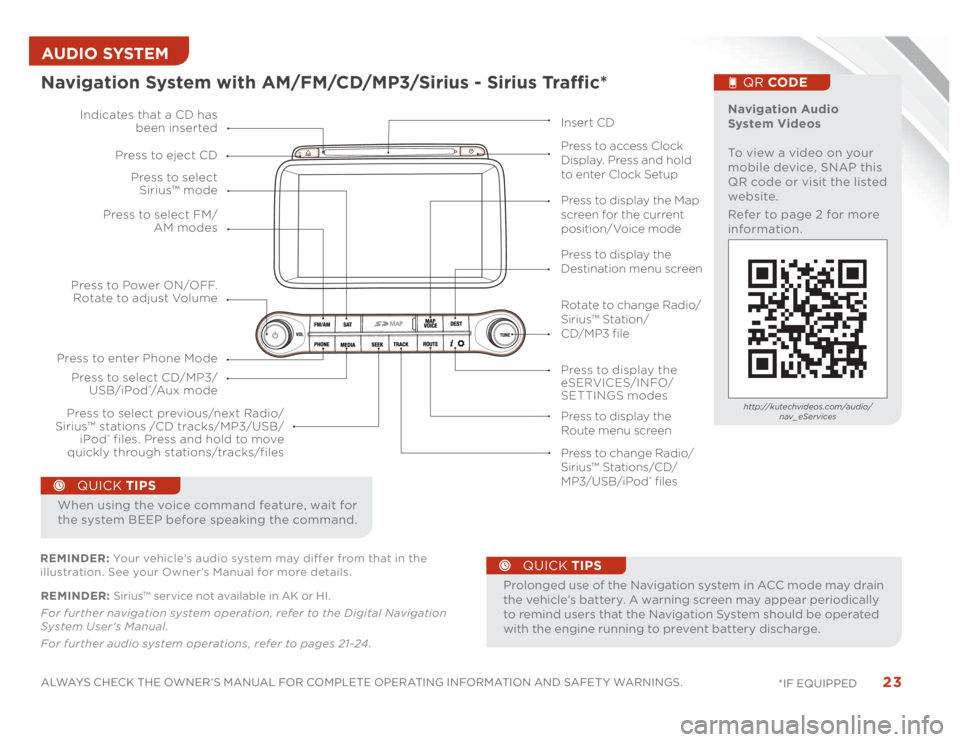
Navigation System with AM/FM/CD/MP3/Sirius - Sirius Traffic*
MAP
Press to Power ON/OFF.
Rotate to adjust Volume
Press to enter Phone ModePress to select FM/
AM modes Press to select
Sirius™ mode
Press to display the
eSERVICES/INFO/
SETTINGS modes Press to select CD/MP3/
USB/iPod
®/A u x m o d e Indicates that a CD has
been inserted
Press to change Radio/
Sirius™ Stations/CD/
MP3/USB/iPod
® files Press to display the Map
screen for the current
position/Voice mode
Press to display the
Destination menu screen
Press to display the
Route menu screen Press to eject CD
Press to access Clock
Display. Press and hold
to enter Clock Setup
Press to select previous/next Radio/
Sirius™ stations /CD tracks/MP3/USB/
iPod
® files. Press and hold to move
quickly through stations/tracks/files
Insert CD
Navigation Audio
System Videos
To view a video on your
mobile device, SNAP this
QR code or visit the listed
website.
Refer to page 2 for more
information.
QR CODEhttp://kutechvideos.com/audio/
nav_eServices
REMINDER: Your vehicle’s audio system may differ from that in the
illustration. See your Owner’s Manual for more details.
Rotate to change Radio/
Sirius™ Station/
CD/MP3 file
Page 26 of 46
OPTIMA
FEATURES & FUNCTIONS GUIDE
24
*IF EQUIPPED
AUDIO SYSTEM
DISP
FM/AM
SAT
MEDIAeServices
PHONE
SETUP
ENTER TUNE
FILE POWER
PUSH
VOL
Bluetooth
®
SEEK
TRACKCATEGORY
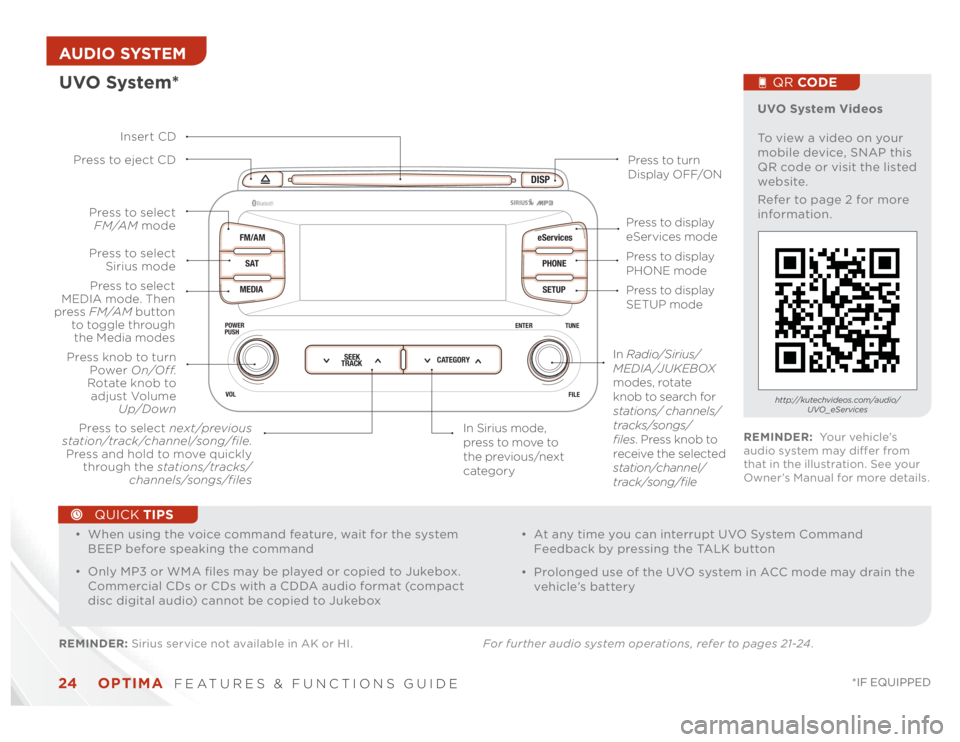
UVO System*REMINDER: Sirius service not available in AK or HI. For further audio system operations, refer to pages 21-24 .
Press to eject CD
Press to turn
Display OFF/ON
Press to display
PHONE mode
Press to display
SETUP mode Press to display
eServices mode
In Sirius mode,
press to move to
the previous/next
category Press to select next/previous
station/track/channel/song/file.
Press and hold to move quickly
through the stations/tracks/
channels/songs/filesPress knob to turn
Power On/Off.
Rotate knob to
adjust Volume
Up/Down
Press to select
MEDIA mode. Then
press FM/AM button
to toggle through
the Media modesPress to select
Sirius modePress to select
FM/AM mode
In Radio/Sirius/
MEDIA/JUKEBOX
modes, rotate
knob to search for
stations/ channels/
tracks/songs/
files. Press knob to
receive the selected
station/channel/
track/song/file Insert CD
UVO System Videos
To view a video on your
mobile device, SNAP this
QR code or visit the listed
website.
Refer to page 2 for more
information.
QR CODEhttp://kutechvideos.com/audio/
UVO_eServices
REMINDER: Yo u r v e h i c l e ’s
audio system may differ from
that in the illustration. See your
Owner’s Manual for more details.
•
• When using the voice command feature, wait for the system
BEEP before speaking the command
• Only MP3 or WMA files may be played or copied to Jukebox.
Commercial CDs or CDs with a CDDA audio format (compact
disc digital audio) cannot be copied to Jukebox
• At any time you can interrupt UVO System Command
Feedback by pressing the TALK button
• Prolonged use of the UVO system in ACC mode may drain the
vehicle’s battery
QUICK TIPS
Page 27 of 46
25
ALWAYS CHECK THE OWNER’S MANUAL FOR COMPLETE OPERATING INFORMATION AND SAFET Y WARNINGS.
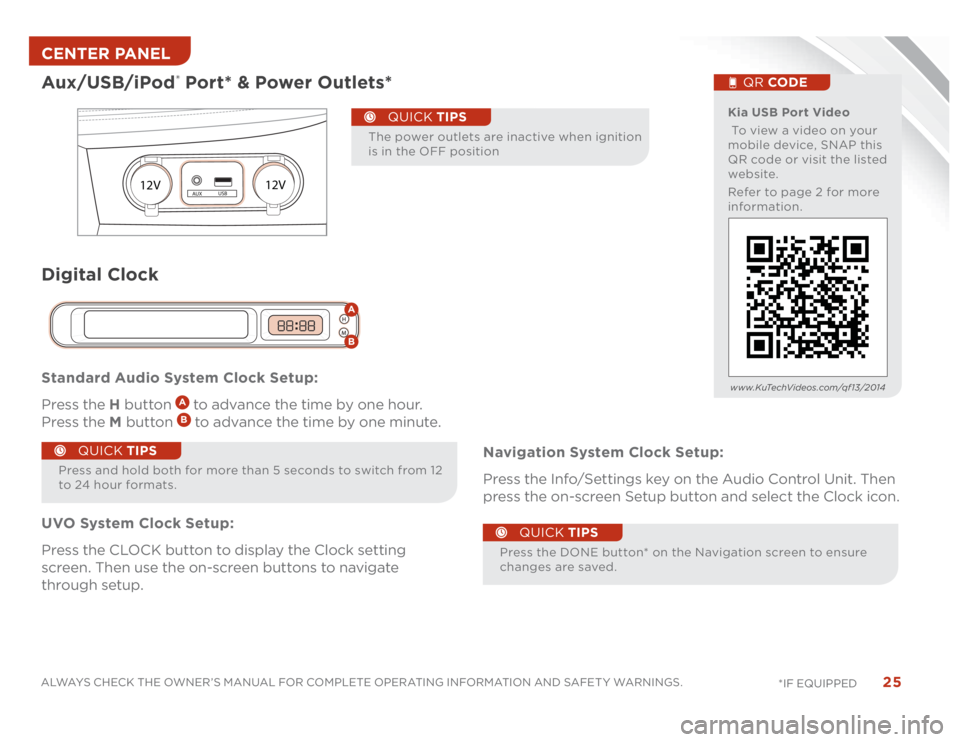
*IF EQUIPPED Standard Audio System Clock Setup:
Press the H button
A to advance the time by one hour.
Press the M button B to advance the time by one minute.
UVO System Clock Setup:
Press the CLOCK button to display the Clock setting
screen. Then use the on-screen buttons to navigate
through setup.Navigation System Clock Setup:
Press the Info/Settings key on the Audio Control Unit. Then
press the on-screen Setup button and select the Clock icon.
Aux/USB/iPod
® Port* & Power Outlets*
12V12V
AUXUSB
Kia USB Port Video
To view a video on your
mobile device, SNAP this
QR code or visit the listed
website.
Refer to page 2 for more
information.
QR CODE
www.KuTechVideos.com/qf13/2014
Press and hold both for more than 5 seconds to switch from 12
to 24 hour formats.
QUICK TIPS
Press the DONE button* on the Navigation screen to ensure
changes are saved.
Digital Clock
H
MH
MAB
QUICK TIPS
The power outlets are inactive when ignition
is in the OFF position
QUICK TIPS
CENTER PANEL
Page 31 of 46

29
ALWAYS CHECK THE OWNER’S MANUAL FOR COMPLETE OPERATING INFORMATION AND SAFET Y WARNINGS.
*IF EQUIPPED SEATING
Seatback Lumbar Seat forward/
backwardSeat Cushion
Driver Position Memory System*To store a seating position into memory, first place the
shifter into P (Park) while the ignition switch is ON. Then:
1. Adjust the driver’s seat
2. Press the SET button
A on the control panel. System
will beep once
3. Press one of the memory buttons
B within 5 seconds. The
system will beep twice when memory has been stored
4. “Driver (1 or 2) set is memorized” will appear on the
instrument cluster LCD display
Power Adjustable Driver’s Seat*Move/Press controls to adjust Seat forward/backward, Seat Cushion, Seatback or Lumbar
B
C
A
A
B
C
A
SET
1
2
AB
Driver Position Memory
System Video
To view a video on your
mobile device, SNAP this
QR code or visit the listed
website.
Refer to page 2 for more
information.
QR CODE
www.KuTechVideos.com/qf13/2014