2014 KIA CEED instrument panel
[x] Cancel search: instrument panelPage 797 of 1206

4 113
Features of your vehicle
Headlight position ( )
When the light switch is in the headlight position the head, tail, position, license
and instrument panel lights are ON.
✽✽NOTICE
The ignition switch must be in the ON position to turn on the headlights.
Auto light/AFLS position (if equipped)
When the light switch is in the AUTO light position, the taillights and headlights will
be turned ON or OFF automaticallydepending on the amount of light outside
the vehicle.
If your vehicle is equipped with the adap-
tive front lighting system (AFLS), it will
also operate when the headlamp is ON.
OYN049201
CAUTION
Never place anything over the sensor (1) located on the instru-
ment panel, this will ensure betterauto-light system control.
Don’t clean the sensor using a window cleaner, the cleaner may
leave a light film which couldinterfere with sensor operation.
If your vehicle has window tint or other types of coating on thefront windscreen, the Auto light
system may not work properly.
OED040800
JD RHD 4a(~171).QXP 4/29/2013 12:02 PM Page 113
Page 815 of 1206

4 131
Features of your vehicle
Instrument panel vents
The outlet vents can be opened or closed
separately using the thumbwheel or vent
control lever.
Also, you can adjust the direction of air
delivery from these vents using the vent
control lever as shown.
Temperature control
The temperature control knob allows you
to control the temperature of the airflow
in the vehicle.
To change the temperature:
Turn the knob to the right to increasetemperature.
Turn the knob to the left to decrease temperature.
Air intake control
The air intake control is used to select the outside (fresh) air position or recircu-lated air position.
To change the air intake control position,
press the control button.
OJD042105
OJD042107R
OJD042108R
OJD042106
JD RHD 4a(~171).QXP 4/29/2013 12:03 PM Page 131
Page 826 of 1206

Features of your vehicle
142
4
Instrument panel vents
The outlet vents can be opened or closed
separately using the thumbwheel or vent
control lever.
Also, you can adjust the direction of air
delivery from these vents using the vent
control lever as shown.
Temperature control
The temperature will increase to the
maximum (HI) by turning the knob to the
right extremely.
The temperature will decrease to the
minimum (Lo) by turning the knob to the
left extremely.
When turning the knob, the temperature
will increase or decrease by 0.5°C/1°F.
When set to the lowest temperature set-
ting, the air conditioning will operate con-
tinuously.
Operate the driver’s side temperature
control to adjust the driver side tempera-
ture. Operate the passenger’s side tem-
perature control to adjust the passenger
side temperature. Adjusting the driver and passenger sidetemperature individually
1. Press the DUAL button to operate the
driver and passenger side temperature
individually. Also, if the passenger side
temperature control knob is operated,it will automatically change to the
DUAL mode as well.
2. Operate the driver side temperature control to adjust the driver side tem-
perature. Operate the passenger side
temperature control to adjust the pas-
senger side temperature.
When the driver side temperature is set
to the highest (HIGH) or lowest (LOW)
temperature, the DUAL mode deacti-
vates for maximum heating or cooling.
OJD042113
■ Driver’s side■Passenger’s side
OJD042112
OJD042107R
OJD042108R
JD RHD 4a(~171).QXP 4/29/2013 12:04 PM Page 142
Page 1023 of 1206

Driving your vehicle
74
5
Turn signals when towing a trailer
When you tow a trailer, your vehicle has
to have a different turn signal flasher and
extra wiring. The green arrows on your
instrument panel will flash whenever you
signal a turn or lane change. Properly
connected, the trailer lights will also flash
to alert other drivers you’re about to turn,
change lanes, or stop.
When towing a trailer, the green arrows
on your instrument panel will flash for
turns even if the bulbs on the trailer are
burned out. Thus, you may think drivers
behind you are seeing your signals
when, in fact, they are not. It is important
to check occasionally to be sure the trail-
er bulbs are still working. You must also
check the lights every time you discon-
nect and then reconnect the wires.
Do not connect a trailer lighting system
directly to your vehicle’s lighting system.
Use only an approved trailer wiring har-
ness.
An authorised Kia dealer can assist you
in installing the wiring harness.
Driving on grades
Reduce speed and shift to a lower gear
before you start down a long or steep
downgrade. If you don’t shift down, you
might have to use your brakes so much
that they would get hot and no longer
operate efficiently.
On a long uphill grade, shift down and
reduce your speed to around 70 km/h (45mph) to reduce the possibility of engine
and transaxle overheating.
If your trailer weighs more than the max-
imum trailer weight without trailer brakes
and you have an automatic transaxle,
you should drive in D (Drive) when tow-
ing a trailer.
Operating your vehicle in D (Drive) when
towing a trailer will minimize heat build up
and extend the life of your transaxle.
WARNING
Failure to use an approved trailer wiring harness could result in dam-
age to the vehicle electrical system
and/or personal injury.
CAUTION
When towing a trailer on steep grades (in excess of 6%) pay close
attention to the engine coolant temperature gauge to ensure theengine does not overheat.
If the coolant temperature redwarning light illuminates or the coolant temperature gauge movestowards “130”, pull over and stop as soon as it is safe to do so, and
allow the engine to idle until it cools down. You may proceed oncethe engine has cooled sufficiently.
You must decide driving speed depending on trailer weight anduphill grade to reduce the possi- bility of engine and transaxleoverheating.
JD RHD 5.QXP 4/29/2013 11:28 AM Page 74
Page 1052 of 1206

623
What to do in an emergency
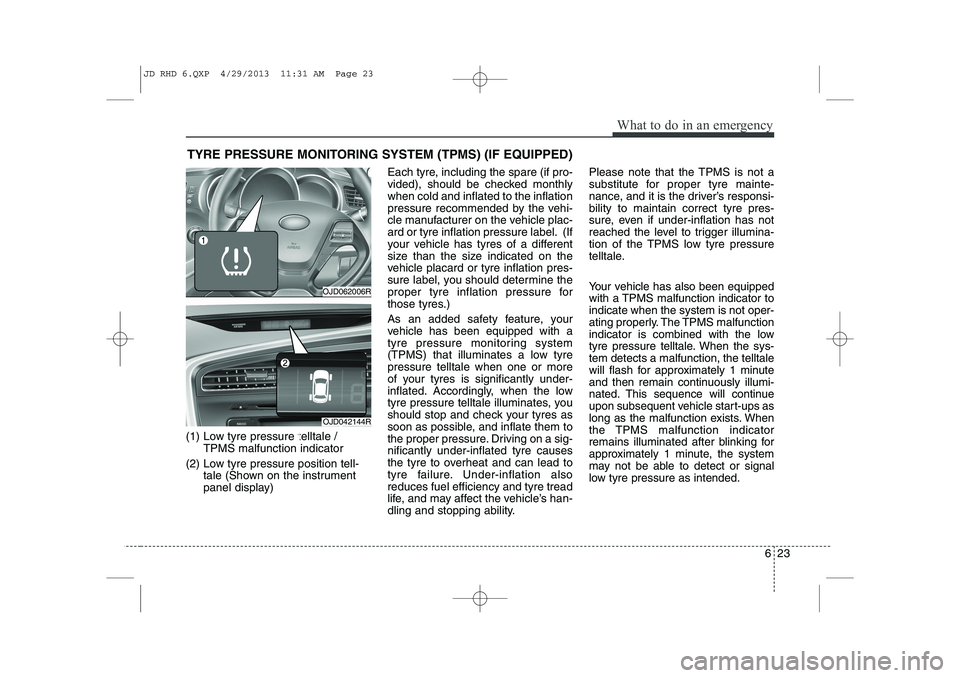
TYRE PRESSURE MONITORING SYSTEM (TPMS) (IF EQUIPPED)
(1) Low tyre pressure telltale / TPMS malfunction indicator
(2) Low tyre pressure position tell- tale (Shown on the instrument
panel display) Each tyre, including the spare (if pro-
vided), should be checked monthlywhen cold and inflated to the inflation
pressure recommended by the vehi-
cle manufacturer on the vehicle plac-
ard or tyre inflation pressure label. (If
your vehicle has tyres of a different
size than the size indicated on the
vehicle placard or tyre inflation pres-
sure label, you should determine the
proper tyre inflation pressure for
those tyres.)
As an added safety feature, your
vehicle has been equipped with a
tyre pressure monitoring system
(TPMS) that illuminates a low tyrepressure telltale when one or more
of your tyres is significantly under-
inflated. Accordingly, when the low
tyre pressure telltale illuminates, you
should stop and check your tyres as
soon as possible, and inflate them to
the proper pressure. Driving on a sig-nificantly under-inflated tyre causes
the tyre to overheat and can lead to
tyre failure. Under-inflation alsoreduces fuel efficiency and tyre tread
life, and may affect the vehicle’s han-
dling and stopping ability. Please note that the TPMS is not a
substitute for proper tyre mainte-
nance, and it is the driver’s responsi-bility to maintain correct tyre pres-
sure, even if under-inflation has not
reached the level to trigger illumina-
tion of the TPMS low tyre pressure
telltale.
Your vehicle has also been equipped
with a TPMS malfunction indicator toindicate when the system is not oper-
ating properly. The TPMS malfunction
indicator is combined with the low
tyre pressure telltale. When the sys-tem detects a malfunction, the telltale
will flash for approximately 1 minute
and then remain continuously illumi-
nated. This sequence will continue
upon subsequent vehicle start-ups as
long as the malfunction exists. When
the TPMS malfunction indicator
remains illuminated after blinking for
approximately 1 minute, the system
may not be able to detect or signal
low tyre pressure as intended.
OJD062006R
OJD042144R
JD RHD 6.QXP 4/29/2013 11:31 AM Page 23
Page 1133 of 1206

Maintenance
72
7
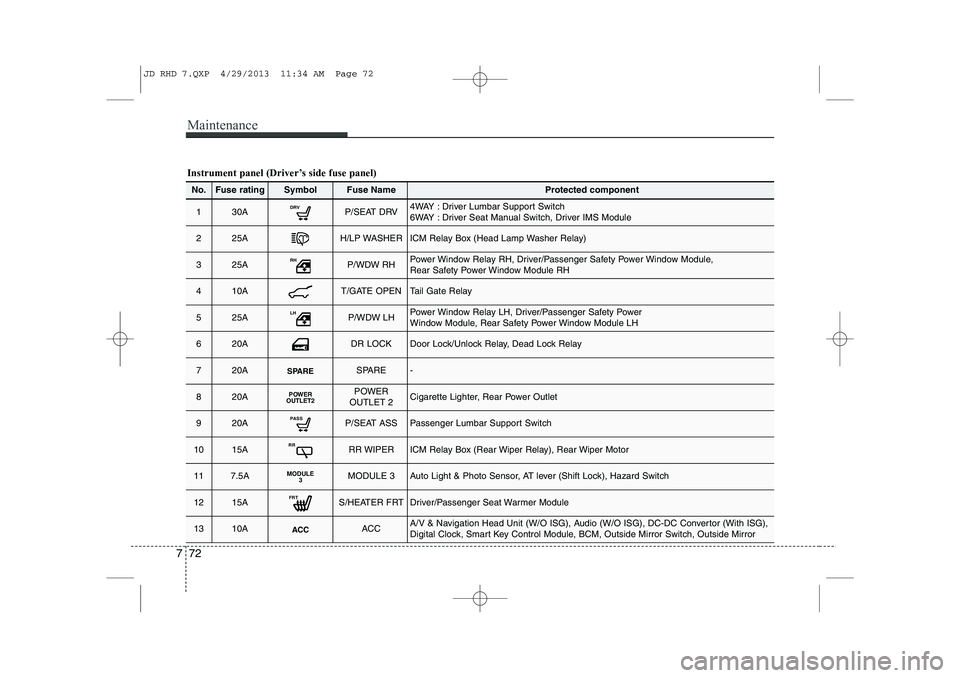
Instrument panel (Driver’s side fuse panel)
No.Fuse ratingSymbolFuse NameProtected component
130ADRVP/SEAT DRV4WAY : Driver Lumbar Support Switch
6WAY : Driver Seat Manual Switch, Driver IMS Module
225AH/LP WASHERICM Relay Box (Head Lamp Washer Relay)
325ARHP/WDW RHPower Window Relay RH, Driver/Passenger Safety Power Window Module,
Rear Safety Power Window Module RH
410AT/GATE OPENTail Gate Relay
525ALHP/WDW LHPower Window Relay LH, Driver/Passenger Safety Power
Window Module, Rear Safety Power Window Module LH
620ADR LOCKDoor Lock/Unlock Relay, Dead Lock Relay
720ASPARESPARE-
820APOWER
OUTLET2POWER
OUTLET 2Cigarette Lighter, Rear Power Outlet
920APASSP/SEAT ASSPassenger Lumbar Support Switch
1015ARRRR WIPERICM Relay Box (Rear Wiper Relay), Rear Wiper Motor
117.5AMODULE 3MODULE 3Auto Light & Photo Sensor, AT lever (Shift Lock), Hazard Switch
1215AFRTS/HEATER FRTDriver/Passenger Seat Warmer Module
1310AACCACCA/V & Navigation Head Unit (W/O ISG), Audio (W/O ISG), DC-DC Convertor (With ISG),
Digital Clock, Smart Key Control Module, BCM, Outside Mirror Switch, Outside Mirror
JD RHD 7.QXP 4/29/2013 11:34 AM Page 72
Page 1197 of 1206

Index
4
I
Cooling fluid, see engine coolant . . . . . . . . . . . . . . . . 7-40
Crankcase emission control system . . . . . . . . . . . . . 7-116
Cruise control system . . . . . . . . . . . . . . . . . . . . . . . . . 5-51
Cup holder . . . . . . . . . . . . . . . . . . . . . . . . . . . . . . . . . 4-157
Curtain air bag . . . . . . . . . . . . . . . . . . . . . . . . . . . . . . 3-56 Dashboard illumination, see instrument panel
illumination (Normal vision) . . . . . . . . . . . . . . . . . . 4-47
Dashboard illumination, see instrument panel illumination (Super vision) . . . . . . . . . . . . . . . . . . . 4-61
Dashboard, see instrument cluster (Normal vision) . . 4-46
Dashboard, see instrument cluster (Super vision) . . . 4-59
Daytime running light (DRL) . . . . . . . . . . . . . . . . . 4-116
Deadlocks . . . . . . . . . . . . . . . . . . . . . . . . . . . . . . . . . . . 4-20
Declaration of conformity . . . . . . . . . . . . . . . . . . . . . 8-13
Defogging (Windscreen) . . . . . . . . . . . . . . . . . . . . . . 4-149
Defroster (Rear window) . . . . . . . . . . . . . . . . . . . . . 4-127
Defrosting (Windscreen) . . . . . . . . . . . . . . . . . . . . . 4-149
Dimensions. . . . . . . . . . . . . . . . . . . . . . . . . . . . . . . . . . . 8-2Display illumination, see instrument panel illumination (Normal vision) . . . . . . . . . . . . . . . . . . . . . . . . . . . . . 4-47
Display illumination, see instrument panel illumination (Super vision) . . . . . . . . . . . . . . . . . . . . . . . . . . . . . . 4-61
Displays, see instrument cluster (Normal vision) . . 4-46
Displays, see instrument cluster (Super vision) . . . . 4-59
Door locks . . . . . . . . . . . . . . . . . . . . . . . . . . . . . . . . . . 4-20 Central door lock switch . . . . . . . . . . . . . . . . . . . . . 4-19
Child-protector rear door lock . . . . . . . . . . . . . . . . 4-21
Deadlocks. . . . . . . . . . . . . . . . . . . . . . . . . . . . . . . . . . 4-20
Double clutch transmission shift indicator (Normal vision) . . . . . . . . . . . . . . . . . . . . . . . . . . . . . 4-49
Double clutch transmission shift indicator (Super vision) . . . . . . . . . . . . . . . . . . . . . . . . . . . . . . 4-64
Drinks holders, see cup holders. . . . . . . . . . . . . . . . 4-157
Driver position memory system. . . . . . . . . . . . . . . . . . 3-8
Driver's and passenger's front air bag . . . . . . . . . . . 3-50
Driving at night . . . . . . . . . . . . . . . . . . . . . . . . . . . . . . 5-65
Driving in flooded areas . . . . . . . . . . . . . . . . . . . . . . . 5-66
Driving in the rain . . . . . . . . . . . . . . . . . . . . . . . . . . . 5-65
Driving information mode . . . . . . . . . . . . . . . . . . . . . 4-65
Driving off-road . . . . . . . . . . . . . . . . . . . . . . . . . . . . . 5-66
DS mode . . . . . . . . . . . . . . . . . . . . . . . . . . . . . . . . . . . . 5-27
Economical operation . . . . . . . . . . . . . . . . . . . . . . . . . 5-62
Electric chromic mirror (ECM) . . . . . . . . . . . . . . . . 4-42
Electric parking brake (EPB) . . . . . . . . . . . . . . . . . . 5-37
Electric power steering . . . . . . . . . . . . . . . . . . . . . . . . 4-37
Electronic stability control (ESC) . . . . . . . . . . . . . . . 5-44
Emergency commodity . . . . . . . . . . . . . . . . . . . . . . . . 6-32
Emergency starting. . . . . . . . . . . . . . . . . . . . . . . . . . . . 6-5
Jump starting . . . . . . . . . . . . . . . . . . . . . . . . . . . . . . . 6-5
Push starting . . . . . . . . . . . . . . . . . . . . . . . . . . . . . . . . 6-7
E
D
JD RHD Index.QXP 4/29/2013 11:42 AM Page 4
Page 1199 of 1206

Index
6
I
Fuse switch . . . . . . . . . . . . . . . . . . . . . . . . . . . . . . . . 7-68
Fuse/relay panel description . . . . . . . . . . . . . . . . . . 7-71
Inner panel fuse . . . . . . . . . . . . . . . . . . . . . . . . . . . . 7-67
Main fuse . . . . . . . . . . . . . . . . . . . . . . . . . . . . . . . . . . 7-69
Multi fuse. . . . . . . . . . . . . . . . . . . . . . . . . . . . . . . . . . 7-70
Gauge (Normal vision) Engine coolant temperature gauge . . . . . . . . . . . . . 4-48
Fuel gauge . . . . . . . . . . . . . . . . . . . . . . . . . . . . . . . . . 4-48
Gauge (Super vision)
Engine coolant temperature gauge . . . . . . . . . . . . 4-63
Fuel gauge . . . . . . . . . . . . . . . . . . . . . . . . . . . . . . . . . 4-62
Glove box . . . . . . . . . . . . . . . . . . . . . . . . . . . . . . . . . . 4-153
Glove box lamp . . . . . . . . . . . . . . . . . . . . . . . . . . . . . 4-125
Hazard warning flasher . . . . . . . . . . . . . . . . . . . . . . 4-110
Hazardous driving conditions . . . . . . . . . . . . . . . . . . 5-64
Headlamp delay function . . . . . . . . . . . . . . . . . . . . . 4-111
Headlight (Headlamp) welcome function . . . . . . . . 4-111
Headlight bulb replacement. . . . . . . . . . . . . . . . . . . . 7-90
Headlight leveling device . . . . . . . . . . . . . . . . . . . . . 4-117
Headlight position . . . . . . . . . . . . . . . . . . . . . . . . . . . 4-113
Headlight washer . . . . . . . . . . . . . . . . . . . . . . . . . . . 4-122
Headrest(front) . . . . . . . . . . . . . . . . . . . . . . . . . . . . . . 3-10 Headrest(rear) . . . . . . . . . . . . . . . . . . . . . . . . . . . . . . . 3-14
Heated steering wheel. . . . . . . . . . . . . . . . . . . . . . . . . 4-38
High - beam operation . . . . . . . . . . . . . . . . . . . . . . . 4-114
Hight adjustment (seat belt) . . . . . . . . . . . . . . . . . . . 3-23
Highway driving . . . . . . . . . . . . . . . . . . . . . . . . . . . . . 5-66
Hill-start assist control (HAC). . . . . . . . . . . . . . . . . . 5-48
Horn . . . . . . . . . . . . . . . . . . . . . . . . . . . . . . . . . . . . . . . 4-39
How to use this manual . . . . . . . . . . . . . . . . . . . . . . . . 1-2
Icy road warning . . . . . . . . . . . . . . . . . . . . . . . . . . . . . 4-91
Indicators and warnings . . . . . . . . . . . . . . . . . . . . . . 4-79
Inside rearview mirror . . . . . . . . . . . . . . . . . . . . . . . . 4-42Instrument cluster
LCD display information . . . . . . . . . . . . . . . . . . . . . 4-73
Warning and indicators . . . . . . . . . . . . . . . . . . . . . . 4-79
Instrument cluster (Normal vision). . . . . . . . . . . . . . 4-46 Automatic transaxle shift position indicator . . . . . 4-49
Double clutch transmission shift indicator . . . . . . 4-50
Fuel gauge . . . . . . . . . . . . . . . . . . . . . . . . . . . . . . . . . 4-48
Instrument panel illumination . . . . . . . . . . . . . . . . 4-47
Manual transaxle shift indicator. . . . . . . . . . . . . . . 4-49
Odometer . . . . . . . . . . . . . . . . . . . . . . . . . . . . . . . . . . 4-51
Speed limiter indicator. . . . . . . . . . . . . . . . . . . . . . . 4-50
Speedometer . . . . . . . . . . . . . . . . . . . . . . . . . . . . . . . 4-47
Tachometer . . . . . . . . . . . . . . . . . . . . . . . . . . . . . . . . 4-47
G
H
I
JD RHD Index.QXP 4/29/2013 11:42 AM Page 6