2014 KIA CEED headlight
[x] Cancel search: headlightPage 1070 of 1206
79
Maintenance
At least monthly:
Check coolant level in the enginecoolant reservoir.
Check the operation of all exterior lights, including the stoplights, turn sig-
nals and hazard warning flashers.
Check the inflation pressures of all tyres including the spare.
At least twice a year
(i.e., every Spring and Fall) :
Check radiator, heater and air condi- tioning hoses for leaks or damage.
Check windscreen washer spray and wiper operation. Clean wiper blades
with clean cloth dampened with wash-er fluid.
Check headlight alignment.
Check muffler, exhaust pipes, shields and clamps.
Check the lap/shoulder belts for wear and function.
Check for worn tyres and loose wheel lug nuts.
At least once a year :
Clean body and door drain holes.
Lubricate door hinges and checks, andbonnet hinges.
Lubricate door and bonnet locks and latches.
Lubricate door rubber weatherstrips.
Check the air conditioning system.
Inspect and lubricate automatic transaxle linkage and controls.
Clean battery and terminals.
Check the brake (and clutch) fluid level.
JD RHD 7.QXP 4/29/2013 11:32 AM Page 9
Page 1114 of 1206
753
Maintenance
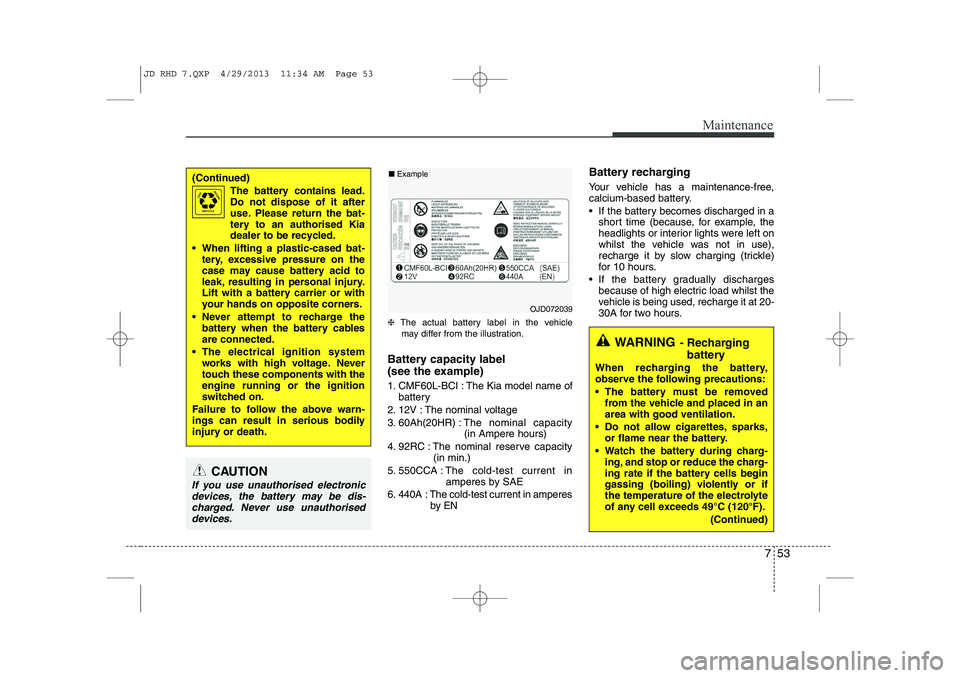
❈The actual battery label in the vehicle
may differ from the illustration.
Battery capacity label
(see the example)
1. CMF60L-BCI : The Kia model name of battery
2. 12V : The nominal voltage
3. 60Ah(20HR) : The nominal capacity
(in Ampere hours)
4. 92RC : The nominal reserve capacity (in min.)
5. 550CCA : The cold-test current in
amperes by SAE
6. 440A : The cold-test current in amperes by EN Battery recharging
Your vehicle has a maintenance-free,
calcium-based battery.
If the battery becomes discharged in a
short time (because, for example, the
headlights or interior lights were left on
whilst the vehicle was not in use),
recharge it by slow charging (trickle)
for 10 hours.
If the battery gradually discharges because of high electric load whilst the
vehicle is being used, recharge it at 20-
30A for two hours.
(Continued)
The battery contains lead.
Do not dispose of it after
use. Please return the bat-
tery to an authorised Kia
dealer to be recycled.
When lifting a plastic-cased bat- tery, excessive pressure on the
case may cause battery acid to
leak, resulting in personal injury.
Lift with a battery carrier or with
your hands on opposite corners.
Never attempt to recharge the battery when the battery cablesare connected.
The electrical ignition system works with high voltage. Never
touch these components with theengine running or the ignition
switched on.
Failure to follow the above warn-
ings can result in serious bodily
injury or death.
CAUTION
If you use unauthorised electronic devices, the battery may be dis- charged. Never use unauthoriseddevices.
OJD072039
WARNING - Recharging
battery
When recharging the battery,
observe the following precautions:
The battery must be removed from the vehicle and placed in an area with good ventilation.
Do not allow cigarettes, sparks, or flame near the battery.
Watch the battery during charg- ing, and stop or reduce the charg-
ing rate if the battery cells begin
gassing (boiling) violently or if
the temperature of the electrolyte
of any cell exceeds 49°C (120°F).
(Continued)
■Example
JD RHD 7.QXP 4/29/2013 11:34 AM Page 53
Page 1121 of 1206
Maintenance
60
7
Compact spare tyre replacement
(if equipped)
A compact spare tyre has a shorter
tread life than a regular size tyre.
Replace it when you can see the
tread wear indicator bars on the tyre.The replacement compact spare tyre
should be the same size and design
tyre as the one provided with your
new vehicle and should be mountedon the same compact spare tyre
wheel. The compact spare tyre is notdesigned to be mounted on a regular
size wheel, and the compact spare
tyre wheel is not designed for mount-
ing a regular size tyre. Wheel replacement
When replacing the metal wheels for
any reason, make sure the new
wheels are equivalent to the original
factory units in diameter, rim widthand offset.
(Continued)
The use of any other tyre size
or type may seriously affect
ride, handling, ground clear-
ance, stopping distance, body
to tyre clearance, snow tyre
clearance, and speedometer
reliability.
It is best to replace all four tyres at the same time. If that
is not possible, or necessary,
then replace the two front or
two rear tyres as a pair.Replacing just one tyre can
seriously affect your vehicle’shandling.
The ABS works by comparing the speed of the wheels. Tyre
size can affect wheel speed.
When replacing tyres, all 4
tyres must use the same size
originally supplied with the
vehicle. Using tyres of a dif-
ferent size can cause the ABS
(Anti-lock Brake System) and
ESC (Electronic Stability
Control) to work irregularly.
WARNING
A wheel that is not the correct
size may adversely affect wheel
and bearing life, braking and
stopping abilities, handling
characteristics, ground clear-
ance, body-to-tyre clearance,
snow chain clearance,speedometer and odometer cal-
ibration, headlight aim and
bumper height.
JD RHD 7.QXP 4/29/2013 11:34 AM Page 60
Page 1128 of 1206
767
Maintenance
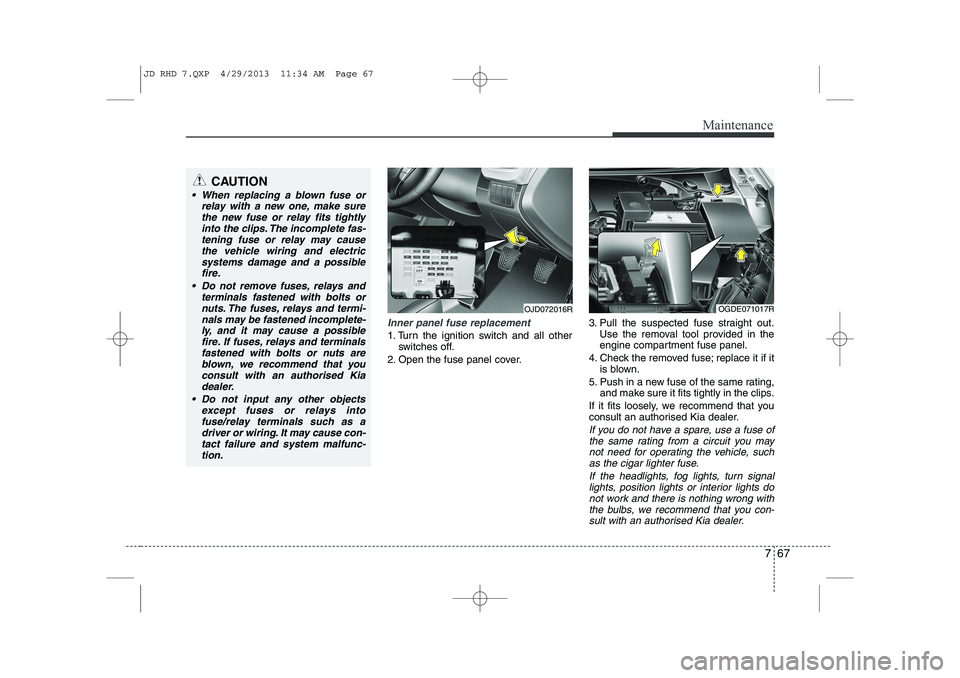
Inner panel fuse replacement
1. Turn the ignition switch and all otherswitches off.
2. Open the fuse panel cover. 3. Pull the suspected fuse straight out.
Use the removal tool provided in the
engine compartment fuse panel.
4. Check the removed fuse; replace it if it is blown.
5. Push in a new fuse of the same rating, and make sure it fits tightly in the clips.
If it fits loosely, we recommend that you
consult an authorised Kia dealer.
If you do not have a spare, use a fuse of the same rating from a circuit you may
not need for operating the vehicle, suchas the cigar lighter fuse.
If the headlights, fog lights, turn signallights, position lights or interior lights do not work and there is nothing wrong with
the bulbs, we recommend that you con- sult with an authorised Kia dealer.
OJD072016ROGDE071017R
CAUTION
When replacing a blown fuse or relay with a new one, make sure
the new fuse or relay fits tightlyinto the clips. The incomplete fas-tening fuse or relay may cause the vehicle wiring and electric
systems damage and a possiblefire.
Do not remove fuses, relays and terminals fastened with bolts or
nuts. The fuses, relays and termi-nals may be fastened incomplete-ly, and it may cause a possiblefire. If fuses, relays and terminals
fastened with bolts or nuts areblown, we recommend that youconsult with an authorised Kia
dealer.
Do not input any other objects except fuses or relays intofuse/relay terminals such as adriver or wiring. It may cause con-
tact failure and system malfunc-tion.
JD RHD 7.QXP 4/29/2013 11:34 AM Page 67
Page 1150 of 1206
789
Maintenance
LIGHT BULBS
Use only the bulbs of the specifiedwattage.
✽✽ NOTICE
After driving in heavy rain or washing the vehicle, headlight and taillight lenses
could appear foggy. This condition is
caused by the temperature differencebetween the lamp inside and outside.
This is similar to the condensation on
your windows inside your vehicle during
rain and does not indicate a problem
with your vehicle. If the water leaks into
the lamp bulb circuitry, we recommendthat the system be checked by an autho-
rised Kia dealer.WARNING - Working on
the lights
Prior to working on the light, firmly
apply the parking brake, ensure
that the ignition switch is turned to
the “LOCK” position (smart key:turn off the engine) and turn off the
lights to avoid sudden movement
of the vehicle and burning your fin-
gers or getting an electric shock.
CAUTION
Be sure to replace the burned-out bulb with one of the same wattage rating. Otherwise, it may causedamage to the fuse or electricwiring system.
CAUTION
If you do not have necessary tools, the correct bulbs and the
expertise, we recommend thatyou consult an authorised Kiadealer. In many cases, it is diffi-cult to replace vehicle light bulbs
because other parts of the vehiclemust be removed before you can get to the bulb. This is especially
true if you have to remove the headlight assembly to get to thebulb(s).
Removing/installing the headlightassembly can result in damage to
the vehicle.
Do not install additional bulb or LED. If you install that, the lampmay not be operated properly and
fuse box or electric wiring system may have problem.
JD RHD 7.QXP 4/29/2013 11:36 AM Page 89
Page 1151 of 1206
Maintenance
90
7
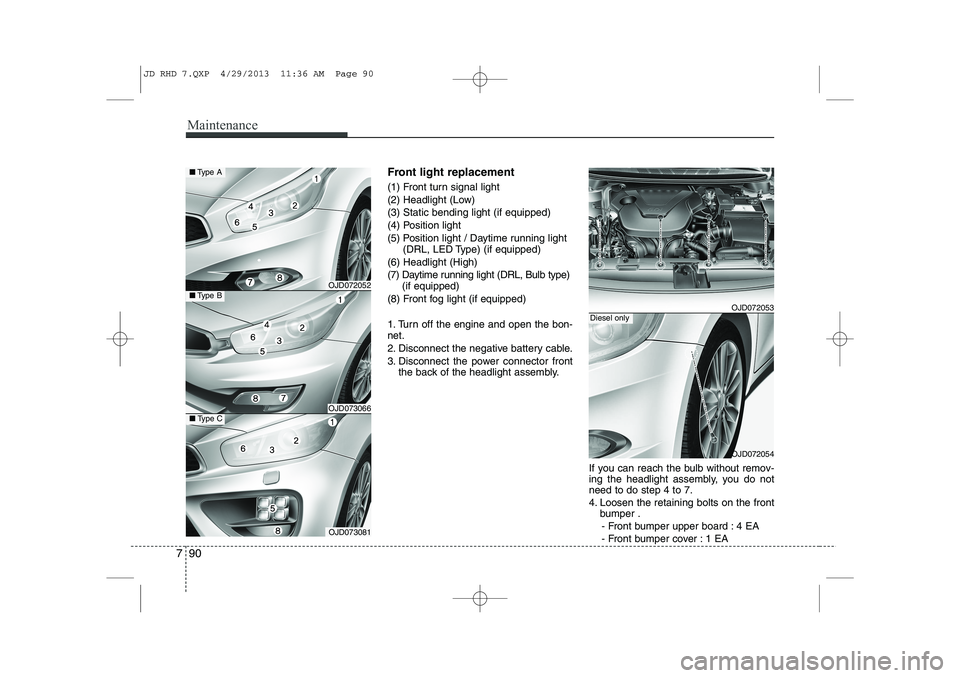
Front light replacement
(1) Front turn signal light
(2) Headlight (Low)(3) Static bending light (if equipped)
(4) Position light
(5) Position light / Daytime running light
(DRL, LED Type) (if equipped)
(6) Headlight (High)
(7) Daytime running light (DRL, Bulb type) (if equipped)
(8) Front fog light (if equipped)
1. Turn off the engine and open the bon- net.
2. Disconnect the negative battery cable.
3. Disconnect the power connector front the back of the headlight assembly.
If you can reach the bulb without remov-
ing the headlight assembly, you do notneed to do step 4 to 7.
4. Loosen the retaining bolts on the frontbumper .
- Front bumper upper board : 4 EA
- Front bumper cover : 1 EA
OJD072053
OJD072054
Diesel only
OJD072052
OJD073066
■ Type A
■Type B
OJD073081
■Type C
JD RHD 7.QXP 4/29/2013 11:36 AM Page 90
Page 1152 of 1206
791
Maintenance
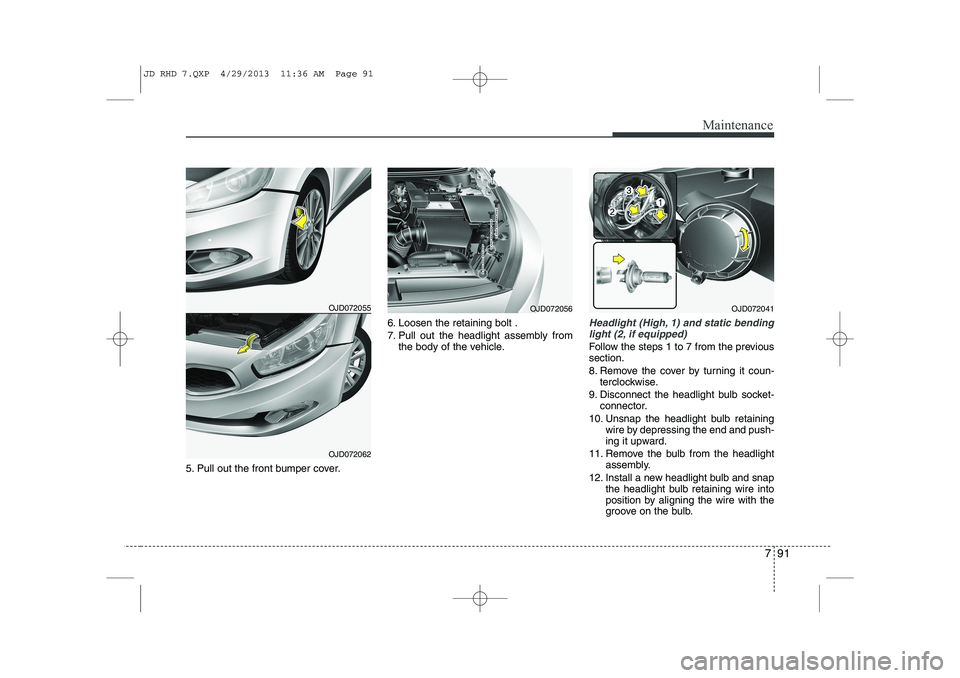
5. Pull out the front bumper cover.6. Loosen the retaining bolt .
7. Pull out the headlight assembly from
the body of the vehicle.
Headlight (High, 1) and static bending
light (2, if equipped)
Follow the steps 1 to 7 from the previous section.
8. Remove the cover by turning it coun- terclockwise.
9. Disconnect the headlight bulb socket- connector.
10. Unsnap the headlight bulb retaining wire by depressing the end and push-
ing it upward.
11. Remove the bulb from the headlight assembly.
12. Install a new headlight bulb and snap the headlight bulb retaining wire into
position by aligning the wire with the
groove on the bulb.
OJD072041OJD072055
OJD072062
OJD072056
JD RHD 7.QXP 4/29/2013 11:36 AM Page 91
Page 1153 of 1206
Maintenance
92
7
13. Connect the headlight bulb socket
connector.
14. Install the headlight bulb cover by turning it clockwise.
15. Connect the power connector to the back of the headlight assembly.
Position light (3, bulb type)
Follow the steps 1 to 9 from the previous
page.
10. Pull out the socket from the assembly.
11. Pull the bulb out of the socket.
12. Insert a new bulb into the socket.
13. Install the socket into the assembly.
14. Install the headlight bulb cover byturning it clockwise.
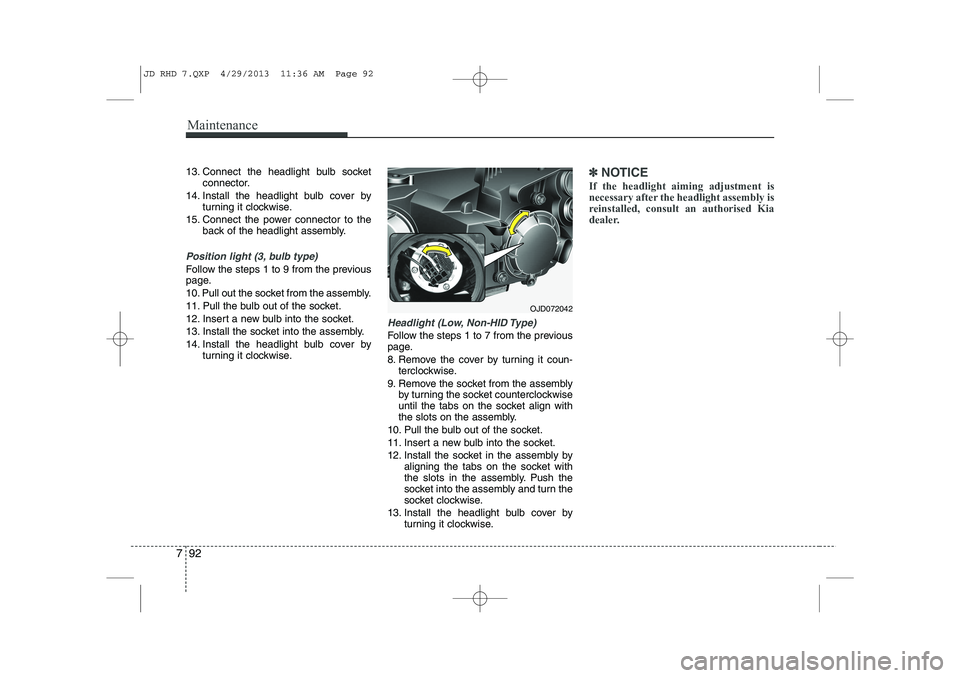
Headlight (Low, Non-HID Type)
Follow the steps 1 to 7 from the previous
page.
8. Remove the cover by turning it coun-terclockwise.
9. Remove the socket from the assembly by turning the socket counterclockwise
until the tabs on the socket align with
the slots on the assembly.
10. Pull the bulb out of the socket.
11. Insert a new bulb into the socket.
12. Install the socket in the assembly by aligning the tabs on the socket with
the slots in the assembly. Push the
socket into the assembly and turn the
socket clockwise.
13. Install the headlight bulb cover by turning it clockwise.
✽✽NOTICE
If the headlight aiming adjustment is
necessary after the headlight assembly is
reinstalled, consult an authorised Kia
dealer.
OJD072042
JD RHD 7.QXP 4/29/2013 11:36 AM Page 92