Page 1155 of 1206
Maintenance
94
7
Turn signal light
Follow the steps 1 to 7 from the previous
page.
8. Remove the socket from the assembly
by turning the socket counterclockwise
until the tabs on the socket align with
the slots on the assembly.
9. Remove the bulb from the socket by pressing it in and rotating it counter-
clockwise until the tabs on the bulb
align with the slots in the socket. Pull
the bulb out of the socket.
10. Insert a new bulb by inserting it into the socket and rotating it until it locks
into place. 11. Install the socket in the assembly by
aligning the tabs on the socket with
the slots in the assembly. Push the
socket into the assembly and turn the
socket clockwise.
Front fog light, Daytime running light
(if equipped)
1. Pull the wheel guard down by rotating the screws.
2. Reach your hand into the back of the front bumper.
3. Disconnect the power connector from the socket.
OJD072044OJD072050
JD RHD 7.QXP 4/29/2013 11:36 AM Page 94
Page 1156 of 1206

795
Maintenance
4. Remove the bulb-socket from thehousing by turning the socket counter
clockwise until the tabs on the socketalign with the slots on the housing.
5. Install the new bulb-socket into the housing by aligning the tabs on the
socket with the slots in the housing.
Push the socket into the housing and
turn the socket clockwise.
6. Connect the power connector to the socket. Headlight and front fog light aim-
ing (for Europe)
Headlight aiming
Without AFLS
1. Inflate the tyres to the specified pres-
sure and remove any loads from the
vehicle except the driver, spare tyre,
and tools.
2. The vehicle should be placed on a flat floor.
3. Draw vertical lines (Vertical lines pass- ing through respective head lamp cen-
tres) and a horizontal line (Horizontalline passing through centre of headlamps) on the screen. 4. With the head lamp and battery in nor-
mal condition, aim the head lamps so
the brightest portion falls on the hori-
zontal and vertical lines.
5. To aim the low beam left or right, turn the driver (1) clockwise or counter-
clockwise. To aim the low beam up or
down, turn the driver (2) clockwise or
counterclockwise.
To aim the high beam up or down, turnthe driver (3) clockwise or counter-
clockwise.
OJD072027
■ Fog light
■Fog light+DRL (Bulb type) ■
DRL
OJD073067/OJD073068/OJD073069
JD RHD 7.QXP 4/29/2013 11:36 AM Page 95
Page 1157 of 1206

Maintenance
96
7
With AFLS
1. Turn off the engine
2. Turn the light switch to the low beam
position.
3. Position the tyres straight ahead with the steering wheel.
4. Turn on the engine.
5. Inflate the tyres to the specified pres- sure and remove any loads from the
vehicle except the driver, spare tyre,
and tools.
6. The vehicle should be placed on a flat floor.
7. Draw vertical lines (Vertical lines pass- ing through respective head lamp cen-
tres) and a horizontal line (Horizontalline passing through centre of headlamps) on the screen.
8. With the head lamp and battery in nor- mal condition, aim the head lamps so
the brightest portion falls on the hori-
zontal and vertical lines.
9. To aim the low beam left or right, turn the driver (1) clockwise or counter-
clockwise. To aim the low beam up or
down, turn the driver (2) clockwise or
counterclockwise. To aim the high
beam up or down, turn the driver (3)
clockwise or counterclockwise.Front fog light aiming
The front fog lamp can be aimed as the same manner of the head lamps aiming.
With the front fog lamps and battery nor-
mal condition, aim the front fog lamps. To
aim the front fog lamp up or down, turn
the driver (1) clockwise or counterclock-
wise.
OJD072028
OJD073070
OJD073082
■Type A
■Type B
■Type C
JD RHD 7.QXP 4/29/2013 11:36 AM Page 96
Page 1162 of 1206
7 101
Maintenance
�
OGDE071056-JD
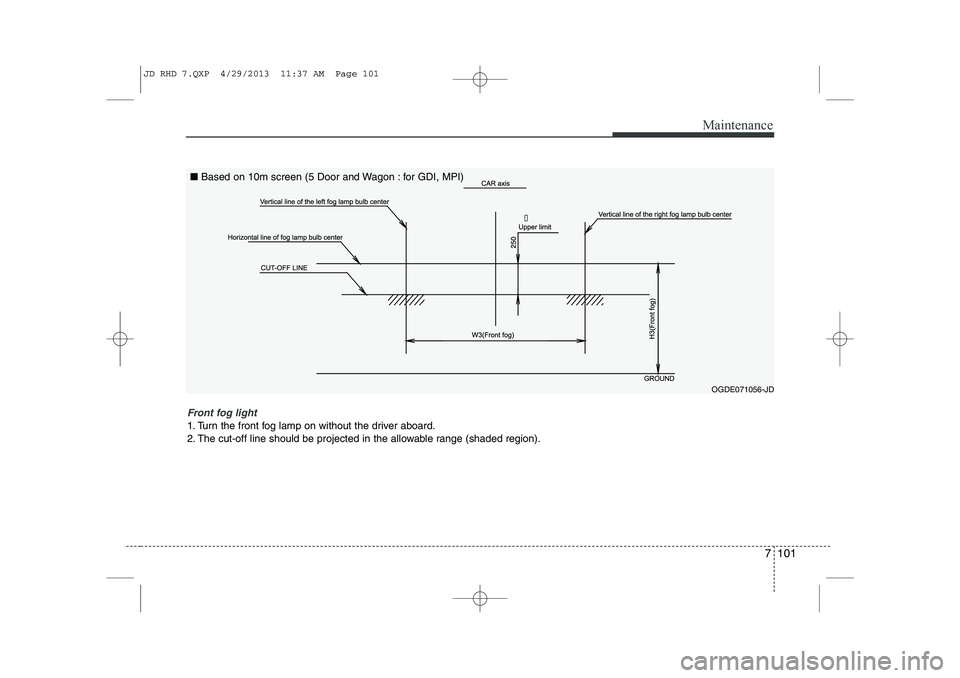
Front fog light
1. Turn the front fog lamp on without the driver aboard.
2. The cut-off line should be projected in the allowable range (shaded region).■
Based on 10m screen (5 Door and Wagon : for GDI, MPI)
JD RHD 7.QXP 4/29/2013 11:37 AM Page 101
Page 1163 of 1206
Maintenance
102
7
�
OGDE071056-JD1
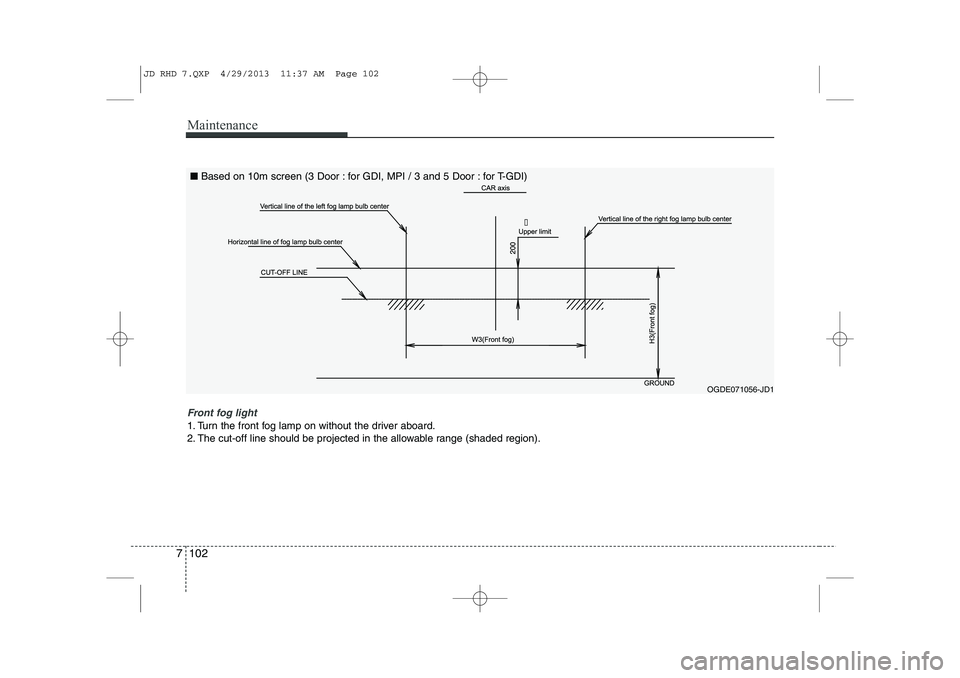
Front fog light
1. Turn the front fog lamp on without the driver aboard.
2. The cut-off line should be projected in the allowable range (shaded region). ■
Based on 10m screen (3 Door : for GDI, MPI / 3 and 5 Door : for T-GDI)
JD RHD 7.QXP 4/29/2013 11:37 AM Page 102
Page 1164 of 1206
7 103
Maintenance
Side repeater light bulb replace- ment
If the light bulb does not operate, we rec-
ommend that the system be checked by
an authorised Kia dealer.(1) Rear turn signal light (2) Stop/tail light
(3) Back-up light (for 3 Door and 5 Door)
(4) Tail light or stop/tail light (for LED type) (5) Rear fog light (for 5 Door), Rear fog
light (Driver’s side) or back-up light
(Passenger’s side), (for wagon)
(6) Rear fog light (for 3 Door)
(7) Stop light (for 3 Door)
(8) Tail light (for 3 Door)
OJD072029/H
Rear combination light bulb replacement
■5 Door
■Wagon
■ 3 Door
Type A
Type B
OJD072030/OJD072063/OJD073072/OJD073072
JD RHD 7.QXP 4/29/2013 11:37 AM Page 103
Page 1167 of 1206
 Tail light or tail and stop light (Bulb type)
7. Remove the socket from the assembly
by turning the socket cou")
Maintenance
106
7
❈ Rear fog light is located only on the driver’s
side (for wagon) Tail light or tail and stop light (Bulb type)
7. Remove the socket from the assembly
by turning the socket counterclockwise
until the tabs on the socket align with
the slots on the assembly.
8. Remove the bulb from the socket by pressing it in and rotating it counter-
clockwise until the tabs on the bulb
align with the slots in the socket. Pull
the bulb out of the socket.
9. Insert a new bulb by inserting it into the socket and rotating it until it locks
into place.
10. Install the socket in the assembly by aligning the tabs on the socket with
the slots in the assembly. Push the
socket into the assembly and turn the
socket clockwise.
11. Install the service cover by putting it into the service hole. Back-up light and rear fog light
(5 Door and Wagon) (if equipped)
7. Remove the socket from the assembly
by turning the socket counterclockwise
until the tabs on the socket align with
the slots on the assembly.
8. Pull the bulb out of the socket.
9. Insert a new bulb into the socket.
10. Install the socket into the assembly by aligning the tabs on the socket
with the slots on the assembly and
turning the socket clockwise.
11. Reinstall the light assembly to the body of the vehicle
❈ Rear fog light is located only on the
driver’s side. (for wagon)
OJD072058
■5 Door
■Wagon
Rear fog light
Back up light
Stop light
OJD072065
RRRReeeeaaaarrrr ffffoooogggg////BBBBaaaacccckkkkuuuupppp lllliiiigggghhhhtttt
TTTTaaaaiiiillll lllliiiigggghhhhtttt
JD RHD 7.QXP 4/29/2013 11:37 AM Page 106
Page 1168 of 1206
7 107
Maintenance
Rear fog light (if equipped)
1. Remove the under cover by rotatingthe screws.
2. Reach your hand into the back of the rear bumper.
3. Disconnect the power connector. 4. Remove the bulb-socket from the
housing by turning the socket counter
clockwise until the tabs on the socketalign with the slots on the housing.
5. Install the new bulb-socket into thehousing by aligning the tabs on the
socket with the slots in the housing.
Push the socket into the housing and
turn the socket clockwise.
6. Connect the power connector.
7. Reinstall the rear under cover.
✽✽ NOTICE
Rear fog light is only on the driver’s side
(5 door, if equipped).
OJD073075
OJD073071 OJD073074
JD RHD 7.QXP 4/29/2013 11:37 AM Page 107

 Rear turn signal light (2) St")

1. Remove the under cover by rotatingthe screws.
2. Reach your hand into the back of the rear bumper.
3. Disconnect the power connector. 4. Remove the b")