2014 KIA CEED ESP
[x] Cancel search: ESPPage 1007 of 1206
Driving your vehicle
58
5
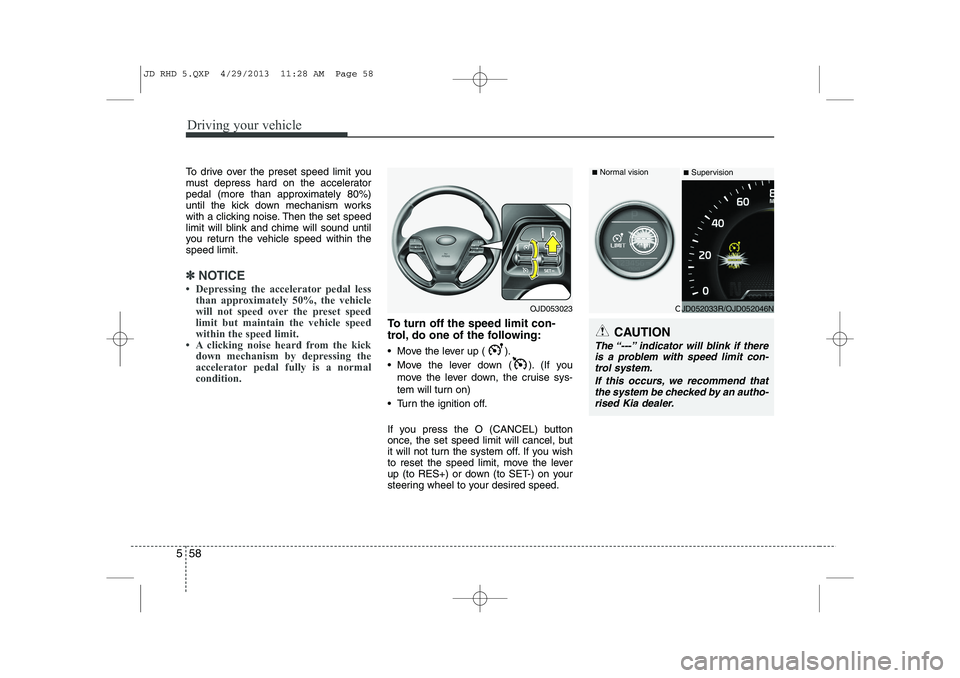
To drive over the preset speed limit you
must depress hard on the accelerator
pedal (more than approximately 80%)
until the kick down mechanism works
with a clicking noise. Then the set speed
limit will blink and chime will sound until
you return the vehicle speed within thespeed limit.
✽✽
NOTICE
Page 1008 of 1206
559
Driving your vehicle
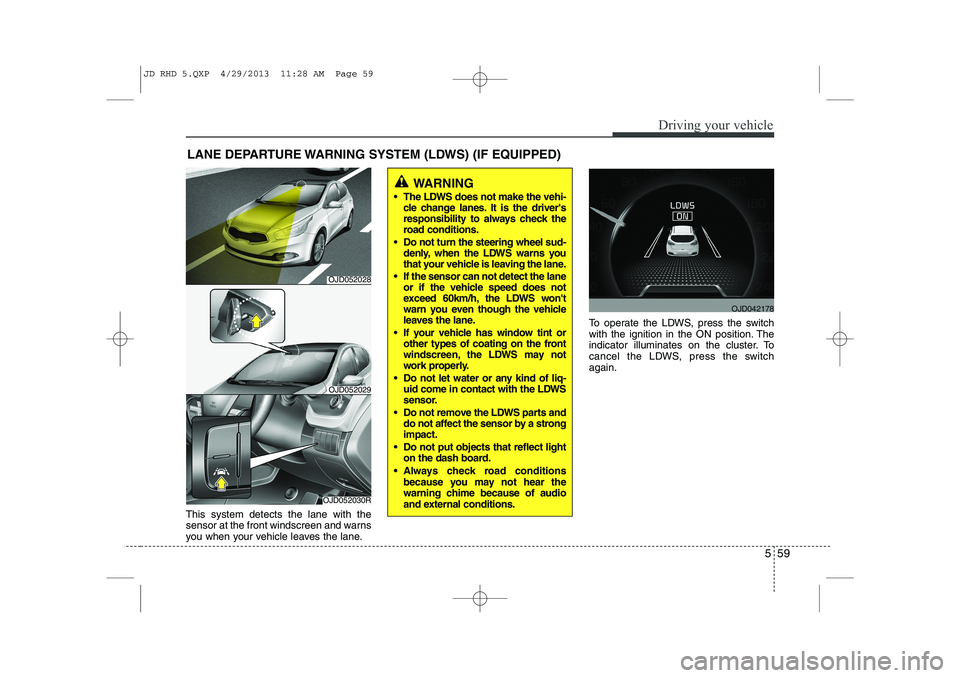
This system detects the lane with the
sensor at the front windscreen and warns
you when your vehicle leaves the lane.To operate the LDWS, press the switch
with the ignition in the ON position. The
indicator illuminates on the cluster. To
cancel the LDWS, press the switchagain.
LANE DEPARTURE WARNING SYSTEM (LDWS) (IF EQUIPPED)
WARNING
The LDWS does not make the vehi- cle change lanes. It is the driver's
responsibility to always check the
road conditions.
Do not turn the steering wheel sud- denly, when the LDWS warns you
that your vehicle is leaving the lane.
If the sensor can not detect the lane or if the vehicle speed does not
exceed 60km/h, the LDWS won't
warn you even though the vehicle
leaves the lane.
If your vehicle has window tint or other types of coating on the front
windscreen, the LDWS may not
work properly.
Do not let water or any kind of liq- uid come in contact with the LDWS
sensor.
Do not remove the LDWS parts and do not affect the sensor by a strongimpact.
Do not put objects that reflect light on the dash board.
Always check road conditions because you may not hear the
warning chime because of audio
and external conditions.
OJD052030R
OJD052029
OJD042178
OJD052028
JD RHD 5.QXP 4/29/2013 11:28 AM Page 59
Page 1011 of 1206
Driving your vehicle
62
5
ECONOMICAL OPERATION
Your vehicle's fuel economy depends
mainly on your style of driving, where you
drive and when you drive.
Each of these factors affects how many
kilometers (miles) you can get from a
litre (gallon) of fuel. To operate your vehi-
cle as economically as possible, use the
following driving suggestions to help
save money in both fuel and repairs:
Drive smoothly. Accelerate at a moder- ate rate. Do not make "jack-rabbit"
starts or full-throttle shifts and maintain
a steady cruising speed. Do not race
between stoplights. Try to adjust your
speed to the traffic so you do not have
to change speeds unnecessarily. Avoid
heavy traffic whenever possible.
Always maintain a safe distance from
other vehicles so you can avoid unnec-
essary braking. This also reduces
brake wear.
Drive at a moderate speed. The faster you drive, the more fuel your vehicle
uses. Driving at a moderate speed,
especially on the highway, is one of the
most effective ways to reduce fuel con-sumption. Do not "ride" the brake or clutch pedal.
This can increase fuel consumption
and also increase wear on these com-
ponents. In addition, driving with your
foot resting on the brake pedal may
cause the brakes to overheat, which
reduces their effectiveness and may
lead to more serious consequences.
Take care of your tyres. Keep them inflated to the recommended pressure.
Incorrect inflation, either too much or
too little, results in unnecessary tyre
wear. Check the tyre pressures at leastonce a month.
Be sure that the wheels are aligned correctly. Improper alignment can
result from hitting curbs or driving too
fast over irregular surfaces. Poor align-
ment causes faster tyre wear and may
also result in other problems as well as
greater fuel consumption. Keep your vehicle in good condition.
For better fuel economy and reduced
maintenance costs, maintain your vehi-cle in accordance with the mainte-
nance schedule. If you drive your vehi-
cle in severe conditions, more frequentmaintenance is required.
Keep your vehicle clean. For maximum service, your vehicle should be kept
clean and free of corrosive materials. It
is especially important that mud, dirt,
ice, etc. not be allowed to accumulate
on the underside of the vehicle. This
extra weight can result in increased
fuel consumption and also contributeto corrosion.
Travel lightly. Do not carry unnecessary weight in your vehicle. Weight reduces
fuel economy.
Do not let the engine idle longer than necessary. If you are waiting (and not
in traffic), turn off your engine and
restart only when you're ready to go.
JD RHD 5.QXP 4/29/2013 11:28 AM Page 62
Page 1014 of 1206
565
Driving your vehicle
✽✽NOTICE
The ESC system should be turned OFF
prior to rocking the vehicle.
Smooth cornering
Avoid braking or gear changing in cor-
ners, especially when roads are wet.
Ideally, corners should always be taken
under gentle acceleration. If you follow
these suggestions, tyre wear will be held
to a minimum. Driving at night
Because night driving presents more
hazards than driving in the daylight, here
are some important tips to remember:
Slow down and keep more distance between you and other vehicles, as it
may be more difficult to see at night,
especially in areas where there may
not be any street lights.
Adjust your mirrors to reduce the glare from other driver's headlights.
Keep your headlights clean and prop- erly aimed on vehicles not equippedwith the automatic headlight aiming
feature. Dirty or improperly aimed
headlights will make it much more diffi-cult to see at night.
Avoid staring directly at the headlights of oncoming vehicles. You could be
temporarily blinded, and it will take
several seconds for your eyes to read-
just to the darkness. Driving in the rain
Rain and wet roads can make driving
dangerous, especially if you’re not pre-
pared for the slick pavement. Here are a
few things to consider when driving in the
rain:
A heavy rainfall will make it harder to
see and will increase the distance
needed to stop your vehicle, so slow
down.
Keep your windscreen wiping equip- ment in good shape. Replace your
windscreen wiper blades when they
show signs of streaking or missingareas on the windscreen.
If your tyres are not in good condition, making a quick stop on wet pavement
can cause a skid and possibly lead to
an accident. Be sure your tyres are in
good shape.
Turn on your headlights to make it eas- ier for others to see you.
Driving too fast through large puddles can affect your brakes. If you must go
through puddles, try to drive through
them slowly.
If you believe you may have gotten your brakes wet, apply them lightly
whilst driving until normal braking
operation returns.
WARNING - Spinning tyres
Do not spin the wheels, especially at speeds more than 56 km/h (35
mph). Spinning the wheels at high
speeds when the vehicle is station-
ary could cause a tyre to overheat
which could result in tyre damage
that may injure bystanders.
WARNING
If your vehicle becomes stuck in
snow, mud, sand, etc., then you
may attempt to rock the vehicle free
by moving it forward and backward.
Do not attempt this procedure if
people or objects are anywhere
near the vehicle. During the rocking
operation the vehicle may suddenly
move forward or backward as it
becomes unstuck, causing injury
or damage to nearby people orobjects.
JD RHD 5.QXP 4/29/2013 11:28 AM Page 65
Page 1022 of 1206
573
Driving your vehicle
Trailer brakes
If your trailer is equipped with a braking
system, make sure it conforms to your
country’s regulations and that it is prop-
erly installed and operating correctly.
If your trailer weight exceeds the maxi-
mum allowed weight without trailer
brakes, then the trailer will also require its
own brakes as well. Be sure to read and
follow the instructions for the trailer
brakes so you’ll be able to install, adjust
and maintain them properly.
Do not tap into or modify your vehicle'sbrake system. Driving with a trailer
Towing a trailer requires a certain
amount of experience. Before setting out
for the open road, you must get to know
your trailer. Acquaint yourself with the
feel of handling and braking with the
added weight of the trailer. And always
keep in mind that the vehicle you are
driving is now a good deal longer and not
nearly so responsive as your vehicle is
by itself.
Before you start, check the trailer towbar
hitch and platform, safety chains, electri-
cal connector(s), lights, tyres and mirror
adjustment. If the trailer has electric
brakes, start your vehicle and trailer mov-
ing and then apply the trailer brake con-
troller by hand to be sure the brakes are
working. This lets you check your electri-
cal connection at the same time.
During your trip, check occasionally to be
sure that the load is secure, and that the
lights and any trailer brakes are still work-ing.Following distance
Stay at least twice as far behind the vehi-
cle ahead as you would when driving
your vehicle without a trailer. This can
help you avoid situations that require
heavy braking and sudden turns.
Passing
You’ll need more passing distance up
ahead when you’re towing a trailer. And,
because of the increased vehicle length,
you’ll need to go much farther beyond the
passed vehicle before you can return to
your lane.
Backing up
Hold the bottom of the steering wheel
with one hand. Then, to move the trailer
to the left, just move your hand to the left.
To move the trailer to the right, move your
hand to the right. Always back up slowly
and, if possible, have someone guide you.
Making turns
When you’re turning with a trailer, make
wider turns than normal. Do this so your
trailer won’t strike soft shoulders, curbs,
road signs, trees, or other objects. Avoid
jerky or sudden manoeuvres. Signal well
in advance.
WARNING
- Trailer brakes
Do not use a trailer with its own
brakes unless you are absolutely
certain that you have properly set
up the brake system. This is not a
task for amateurs. Use an experi-
enced, competent trailer shop for
this work.
JD RHD 5.QXP 4/29/2013 11:28 AM Page 73
Page 1045 of 1206
What to do in an emergency
16
6
Do not take this vehicle through an
automatic car wash whilst the com- pact spare tyre is installed.
Do not use tyre chains on the com- pact spare tyre. Because of the
smaller size, a tyre chain will not fit
properly. This could damage the
vehicle and result in loss of thechain.
The compact spare tyre should not be installed on the front axle if the
vehicle must be driven in snow or
on ice.
Do not use the compact spare tyre on any other vehicle because thistyre has been designed especially
for your vehicle.
The compact spare tyre’s tread life is shorter than a regular tyre.
Inspect your compact spare tyre
regularly and replace worn com-
pact spare tyres with the same sizeand design, mounted on the samewheel. The compact spare tyre should not
be used on any other wheels, nor
should standard tyres, snow tyres,
wheel covers or trim rings be used
with the compact spare wheel. Ifsuch use is attempted, damage tothese items or other car compo-
nents may occur.
Do not use more than one compact spare tyre at a time.
Do not tow a trailer whilst the com- pact spare tyre is installed.
JD RHD 6.QXP 4/29/2013 11:31 AM Page 16
Page 1046 of 1206
617
What to do in an emergency
IF YOU HAVE A FLAT TYRE (WITH TYRE MOBILITY KIT, IF EQUIPPED)
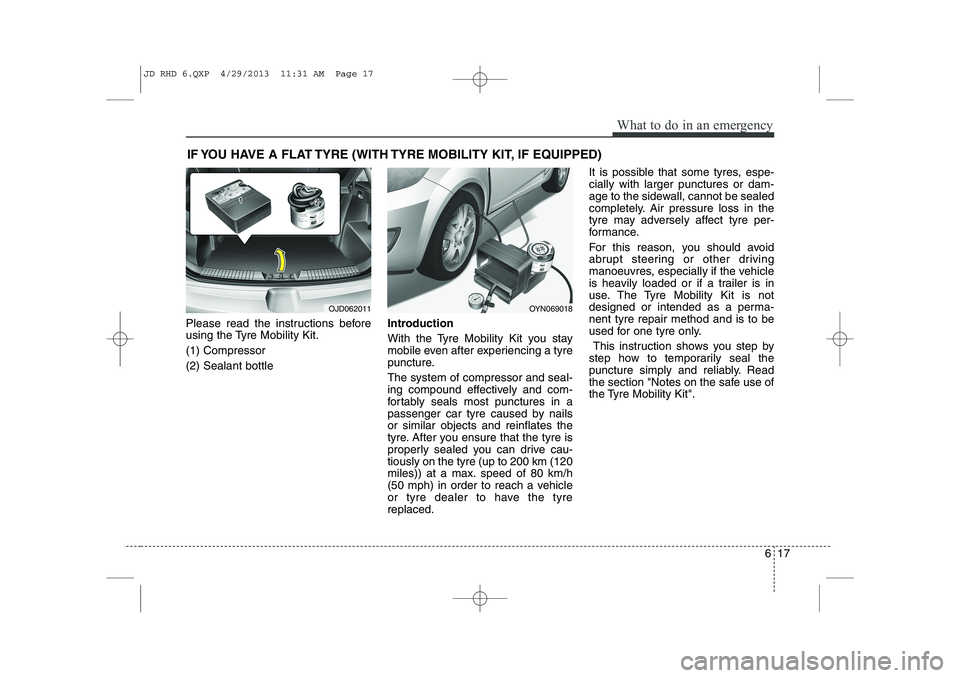
Please read the instructions before
using the Tyre Mobility Kit. (1) Compressor(2) Sealant bottle Introduction
With the Tyre Mobility Kit you stay
mobile even after experiencing a tyre
puncture. The system of compressor and seal-
ing compound effectively and com-
fortably seals most punctures in a
passenger car tyre caused by nailsor similar objects and reinflates the
tyre. After you ensure that the tyre is
properly sealed you can drive cau-tiously on the tyre (up to 200 km (120
miles)) at a max. speed of 80 km/h
(50 mph) in order to reach a vehicle
or tyre dealer to have the tyrereplaced.It is possible that some tyres, espe-cially with larger punctures or dam-
age to the sidewall, cannot be sealed
completely. Air pressure loss in the
tyre may adversely affect tyre per-
formance.
For this reason, you should avoid
abrupt steering or other driving
manoeuvres, especially if the vehicle
is heavily loaded or if a trailer is in
use. The Tyre Mobility Kit is not
designed or intended as a perma-nent tyre repair method and is to be
used for one tyre only.
This instruction shows you step by
step how to temporarily seal the
puncture simply and reliably. Read
the section "Notes on the safe use of
the Tyre Mobility Kit".
OJD062011OYN069018
JD RHD 6.QXP 4/29/2013 11:31 AM Page 17
Page 1052 of 1206
623
What to do in an emergency
TYRE PRESSURE MONITORING SYSTEM (TPMS) (IF EQUIPPED)
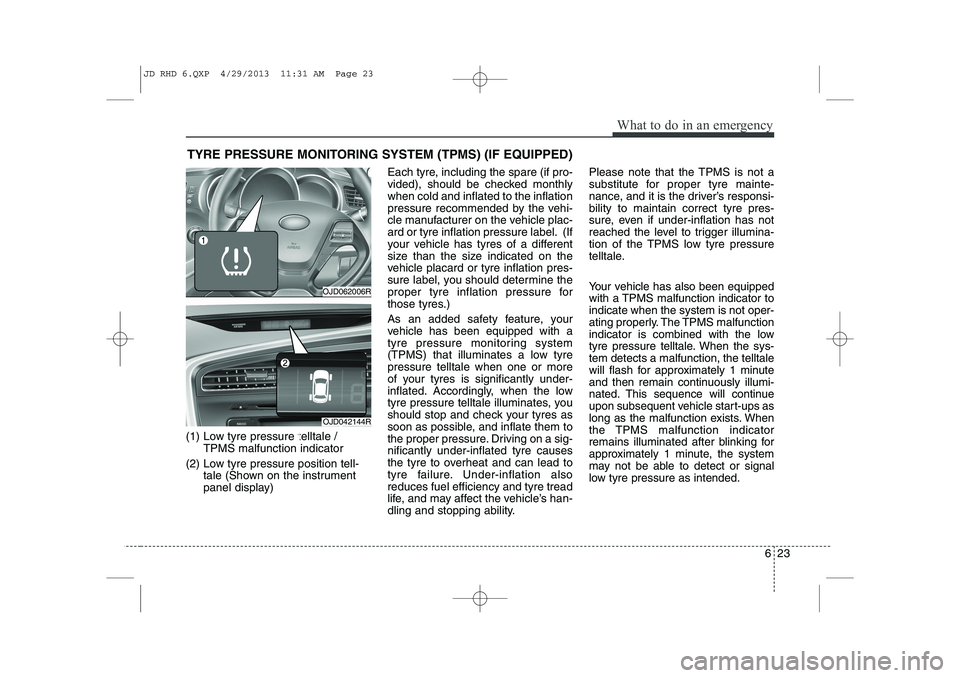
(1) Low tyre pressure telltale / TPMS malfunction indicator
(2) Low tyre pressure position tell- tale (Shown on the instrument
panel display) Each tyre, including the spare (if pro-
vided), should be checked monthlywhen cold and inflated to the inflation
pressure recommended by the vehi-
cle manufacturer on the vehicle plac-
ard or tyre inflation pressure label. (If
your vehicle has tyres of a different
size than the size indicated on the
vehicle placard or tyre inflation pres-
sure label, you should determine the
proper tyre inflation pressure for
those tyres.)
As an added safety feature, your
vehicle has been equipped with a
tyre pressure monitoring system
(TPMS) that illuminates a low tyrepressure telltale when one or more
of your tyres is significantly under-
inflated. Accordingly, when the low
tyre pressure telltale illuminates, you
should stop and check your tyres as
soon as possible, and inflate them to
the proper pressure. Driving on a sig-nificantly under-inflated tyre causes
the tyre to overheat and can lead to
tyre failure. Under-inflation alsoreduces fuel efficiency and tyre tread
life, and may affect the vehicle’s han-
dling and stopping ability. Please note that the TPMS is not a
substitute for proper tyre mainte-
nance, and it is the driver’s responsi-bility to maintain correct tyre pres-
sure, even if under-inflation has not
reached the level to trigger illumina-
tion of the TPMS low tyre pressure
telltale.
Your vehicle has also been equipped
with a TPMS malfunction indicator toindicate when the system is not oper-
ating properly. The TPMS malfunction
indicator is combined with the low
tyre pressure telltale. When the sys-tem detects a malfunction, the telltale
will flash for approximately 1 minute
and then remain continuously illumi-
nated. This sequence will continue
upon subsequent vehicle start-ups as
long as the malfunction exists. When
the TPMS malfunction indicator
remains illuminated after blinking for
approximately 1 minute, the system
may not be able to detect or signal
low tyre pressure as intended.
OJD062006R
OJD042144R
JD RHD 6.QXP 4/29/2013 11:31 AM Page 23