2014 KIA CEED oil
[x] Cancel search: oilPage 1127 of 1206
Maintenance
66
7
FUSES
A vehicle’s electrical system is protected
from electrical overload damage by
fuses.
This vehicle has 3 (or 4) fuse panels, one
located in the driver’s side panel bolster,
others in the engine compartment near
the battery.
If any of your vehicle’s lights, acces-
sories, or controls do not work, check the
appropriate circuit fuse. If a fuse has
blown, the element inside the fuse will bemelted.
If the electrical system does not work,
first check the driver’s side fuse panel.
Always replace a blown fuse with one of
the same rating.
Before replacing a blown fuse, move to
safe place, turn off the engine and all
electric devices, and disconnect the neg-
ative battery cable.
If the replacement fuse blows, this indi-
cates an electrical problem. Avoid using
the system involved and we recommend
that you consult an authorised Kia deal-
er.
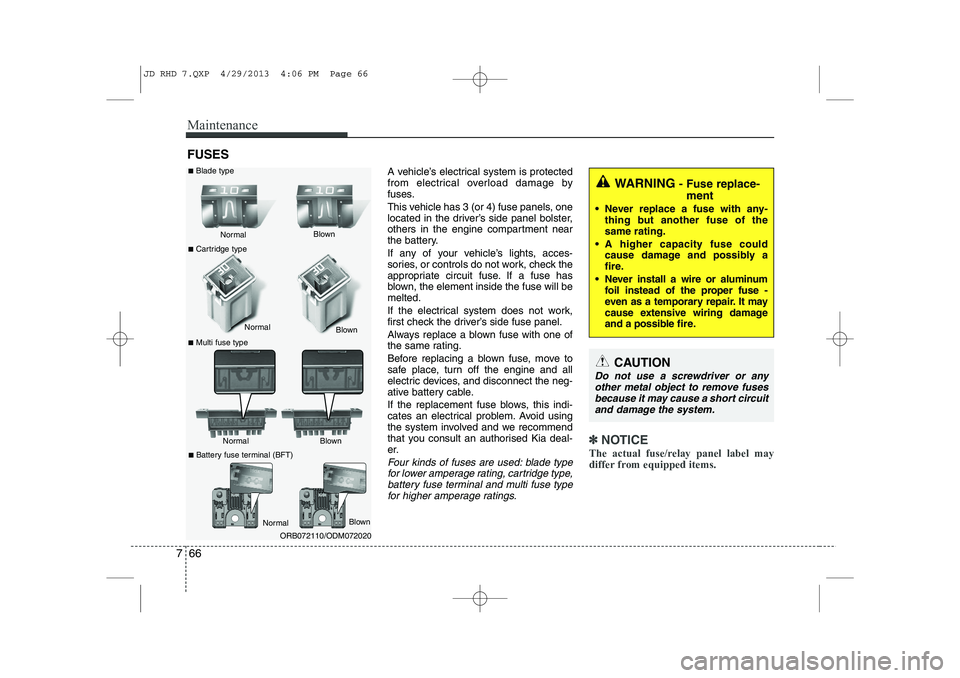
Four kinds of fuses are used: blade typefor lower amperage rating, cartridge type, battery fuse terminal and multi fuse typefor higher amperage ratings.
✽✽ NOTICE
The actual fuse/relay panel label may
differ from equipped items.
WARNING - Fuse replace-
ment
• Never replace a fuse with any- thing but another fuse of the same rating.
A higher capacity fuse could cause damage and possibly a
fire.
Never install a wire or aluminum foil instead of the proper fuse -
even as a temporary repair. It may
cause extensive wiring damage
and a possible fire.
CAUTION
Do not use a screwdriver or any
other metal object to remove fusesbecause it may cause a short circuitand damage the system.
Normal
Normal
■
Blade type
■ Cartridge type
■ Multi fuse type Blown
Blown
Normal Blown
ORB072110/ODM072020
Normal
Blown
■
Battery fuse terminal (BFT)
JD RHD 7.QXP 4/29/2013 4:06 PM Page 66
Page 1142 of 1206

781
Maintenance
SymbolRelay NameType
LOCOOLING FAN LOW RELAYPLUG MICRO
HICOOLING FAN HIGH RELAYPLUG MICRO
ESSESS RELAYPLUG MICRO
BLOWER RELAYPLUG MICRO
RR
HTDREAR DEFOGGER RELAYPLUG MICRO
4 (IG2)IG2 RELAYPLUG MICRO
FRT WIPER RELAYPLUG MICRO
3 (IG1)IG1 RELAYPLUG MICRO
1START RELAYPLUG MICRO
2 (ACC)ACC RELAYPLUG MICRO
PTCPTC RELAYPLUG MINI
HACHAC RELAYPLUG MICRO
Fuse ratingSymbolFuse NameRelay Name
15AF/PUMPF/PUMPFUEL PUMP RELAY
15A3ECU3ECU
15AHORNHorn Relay
10AINJECTORINJECTORINJECTOR, ECU,
FUEL PUMP RELAY
10A2ECU2ECU
20AIGN
COILIGN COILIgnition Coil #1/#2/#3/#4, Condenser
10A9SENSOR2E/R Fuse & Relay Box
(COOLING LOW RELAY),
Oil Control Valve #1/#2
20A1ECU1ECU
10A8SENSOR1Oxygen Sensor (UP/DOWN),
Variable Intake Solenoid Valve,
Purge Control Solenoid Valve
JD RHD 7.QXP 4/29/2013 11:35 AM Page 81
Page 1145 of 1206
Maintenance
84
7
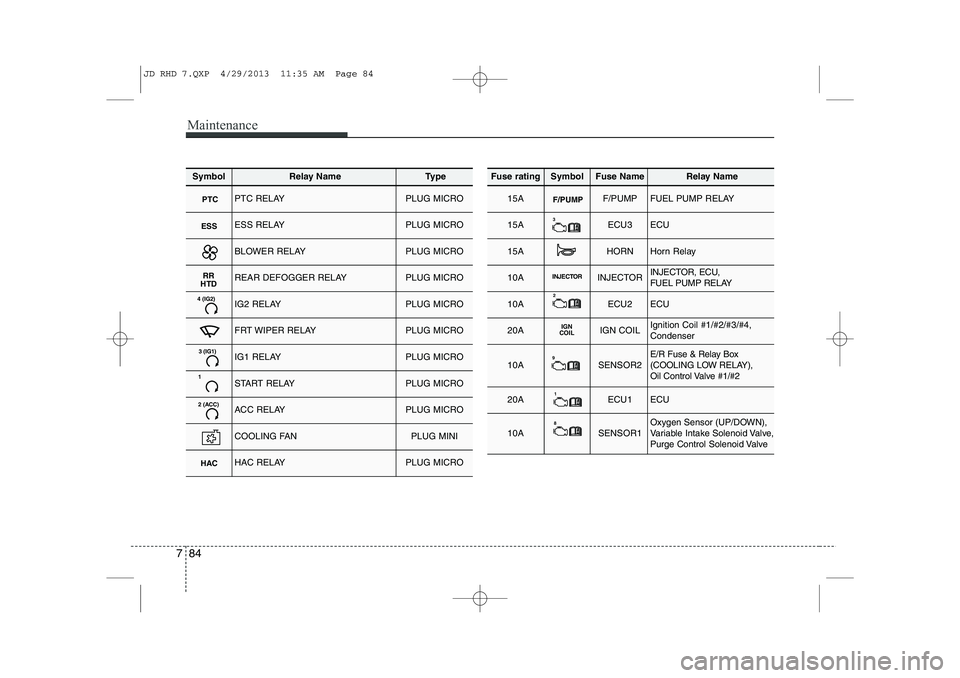
SymbolRelay NameType
PTCPTC RELAYPLUG MICRO
ESSESS RELAYPLUG MICRO
BLOWER RELAYPLUG MICRO
RR
HTDREAR DEFOGGER RELAYPLUG MICRO
4 (IG2)IG2 RELAYPLUG MICRO
FRT WIPER RELAYPLUG MICRO
3 (IG1)IG1 RELAYPLUG MICRO
1START RELAYPLUG MICRO
2 (ACC)ACC RELAYPLUG MICRO
COOLING FANPLUG MINI
HACHAC RELAYPLUG MICRO
Fuse ratingSymbolFuse NameRelay Name
15AF/PUMPF/PUMPFUEL PUMP RELAY
15A3ECU3ECU
15AHORNHorn Relay
10AINJECTORINJECTORINJECTOR, ECU,
FUEL PUMP RELAY
10A2ECU2ECU
20AIGN
COILIGN COILIgnition Coil #1/#2/#3/#4, Condenser
10A9SENSOR2E/R Fuse & Relay Box
(COOLING LOW RELAY),
Oil Control Valve #1/#2
20A1ECU1ECU
10A8SENSOR1Oxygen Sensor (UP/DOWN),
Variable Intake Solenoid Valve,
Purge Control Solenoid Valve
JD RHD 7.QXP 4/29/2013 11:35 AM Page 84
Page 1148 of 1206
787
Maintenance
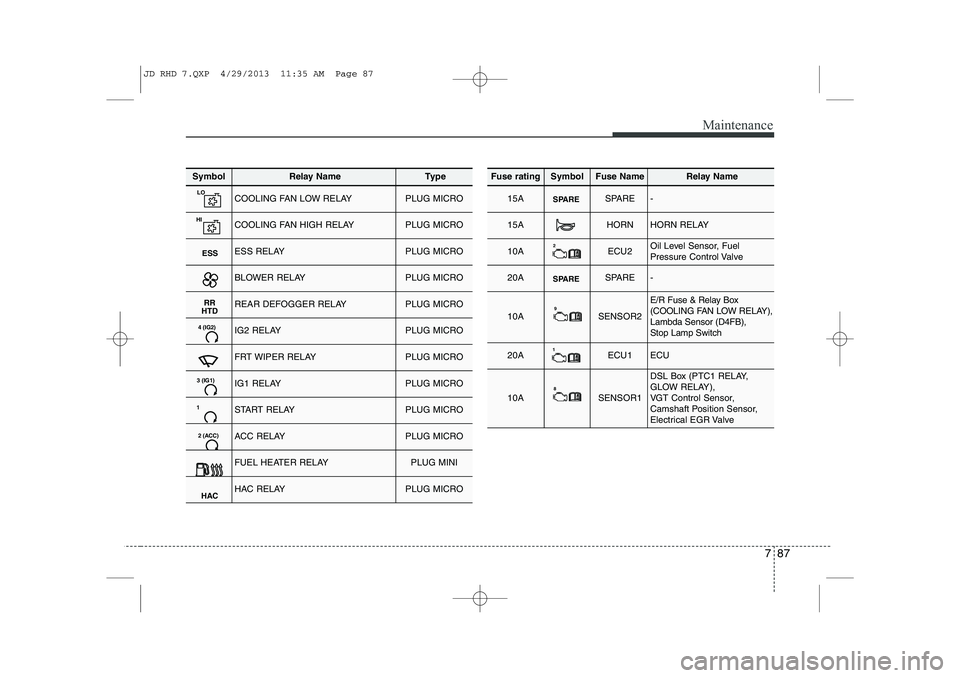
SymbolRelay NameType
LOCOOLING FAN LOW RELAYPLUG MICRO
HICOOLING FAN HIGH RELAYPLUG MICRO
ESSESS RELAYPLUG MICRO
BLOWER RELAYPLUG MICRO
RR
HTDREAR DEFOGGER RELAYPLUG MICRO
4 (IG2)IG2 RELAYPLUG MICRO
FRT WIPER RELAYPLUG MICRO
3 (IG1)IG1 RELAYPLUG MICRO
1START RELAYPLUG MICRO
2 (ACC)ACC RELAYPLUG MICRO
FUEL HEATER RELAYPLUG MINI
HACHAC RELAYPLUG MICRO
Fuse ratingSymbolFuse NameRelay Name
15ASPARESPARE-
15AHORNHORN RELAY
10A2ECU2Oil Level Sensor, Fuel
Pressure Control Valve
20ASPARESPARE-
10A9SENSOR2
E/R Fuse & Relay Box
(COOLING FAN LOW RELAY),Lambda Sensor (D4FB), Stop Lamp Switch
20A1ECU1ECU
10A8SENSOR1
DSL Box (PTC1 RELAY,
GLOW RELAY),
VGT Control Sensor,
Camshaft Position Sensor,
Electrical EGR Valve
JD RHD 7.QXP 4/29/2013 11:35 AM Page 87
Page 1154 of 1206
793
Maintenance
Headlight (Low, HID type),Position light/DRL (LED type)
If the light does not operate, we recom-
mend that the system be checked by an
authorised Kia dealer.
✽✽ NOTICE
HID lamps have superior performance
vs. halogen bulbs. HID lamps are esti-
mated by the manufacturer to last twice
as long or longer than halogen bulbs
depending on their frequency of use.
They will probably require replacementat some point in the life of the vehicle.
Cycling the headlamps on and off morethan typical use will shorten HID lampslife. HID lamps do not fail in the same
manner as halogen incandescent lamps.
If a headlamp goes out after a period of
operation but will immediately relightwhen the headlamp switch is cycled it is
likely the HID lamp needs to be replaced.
HID lighting components are more com-plex than conventional halogen bulbs
thus have higher replacement cost.
❈❈ Traffic Change (For Europe)
The low beam light distribution is asym-
metric. If you go abroad to a country with
opposite traffic direction, this asymmetric
part will dazzle oncoming car driver. To
prevent dazzle, ECE regulation demand
several technical solutions (ex. automatic
change system, adhesive sheet, down
aiming). This headlamps are designed
not to dazzle opposite drivers. So, you
need not change your headlamps in a
country with opposite traffic direction.
WARNING - HID Headlight
low beam (if equipped)
Do not attempt to replace or
inspect the low beam (XENON bulb)
due to electric shock danger. If the
low beam (XENON bulb) is not
working, we recommend that the
system be checked by an autho-
rised Kia dealer.
OHD076046
WARNING - Halogen bulbs
Halogen bulbs contain pressurized
gas that will produce flying pieces
of glass if broken.
Always handle them carefully, and avoid scratches and abrasions. If
the bulbs are lit, avoid contact with
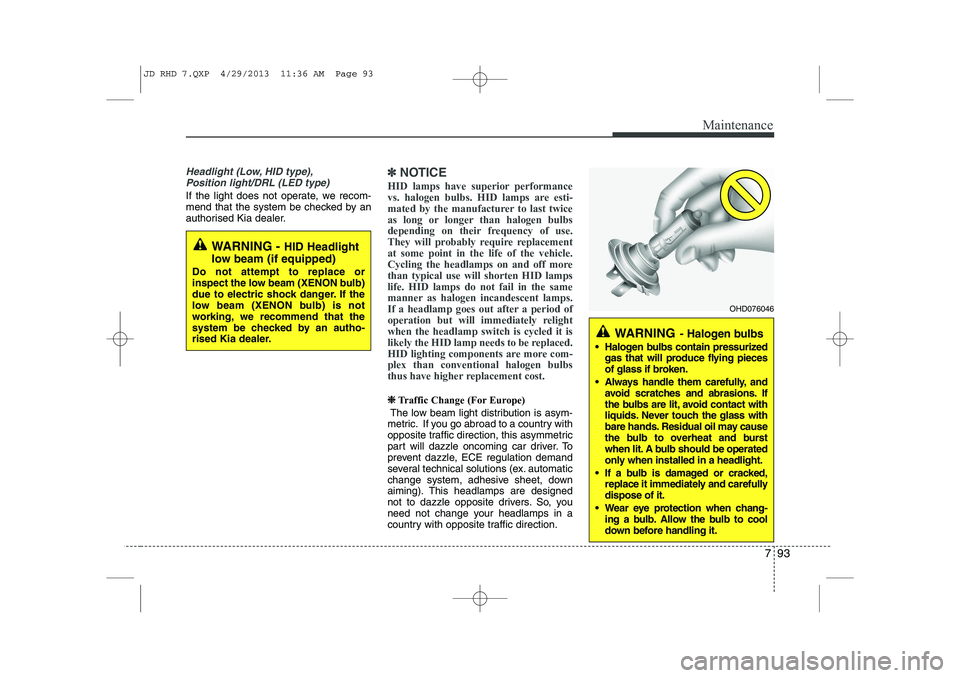
liquids. Never touch the glass with
bare hands. Residual oil may cause
the bulb to overheat and burst
when lit. A bulb should be operated
only when installed in a headlight.
If a bulb is damaged or cracked, replace it immediately and carefullydispose of it.
Wear eye protection when chang- ing a bulb. Allow the bulb to cool
down before handling it.
JD RHD 7.QXP 4/29/2013 11:36 AM Page 93
Page 1172 of 1206
7 111
Maintenance
Waxing
Wax the vehicle when water will no longer bead on the paint.
Always wash and dry the vehicle before
waxing. Use a good quality liquid or
paste wax, and follow the manufacturer’s
instructions. Wax all metal trim to protect
it and to maintain its luster.
Removing oil, tar, and similar materials
with a spot remover will usually strip the
wax from the finish. Be sure to re-wax
these areas even if the rest of the vehicle
does not yet need waxing.Finish damage repair
Deep scratches or stone chips in the
painted surface must be repaired
promptly. Exposed metal will quickly rust
and may develop into a major repair
expense.
✽✽NOTICE
If your vehicle is damaged and requires
any metal repair or replacement, be sure
the body shop applies anti-corrosion
materials to the parts repaired or
replaced.
CAUTION
Wiping dust or dirt off the body with a dry cloth will scratch the
finish.
Do not use steel wool, abrasive cleaners, or strong detergentscontaining highly alkaline orcaustic agents on chrome-plated
or anodized aluminum parts. This may result in damage to the pro-tective coating and cause discol-oration or paint deterioration.
CAUTION
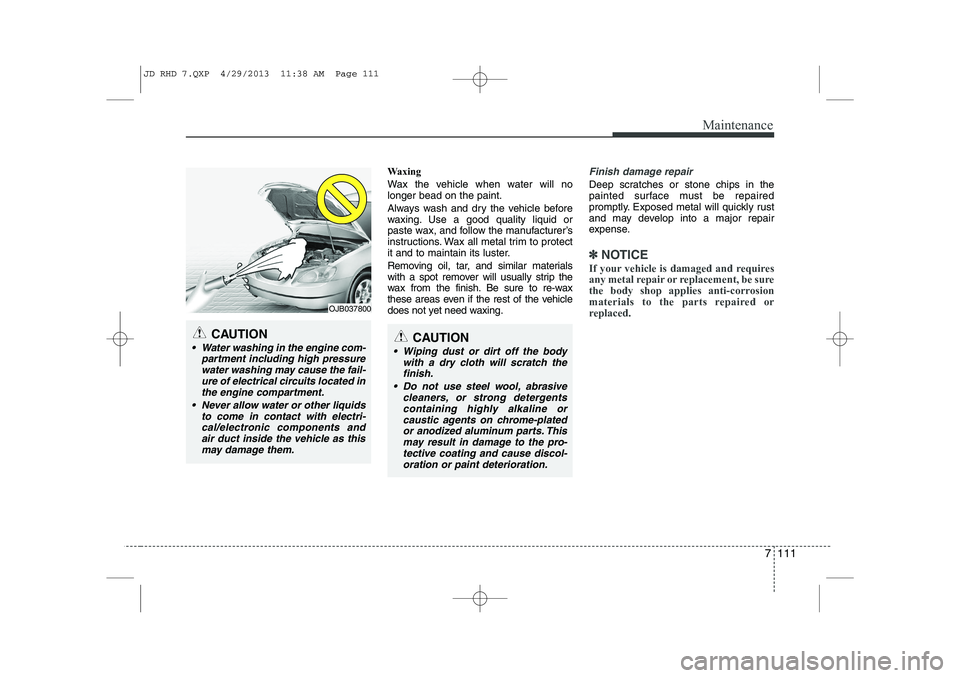
Water washing in the engine com- partment including high pressure
water washing may cause the fail-ure of electrical circuits located inthe engine compartment.
Never allow water or other liquids to come in contact with electri-cal/electronic components andair duct inside the vehicle as this may damage them.
OJB037800
JD RHD 7.QXP 4/29/2013 11:38 AM Page 111
Page 1176 of 1206
7 115
Maintenance
Interior care
Interior general precautions
Prevent chemicals such as perfume, cos-
metic oil, sun cream, hand cleaner, and
air freshener from contacting the interior
parts because they may cause damage
or discoloration. If they do contact the
interior parts, wipe them off immediately.
See the instructions that follow for the
proper way to clean vinyl.
Cleaning the upholstery and interiortrim
Vinyl
Remove dust and loose dirt from vinyl
with a whisk broom or vacuum cleaner.
Clean vinyl surfaces with a vinyl cleaner. Fabric
Remove dust and loose dirt from fabric
with a whisk broom or vacuum cleaner.Clean with a mild soap solution recom-
mended for upholstery or carpets.
Remove fresh spots immediately with a
fabric spot cleaner. If fresh spots do not
receive immediate attention, the fabriccan be stained and its colour can be
affected. Also, its fire-resistant properties
can be reduced if the material is not
properly maintained.
Cleaning the lap/shoulder belt web- bing
Clean the belt webbing with any mild
soap solution recommended for cleaning
upholstery or carpet. Follow the instruc-
tions provided with the soap. Do not
bleach or re-dye the webbing because
this may weaken it.
Cleaning the interior window glass
If the interior glass surfaces of the vehi-
cle become fogged (that is, covered with
an oily, greasy or waxy film), they should
be cleaned with glass cleaner. Follow the
directions on the glass cleaner container.
CAUTION
Never allow water or other liquidsto come in contact with
electrical/electronic components inside the vehicle as this may dam-age them.
CAUTION
Using anything but recommended
cleaners and procedures may affectthe fabric’s appearance and fire- resistant properties.
CAUTION
When cleaning leather products
(steering wheel, seats etc.), use neutral detergents or low alcoholcontent solutions. If you use highalcohol content solutions or
acid/alkaline detergents, the colourof the leather may fade or the sur-face may get stripped off.
CAUTION
Do not scrape or scratch the insideof the rear window. This may result
in damage to the rear windowdefroster grid.
JD RHD 7.QXP 4/29/2013 11:38 AM Page 115
Page 1188 of 1206
Specifications & Consumer information
8
8
To help achieve proper engine and powertrain performance and durability, use only lubricants of the proper quality. The correct
lubricants also help promote engine efficiency that results in improved fuel economy.
These lubricants and fluids are recommended for use in your vehicle. RECOMMENDED LUBRICANTS AND CAPACITIES
Lubricant Volume Classification
Engine oil *1 *2
(drain and refill) Recommends Petrol Engine1.4 MPI
3.6 l(3.8 US qt.) For Europe
API Service SL or SM, ACEA A5 or above
Except Europe
API Service SM, ILSAC GF-4 or above
1.6 MPI 1.6 GDI
1.6 T-GDI 4.5
l(4.75 US qt.)
ACEA A5 or above (5W-30)
Diesel Engine with DPF *
3
5.3 l(5.60 US qt.)
ACEA C2 or C3
without DPF * 3
5.3 l(5.60 US qt.)
ACEA B4
Manual
transaxle fluid PetrolEngine
MPI/GDI
1.8
l ~ 1.9 l
(1.90 ~ 2.01US qt.) HK MTF(SK),
HD MTF(H.K.SHELL),
Kia Genuine transaxle fluid
(API GL-4, SAE 75W/85, TGO-7(MS 517-14)), Consult an authorised Kia dealer for details.
T-GDI
1.9
l ~ 2.0 l
(2.01 ~ 2.11US qt.)
DieselEngine High
1.9 l ~ 2.0 l
(2.01 ~ 2.11 US qt.)
Low
Automatic
transaxle fluid PetrolEngine
MPI/GDI
7.3
l(7.71 US qt.) MICHANG ATF SP-IV
SK ATF SP-IV
NOCA ATF SP-IV
Kia genuine ATF SP-IV
Diesel Engine7.1 l(7.50 US qt.)
JD RHD 8.QXP 5/2/2013 11:39 AM Page 8