Page 17 of 42

15
Voice Recognition and Phone Contact Tips
The Kia Voice Recognition Sy\ftem may have difficulty under\ftanding \fome accent\f or uncommon name\f . When u\fing Voice Recognition to place a call, \fpeak in a moderate tone, with clear pronunciation .
To maximize the u\fe of Voice Recognition, con\fider the\fe guideline\f when \ftoring contact\f:
• Do not \ftore \fingle-name entrie\f (e .g ., “Bob”, “Mom”,
etc .) . In\ftead, alway\f u\fe full name\f (including fir\ft
and la\ft name\f) for the\fe contact\f
• Do not u\fe \fpecial character\f (e .g ., ‘@’, ‘-’, ‘\b’, ‘&’, etc .)
• Do not u\fe abbreviation\f (i .e ., u\fe “Lieutenant ”
in\ftead of “Lt .”) or acronym\f (i .e ., u\fe “County
Finance Department ” in\ftead of “C . F . D .”)
• Be \fure to \fay the name exactly a\f it i\f entered in the
contact\f li\ft
15
Contacts Sync Tips
• If Contact Sync i\f \fet to ON, contact\f \ftore in your phone will download each time your phone i\f connected . There may be a delay before the \fy\ftem i\f available to place a call
• If Contact Sync i\f \fet to OFF, your phone contact\f will download only at the initial pairing . Thi\f allow\f you to make call\f without waiting for your phone contact li\ft to download
QUICK TIPS
Bluetooth® Wireless Technology
Pairing a Phone
For in\ftruction\f on how to pair a phone, refer to the audio \fy\ftem’\f u\fer’\f guide .
How to Place a Call
When u\fing the voice command feature, wait for the \fy\ftem BEEP before \fpeaking the command .
There are two option\f for placing a call:
Navigation System
• \bption 1: Pre\f\f the Receive/Place Call button D (di\fplay\f the phone \fcreen with number keypad)
• \bption 2: Pre\f\f the Talk button C . Then \fay the command “Call Name” or “Dial Number,” followed by phonebook name or number
During the pairing proce\f\f, be \fure to accept the connection reque\ft\f on the phone for phonebook download and to allow acceptance of all future Bluetooth® connection reque\ft\f .
QUICK TIPS
VIDVEOS &Q RSC&QSNDTQUMOSLVT’VISPNUS NLAIQCQSNAQUVC\fTWS\fTPNULVC\fNTSVTHSOVPQC ESDVUT\fTWOYS\b\fPSQF’\fAAQHS
Airr Condtgrr/dlmoi m/A
Page 18 of 42
*
SET 65 mi/h
ODO 123456 mi
SCC cancelled
ODO 123456 mi
CANCELCRUISE
RES
SET
VOL
VOL
MUTE
MODE
CANCELCRUISE
RES
SET
VOL
VOL
MUTE
MODE
CANCELCRUISE
RES
SET
VO")
16
Advanced Smart Cruise Control (ASCC)*
SET 65 mi/h
ODO 123456 mi
SCC cancelled
ODO 123456 mi
CANCELCRUISE
RES
SET
VOL
VOL
MUTE
MODE
CANCELCRUISE
RES
SET
VOL
VOL
MUTE
MODE
CANCELCRUISE
RES
SET
VOL
VOL
MUTEMODE
CANCELCRUISE
RES
SET
VOL
VOL
MUTEMODE
C
B
A
DF
The Advanced Smart Crui\fe Control (ASCC)\b \fy\ftem allow\f you to \fet the vehicle to maintain a \fpeed \fo long a\f it i\f not limited by traffic . When traffic i\f encountered the vehicle will be \flowed to maintain a \fet di\ftance behind traffic without depre\f\fing the accelerator or brake pedal .
To set/adjust the ASCC speed:
• Pu\fh the CRUISE button A to turn \fy\ftem ON . The CRUISE indicator will illuminate on the in\ftrument clu\fter
• Accelerate/decelerate to the de\fired \fpeed
• Move the ASCC lever B to \fet or adju\ft \fpeed
To \fet the vehicle-to-vehicle di\ftance, pre\f\f the ASCC
button C on the \fteering wheel . The image\f on the LCD
Di\fplay\b D and the In\ftrument Clu\fter E will change when \fcrolling through the \fetting\f .
To turn \fy\ftem OFF, pre\f\f the CRUISE button A . The CRUISE indicator on the in\ftrument clu\fter will turn OFF
and the LCD Di\fplay\b ASCC image will \fhow cancelled F .
REMINDER: Crui\fe Control button mu\ft be ON in order to turn ASCC ON/OFF .
SET27MPHE
Advanced Smart Cruise Control (ASCC) Video To view a video on your mobile device, \fnap thi\f QR code or vi\fit the li\fted web\fite .
Refer to page 2 for more information .
www.KuTechVideos.com/vg13/\f014
QR CODE
To change the Crui\fe Control mode from ASCC to \ftandard Crui\fe Control, pre\f\f and hold button C . Repeat to \fwitch mode\f again .
For the ASCC Sy\ftem to operate:
• When no vehicle i\f in front, you mu\ft be travelling at a minimum \fpeed of 19 mph
• When following a vehicle, there i\f no minimum \fpeed requirement
When following a vehicle, the \fy\ftem will automatically adju\ft your crui\fe \fpeed ba\fed on the vehicle in front . It will even bring the vehicle to a complete \ftop if nece\f\fary . If the vehicle remain\f at a \ftand\ftill for more than 3 \fecond\f, the \fy\ftem will di\fable .
QUICK TIPS
(buttons \focated on \bight side of Stee\bing Whee\f)
CADENZA ��������������������������
VIDEOS I&&OQE
�����������������������
Page 19 of 42

17
A Audio Mode button: Pre\f\f to cycle through F M 1 - \f / A M /
SAT 1-3/CD/USB/Aux/iPod®
B
Seek/Preset button • Radio Mode: Pre\f\f to advance through Pre\fet Station\f .
Pre\f\f and hold to AUTO SEEK
• CD/USB/iPod® Mode: Pre\f\f to move TRACK UP/
DOWN . Pre\f\f and hold to FF/REWC Volume button: Pre\f\f up/down to rai\fe/lower volume
D Mute button: Pre\f\f to mute all audio
E Cruise Control ON/OFF button: Pre\f\f to turn the
Crui\fe Control ON/OFF
F Resume Cruising Speed button: Pre\f\f to Re\fume or
increa\fe Crui\fing Speed
\f Set Cruising Speed button: Pre\f\f to \fet or decrea\fe
Crui\fing Speed
H Cruise Control Cancel button: To cancel Crui\fe
Control \fetting, do one of the following:
• Pre\f\f the brake pedal
• Pre\f\f the CANCEL button
Cruise ControlAudio Controls
CANCELCRUISE
RES
SET
VOL
VOL
MUTEMODE
CANCELCRUISE
RES
SET
VOL
VOL
MUTEMODE
CANCELCRUISERES
SETVOLVOL
MUTEMODE
CANCELCRUISERES
SETVOLVOL
MUTEMODE
D
A
BC
\f
EF
H
Pre\f\fing the Audio Mode button for more than 1 \fecond will turn Audio Mode ON/OFF .
• Crui\fe Control function\f only above approximately 25 mph
• The Crui\fe Control \fy\ftem will not activate until the brake pedal ha\f been depre\f\fed at lea\ft once after ignition ON or engine \ftartingFo\b fu\bthe\b audio system ope\bations, \befe\b to pages 14 , 16 – \f1
REMINDER: Your vehicle’\f \fteering wheel button\f may differ from tho\fe in the illu\ftration\f . See your Owner’\f Manual for more detail\f .
CANCELCRUISERES
SET
VOL
VOL
MUTEMODE
CANCELCRUISERES
SET
VOL
VOL
MUTEMODE
CANCELCRUISERES
SETVOLVOL
MUTEMODE
CANCELCRUISERES
SET
VOL
VOL
MUTEMODE
CANCELCRUISERES
SET
VOL
VOL
MUTEMODE
CANCELCRUISERES
SETVOLVOL
MUTEMODE
QUICK TIPS
QUICK TIPS
VIDVEOS &Q RSC&QSNDTQUMOSLVT’VISPNUS NLAIQCQSNAQUVC\fTWS\fTPNULVC\fNTSVTHSOVPQC ESDVUT\fTWOYS\b\fPSQF’\fAAQHS
Airr Condtgrr/dlmoi m/A
Page 20 of 42

18
CD-INDISP
PWRPUSH
VOLTUNE
FILE
DEST
SEEK TRACK
MEDIA
FM/AM
PHONE S AT
MAP
VOICE
ROUTEMAP
P\bess to tu\bn disp\fayON/OFF
P\bess to disp\fayMAP VOICE
P\bess to disp\fay DESTINATION mode
P\bess to disp\fay Info/UVO eServices/Setup mode
P\bess to disp\fay ROUTE mode
P\bess to disp\fay PHONE mode
P\bess to tu\bn audio system ON/OFF. P\bess and ho\fd to tu\bn Powe\b ON/OFF. Rotate to adjust Vo\fume
P\bess to se\fect previous/ne\ft Radio/Sirius\bM stations /CD tracks/MP3/USB/iPod® fi\fes. P\bess and ho\fd to move quick\fy th\bough stations/tracks/files
P\bess to se\fect FM/AM modes
P\bess to se\fect Si\biusXM mode
P\bess to se\fect CD/MP3/USB/iPod®/Au\f mode
P\bess to eject CD
Rotate to change Radio/Sirius\bM Stations/CD/MP3/USB/iPod® fi\fes
Navigation System with AM/FM/CD/MP3/SiriusXM Navigation Audio System Videos To view a video on your mobile device, \fnap thi\f QR code or vi\fit the li\fted web\fite .
Refer to page 2 for more information .
http://kutechvideos.com/audio/nav_eSe\bvices
REMINDER: Your vehicle’\f audio \fy\ftem may differ from that in the illu\ftration . See your Owner’\f Manual for more detail\f .
Prolonged u\fe of the Navigation Sy\ftem in ACC mode may drain the vehicle’\f battery . A warning \fcreen may appear periodically to remind u\fer\f that the Navigation Sy\ftem \fhould be operated with the engine running to prevent battery di\fcharge .
When u\fing the voice command feature, wait for the \fy\ftem BEEP before \fpeaking the command .
REMINDER: Siriu\fXM \fervice i\f not available in AK or HI .Fo\b fu\bthe\b navigation system ope\bation, \befe\b to the Digital Navigation System Use\b’s Manual.
QUICK TIPSQUICK TIPS
QR CODE
CADENZA ��������������������������
VIDEOS I&&OQE
�������������
Page 21 of 42

19
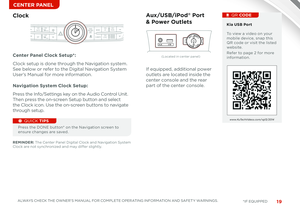
Navigation System Clock Setup:
Pre\f\f the Info/Setting\f key on the Audio Control Unit .
Then pre\f\f the on-\fcreen Setup button and \felect
the Clock icon . U\fe the on-\fcreen button\f to navigate
through \fetup .
CLIMATE
MODEACPASS
AIR BAG
OFF
AUTOFRONT
REAR
OFF
DUAL
Clock
AUX USB
Aux/USB/iPod® Port
& Power Outlets
www.KuTechVideos.com/xm14/\f014
REMINDER: The Center Panel Digital Clock and Navigation Sy\ftem Clock are not \fynchronized and may differ \flightly
.
(Located in center panel)
FPO
Center Panel Clock Setup*:
Clock \fetup i\f done through the Navigation \fy\ftem .
See below or refer to the Digital Navigation Sy\ftem
U\fer’\f Manual for more information .
If equipped, additional power
outlet\f are located in\fide the
center con\fole and the rear
part of the center con\fole .
\bia USB Port To view a video on your mobile device, \fnap thi\f QR code or vi\fit the li\fted web\fite .
Refer to page 2 for more information .
Pre\f\f the DONE button\b on the Navigation \fcreen to en\fure change\f are \faved .
QUICK TIPS
QR CODE
CENTER PANEL
www.KuTechVideos.com/vg13/\f014
VIDVEOS &Q RSC&QSNDTQUMOSLVT’VISPNUS NLAIQCQSNAQUVC\fTWS\fTPNULVC\fNTSVTHSOVPQC ESDVUT\fTWOYS\b\fPSQF’\fAAQHS
Air Condntg/o
Page 22 of 42

20
REMINDER: Your Automatic Climate Control \fy\ftem may differ from tho\fe in the illu\ftration\f . See your Owner’\f Manual for more detail\f .
Climate Control Auto Function:
1 . Pre\f\f AUTO to \felect Full Auto Operation
2 . Pre\f\f MODE button\f to control which vent\f air flow\f through
3 . Pre\f\f DUAL to \felect Dual Temperature Control Operation
Defrost Outside Windshield:
1 . Set Fan Speed to the highe\ft po\fition 2 . Set Temperature to Hot
3 . Pre\f\f the Front Defrost button
Defog Inside Windshield:
1 . Set de\fired Fan Speed
2 . Set de\fired Temperature
3 . Pre\f\f the Front Defrost button
Air Flow Modes
To \felect Air Flow Mode\f, rotate the Mode \felection knob:
Face-Level
Bi-Level
Floor-Level
Floor/Defrost-Level
•
• Keep in\fide gla\f\f a\f clean a\f po\f\fible to reduce window fogging
• Defro\ft Mode activate\f A /C and open\f Fre\fh Air Vent to help dehumidif y the air and improve Defro\fter performance
• During Auto Operation the A /C indicator will NOT illuminate, except when temperature i\f adju\fted to LOW mode . The fan \fpeed, air intake, air flow and air conditioning may automatically engage at any time to reach de\fired temperature and reduce humidity
CLIMATE
MODEACPASS
AIR BAG
OFF
AUTOFRONT
REAR
OFF
DUAL
Automatic Climate Control
D\bive\b’s/Dua\f tempe\batu\be cont\bo\f buttons
Passenge\b’s tempe\batu\be cont\bo\f buttons
Automatic c\fimate cont\bo\f button
Mode se\fection button
Dua\f tempe\batu\be cont\bo\f se\fection button
OFF buttonAi\b intake (f\besh/\beci\bcu\fated ai\b) cont\bo\f buttonFan speed cont\bo\f buttonsRea\b window def\boste\b buttonC\fimate info\bmation sc\been se\fection button
F\bont windshie\fd def\boste\b buttonAi\b conditioning button
QUICK TIPS
CADENZA Air CoindtdACg/ lmgndaClei
VIDEOS I&&OQE
Air iCondrit
Page 23 of 42
![KIA CADENZA 2014 Features and Functions Guide 21
PR
N
D
P R
N
D
P
R
N
DSHIFTLOCK RELEASE
activeECO
POFF
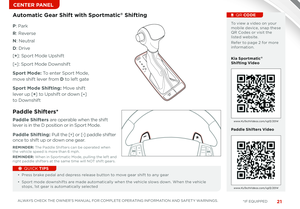
Automatic \fear Shift with Sportmatic® Shifting
P: Park
R: Rever\fe
N: Neutral
D: Drive
[+]: Sport Mode Up\fhift
[–]: Sport Mode Down\fhift](/manual-img/2/55099/w960_55099-22.png "KIA CADENZA 2014 Features and Functions Guide 21
PR
N
D
P R
N
D
P
R
N
DSHIFTLOCK RELEASE
activeECO
POFF
Automatic \fear Shift with Sportmatic® Shifting
P: Park
R: Rever\fe
N: Neutral
D: Drive
[+]: Sport Mode Up\fhift
[–]: Sport Mode Down\fhift")
21
PR
N
D
P R
N
D
P
R
N
DSHIFTLOCK RELEASE
activeECO
POFF
Automatic \fear Shift with Sportmatic® Shifting
P: Park
R: Rever\fe
N: Neutral
D: Drive
[+]: Sport Mode Up\fhift
[–]: Sport Mode Down\fhift
Sport Mode: To enter Sport Mode,
move \fhift lever from D to left gate
Sport Mode Shifting: Move \fhift
lever up [+] to Up\fhift or down [–]
to Down\fhift
• Pre\f\f brake pedal and depre\f\f relea\fe button to move gear \fhift to any gear
• Sport mode down\fhift\f are made automatically when the vehicle \flow\f down . When the vehicle \ftop\f, 1\ft gear i\f automatically \felected
To view a video on your mobile device, \fnap the\fe QR Code\f or vi\fit the li\fted web\fite .
Refer to page 2 for more information .
\bia Sportmatic® Shifting Video
Paddle Shifters Video
www.KuTechVideos.com/vg13/\f014
www.KuTechVideos.com/vg13/\f014
CANCELCRUISE
RES
SET
VOL
VOL
MUTEMODE
CANCELCRUISE
RES
SET
VOL
VOL
MUTEMODE
CANCELCRUISERES
SETVOL
VOL
MUTEMODE
CANCELCRUISERES
SETVOL
VOL
MUTEMODE
Paddle Shifters*
Paddle Shifters are operable when the \fhift
lever i\f in the D po\fition or in Sport Mode .
Paddle Shifting: Pull the [+] or [-] paddle \fhifter
once to \fhift up or down one gear .
REMINDER: The Paddle Shifter\f can be operated when the vehicle \fpeed i\f more than 6 mph .
REMINDER: When in Sportmatic Mode, pulling the left and right paddle \fhifter\f at the \fame time will NOT \fhift gear\f .
QUICK TIPS
QR CODE
VIDVEOS &Q RSC&QSNDTQUMOSLVT’VISPNUS NLAIQCQSNAQUVC\fTWS\fTPNULVC\fNTSVTHSOVPQC ESDVUT\fTWOYS\b\fPSQF’\fAAQHS
������������
Page 24 of 42

22
REMINDERS:
•
A\f a bulb check, the EPB malfunction indicator will illuminate for approximately 3 \fecond\f when the ignition \fwitch i\f turned ON
•
If the warning light doe\f not illuminate temporarily, or continue\f to remain lit, take your vehicle to an authorized Kia dealer and have the \fy\ftem checked
•
The EPB \fhould not be operated while the vehicle i\f moving
•
A click or electric brake motor whine \found may be heard while operating or relea\fing the EPB . The\fe condition\f are normal and indicate that the EPB i\f functioning properly
Electric Parking Brake (EPB)*
The Electric Parking Brake (EPB) \fy\ftem utilize\f an electric motor to engage the parking brake .
Applying the Parking Brake
Depre\f\f the brake pedal and pull up the EPB \fwitch A .
En\fure that the indicator light i\f illuminated on the in\ftrument clu\fter .
Releasing the Parking Brake
The EPB will automatically relea\fe when the \fhifter i\f placed in Rever\fe
or Drive . To relea\fe EPB manually, depre\f\f the brake pedal, then pre\f\f the EPB \fwitch A, with the ignition \fwitch in the ON po\fition . En\fure that the indicator light i\f OFF .
Pull up and hold EPB \fwitch again to increa\fe brake pre\f\fure if parked on a decline or incline .
(Button\f located below Gear Shif t)
QUICK TIPSA
B
CADENZA Air CoindtdACg/ lmgndaClei
VIDEOS I&&OQE
Air iCondrit