Page 33 of 674
How To Use Remote Start
All of the following conditions must be met before the
engine will remote start:
•Shift lever in PARK
• Doors closed
• Hood closed
• Hazard switch off
• Brake switch inactive (brake pedal not pressed)
• Ignition key removed from ignition switch
• Battery at an acceptable charge level
• RKE PANIC button not pressed
• System not disabled from previous remote start event
• Vehicle theft alarm not active
Page 73 of 674
LOCK position, in the ACC position, or not in the
ignition, the air bag system is not on and the air bags will
not inflate.
The ORC contains a backup power supply system that
may deploy the air bags even if the battery loses power or
it becomes disconnected prior to deployment.Also, the ORC turns on the Air Bag Warning
Light for four to eight seconds for a self-check
when the ignition is first turned on. After the
self-check, the Air Bag Warning Light will turn
off. If the ORC detects a malfunction in any part of the
system, it turns on the Air Bag Warning Light either
momentarily or continuously. A single chime will sound
if the light comes on again after initial startup.
It also includes diagnostics that will illuminate the instru-
ment cluster Air Bag Warning Light if a malfunction is noted that could affect the air bag system. The diagnos-
tics also record the nature of the malfunction.
2
THINGS TO KNOW BEFORE STARTING YOUR VEHICLE 71
Page 295 of 674

WARNING!
You or others could be injured if you carry the side
bars loose in your vehicle. Remove the side bars from
the vehicle or securely store them as described or
they may cause personal injury if an accident occurs.
See your authorized dealer for the cinch straps.
10. Remove the windshield wiper arms by first pulling the wiper away from the windshield and out to the
“lock” position. Unsnap the wiper arm nut caps, and
remove the retaining nuts. Lift the wiper arms off and
store them in the center console or securely behind
the rear seat.
NOTE: It may be necessary to use a battery terminal
puller tool in order to separate the wiper arms from the
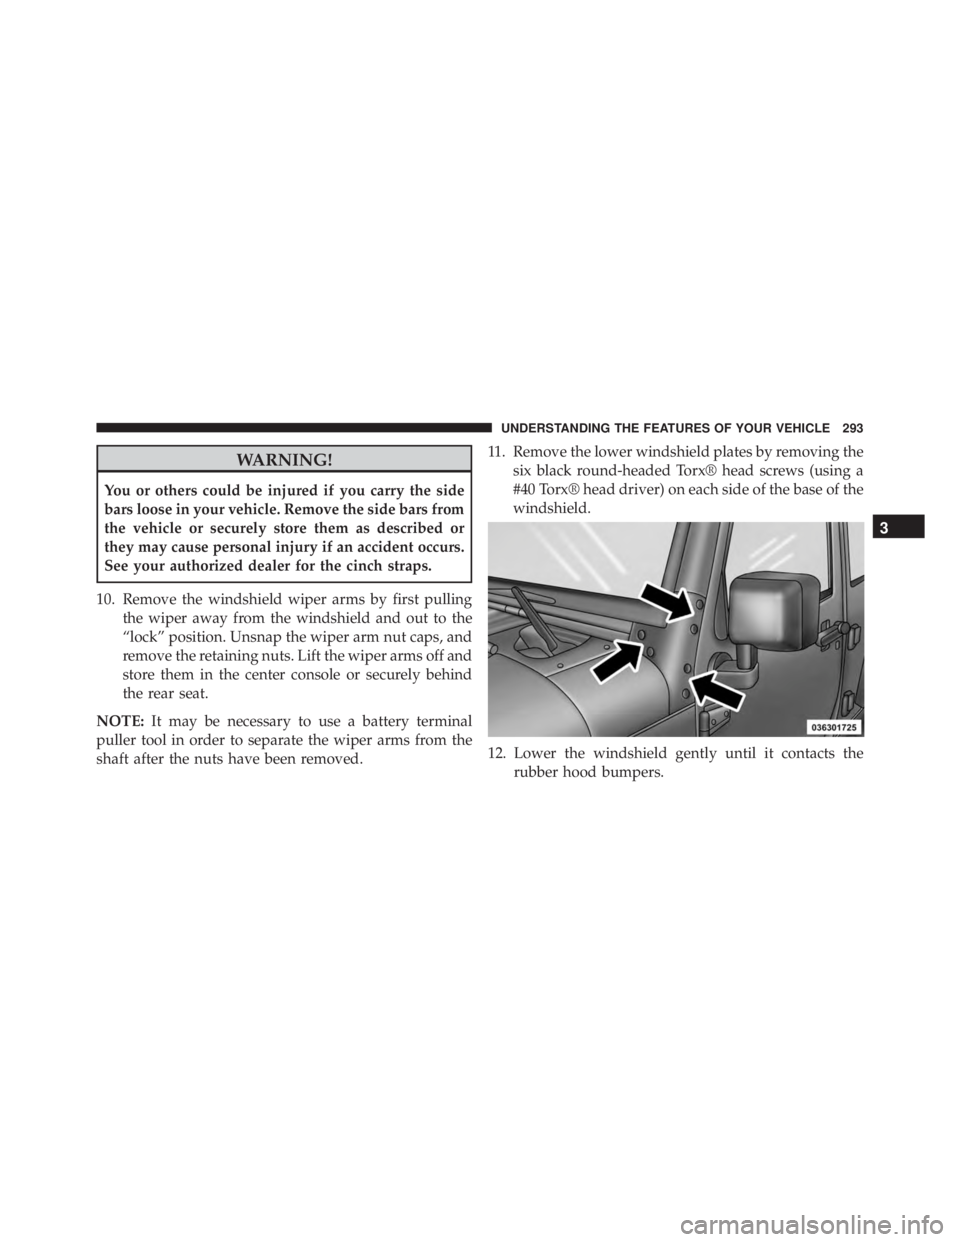
shaft after the nuts have been removed. 11. Remove the lower windshield plates by removing the
six black round-headed Torx® head screws (using a
#40 Torx® head driver) on each side of the base of the
windshield.
12. Lower the windshield gently until it contacts the rubber hood bumpers.
3
UNDERSTANDING THE FEATURES OF YOUR VEHICLE 293
Page 418 of 674
WARNING!(Continued)
•Do not attempt to push or tow your vehicle to get it
started. Vehicles equipped with an automatic trans-
mission cannot be started this way. Unburned fuel
could enter the catalytic converter and, once the
engine has started, ignite and damage the converter
and vehicle.
• If the vehicle has a discharged battery, booster
cables may be used to obtain a start from a booster
battery or the battery in another vehicle. This type
of start can be dangerous if done improperly. Refer
to “Jump Starting” in “What To Do In Emergen-
cies” for further information.
Without Tip Start — Manual Transmission Only
If the engine fails to start after you have followed the
“Normal Starting” or “Extreme Cold Weather” proce-
dures, it may be flooded. Push the accelerator pedal all
the way to the floor and hold it there while cranking the engine. This should clear any excess fuel in case the
engine is flooded.
Page 563 of 674
NOTE:When using a portable battery booster pack
follow the manufacturer ’s operating instructions and
precautions.
Page 564 of 674
WARNING!(Continued)
ignition switch is ON. You can be injured by
moving fan blades.
• Remove any metal jewelry such as rings, watch
bands and bracelets that could make an inadvertent
electrical contact. You could be seriously injured.
• Batteries contain sulfuric acid that can burn your
skin or eyes and generate hydrogen gas which is
flammable and explosive. Keep open flames or
sparks away from the battery.
1. Set the parking brake, shift the automatic transmission into PARK (manual transmission in NEUTRAL) and
turn the ignition to LOCK.
2. Turn off the heater, radio, and all unnecessary electri- cal accessories. 3. If using another vehicle to jump-start the battery, park
the vehicle within the jumper cables reach, set the
parking brake and make sure the ignition is OFF.
Page 565 of 674
CAUTION!
Failure to follow these procedures could result in
damage to the charging system of the booster vehicle
or the discharged vehicle.
Connecting The Jumper Cables
1. Connect the positive (+)end of the jumper cable to the
positive (+)post of the discharged vehicle.
2. Connect the opposite end of the positive (+)jumper
cable to the positive (+)post of the booster battery.
3. Connect the negative (-)end of the jumper cable to the
negative (-)post of the booster battery.
4. Connect the opposite end of the negative (-)jumper
cable to a good engine ground (exposed metal part of
the discharged vehicle’s engine) away from the battery
and the fuel injection system.
Page 584 of 674
Maintenance-Free Battery
Your vehicle is equipped with a maintenance-free battery.
You will never have to add water, nor is periodic main-
tenance required.