2014 JEEP RENEGADE radio
[x] Cancel search: radioPage 189 of 212

USB/iPod/AUX SUPPORT
Versions with Uconnect 5" Radio:
the vehicle has a USB/AUX port located
on the central tunnel.
Versions with Uconnect 5" Radio
Nav: the vehicle has a USB/AUX port
located in the centre tunnel and a USB
port located inside the front armrest.
RADIO MODE
After the desired radio station is
selected on the display (see fig. 161),
the following information is shown:
At the top: the list of radio stations
stored (preset) is displayed; the station
being listened to is highlighted.
In the middle: display of the name of
the current radio station and the
buttons (
/) for selecting the
previous or next radio station.At the bottom: display of the following
buttons:
❒"Browse": list of the radio stations
available;
❒"AM/FM", "AM/DAB", "FM/DAB":
selection of the desired frequency band
(button reconfigurable according to
the band selected: AM, FM or DAB);
❒"Tune" : manual radio station tuning
(not available for DAB radios);
❒"Info": additional information on the
source being listened to;
❒"Audio": access to the "Audio
setting" screen.
Audio menu
The following adjustments can be
carried out using the "Audio" menu:
❒"Equaliser" (where provided);
❒"Balance/Fader" (left/right and
front/rear sound balance adjustment);
❒"Volume/Speed" (excluding versions
with Hi-Fi system) speed-dependent
automatic volume adjustment;
❒"Loudness" (where provided);
❒"Auto-On Radio" (selects the radio
operation when the ignition device
is turned to MAR).
MEDIA MODE
With Media mode active, briefly press
buttons
/to play the
previous/next track or keep buttons
/pressed to fast rewind/
forward the track.
Track selection (Browse)
NOTE For languages not supported by
the system which feature special
characters (e.g. Greek), the keyboard is
not available. In these cases this
function will be limited.
Bluetooth
® SOURCE
Pairing an audio device Bluetooth®
To pair aBluetooth® audio device,
proceed as follows:
❒activate theBluetooth® function on
the device;
❒Press the MEDIA button on the front
panel;
❒if the "Media" source is active, press
the "Source" button;
❒select theBluetooth® Media
source;
❒press the "Add Device" button;
❒search forUconnect™on theBlue-
tooth® audio device (during the pairing
stage a screen is displayed showing the
progress of the operation);
161J0A2500C
187
Page 191 of 212

NOTE The operations described above
can only be accessed if supported by
the mobile phone in use.
SMS message reader
The system can read the messages
received by the mobile phone. To use
this function the mobile phone must
support the SMS exchange function
throughBluetooth®.
If this function is not supported by the
phone, the corresponding
button is
deactivated (greyed out).
When a text message is received, the
display will show a screen where the
options "Listen", "Call" or "Ignore" can
be selected.
Press the
button to access the list
of SMS messages received by the
mobile phone (the list displays a
maximum of 60 messages received).
SETTINGS
Press the +MORE button on the front
panel to display the main "Settings"
menu.
NOTE The menu items displayed vary
according to the versions.
The menu includes the following items:
❒Display;
❒Units;
❒Voice commands;
❒Clock & Date;❒Safety/Assistance (where provided);
❒Lights (where provided);
❒Doors & Locks;
❒Engine Off Options;
❒Audio;
❒Phone/Bluetooth;
❒SiriusXM Setup (where provided);
❒Radio Setup;
❒Restore settings
Safety/Assistance(where provided)
This function can be used to carry out
the following adjustments:
ParkView Camera(where provided)
This function can be used to carry out
the following adjustments:
❒"Active Guidelines" (where provided):
permits the activation of dynamic grids
that indicate the trajectory of the vehicle
on the display.
❒"ParkView cam.delay" (where
provided): permits a delay in the
disappearance of images from the
camera when reverse is disengaged.
Forward Collision Warning(where provided)
This function can be used to select the
Forward Collision Warning system
intervention method.The options available are:
❒"Off": the system is deactivated;
❒"Only warning": the system
intervenes only by providing the driver
with an acoustic warning (where
provided);
❒"Only active braking": the system
intervenes by activating automatic
braking (where provided);
❒"Warning + active braking": the
system intervenes by providing the
driver with an acoustic warning and
activating automatic braking.
Forward Collision Sensitivity(where provided)
This function can be used to select the
"readiness" of the system to intervene,
on the basis of distance from the
obstacle.
The options available are "Near",
"Med", "Far".
ParkSense(where provided)
This function can be used to select the
type of warning provided by the
ParkSense system.
The options available are:
❒"Sound Only": the system warns the
driver that an obstacle is present
through acoustic warnings only, via the
speakers in the vehicle.
189
Page 192 of 212

❒"Sound & Display": the system warns
the driver that an obstacle is present
through acoustic (via the speakers
in the vehicle) and visual (on the
instrument panel) warnings.
Front ParkSense Vol.(where provided)
This function can be used to select the
volume of the acoustic warnings
provided by the front Parksense
system.
Rear ParkSense Vol.(where provided)
This function can be used to select the
volume of the acoustic warnings
provided by the rear Parksense system.
ParkSense Vol.(where provided)
This function can be used to select the
volume of the acoustic warnings
provided by the Parksense system.
LaneSense Warning(where provided)
This function can be used to select the
"readiness" of the LaneSense system to
intervene.
LaneSense Strength(where provided)
This function can be used to select the
force to apply to the steering wheel
to put the vehicle back in the lane
through the electric steering system, in
the event of LaneSense system
intervention.
SideSense(where provided)
This function can be used to select the
Side Distance Warning system warning
type.
The options available are:
❒"Off": the system is deactivated;
❒"Sound Only": the system warns the
driver that an obstacle is present
through acoustic warnings only, via the
speakers in the vehicle.
❒"Sound & Display": the system warns
the driver that an obstacle is present
through acoustic (via the speakers
in the vehicle) and visual (on the
instrument panel) warnings.
SideSense Intensity(where provided)
This function can be used to select the
Side Distance Warning system acoustic
warning volume.
Blind Spot Alert(where provided)
This function can be used to select the
type of warning ("Sound Only" or
"Sound & Display") to indicate the
presence of objects in the blind spot of
the door mirror.
Rain sensor(where provided)
This function can be used to activate/
deactivate the automatic operation
of the wipers in the event of rain.
Brakes(where provided)
This function can be used to select the
following submenus:
❒"Brake Service" (where provided):
permits the activation of the procedure
to carry out braking system servicing;
❒"Auto Park Brake" (where provided):
permits the activation/deactivation of
automatic parking brake engagement.
NAVIGATION(Uconnect 5" Radio Nav versions only)
Programming a route
IMPORTANT In the interest of safety
and to reduce distractions while you are
driving, you should always plan a route
before you start driving.
190
MULTIMEDIA
Page 193 of 212

❒tap the screen to open the Main
menu;
❒select "Navigate to" or "Drive to";
❒select "Address": you can change the
country or state setting by tapping the
flag before you select a city;
❒enter the town or city name, or the
postcode. Towns with similar names
are shown in the list while you type;
Tip: tap the arrow to the right of the list
to expand the list of suggested towns.
When the correct city or town appears
in the list, tap the name to select the
destination.
❒enter the street name. Streets with
similar names are shown in the list while
you type. When the correct street
name appears in the list, tap the name
to select the destination;
❒enter the house number, then tap
"Done";
❒the location is shown on the map.
Tap "Select" to continue or tap "Back"
to enter another address;
❒when the new route is shown, tap
"Done". For more information about the
route, tap "Details". To change your
route, for example, to travel via a
particular location or to select a new
destination, tap "Change route". You
are guided to your destination, using
spoken instructions and on-screen
directions.
MAP UPDATE(Uconnect 5" Radio Nav versions only)
The map can be updated in two
different ways:
❒most recent maps guarantee:ifa
new map is available for your system
within 90 day of initial use, it can be
downloaded once free of charge.
❒map update: it is possible to
purchase a new version of the map
installed on your system.
Preparing a USB device
To update the map, a USB device that
meets the following requirements must
be used:
❒ideally, the USB device should be
empty;
❒the USB device must have at least
8 GB of memory free;
❒the USB must use a FAT-32 file
system;
❒the USB device must not be blocked
and must allow files to be saved.
NOTE The use of a memory stick is
recommended, while the use of mass
storage devices, such as mobile
phones or multimedia players, is not
recommended.
To prepare a USB device, proceed as
follows:❒ensure that the map you wish to
update is active in the navigation
system. If the navigation system has
several maps and you wish to update a
map which is not currently active,
activate the map. To do this, select
"Change map" in the "Settings" menu
of the navigation application;
❒select "Navigation updates" in the
"Settings" menu. You are asked
whether you wish to prepare a USB
device for downloading updates;
❒select "Yes";
❒insert the USB device.
The system starts to prepare the USB
device.
When the USB device is ready, the
display shows a dedicated message.
Remove the USB device and connect it
to the computer. The new map can
now be downloaded to the USB
device.
TomTom HOME installation
To install TomTom HOME and create
a MyTomTom account, proceed as
follows:
❒download and install the TomTom
HOME application on the computer. On
the computer, access
www.tomtom.com/getstarted. Select
"Download TomTom HOME", then
follow the instructions provided.
191
To plan a route, do the following:
Page 195 of 212

VOICE COMMANDS
NOTE For languages not supported by
the system, voice commands are not
available.
To use the voice commands, press the
button ("Voice" button) or
("Phone" button) on the controls of
the steering wheel and give the
command you want to activate, out
loud.
Phone functions
Thebutton activates the following
functions:
❒Call
❒Dial
❒Redial
❒Call back
❒Last calls
❒Outgoing calls
❒Missed calls
❒Incoming calls
❒Phonebook
❒Search
❒Show SMS
Radio functions
Thebutton activates the following
functions:
❒Tune to XXX-FM
❒Tune to XXX AM
❒Tune to Radio XXX
❒Tune to DAB channel
Media Functions
Thebutton activates the following
functions:
❒Play song...
❒Play album…
❒Play artist…
❒Play genre…
❒Play playlist…
❒Play podcast…
❒Play audiobook…
❒Play track number…
❒Select the media
❒Display
Navigation functions(only versions with Uconnect 5" Radio
Nav and Uconnect 6.5" Radio Nav)
The
button activates the following
functions:
❒Drive Home
❒2D view
❒3D view
❒Clear route
❒Add Favourite
❒Repeat instruction
193
Page 196 of 212
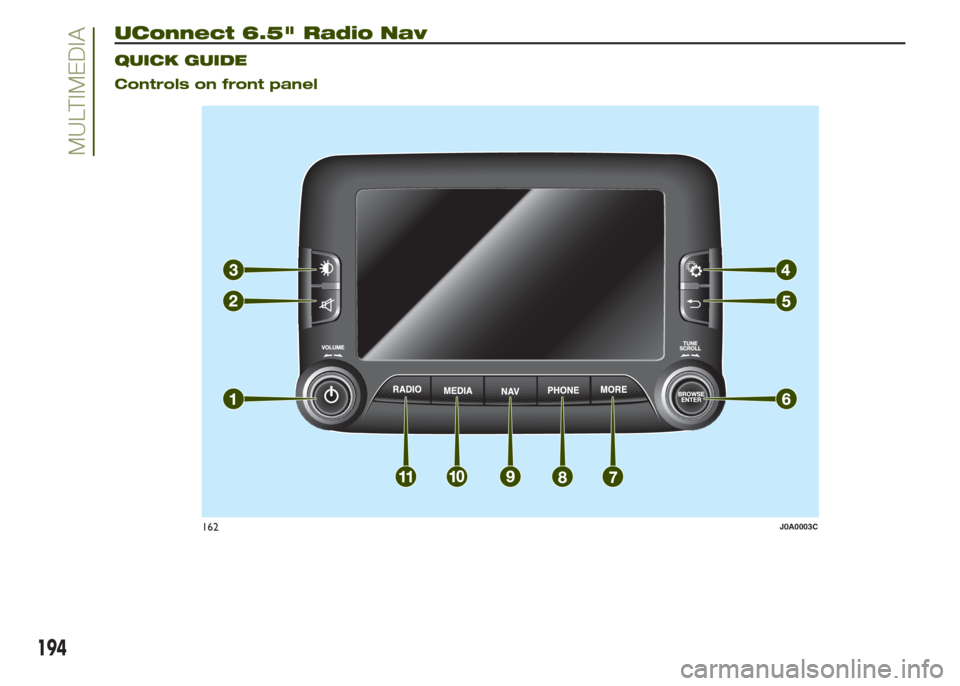
UConnect 6.5" Radio Nav.
QUICK GUIDE
Controls on front panel
162J0A0003C
194
MULTIMEDIA
Page 197 of 212

Front panel control summary table
Button Functions Mode
1–Switching on Brief button press
Switching off Brief button press
Volume adjustment Left/right rotation of knob
2–
Volume activation/deactivation (Mute/Pause) Brief button press
3–
Display on/off Brief button press
4–
Access to the Vehicle Settings menu Brief button press
5–
Exit the selection/return to previous screen Brief button press
6 – BROWSE ENTERScrolling the list or tuning to a radio station Left/right rotation of knob
Confirmation of the option displayed Brief button press
7 – MOREAccess to the additional functions: display of
Time, Compass, Outside temperature, Media
PlayerBrief button press
8 – PHONEPhone data display Brief button press
9–NAVAccess to the Navigation menu Brief button press
10 – MEDIASource selection Brief button press
11 – RADIOAccess to the Radio mode Brief button press
The system uses the "touch screen" function; to interact with the different functions, press the "graphic buttons" displayed. To
confirm the selection, press the button "OK". To go back to the previous screen, press the
(Delete) button or, depending on
the activated screen,
/Done.
195
Page 198 of 212

STEERING WHEEL
CONTROLS
For the operation of the controls on the
steering wheel see paragraph Uconnect
5" Radio/Uconnect 5" Radio Nav.
USB/iPod/AUX SUPPORT
The vehicle has a USB/AUX port
located in the centre tunnel and a USB
port located inside the front armrest.
RADIO MODE
After the desired radio station is
selected on the display (see fig. 163),
the following information is shown:
At the top: display of the stored radio
station (preset) list. The station being
listened to is highlighted.In the central part: displaying of the
radio station being listened to and
"AM/FM", "AM/DAB", "FM/DAB"
buttons: selection of the desired
frequency band (button reconfigurable
according to the band selected: AM,
FM or DAB);
At the bottom: display of the following
buttons:
❒"browse": list of the radio stations
available;
❒/select previous/following
radio station;
❒"tune" : manual radio station tuning
(not available for DAB radios);
❒"Audio": access to the "Audio
setting" screen.
Audio menu
The following adjustments can be
carried out using the "Audio" menu:
❒"Balance/Fader" (left/right and
front/rear sound balance adjustment);
❒"Equaliser" (where provided);
❒"Volume/Speed" (excluding versions
with Hi-Fi system) speed-dependent
automatic volume adjustment;
❒"Surround Sound" (where provided);
❒"AUX Volume comp.";
❒"Loudness" (where provided);❒"Auto-On Radio" (selects the radio
operation when the ignition device
is turned to MAR).
MEDIA MODE
With Media mode active, briefly press
buttons
/to play the
previous/next track or keep buttons
/pressed to fast rewind/
forward the track.
Bluetooth
® SOURCE
Pairing an audio device Bluetooth®
Proceed as follows:
❒activate theBluetooth® function on
the device;
❒Press the MEDIA button on the front
panel;
❒if the "Media" source is active, press
the "Source" button;
❒select theBluetooth® Media
source;
❒press the "Add Device" button;
❒search forUconnect™on theBlue-
tooth® audio device (during the pairing
stage a screen is displayed showing the
progress of the operation);
❒when requested by the audio device,
enter the PIN code shown on the
system display or confirm on the device
the PIN displayed;
163J0A2501C
196
MULTIMEDIA