2014 JEEP GRAND CHEROKEE turn signal
[x] Cancel search: turn signalPage 3 of 220

INTRODUCTION/WELCOME
WELCOME FROM CHRYSLER
GROUP LLC.................. 3
CONTROLS AT A GLANCE
DRIVER COCKPIT............... 6
INSTRUMENT CLUSTER.......... 8
GETTING STARTED
KEYFOB ................... 10
REMOTE START............... 10
KEYLESS ENTER-N-GO™......... 11
VEHICLE SECURITY ALARM....... 15
SEATBELT .................. 15
SUPPLEMENTAL RESTRAINT SYSTEM
(SRS) — AIR BAGS............ 16
CHILD RESTRAINTS............ 17
FRONT SEATS................ 21
REAR SEATS................. 24
HEATED/VENTILATED SEATS....... 24
HEATED STEERING WHEEL....... 26
TILT/TELESCOPING STEERING
COLUMN................... 27
OPERATING YOUR VEHICLE
ENGINE BREAK-IN
RECOMMENDATIONS........... 28
HEADLIGHT SWITCH............ 29
TURN SIGNAL/WIPER/WASHER/HIGH
BEAM LEVER................ 30
AUTOMATIC DIMMING MIRRORS.... 32
SPEED CONTROL.............. 32
ADAPTIVE CRUISE CONTROL (ACC) . . . 34
FORWARD COLLISION WARNING (FCW)
WITHMITIGATION ............. 36
ELECTRONIC SHIFTER........... 38
PADDLE SHIFT MODE........... 39
FUEL ECONOMY (ECO) MODE...... 39
AUTOMATIC CLIMATE CONTROLS
WITH TOUCHSCREEN........... 40
PARKSENSE
®FRONT AND REAR
PARK ASSIST................ 42
PARKVIEW
®REAR BACK-UP CAMERA . 43
BLIND SPOT MONITORING........ 44
POWER SUNROOF............. 44
WIND BUFFETING............. 47
ELECTRONICS
YOUR VEHICLE'S SOUND SYSTEM . . . 48
IDENTIFYING YOUR RADIO........ 50
Uconnect
®ACCESS............. 51
Uconnect®5.0 ................ 65
Uconnect®8.4A ............... 73
Uconnect®8.4AN .............. 93
STEERING WHEEL AUDIO CONTROLS . . 114ELECTRONIC VEHICLE INFORMATION
CENTER (EVIC).............. 114
PROGRAMMABLE FEATURES...... 115
UNIVERSAL GARAGE DOOR OPENER
(HomeLink
®) ................ 117
POWER INVERTER............ 119
POWER OUTLETS............. 120
OFF-ROAD CAPABILITIES
(4WD OPERATION)
QUADRA-TRAC I®FOUR-WHEEL
DRIVE .................... 122
QUADRA-TRAC II
®/QUADRA-DRIVE II®FOUR-WHEEL DRIVE.......... 122
SELEC-TERRAIN™............ 124
QUADRA-LIFT™.............. 125
HILL START ASSIST/HILL DESCENT
CONTROL/SELEC SPEED CONTROL . . 127
UTILITY
TRAILER TOWING WEIGHTS (MAXIMUM
TRAILER WEIGHT RATINGS)...... 128
RECREATIONAL TOWING (BEHIND
MOTORHOME, ETC.)........... 132
SRT
PADDLE SHIFT MODE.......... 136
SELEC-TRACK™.............. 137
SRT PERFORMANCE FEATURES.... 138
SUMMER/THREE-SEASON TIRES . . . 141
DIESEL
DIESEL ENGINE BREAK-IN
RECOMMENDATIONS.......... 142
DIESEL ENGINE STARTING
PROCEDURES............... 142
DIESEL FUEL FILTERS/WATER
SEPARATOR ................ 144
EXHAUST REGENERATION....... 145
DIESEL EXHAUST FLUID........ 146
WHAT TO DO IN EMERGENCIES
ROADSIDE ASSISTANCE......... 150
INSTRUMENT CLUSTER WARNING
LIGHTS................... 150
IF YOUR ENGINE OVERHEATS..... 158
JACKING AND TIRE CHANGING.... 158
BATTERY LOCATION........... 165
JUMP-STARTING............. 165
EMERGENCY TOW HOOKS....... 167
MANUAL PARK RELEASE 8-SPEED . . 168
TOWING A DISABLED VEHICLE.... 169
EVENT DATA RECORDER (EDR).... 170
CAP-LESS FUEL FILL FUNNEL..... 170
TABLE OF CONTENTS
Page 8 of 220

DRIVER COCKPIT
1. Headlight Switch pg. 29
2. Electronic Vehicle Information Center (EVIC) Controls pg. 114
3. Turn Signal/Wiper/Washer/High Beams Lever (behind steering wheel) pg. 30
4. Instrument Cluster pg. 9
5. Electronic Vehicle Information Center (EVIC) Display pg. 8
6. Speed Control pg. 32
7. Engine Start/Stop Button (behind steering wheel) pg. 13
8. Audio System (Touchscreen Radio Shown) pg. 48
CONTROLS AT A GLANCE
6
Page 11 of 220

Indicators
-Turn Signal Indicators
- High Beam Indicator
- Front Fog Light Indicator *
- Park/Headlight ON Indicator *
- Vehicle Security Indicator *
- Electronic Speed Control ON Indicator
- Electronic Speed Control SET Indicator
- Hill Descent Control Indicator *
- Door Ajar Indicator
- Electronic Stability Control (ESC) Off Indicator *
- Windshield Washer Fluid Low Indicator
- Liftgate Ajar Indicator *
* If equipped
** Bulb Check with Key On
CONTROLS AT A GLANCE
9
Page 29 of 220

TILT/TELESCOPING STEERING COLUMN
Manual Tilt/Telescoping Steering Column
The tilt/telescoping control handle is located below the steering wheel at the end of
the steering column.
• Push the handle down to unlock the
steering column.
• To tilt the steering column, move the
steering wheel upward or downward as
desired.
• To lengthen or shorten the steering
column, pull the steering wheel out-
ward or push it inward as desired.
• Pull up on the handle to lock the
column firmly in place.
Power Tilt/Telescoping Steering Column
The power tilt/telescoping steering control is located below the turn signal/wiper/
washer/high beam lever on the steering column.
• To tilt the steering column, move the
power tilt/telescoping control up or
down as desired.
• To lengthen or shorten the steering
column, pull the control toward you
or push the control away from you as
desired.
WARNING!
• Do not adjust the steering wheel while driving. The tilt/telescoping adjustment
must be locked while driving. Adjusting the steering wheel while driving or
driving without the tilt/telescoping adjustment locked could cause the driver to
lose control of the vehicle. Failure to follow this warning may result in you and
others being severely injured or killed.
• Moving the steering column while the vehicle is moving is dangerous. Without
a stable steering column, you could lose control of the vehicle and have a
collision. Adjust the column only while the vehicle is stopped.
GETTING STARTED
27
Page 32 of 220

Automatic High Beams
The Automatic High Beams system provides increased forward lighting at night by
automating high beam control through the use of a digital camera mounted on the
inside rearview mirror. This camera detects vehicle specific light and automatically
switches from high beams to low beams until the approaching vehicle is out of view.
This feature is programmable through the Uconnect
®system. Refer to “Uconnect®
Settings ” in “Understanding Your Instrument Panel” in the Owner's Manual on the
DVD for further details.
Instrument Panel Dimmer
• Rotate the dimmer control to the extreme bottom position to fully dim the
instrument panel lights and prevent the interior lights from illuminating when a
door is opened.
• Rotate the dimmer control up to increase the brightness of the instrument panel
when the parking lights or headlights are on.
• Rotate the dimmer control up to the next detent position to fully brighten the
odometer and radio when the parking lights or headlights are on.
• Rotate the dimmer control up to the last detent position to turn on the interior
lighting.
• If your vehicle is equipped with a touchscreen, the dimming is programmable
through the Uconnect
®system. Refer to “Uconnect®Settings ” in “Understanding
Your Instrument Panel” in the Owner's Manual on the DVD for further details.
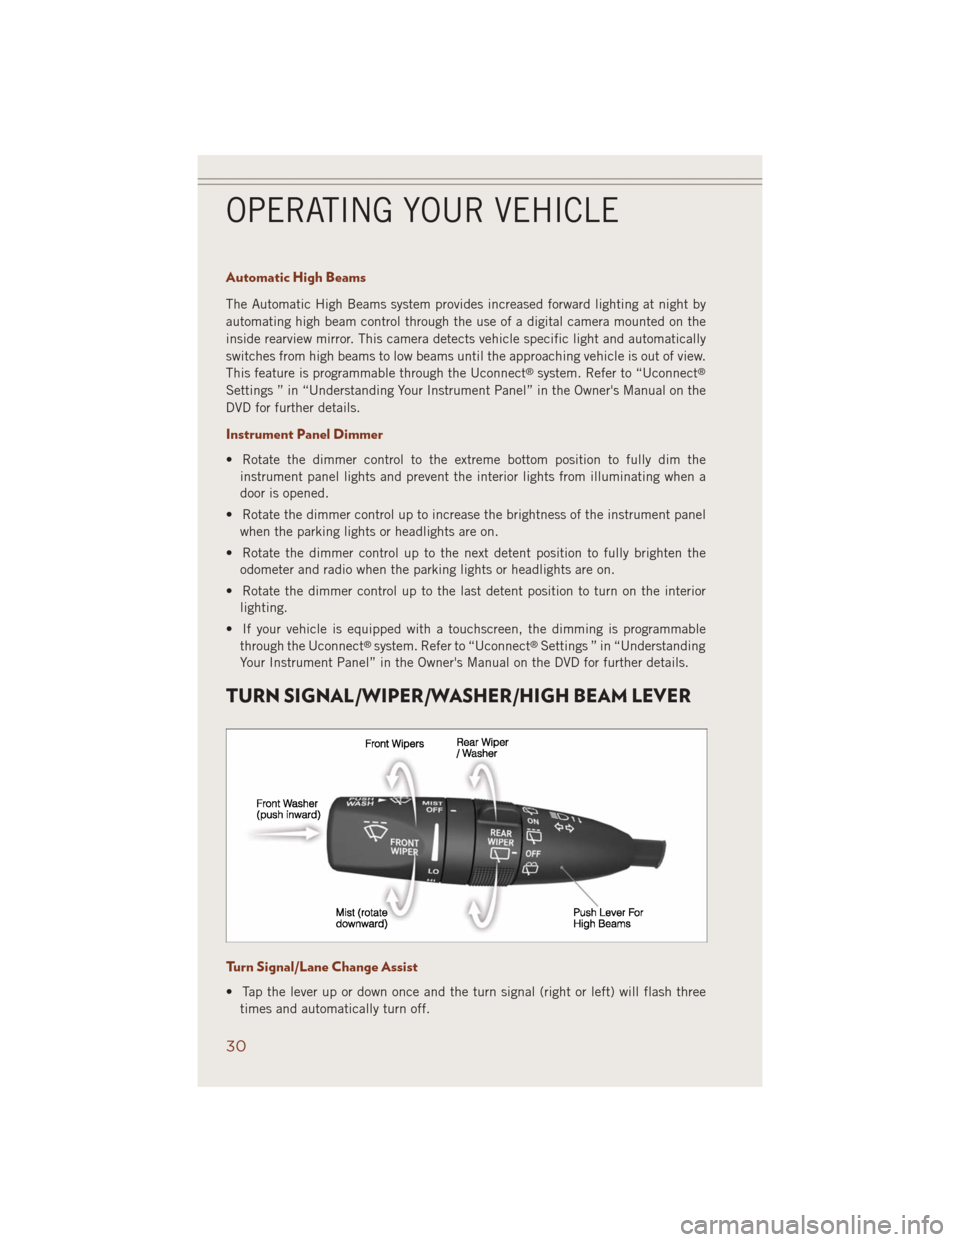
TURN SIGNAL/WIPER/WASHER/HIGH BEAM LEVER
Turn Signal/Lane Change Assist
• Tap the lever up or down once and the turn signal (right or left) will flash three
times and automatically turn off.
OPERATING YOUR VEHICLE
30
Page 60 of 220

3.Roadside Assistance (If Equipped)— If your vehicle is equipped with this feature
and within wireless range, you may be able to connect to Roadside Assistance by
pressing the “Assist” button on the rearview mirror. You will be presented with
Assist Care options. Make a selection by touching the prompts displayed on the
radio. If Roadside Assistance is provided to your vehicle, you agree to be
responsible for any additional roadside assistance service costs that you may
incur. In order to provide Uconnect
®Services to you, we may record and monitor
your conversations with Roadside Assistance, Uconnect®Care or Vehicle Care,
whether such conversations are initiated through the Uconnect®Services in your
vehicle, or via a landline or mobile telephone, and may share information
obtained through such recording and monitoring in accordance with regulatory
requirements. You acknowledge, agree and consent to any recording, monitoring
or sharing of information obtained through any such call recordings.
4.Yelp®— Customers have the ability to search for nearby destinations or a point
of interest (POI) either by category or custom search by using keywords (for
example, “Italian restaurant”). Searching can be done by voice or using the
touchscreen keypad. Using the touchscreen, launch Yelp
®by selecting the
“Apps” icon, touch the “All Apps” tab, and then touch “Yelp.” Using voice
recognition press the Voice Command (VR) button on the steering wheel and say
“Launch Yelp
®.”
5.Security Alarm Notification— The Security Alarm Notification feature notifies you
via email or text (SMS) message when the vehicle’s factory-installed security
alarm system has been set-off. There are a number of reasons why your alarm may
have been triggered, one of which could be that your vehicle was stolen. If so,
please see the details of the Stolen Vehicle Assistance service below. When you
register, Security Alarm Notification is automatically set to send you an email at
the mail address you provide should the alarm go off. You may also opt to have a
text message sent to your mobile device.
6.Stolen Vehicle Assistance— If your vehicle is stolen, contact local law enforce-
ment immediately to file a stolen vehicle report. Once this report has been filed,
Uconnect
®care can help locate your vehicle. The Uconnect®Care agent will ask
for the stolen vehicle report number issued by local law enforcement. Then, using
GPS technology and the built-in wireless connection within your vehicle, the
Uconnect
®Care agent will be able to locate the stolen vehicle and work with law
enforcement to help recover it. (Vehicle must be within the United States, have
network coverage and must be registered with Uconnect
®Access with an active
subscription that includes the applicable feature).
7.WiFi Hotspot— WiFi Hotspot is on-demand WiFi 3G connectivity that's built-in
and ready to go whenever you are. Once your vehicle is registered for Uconnect
®
Access, you can purchase a Wifi Hotspot subscription at the Uconnect®Store.
After you've made your purchase, turn on your signal and connect your devices.
It's never been easier to bring your home or office with you.
Your vehicle must have a working electrical system for any of the in vehicle Uconnect®
features to operate.
ELECTRONICS
58
Page 98 of 220

Store Radio Presets
• Your radio can store 36 total preset stations, 12 presets per band (AM, FM and
SXM). They are shown at the top of your radio screen. To see the 12 preset stations
per band, press the arrow soft-key at the top right of the screen to toggle between
the two sets of six presets.
• To set a station into memory press and hold the desired numbered soft-key for
more than two seconds or until you hear a confirmation beep.
HD Radio
• HD Radio technology (available on Uconnect
®8.4AN) allows broadcasters to
transmit a high-quality digital signal.
• With an HD radio receiver, the listener is provided with a clear sound that
enhances the listening experience. HD radio can also transmit data such as song
title or artist.
SiriusXM PREMIER OVER 160 CHANNELS
• Get every channel available on your satellite radio, and enjoy all you want, all in
one place. Hear commercial-free music plus sports, news, talk and entertainment.
Get all the premium programming, including Howard Stern, every NFL game,
Oprah Radio
®, every MLB®and NHL®game, every NASCAR®race, Martha
Stewart and more. And get 20+ extra channels, including SiriusXM Latino,
offering 20 channels of commercial free music, news, talk, comedy, sports and
more dedicated to Spanish language programming.
• To access SiriusXM Satellite Radio, touch the “SXM” soft-key on the main Radio
screen.
• The following describes features that are available when in SiriusXM Satellite
Radio mode.
Seek Up/Seek Down
• Touch the “Seek” arrow soft-keys for less than two seconds to seek through
channels in SXM mode.
• Touch and hold either “arrow” soft-key for more than two seconds to bypass
channels without stopping. The radio will stop at the next listenable channel once
the “arrow” soft-key is released.
Direct Tune
• Tune directly to a SXM channel by pressing the “Tune” soft-key on the screen, and
entering the desired station number.
Jump
• Automatically tells you when Traffic & Weather for a favorite city is available, and
gives you the option to switch to that channel. Touch “Jump” to activate the
feature. After listening to Traffic and Weather, touch “Jump” again to return to the
previous channel.
ELECTRONICS
96
Page 120 of 220

3. Simultaneously press and hold both the HomeLink®button you want to program
and the hand-held transmitter button.
4. Continue to hold both buttons and observe the indicator light. The HomeLink
®
indicator will flash slowly and then rapidly after HomeLink®has received the
frequency signal from the hand-held transmitter. Release both buttons after the
indicator light changes from slow to rapid.
5. At the garage door opener motor (in the garage), locate the “LEARN” or
“TRAINING” button. This can usually be found where the hanging antenna wire
is attached to the garage door opener motor. Firmly press and release the
“LEARN” or “TRAINING” button.
NOTE:
You have 30 seconds in which to initiate the next step after the LEARN button has
been pressed.
6. Return to the vehicle and press the programmed HomeLink
®button twice
(holding the button for two seconds each time). If the device is plugged in and
activates, programming is complete.
NOTE:
If the device does not activate, press the button a third time (for two seconds) to
complete the training.
7. To program the remaining two HomeLink
®buttons, repeat each step for each
remaining button. DO NOT erase the channels.
Programming A Non-Rolling Code
NOTE:
For programming Garage Door Openers manufactured before 1995.
1. Turn the ignition switch to the ON/RUN position.
2.
Place the hand-held transmitter 1 to 3 inches (3 to 8 cm) away from the HomeLink®
button you wish to program while keeping the HomeLink®indicator light in view.
3. Simultaneously press and hold both the HomeLink®button you want to program
and the hand-held transmitter button.
4. Continue to hold both buttons and observe the indicator light. The HomeLink
®
indicator will flash slowly and then rapidly after HomeLink®has received the
frequency signal from the hand-held transmitter. Release both buttons after the
indicator light changes from slow to rapid.
5. Press and hold the programmed HomeLink
®button and observe the indicator
light. If the indicator light stays on constantly, programming is complete and the
garage door (or device) should activate when the HomeLink
®button is pressed.
6. To program the two remaining HomeLink
®buttons, repeat each step for each
remaining button. DO NOT erase the channels.
ELECTRONICS
118