2014 JEEP GRAND CHEROKEE radio controls
[x] Cancel search: radio controlsPage 92 of 220
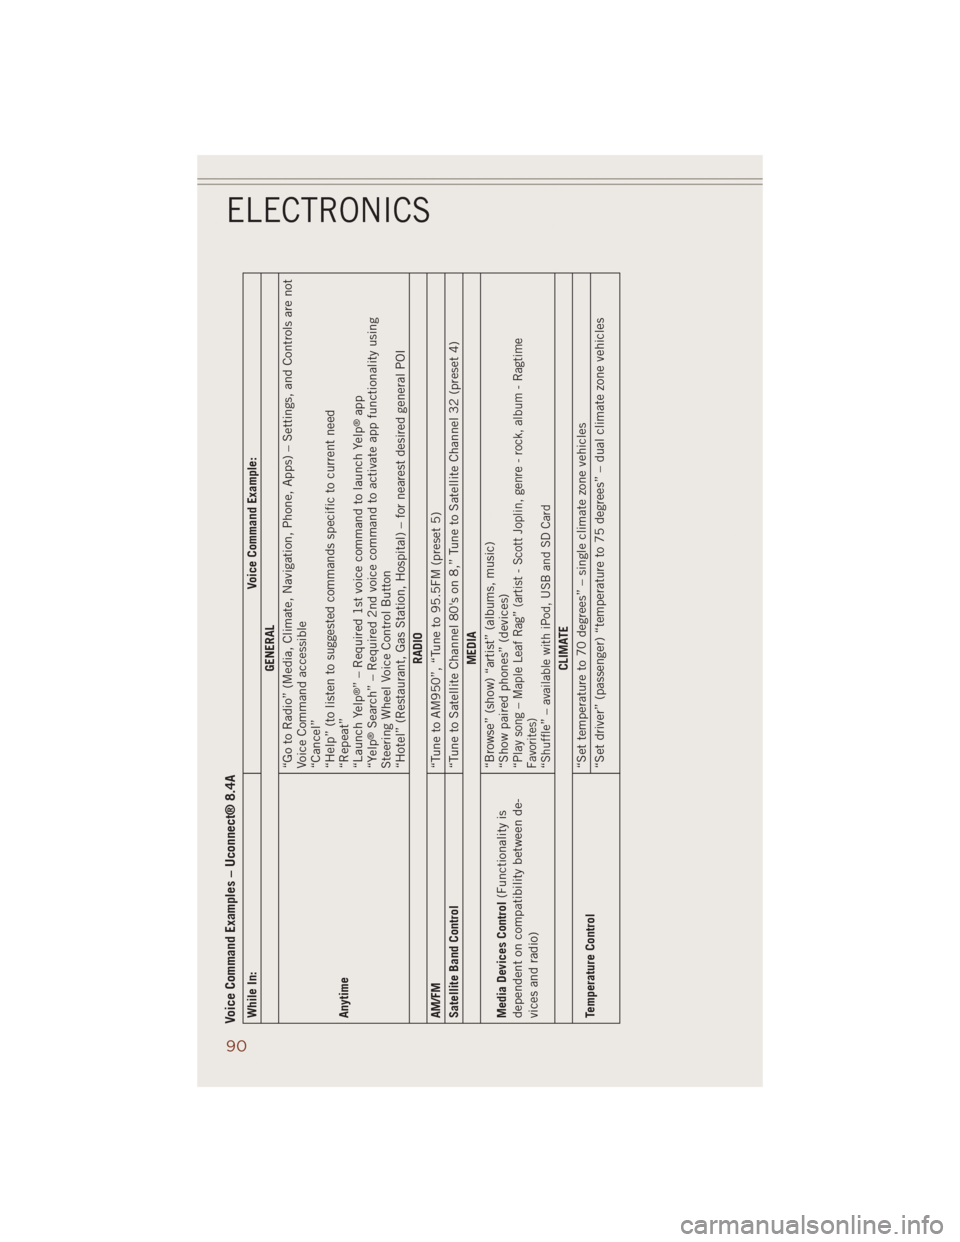
Voice Command Examples – Uconnect® 8.4AWhile In: Voice Command Example:
GENERAL
Anytime“Go to Radio” (Media, Climate, Navigation, Phone, Apps) – Settings, and Controls are not
Voice Command accessible
“Cancel”
“Help” (to listen to suggested commands specific to current need
“Repeat”
“Launch Yelp
®” – Required 1st voice command to launch Yelp
®app
“Yelp
®Search” – Required 2nd voice command to activate app functionality using
Steering Wheel Voice Control Button
“Hotel” (Restaurant, Gas Station, Hospital) – for nearest desired general POI
RADIO
AM/FM
“Tune to AM950”, “Tune to 95.5FM (preset 5)
Satellite Band Control
“Tune to Satellite Channel 80's on 8,” Tune to Satellite Channel 32 (preset 4)
MEDIA
Media Devices Control(Functionality is
dependent on compatibility between de-
vices and radio)“Browse” (show) “artist” (albums, music)
“Show paired phones” (devices)
“
Play song – Maple Leaf Rag” (artist - Scott Joplin, genre - rock, album - Ragtime
Favorites)
“Shuffle” – available with iPod, USB and SD Card
CLIMATE
Temperature Control“Set temperature to 70 degrees” – single climate zone vehicles
“Set driver” (passenger) “temperature to 75 degrees” – dual climate zone vehicles
ELECTRONICS
90
Page 95 of 220
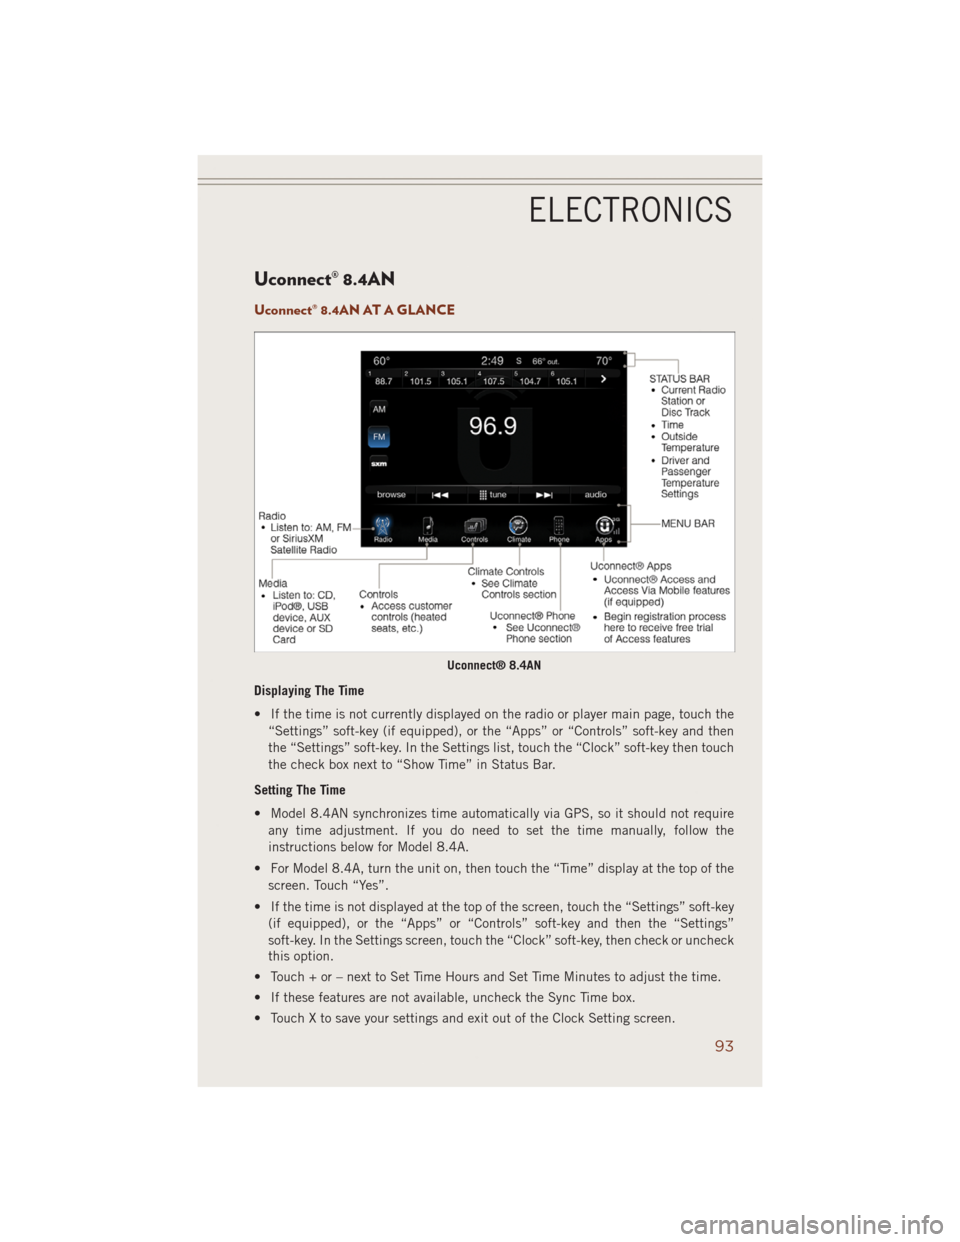
Uconnect® 8.4AN
Uconnect® 8.4AN AT A GLANCE
Displaying The Time
• If the time is not currently displayed on the radio or player main page, touch the
“Settings” soft-key (if equipped), or the “Apps” or “Controls” soft-key and then
the “Settings” soft-key. In the Settings list, touch the “Clock” soft-key then touch
the check box next to “Show Time” in Status Bar.
Setting The Time
• Model 8.4AN synchronizes time automatically via GPS, so it should not require
any time adjustment. If you do need to set the time manually, follow the
instructions below for Model 8.4A.
• For Model 8.4A, turn the unit on, then touch the “Time” display at the top of the
screen. Touch “Yes”.
• If the time is not displayed at the top of the screen, touch the “Settings” soft-key
(if equipped), or the “Apps” or “Controls” soft-key and then the “Settings”
soft-key. In the Settings screen, touch the “Clock” soft-key, then check or uncheck
this option.
• Touch + or – next to Set Time Hours and Set Time Minutes to adjust the time.
• If these features are not available, uncheck the Sync Time box.
• Touch X to save your settings and exit out of the Clock Setting screen.
Uconnect® 8.4AN
ELECTRONICS
93
Page 99 of 220
Fav
• Activates the favorites menu. You can add up to 50 favorite artists or songs. Just
touch “Add Fav Artist” or “Add Fav Song” while the song is playing. You will then
be alerted any time one of these songs, or works by these artists, is playing on other
SiriusXM channels.
SiriusXM Parental Controls
• You can skip or hide certain channels from view if you do not want access to them.
Touch the “More” soft-key, then the “Settings” soft-key, next touch the “Sirius
Setup” soft-key, then select “Channel Skip”. Touch the box, check-mark, next to
the channel you want skipped. They will not show up in normal usage.
• SiriusXM also offers the option to permanently block selected channels. Call
(1-888-601-6297 for U.S. customers, 1-877-438-9677 for Canadian custom-
ers) and request the Family - Friendly Package.
Browse
• Lets you browse the SiriusXM channel listing or Genre listing. Favorites, Game
Zone, Weather and Jump settings also provide a way to browse the SiriusXM
channel list.
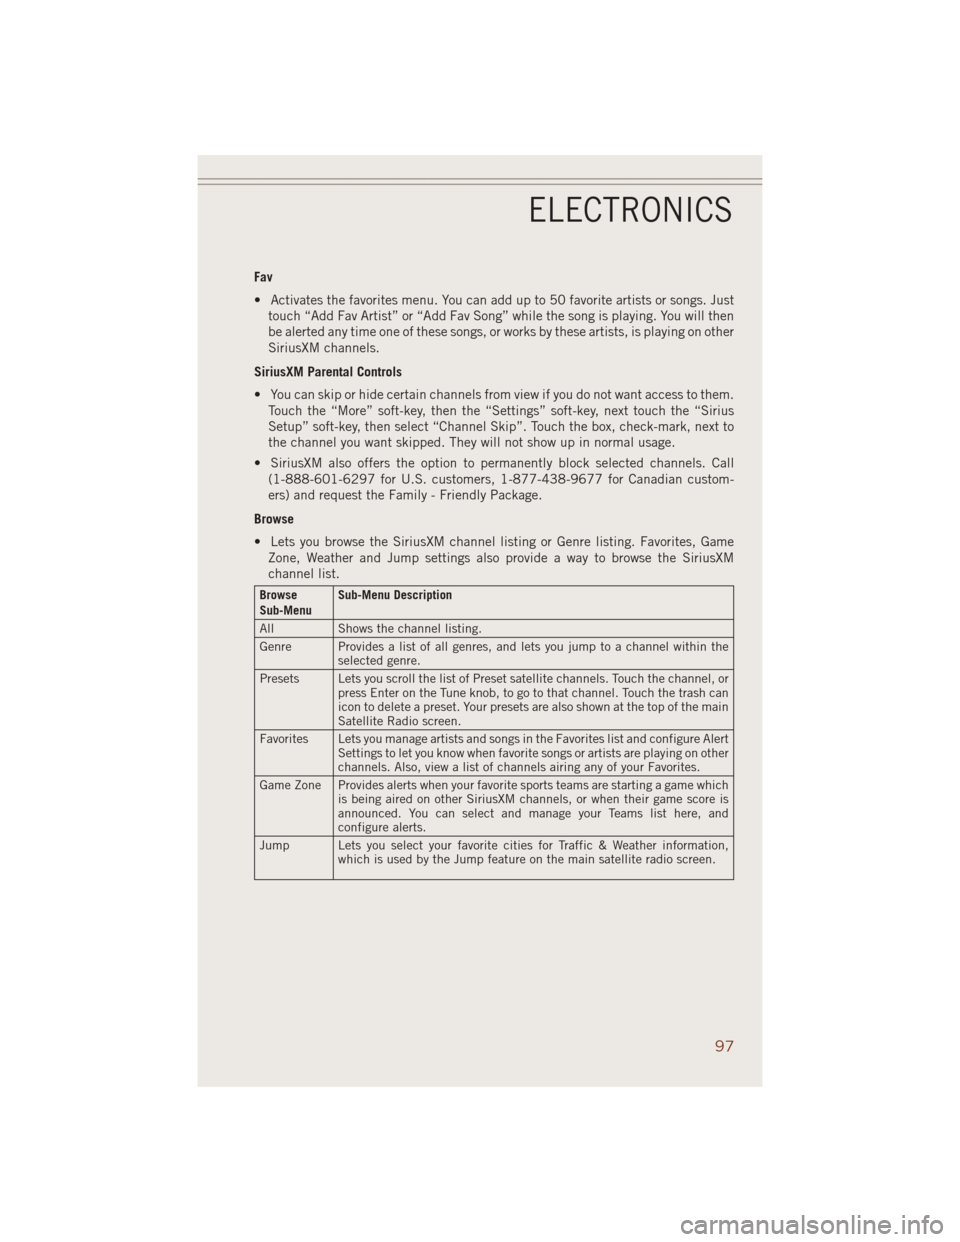
Browse
Sub-MenuSub-Menu Description
All Shows the channel listing.
Genre Provides a list of all genres, and lets you jump to a channel within the
selected genre.
Presets Lets you scroll the list of Preset satellite channels. Touch the channel, or
press Enter on the Tune knob, to go to that channel. Touch the trash can
icon to delete a preset. Your presets are also shown at the top of the main
Satellite Radio screen.
Favorites Lets you manage artists and songs in the Favorites list and configure Alert
Settings to let you know when favorite songs or artists are playing on other
channels. Also, view a list of channels airing any of your Favorites.
Game Zone Provides alerts when your favorite sports teams are starting a game which
is being aired on other SiriusXM channels, or when their game score is
announced. You can select and manage your Teams list here, and
configure alerts.
Jump Lets you select your favorite cities for Traffic & Weather information,
which is used by the Jump feature on the main satellite radio screen.
ELECTRONICS
97
Page 101 of 220
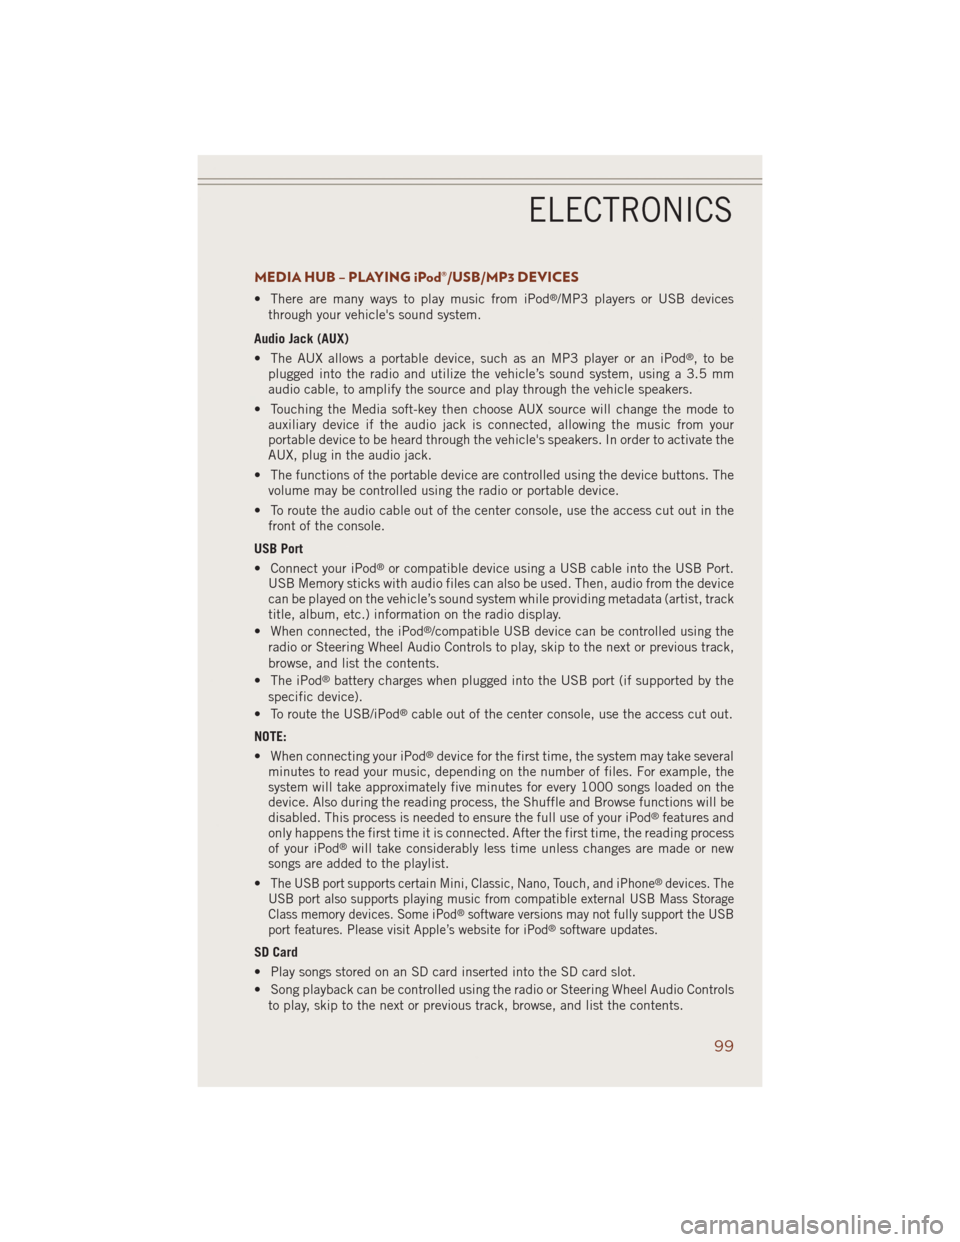
MEDIA HUB – PLAYING iPod®/USB/MP3 DEVICES
• There are many ways to play music from iPod®/MP3 players or USB devices
through your vehicle's sound system.
Audio Jack (AUX)
• The AUX allows a portable device, such as an MP3 player or an iPod
®,tobe
plugged into the radio and utilize the vehicle’s sound system, using a 3.5 mm
audio cable, to amplify the source and play through the vehicle speakers.
• Touching the Media soft-key then choose AUX source will change the mode to
auxiliary device if the audio jack is connected, allowing the music from your
portable device to be heard through the vehicle's speakers. In order to activate the
AUX, plug in the audio jack.
• The functions of the portable device are controlled using the device buttons. The
volume may be controlled using the radio or portable device.
• To route the audio cable out of the center console, use the access cut out in the
front of the console.
USB Port
• Connect your iPod
®or compatible device using a USB cable into the USB Port.
USB Memory sticks with audio files can also be used. Then, audio from the device
can be played on the vehicle’s sound system while providing metadata (artist, track
title, album, etc.) information on the radio display.
• When connected, the iPod
®/compatible USB device can be controlled using the
radio or Steering Wheel Audio Controls to play, skip to the next or previous track,
browse, and list the contents.
• The iPod
®battery charges when plugged into the USB port (if supported by the
specific device).
• To route the USB/iPod
®cable out of the center console, use the access cut out.
NOTE:
• When connecting your iPod
®device for the first time, the system may take several
minutes to read your music, depending on the number of files. For example, the
system will take approximately five minutes for every 1000 songs loaded on the
device. Also during the reading process, the Shuffle and Browse functions will be
disabled. This process is needed to ensure the full use of your iPod
®features and
only happens the first time it is connected. After the first time, the reading process
of your iPod
®will take considerably less time unless changes are made or new
songs are added to the playlist.
•
The USB port supports certain Mini, Classic, Nano, Touch, and iPhone®devices. The
USB port also supports playing music from compatible external USB Mass Storage
Class memory devices. Some iPod
®software versions may not fully support the USB
port features. Please visit Apple’s website for iPod®software updates.
SD Card
• Play songs stored on an SD card inserted into the SD card slot.
• Song playback can be controlled using the radio or Steering Wheel Audio Controls
to play, skip to the next or previous track, browse, and list the contents.
ELECTRONICS
99
Page 112 of 220
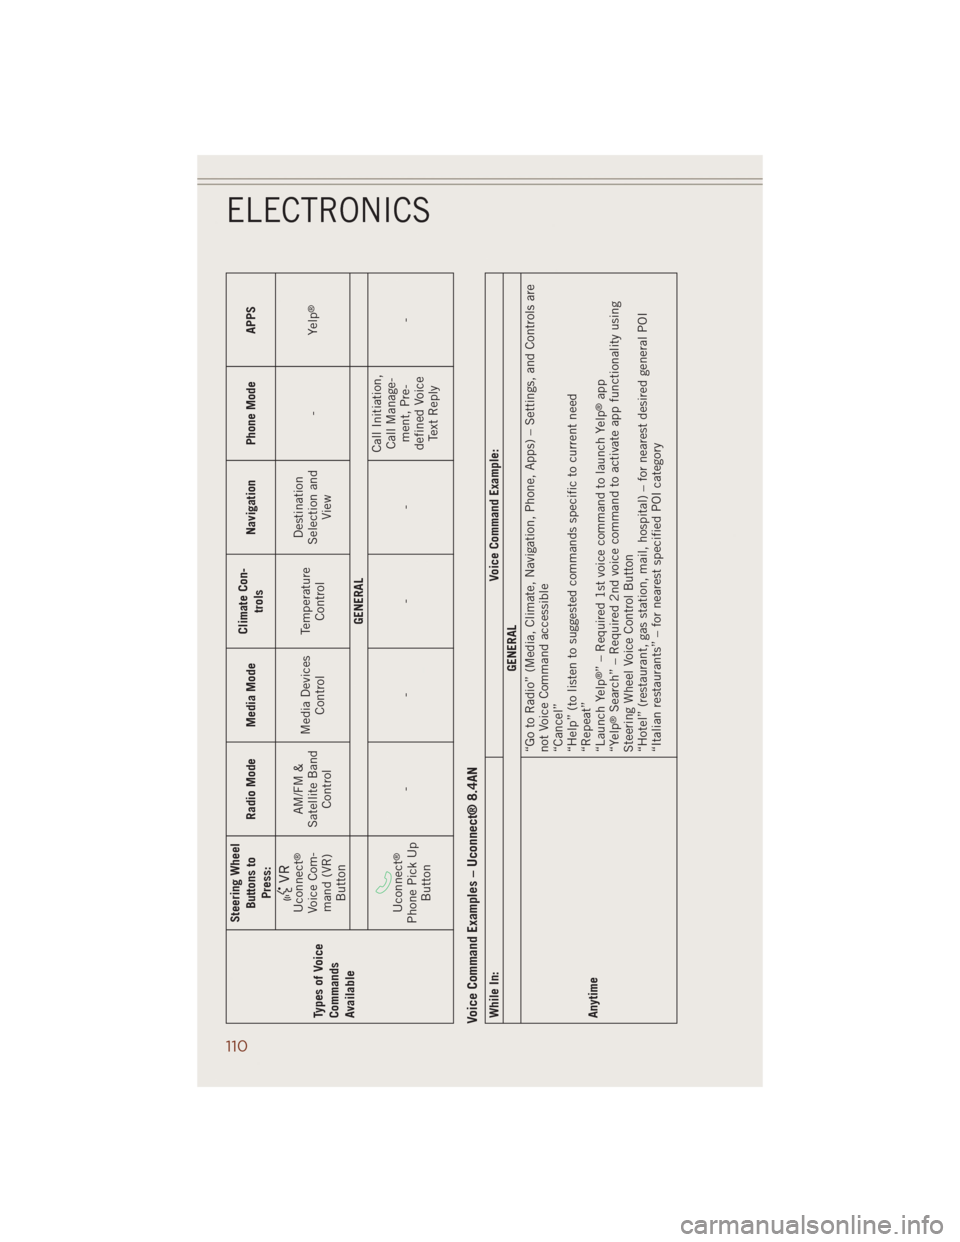
Types of Voice
Commands
AvailableSteering Wheel
Buttons to
Press:Radio Mode Media ModeClimate Con-
trolsNavigation Phone Mode APPS
Uconnect
®
Voice Com-
mand (VR)
ButtonAM/FM &
Satellite Band
ControlMedia Devices
ControlTemperature
ControlDestination
Selection and
View-Yelp
®
GENERAL
Uconnect
®
Phone Pick Up
Button----Call Initiation,
Call Manage-
ment, Pre-
defined Voice
Text Reply-
Voice Command Examples – Uconnect® 8.4ANWhile In: Voice Command Example:
GENERAL
Anytime“Go to Radio” (Media, Climate, Navigation, Phone, Apps) – Settings, and Controls are
not Voice Command accessible
“Cancel”
“Help” (to listen to suggested commands specific to current need
“Repeat”
“Launch Yelp
®” – Required 1st voice command to launch Yelp
®app
“Yelp
®Search” – Required 2nd voice command to activate app functionality using
Steering Wheel Voice Control Button
“Hotel” (restaurant, gas station, mail, hospital) – for nearest desired general POI
“Italian restaurants” – for nearest specified POI category
ELECTRONICS
110
Page 116 of 220
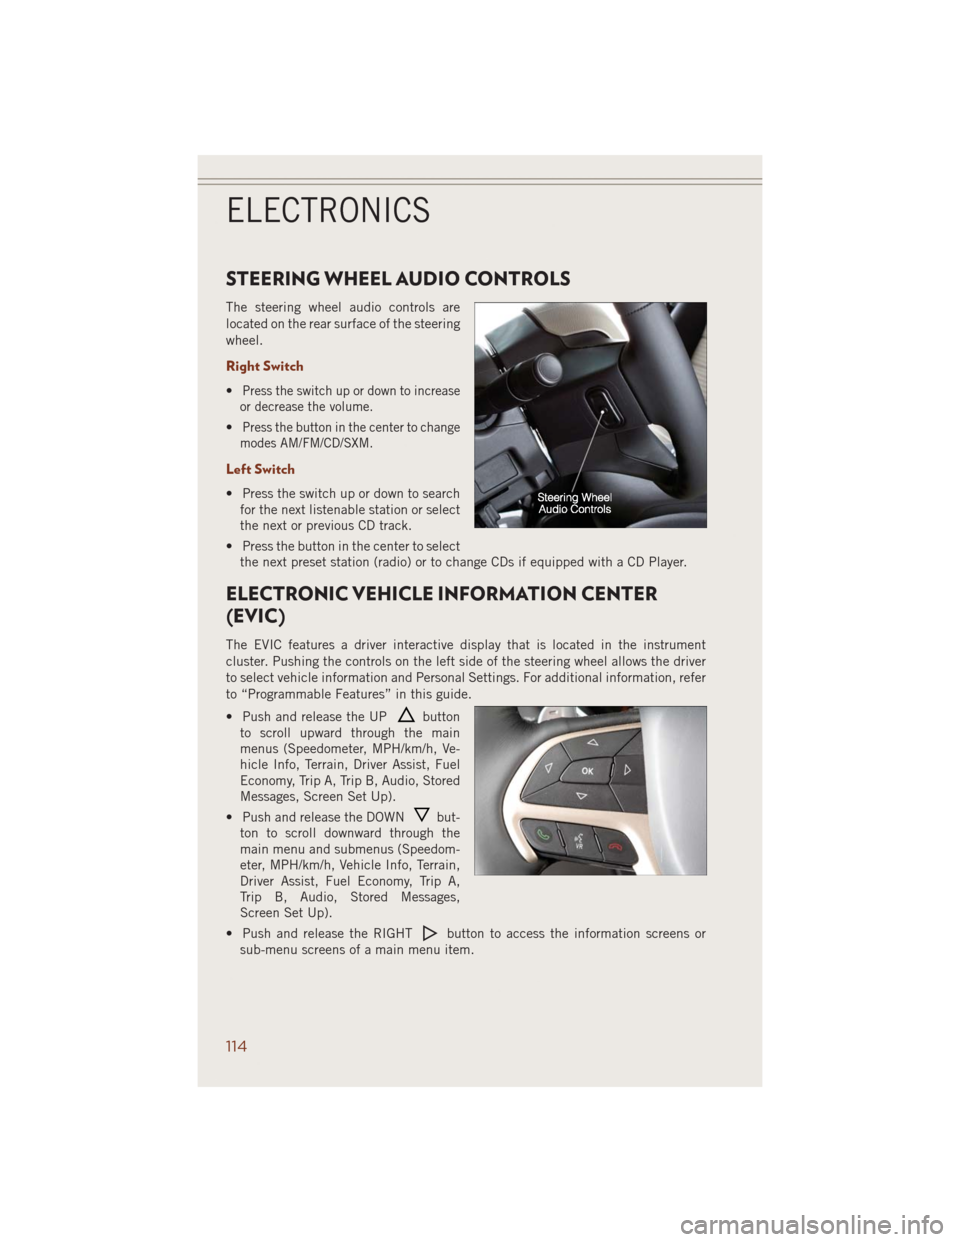
STEERING WHEEL AUDIO CONTROLS
The steering wheel audio controls are
located on the rear surface of the steering
wheel.
Right Switch
•Press the switch up or down to increase
or decrease the volume.
•Press the button in the center to change
modes AM/FM/CD/SXM.
Left Switch
• Press the switch up or down to search
for the next listenable station or select
the next or previous CD track.
• Press the button in the center to select
the next preset station (radio) or to change CDs if equipped with a CD Player.
ELECTRONIC VEHICLE INFORMATION CENTER
(EVIC)
The EVIC features a driver interactive display that is located in the instrument
cluster. Pushing the controls on the left side of the steering wheel allows the driver
to select vehicle information and Personal Settings. For additional information, refer
to “Programmable Features” in this guide.
• Push and release the UP
button
to scroll upward through the main
menus (Speedometer, MPH/km/h, Ve-
hicle Info, Terrain, Driver Assist, Fuel
Economy, Trip A, Trip B, Audio, Stored
Messages, Screen Set Up).
• Push and release the DOWN
but-
ton to scroll downward through the
main menu and submenus (Speedom-
eter, MPH/km/h, Vehicle Info, Terrain,
Driver Assist, Fuel Economy, Trip A,
Trip B, Audio, Stored Messages,
Screen Set Up).
• Push and release the RIGHT
button to access the information screens or
sub-menu screens of a main menu item.
ELECTRONICS
114
Page 127 of 220

QUADRA-LIFT™
The Quadra-Lift™ air suspension system provides full time load leveling capability
along with the benefit of being able to adjust vehicle height by the push of a button.
Quadra-Lift™ is available with both Quadra-Trac II
®and Quadra-Drive II™.
• The system requires that the engine be
running for all changes. When lowering
the vehicle all of the doors, including
the liftgate, must be closed.
• The Quadra-Lift™ air suspension sys-
tem uses a lifting and lowering pattern
which keeps the headlights from shin-
ing into oncoming traffic. When raising
the vehicle, the rear of the vehicle will
move up first and then the front. When
lowering the vehicle, the front will
move down first and then the rear.
• After the engine is turned off, you may
notice that the air suspension system
operates briefly. This is normal. The
system is correcting the position of the vehicle.
• To assist with changing a spare tire, the Quadra-Lift™ air suspension system has
a feature which allows the automatic leveling to be disabled. The feature controls
are located in the radio screen. Driving the vehicle over 5 mph (8 km/h) will return
the air suspension to normal operation.
• An audible chime will be heard whenever a system error has been detected.
Operation
• Pressing the “Up” or “Down” button once will move the suspension one position
higher or lower from the current position, assuming all conditions are met (i.e.,
engine running and all doors and liftgate closed).
• The 4 indicator lamps will illuminate to show the current position of the vehicle.
Flashing indicator lamps will show a position which the system is working to
achieve. If multiple indicator lamps are flashing on the “Up” button, the highest
flashing indicator lamp is the position the system is working to achieve.
• Normal Ride Height (NRH) – This is the standard position of the
suspension and is meant for normal driving. Only the bottom Indicator
lamp on the “Up” button will be illuminated when the vehicle is in this
position.
UP
OFF-ROAD CAPABILITIES (4WD OPERATION)
125