Page 75 of 204
Uconnect® 5.0
Setting The Time
1. Press the MORE hard-key on the right side of the display, next press the“Settings” soft-key, then press the “Clock & Date” soft-key, and then the “Time”
soft-key.
2. Touch the “Up or Down” arrows to adjust the hours or minutes, next select the “AM or PM” soft-key. You can also select 12hr or 24hr format by touching the
desired soft-key.
3. Once the time is set press the “Done” soft-key to exit the time screen.
Equalizer, Balance And Fade
1. Press the MORE hard-key on the right side of the display, next press the “Settings” soft-key.
2. Then scroll down and press the “Audio” soft-key to get to the Audio menu.
3. The Audio Menu shows the following options for you to customize your audio settings.
Uconnect® 5.0
ELECTRONICS
73
Page 83 of 204

Uconnect® 8.4A
Uconnect® 8.4A At A Glance
Displaying The Time
• If the time is not currently displayed on the radio or player main page, touch the“Controls” soft-key or the “Apps” soft-key, then the “Settings” soft-key. In the
Settings list, touch the “Clock” soft-key.
Setting The Time
• Model 8.4AN synchronizes time automatically via GPS, so it should not require any time adjustment. If you do need to set the time manually, follow the
instructions below for Model 8.4A.
• For Model 8.4A, turn the unit on, then touch the “Time Display” at the top of the screen. Touch “Yes”.
• If the time is not displayed at the top of the screen, touch the “Controls” soft-key or the “Apps” soft-key and then the “Settings” soft-key. In the Settings screen,
touch the “Clock” soft-key, then check or uncheck this option.
• Touch “+” or “–” next to Set Time Hours and Set Time Minutes to adjust the time.
• If these features are not available, uncheck the Sync with GPS box.
• Touch “X” to save your settings and exit out of the Clock Setting screen.
ELECTRONICS
81
Page 102 of 204

Uconnect® 8.4AN
Uconnect® 8.4AN At A Glance
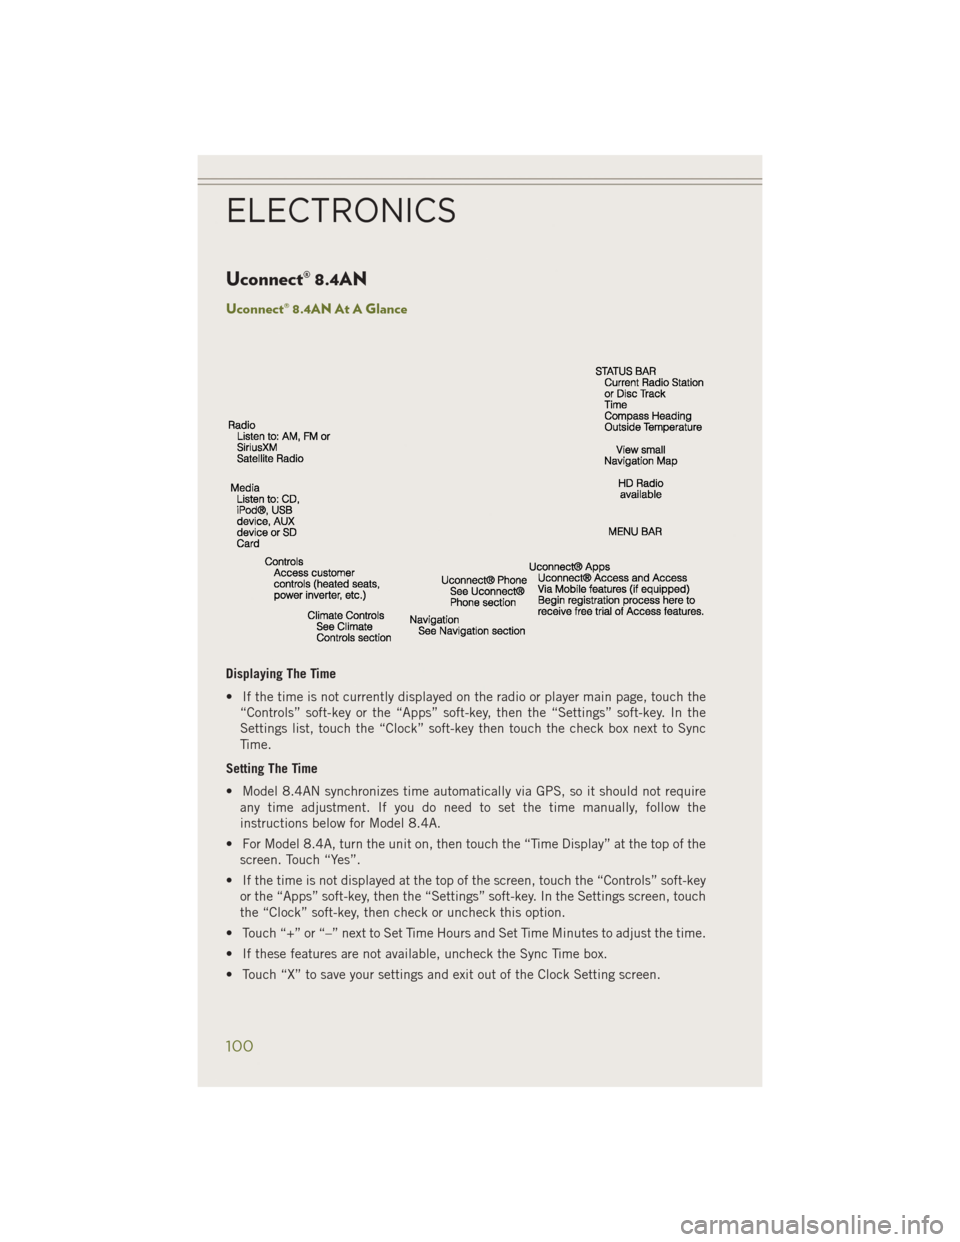
Displaying The Time
• If the time is not currently displayed on the radio or player main page, touch the“Controls” soft-key or the “Apps” soft-key, then the “Settings” soft-key. In the
Settings list, touch the “Clock” soft-key then touch the check box next to Sync
Time.
Setting The Time
• Model 8.4AN synchronizes time automatically via GPS, so it should not require any time adjustment. If you do need to set the time manually, follow the
instructions below for Model 8.4A.
• For Model 8.4A, turn the unit on, then touch the “Time Display” at the top of the screen. Touch “Yes”.
• If the time is not displayed at the top of the screen, touch the “Controls” soft-key or the “Apps” soft-key, then the “Settings” soft-key. In the Settings screen, touch
the “Clock” soft-key, then check or uncheck this option.
• Touch “+” or “–” next to Set Time Hours and Set Time Minutes to adjust the time.
• If these features are not available, uncheck the Sync Time box.
• Touch “X” to save your settings and exit out of the Clock Setting screen.
ELECTRONICS
100
Page 124 of 204

PROGRAMMABLE FEATURES
Uconnect® Customer Programmable Features
The Uconnect®system allows you to access Customer Programmable feature
settings such as Display, Clock, Safety/Assistance, Lights, Doors & Locks, Auto-On
Comfort & Remote Start, Engine Off Operation, Audio, Phone/Bluetooth
®and
SiriusXM Setup and System Information through soft-keys.
• Touch the “Apps” soft-key located near the bottom of the screen, then touch the “Settings” soft-key to access the Settings screen. When making a selection, scroll
up or down until the preferred setting is highlighted, then press and release the
preferred setting until a check-mark appears next to the setting, showing that
setting has been selected. The following feature settings are available:
• Display • Clock
• Safety/Assistance • Doors & Locks
• Auto-On Comfort & Remote Start • Engine Off Options
• Phone/Bluetooth
®• Audio
• Lights • SiriusXM Setup
• Units • System Information
• Voice
NOTE:
Depending on the vehicles options, feature settings may vary.
UNIVERSAL GARAGE DOOR OPENER (HomeLink®)
• HomeLink®replaces up to three hand-
held transmitters that operate devices
such as garage door openers, motor-
ized gates, lighting or home security
systems. The HomeLink
®unit is pow-
ered by your vehicles 12 Volt battery.
• The HomeLink
®buttons that are lo-
cated in the overhead console or sun-
visor designate the three different
HomeLink
®channels.
• The HomeLink
®indicator is located
above the center button.
ELECTRONICS
122