2014 JAGUAR XF light
[x] Cancel search: lightPage 3 of 16

3
DRIVER CONTROLSVEHICLE ACCESS
The Smart key may not be detected if it is placed in The Smart key may not be detected if it is placed in a metal container, or if it is shielded by a device with a metal container, or if it is shielded by a device with a back-lit LCD screen, (e.g., laptop, smart phone, a back-lit LCD screen, (e.g., laptop, smart phone, etc). Keep the Smart key clear of such devices etc). Keep the Smart key clear of such devices when attempting Keyless entry or Keyless starting.when attempting Keyless entry or Keyless starting.
Do not leave your Smart key in the trunk, as the Do not leave your Smart key in the trunk, as the vehicle WILL NOT automatically unlock (should it vehicle WILL NOT automatically unlock (should it become shielded).become shielded).
25.
26.
27.
28.
29.
30.
31.
32.
33. 28
Unlocking mode alternatives
Single-point entry allows only the driver’s door to unlock with a single press. A second press unlocks all other doors and the trunk.
Multi-point entry will unlock all of the doors and the trunk with a single press.
To change between modes, with the vehicle unlocked, press the lock and unlock buttons simultaneously for 3 seconds. The hazard warning lamps will flash twice to confirm the change.
Smart key
Press once to lock the vehicle and arm only the exterior (perimetric) alarm.
Multi-point entry - Press once to disarm the alarm, unlock all of the doors and unlock the trunk.
Press and hold to unlock all doors and open the windows and sunroof (Global opening).
Press once to switch the headlamps on for up to 120 seconds. Time delay is set on the lighting control. Press again to switch off.
Press to open only the trunk. The rest of the security system remains active.
Press and hold for 3 seconds to activate/cancel the panic alarm.
Keyless entry/exit
To unlock the vehicle and disarm the alarm, first make sure that the Smart key is outside of the vehicle but within 3 ft (1 m).
Operate a door handle or the trunk release button.
To lock the vehicle and arm the alarm, first make sure that the Smart key is outside the vehicle but within 3 ft (1 m).
Press a door handle button once to Single lock.
Operating note
If the Smart key fails to operate, hold it against the facia, over the auxiliary switch pack. Start the engine as normal (see page 5). The Smart key can now be removed.
Emergency key release
Slide the side section up to remove. Remove the keyblade and unfold it.
Use the blade to lever off the appropriate door lock cover. The cover has a key symbol embossed into it.
Insert the key into the exposed lock, then turn and release it to unlock.
If the security system was previously armed with the Smart key, when the door is unlocked the alarm will sound. To disarm the alarm, press the unlock button on the Smart key or press the START/STOPbutton with the Smart key inside the vehicle.
Page 6 of 16

STARTING AND DRIVING
6
STARTING AND DRIVING
Transmission
See page 2, item 2, 6 and 16.
Apply the brake pedal, then rotate the gear selector from the P position. Maintain brake pressure until a gear is selected.
Select P before switching off the engine. However, if the engine is switched off with R, D or S selected, the selector will automatically return to P while retracting.
To return to automatic operation, pull and hold the right (upshift) paddle for 2 seconds or rotate the gear selector from S to D position.
Operating note
If the engine is switched off with N selected, automatic selection of P is delayed for 10 minutes. DONOTuse this feature to enable towing of the vehicle. Refer to Vehicle recovery in the Owner’s Handbook.
Cruise control and Forward alert
1.
2.
3.
Auto headlamps and wipers
See page 2, items 1 and 7 .
Auto headlamps
1. When the lighting control AUTO position is selected, the side lamps and headlamps will turn on automatically as ambient light falls below a pre-set level. With the lighting control in the low beam position, High beam assist will activate automatically in the absence of other vehicle lights ahead. The vehicle’s speed must be above 25 mph (40 km/h).
2. 3. 4.The headlamps can temporarily illuminate the way ahead when exiting the car at night. Rotate the control for delay periods of 30, 60, or 120 seconds.
Auto wipers
For automatic wipe, activated by the Rain sensor, move the wiper control up to the first position. Sensitivity can be adjusted by rotating the collar.
5. First stop for the Auto position.
6. Rain sensor maximum sensitivity.
7. Rain sensor minimum sensitivity.
Care pointCare point
Before entering an automatic car wash, turn the Before entering an automatic car wash, turn the wipers off to deactivate the Rain sensor. Otherwise, wipers off to deactivate the Rain sensor. Otherwise, the wipers will operate during the washing process the wipers will operate during the washing process and may be damaged.and may be damaged.
Automatic gear selection
Select D for fully automatic gear changes.
Sport mode
When selected, automatic gear change points are modified to make full use of engine power.
Press the selector down and rotate from D to S.
Manual gear changes
Manual gear change mode is effective when rapid acceleration and engine braking are required.
Page 11 of 16

HEATING AND VENTILATIONAUDIO AND TOUCH SCREEN
11
1.
2.
3.
4.
5.
6.
7.
8.
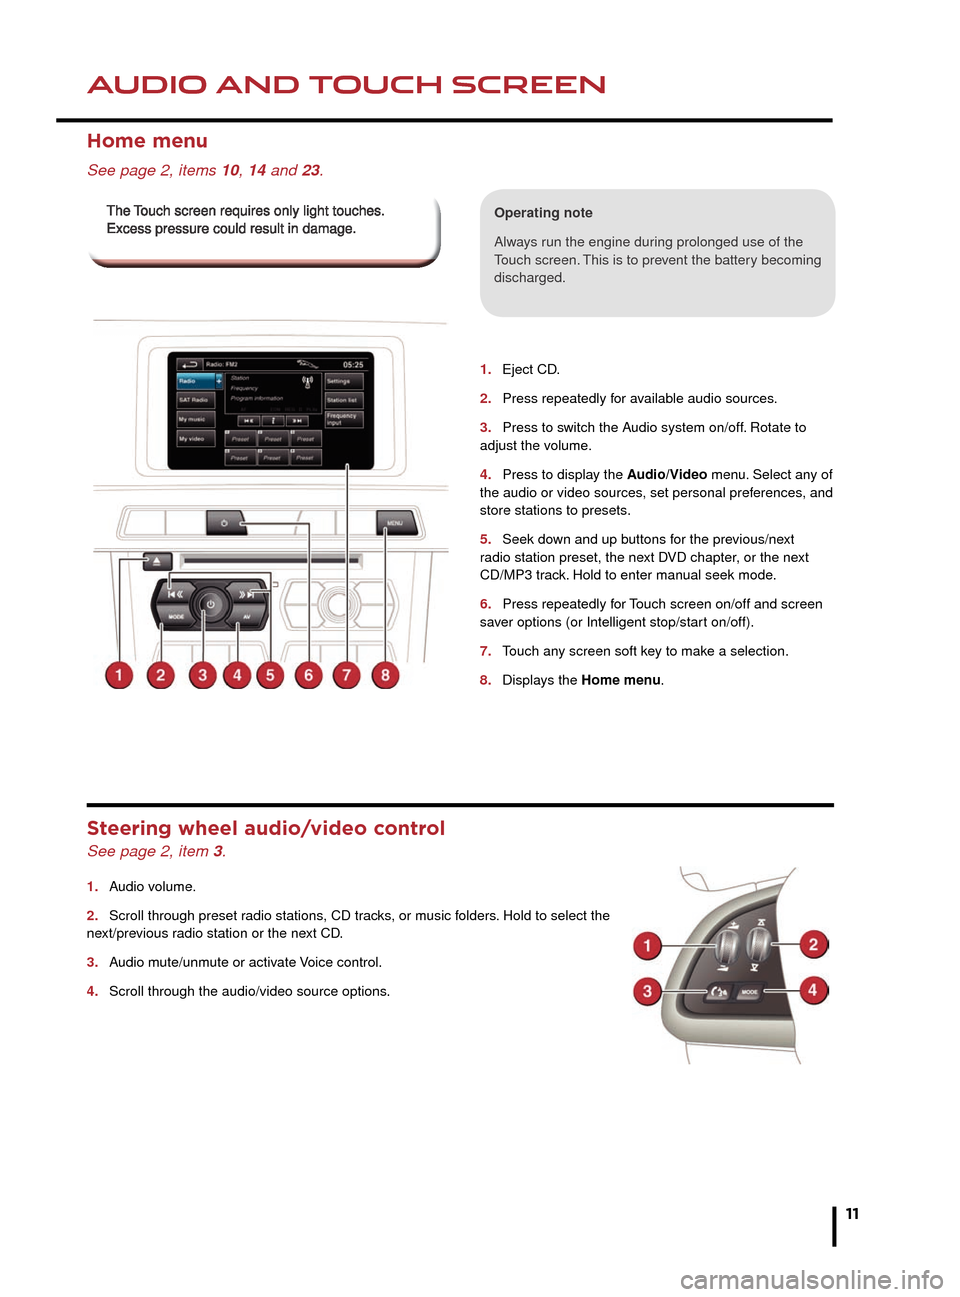
1. Eject CD.
2. Press repeatedly for available audio sources.
3. Press to switch the Audio system on/off. Rotate to adjust the volume.
4. Press to display the Audio/Video menu. Select any of the audio or video sources, set personal preferences, and store stations to presets.
5. Seek down and up buttons for the previous/next radio station preset, the next DVD chapter, or the next CD/MP3 track. Hold to enter manual seek mode.
6. Press repeatedly for Touch screen on/off and screen saver options (or Intelligent stop/start on/off).
7. Touch any screen soft key to make a selection.
8. Displays the Home menu.
Home menu
See page 2, items 10, 14 and 23.
Operating note
Always run the engine during prolonged use of the Touch screen. This is to prevent the battery becoming discharged.
Steering wheel audio/video control
See page 2, item 3.
1. Audio volume.
2. Scroll through preset radio stations, CD tracks, or music folders. Hold to select the next/previous radio station or the next CD.
3. Audio mute/unmute or activate Voice control.
4. Scroll through the audio/video source options.
The Touch screen requires only light touches. The Touch screen requires only light touches. Excess pressure could result in damage.Excess pressure could result in damage.
Page 14 of 16

NAVIGATION
14
TELEPHONE
Nav menus
Country selection
On initial activation, make sure
that both the correct country
and search area have been
selected.
For more information, refer to
the Navigation section of the
Owner’s Handbook.
Note: To access navigation, press either the N AV hard
key or touch the Nav icon on the Home menu.
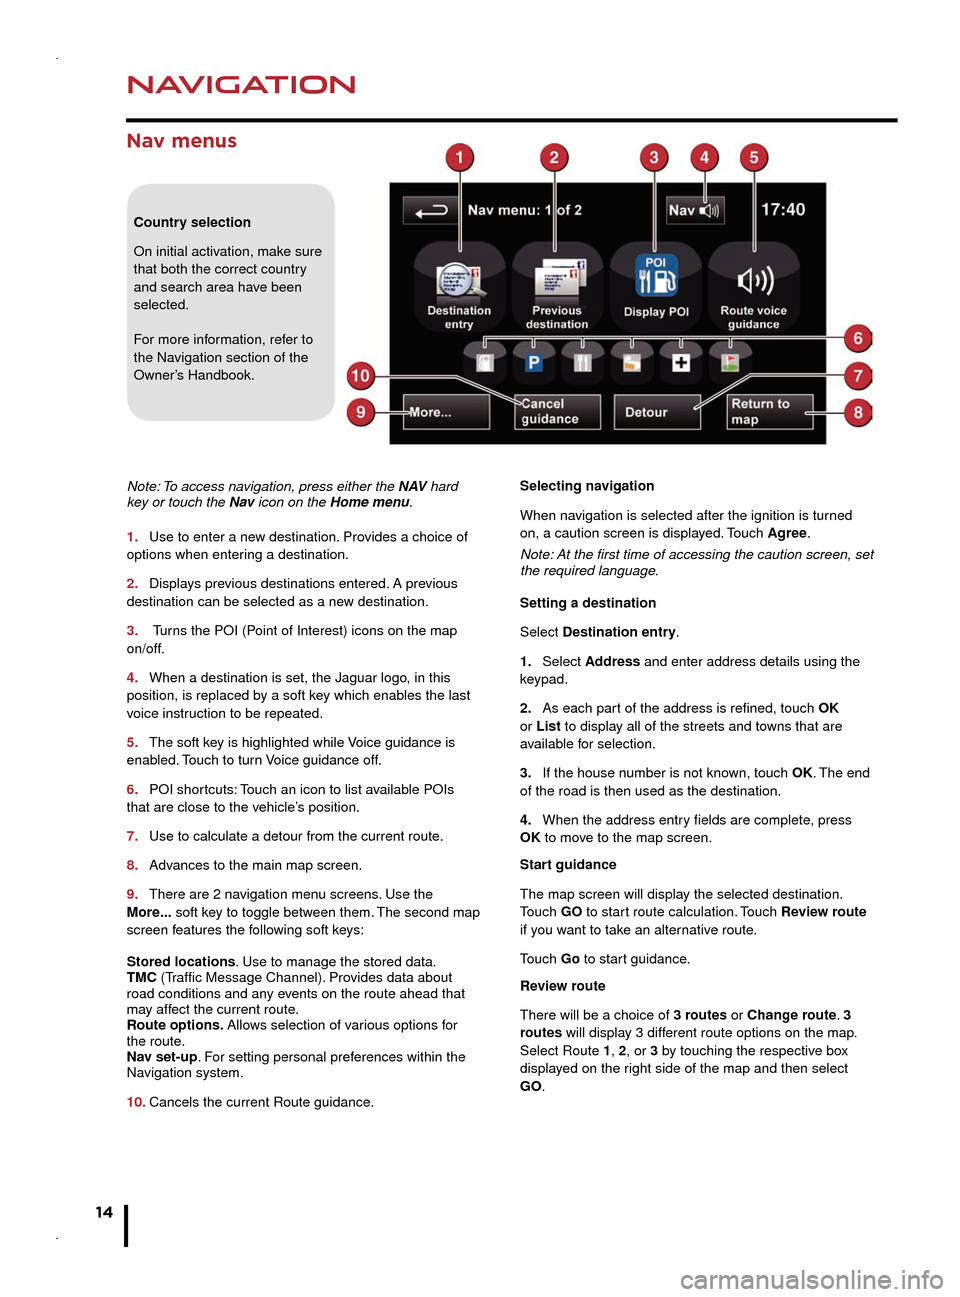
1.
Use to enter a new destination. Pro
vides a choice of
options when entering a destination.
2.
Displays previous destinations entered.
A previous
destination can be selected as a new destination.
3.
Tur
ns the POI (Point of Interest) icons on the map
on/off.
4.
When a destination is set, the Jaguar logo, in this
position, is replaced b
y a soft key which enables the last
voice instruction to be repeated.
5.
The soft key is highlighted while
Voice guidance is
enabled. Touch to turn Voice guidance off.
6.
POI shortcuts:
Touch an icon to list available POIs
that are close to the vehicle’s position.
7.
Use to calculate a detour from the current route.
8.
Advances to the main map screen.
9.
There are 2 navigation menu screens
. Use the
More... soft key to toggle between them. The second map
screen features the following soft keys:
Stored locations. Use to manage the stored data.
TMC (Traffic Message Channel). Provides data about
road conditions and any events on the route ahead that
may affect the current route.
Route options. Allows selection of various options for
the route.
Nav set-up. For setting personal preferences within the
Navigation system.
10.
Cancels the current Route guidance. Selecting navigation
When na
vigation is selected after the ignition is turned
on, a caution screen is displayed. Touch Agree.
Note: At the first time of accessing the caution screen, set
the required language.
Setting a destination
Select Destination entry.
1.
Select Address
and enter address details using the
keypad.
2.
As each part of the address is refined, touch OK
or List to display all of the streets and towns that are
available for selection.
3.
If the house number is not known, touch
OK. The end
of the road is then used as the destination.
4.
When the address entry fields are complete, press
OK
to move to the map screen.
Start guidance
The map screen will display the selected destination.
Touch GO to start route calculation. Touch Review route
if you want to take an alternative route.
Touch Go to start guidance.
Review route
There will be a choice of 3 routes or Change route. 3
routes will display 3 different route options on the map.
Select Route 1, 2, or 3 by touching the respective box
displayed on the right side of the map and then select
GO.
Bluetooth® wireless technology
devices
See page 2, item 3.
Connection must be made with the ignition on or the
engine running.
Use the following procedure in conjunction with your
phone manufacturer’s instructions.
Pairing and connecting using a phone
Note: The process of pairing and connecting a phone
to the vehicle will vary depending on the type of phone
used.
1. Switch the ignition on and make sure that the Touch
screen is active.
2. From the Home menu, select Phone.
3. If no phone is connected, select Search new,
otherwise select Change phone and then select Search
new.
4. Select the Device to vehicle option.
Note: The vehicle’s Bluetooth wireless technology
system is discoverable for only 3 minutes.
5. Using your phone, search for Bluetooth wireless
technology devices. On some phones, this is referred
to as a new paired device. See your phone’s operating
instructions for further information.
6. When the vehicle’s system is discovered, begin the
pairing process and follow the on-screen instructions.
7. When requested, enter a PIN of your choice into your
phone and the vehicle’s system. Select OK.
8. When your phone is paired and connected, a
confirmation message will be displayed.
Note: Some phones require the pairing to be set as
‘authorised’ or ‘trusted’, in order to automatically connect.
Please refer to your phone’s operating instructions for
further information.
Downloading phonebook entries
When a phone with phonebook download capability
is paired and docked, its phonebook directory can be
automatically downloaded to the vehicle’s system.
See PHONEBOOK in the Owner’s Handbook for more
information.
Bluetooth Connectivity
Compatible Bluetooth wireless technology
devices can communicate with the vehicle’s in-built
telephone system. For the latest compatibility
information, refer to www.jaguar.com and route to
the Ownership area.