Page 152 of 498

SPA1562A
OPENING THE FUEL-FILLER DOOR
To open the fuel-filler door, unlock the fuel-
filler door by using one of the following
operations, then push the left side of the
door.
.Push the door handle request switch
with the Intelligent Key carried with
you.
. Push the UNLOCK button on the Intelli-
gent Key.
. Insert the mechanical key into the door
lock cylinder and turn it to the rear of
the vehicle. .
Push the power door lock switch to the
UNLOCK position.
To lock, close the fuel-filler door securely
and lock all doors by operating the door
handle request switch, the LOCK button on
the Intelligent Key, the mechanical key or
the power door lock switch.
FUEL-FILLER CAP
WARNING
. Gasoline is extremely flammable and
highly explosive under certain condi-
tions. You could be burned or seriously
injured if it is misused or mishandled.
Always stop engine and do not smoke or
allow open flames or sparks near the
vehicle when refueling.
. Do not attempt to top off the fuel tank
after the fuel pump nozzle shuts off
automatically. Continued refueling may
cause fuel overflow, resulting in fuel
spray and possibly a fire.
. Use only an original equipment type
fuel-filler cap as a replacement. It has a
built-in safety valve needed for proper
operation of the fuel system and emis-
sion control system. An incorrect cap can result in a serious malfunction and
possible injury. It could also cause the
malfunction indicator light to come on.
. Never pour fuel into the throttle body to
attempt to start your vehicle.
. Do not fill a portable fuel container in
the vehicle or trailer. Static electricity
can cause an explosion of flammable
liquid, vapor or gas in any vehicle or
trailer. To reduce the risk of serious
injury or death when filling portable fuel
containers:—Always place the container on the
ground when filling.
—Do not use electronic devices whenfilling.
—Keep the pump nozzle in contactwith the container while you are
filling it.
—Use only approved portable fuelcontainers for flammable liquid.
CAUTION
. If fuel is spilled on the vehicle body,
flush it away with water to avoid paint
Pre-driving checks and adjustments3-19
FUEL-FILLER DOOR
Page 153 of 498

3-20Pre-driving checks and adjustments
damage.
. Insert the cap straight into the fuel-filler
tube, then tighten the fuel-filler cap until
a single click is heard. Failure to tighten
the fuel-filler cap properly may cause the
malfunction indicator light (MIL) to
illuminate. If thelight illuminates
because the fuel-filler cap is loose or
missing, tighten or install the cap and
continue to drive the vehicle. The
light should turn off after a few driving
trips. If thelight does not turn off
after a few driving trips, have the vehicle
inspected by an INFINITI retailer.
. The LOOSE FUEL CAP warning will appear
if the fuel-filler cap is not properly
tightened. Failure to tighten the fuel-
filler cap properly after the LOOSE FUEL
CAP warning appears may cause the
Malfunction Indicator Light (MIL) to
illuminate.JVP0006X
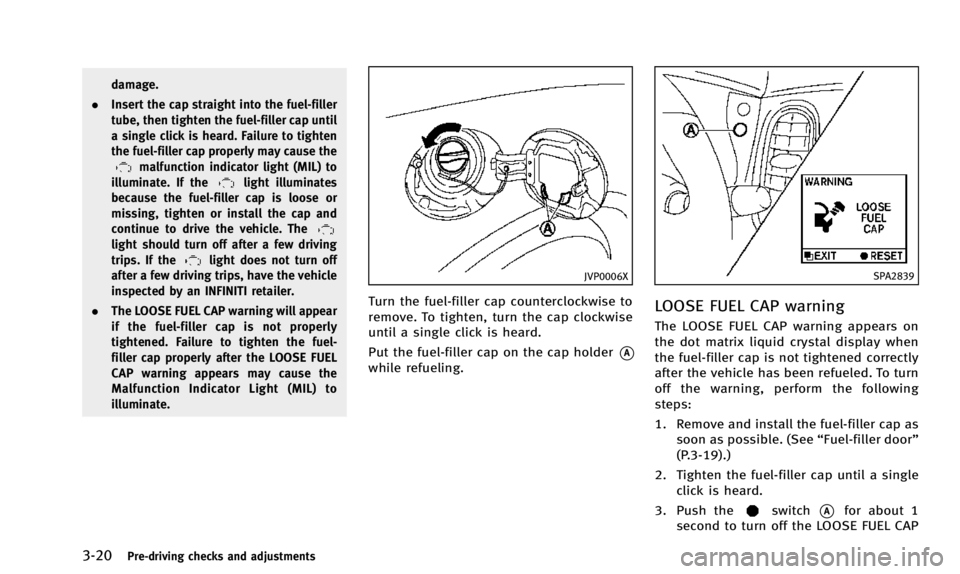
Turn the fuel-filler cap counterclockwise to
remove. To tighten, turn the cap clockwise
until a single click is heard.
Put the fuel-filler cap on the cap holder
*A
while refueling.
SPA2839
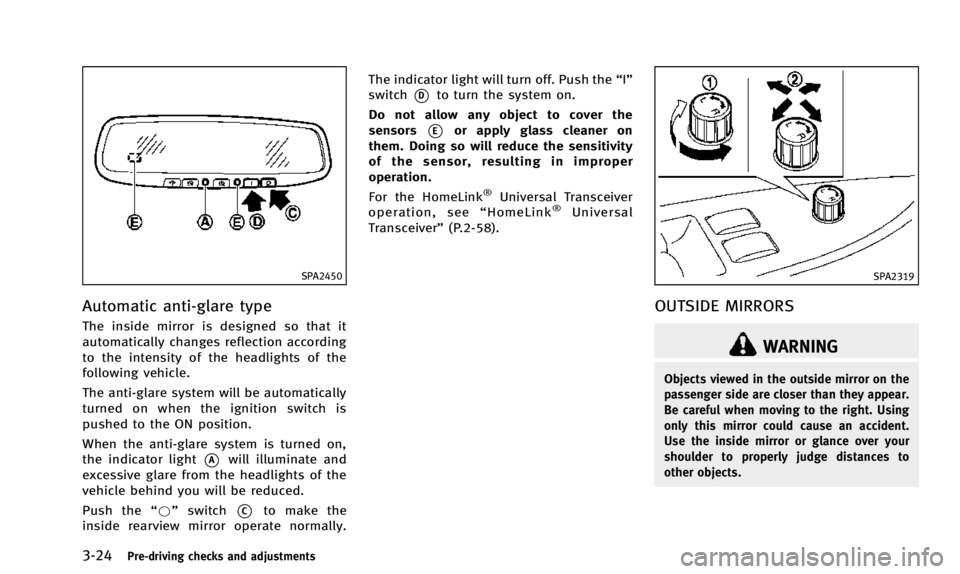
LOOSE FUEL CAP warning
The LOOSE FUEL CAP warning appears on
the dot matrix liquid crystal display when
the fuel-filler cap is not tightened correctly
after the vehicle has been refueled. To turn
off the warning, perform the following
steps:
1. Remove and install the fuel-filler cap as
soon as possible. (See “Fuel-filler door”
(P.3-19).)
2. Tighten the fuel-filler cap until a single click is heard.
3. Push the
switch*Afor about 1
second to turn off the LOOSE FUEL CAP
Page 154 of 498

tightening the fuel-filler cap.WARNING
.Do not adjust the steering wheel while
driving. You could lose control of your
vehicle and cause an accident.
. Do not adjust the steering wheel any
closer to you than is necessary for
proper steering operation and comfort.
The driver’s air bag inflates with great
force. If you are unrestrained, leaning
forward, sitting sideways or out of
position in any way, you are at greater
risk of injury or death in a crash. You
may also receive serious or fatal injuries
from the air bag if you are up against it
when it inflates. Always sit back against
the seatback and as far away as practical
from the steering wheel. Always use the
seat belts.
SPA2468
MANUAL OPERATION (if so
equipped)
Tilt or telescopic operation
Pull the lock lever*1down and adjust the
steering wheel up, down, forward or rear-
ward to the desired position.
Push the lock lever up securely to lock the
steering wheel in place.
Pre-driving checks and adjustments3-21
TILT/TELESCOPIC COLUMN
Page 156 of 498
2. To block glare from the side, removethe main sun visor from the center
mount and swing the visor to the side
*2.
3. Slide the sun visor
*3in or out as
needed.
SPA2447
INSIDE MIRROR
Adjust the height and the angle of the
inside mirror to the desired position.
SPA2143
Manual anti-glare type
The night position*1will reduce glare
from the headlights of vehicles behind you
at night.
Use the day position
*2when driving in
daylight hours.
WARNING
Use the night position only when necessary,
because it reduces rearview clarity.
Pre-driving checks and adjustments3-23
MIRRORS
Page 157 of 498

3-24Pre-driving checks and adjustments
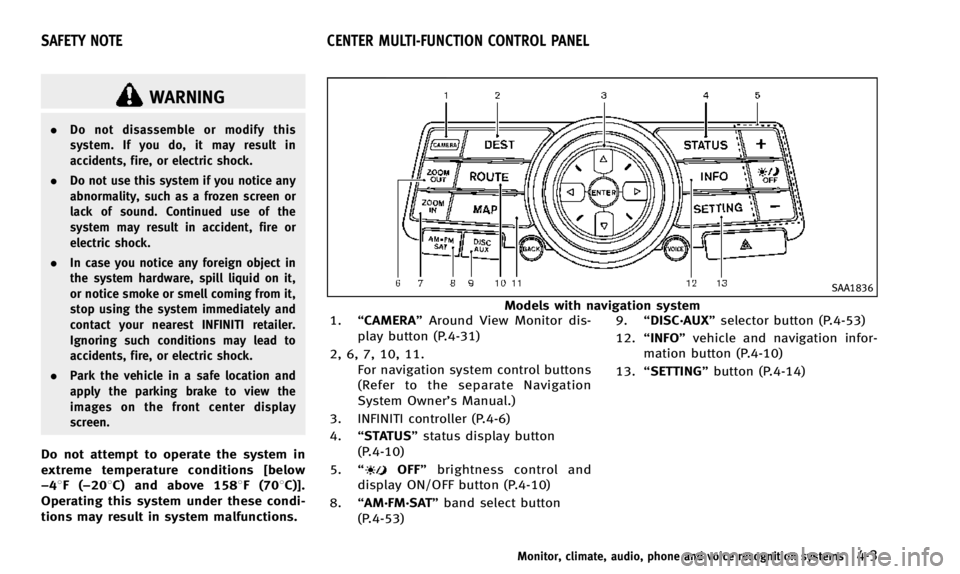
SPA2450
Automatic anti-glare type
The inside mirror is designed so that it
automatically changes reflection according
to the intensity of the headlights of the
following vehicle.
The anti-glare system will be automatically
turned on when the ignition switch is
pushed to the ON position.
When the anti-glare system is turned on,
the indicator light
*Awill illuminate and
excessive glare from the headlights of the
vehicle behind you will be reduced.
Push the “*”switch
*Cto make the
inside rearview mirror operate normally. The indicator light will turn off. Push the
“I”
switch
*Dto turn the system on.
Do not allow any object to cover the
sensors
*Eor apply glass cleaner on
them. Doing so will reduce the sensitivity
of the sensor, resulting in improper
operation.
For the HomeLink
®Universal Transceiver
operation, see “HomeLink®Universal
Transceiver” (P.2-58).
SPA2319
OUTSIDE MIRRORS
WARNING
Objects viewed in the outside mirror on the
passenger side are closer than they appear.
Be careful when moving to the right. Using
only this mirror could cause an accident.
Use the inside mirror or glance over your
shoulder to properly judge distances to
other objects.
Page 166 of 498

WARNING
.Do not disassemble or modify this
system. If you do, it may result in
accidents, fire, or electric shock.
. Do not use this system if you notice any
abnormality, such as a frozen screen or
lack of sound. Continued use of the
system may result in accident, fire or
electric shock.
. In case you notice any foreign object in
the system hardware, spill liquid on it,
or notice smoke or smell coming from it,
stop using the system immediately and
contact your nearest INFINITI retailer.
Ignoring such conditions may lead to
accidents, fire, or electric shock.
. Park the vehicle in a safe location and
apply the parking brake to view the
images on the front center display
screen.
Do not attempt to operate the system in
extreme temperature conditions [below
−48F( −208C) and above 1588F (708C)].
Operating this system under these condi-
tions may result in system malfunctions.
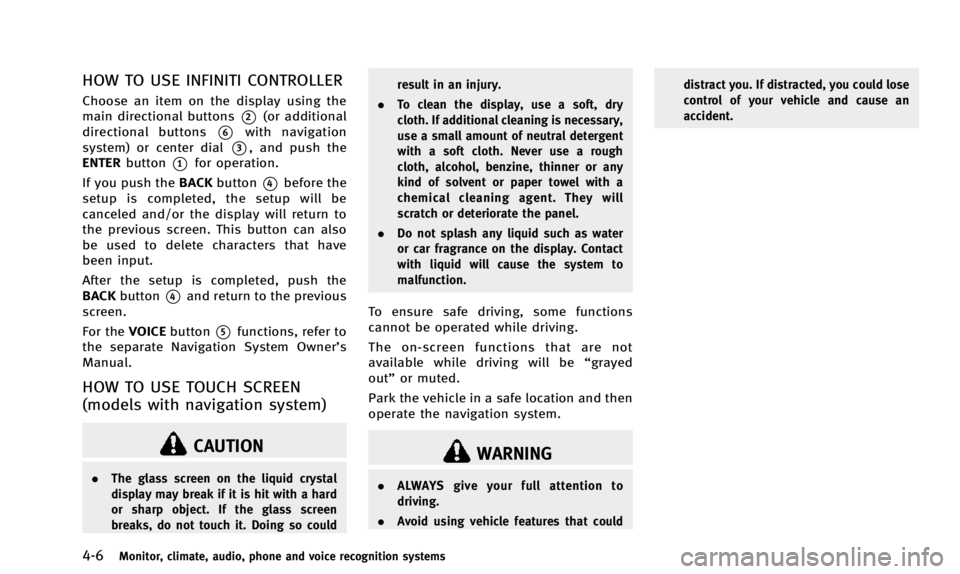
SAA1836
Models with navigation system
1. “CAMERA” Around View Monitor dis-
play button (P.4-31)
2, 6, 7, 10, 11. For navigation system control buttons
(Refer to the separate Navigation
System Owner’s Manual.)
3. INFINITI controller (P.4-6)
4. “STATUS” status display button
(P.4-10)
5. “
OFF” brightness control and
display ON/OFF button (P.4-10)
8. “AM·FM·SAT” band select button
(P.4-53) 9.
“DISC·AUX” selector button (P.4-53)
12. “INFO” vehicle and navigation infor-
mation button (P.4-10)
13. “SETTING” button (P.4-14)
Monitor, climate, audio, phone and voice recognition systems4-3
SAFETY NOTE CENTER MULTI-FUNCTION CONTROL PANEL
Page 169 of 498

4-6Monitor, climate, audio, phone and voice recognition systems
HOW TO USE INFINITI CONTROLLER
Choose an item on the display using the
main directional buttons
*2(or additional
directional buttons
*6with navigation
system) or center dial
*3, and push the
ENTER button
*1for operation.
If you push the BACKbutton
*4before the
setup is completed, the setup will be
canceled and/or the display will return to
the previous screen. This button can also
be used to delete characters that have
been input.
After the setup is completed, push the
BACK button
*4and return to the previous
screen.
For the VOICEbutton
*5functions, refer to
the separate Navigation System Owner’s
Manual.
HOW TO USE TOUCH SCREEN
(models with navigation system)
CAUTION
. The glass screen on the liquid crystal
display may break if it is hit with a hard
or sharp object. If the glass screen
breaks, do not touch it. Doing so could result in an injury.
. To clean the display, use a soft, dry
cloth. If additional cleaning is necessary,
use a small amount of neutral detergent
with a soft cloth. Never use a rough
cloth, alcohol, benzine, thinner or any
kind of solvent or paper towel with a
chemical cleaning agent. They will
scratch or deteriorate the panel.
. Do not splash any liquid such as water
or car fragrance on the display. Contact
with liquid will cause the system to
malfunction.
To ensure safe driving, some functions
cannot be operated while driving.
The on-screen functions that are not
available while driving will be “grayed
out” or muted.
Park the vehicle in a safe location and then
operate the navigation system.
WARNING
. ALWAYS give your full attention to
driving.
. Avoid using vehicle features that could distract you. If distracted, you could lose
control of your vehicle and cause an
accident.
Page 180 of 498

JVH0176M
Switch Beeps settings (models
without navigation system)
The“Switch Beeps” screen will appear
when pushing the SETTINGbutton, select-
ing the “Switch Beeps” key with the
INFINITI controller and pushing the ENTER
button.
Switch Beeps:
When this item is turned to ON, you will
hear a beep sound when you use a button.
Driver assistance settings (if so
equipped)
For the details of the “Driver Assistance”
settings, see the following items:
. “Lane Departure Warning (LDW) sys-
tem/Lane Departure Prevention (LDP)
system” (P.5-19).
. “Distance Control Assist (DCA) system”
(P.5-59).
SAA2486
Display settings (models with na-
vigation system)
The display as illustrated will appear when
pushing the SETTING button and selecting
the “Display” key.
Display Adjustment:
To adjust the display settings, select the
“Display Adjustment” key. The following
settings are available.
. Display
To turn off the screen, push the ENTER
button and turn the “Display”indicator off.
The other method is to push and hold the
“
OFF” button for more than 2 seconds.
Monitor, climate, audio, phone and voice recognition systems4-17