2014 INFINITI Q70 HYBRID radio
[x] Cancel search: radioPage 166 of 522

WARNING
The Intelligent Key transmits radio waves
when the buttons are pushed. The FAA
advises that the radio waves may affect
aircraft navigation and communication sys-
tems. Do not operate the Intelligent Key
while on an airplane. Make sure the buttons
are not operated unintentionally when the
unit is stored during a flight.
It is possible to lock/unlock all doors, fuel-
filler door, activate the panic alarm and
open the windows by pushing the buttons
on the Intelligent Key from outside the
vehicle.
Before locking the doors, make sure the
Intelligent Key is not left in the vehicle.
The LOCK/UNLOCK button on the Intelli-
gent Key can operate at a distance of
approximately 33 ft (10 m) from the
vehicle. (The effective distance depends
upon the conditions around the vehicle.)
As many as 4 Intelligent Keys can be used
with one vehicle. For information concern-
ing the purchase and use of additional
Intelligent Keys, contact an INFINITI retai-
ler.The lock and unlock buttons on the
Intelligent Key will not operate when:
.
the distance between the Intelligent Key
and the vehicle is over 33 ft (10 m).
. the Intelligent Key battery is dis-
charged.
After locking with the remote keyless entry
function, pull the door handle to make sure
the doors are securely locked.
The LOCK/UNLOCK operating range varies
depending on the environment. To securely
operate the lock and unlock buttons,
approach the vehicle to about 3 ft (1 m)
from the door.SPA2100
1. LOCK button
2. UNLOCK button
3. TRUNK button
4. PANIC button
HOW TO USE REMOTE KEYLESS
ENTRY SYSTEM
When you lock or unlock the doors or the
trunk lid, the hazard indicator will flash
and the horn (or the outside chime) will
sound as a confirmation. For details, see
“Setting hazard indicator and horn mode”
(P.3-15).
Pre-driving checks and adjustments3-13
REMOTE KEYLESS ENTRY SYSTEM
Page 184 of 522

4 Monitor, climate, audio, phone and voice recogni-tion systems
Safety note .......................................................... 4-3
Center multi-function control panel ...................... 4-4 How to use INFINITI controller.......................... 4-6
How to use touch screen (models with
navigation system) .......................................... 4-6
Menu options (models with
navigation system) .......................................... 4-8
How to select menus on the screen................. 4-9
Vehicle information and settings........................ 4-10 How to use STATUS button ............................ 4-10
How to use brightness control and display
ON/OFF button .............................................. 4-10
How to use DISP button ................................ 4-10
How to use ECON button (models without
navigation system) ........................................ 4-10
How to use INFO button ................................ 4-10
How to use SETTING button ........................... 4-16
RearView monitor .............................................. 4-26 How to read displayed lines .......................... 4-27
How to park with predictive course lines ....... 4-27
Difference between predicted and
actual distances ............................................ 4-29
Predictive course line settings ....................... 4-32
How to adjust screen .................................... 4-32
Sonar indicator (if so equipped) .................... 4-32 Operating tips.............................................. 4-32
Ventilators ........................................................ 4-33
Automatic climate control.................................. 4-34
Automatic climate control (Type A) ............... 4-35
Automatic climate control (Type B) ............... 4-39
Forest Air
®(if so equipped) ......................... 4-42
Operating tips.............................................. 4-46
Linking Intelligent Key ................................. 4-47
In-cabin microfilter....................................... 4-47
Servicing climate control.............................. 4-47
Audio system .................................................... 4-48 Audio operation precautions ........................ 4-48
FM-AM-SAT radio with Compact Disc
(CD) player................................................... 4-62
DVD (Digital Versatile Disc) player operation
(models with navigation system) .................. 4-66
USB input operation .................................... 4-69
Streaming audio via Bluetooth
®(models with
navigation system)....................................... 4-74
iPod
®player operation ................................ 4-79
CD/DVD/USB memory care and cleaning...... 4-81
Steering-wheel-mounted controls
for audio ..................................................... 4-82
Antenna ....................................................... 4-83
Car phone or CB radio ...................................... 4-84
Page 215 of 522

4-32Monitor, climate, audio, phone and voice recognition systems
SAA2404
Models with navigation system
SAA2606
Models without navigation system
PREDICTIVE COURSE LINE SETTINGS
To turn ON or OFF the predictive course line
display, push the SETTING button, select
the“Camera” key and push the ENTER
button.
. Predictive Course Lines
When this item is turned to ON, the
predictive course lines will be displayed
on the monitor when the shift lever is in
the “R” (Reverse) position.
HOW TO ADJUST SCREEN
To adjust the Display ON/OFF, Brightness,
Tint, Color, Contrast and Black Level of the
RearView monitor, push the SETTING but-
ton with the RearView monitor on, select
the“Display” key on the screen and select
the item key and adjust the level using the
INFINITI controller.
Do not adjust the Brightness, Tint, Color,
Contrast and Black Level of the RearView
monitor while the vehicle is moving. Make
sure the parking brake is firmly applied
and the engine is not running.
SONAR INDICATOR (if so equipped)
When the “Sonar Display” key is ON, the
sonar indicator will appear in the display.
(See “How to use SETTING button” (P.4-16)
and “Sonar system” (P.5-93).)
OPERATING TIPS
.When the shift lever is shifted to the “R”
(Reverse) position, the monitor screen
automatically changes to the RearView
monitor mode. However, the radio can
be heard.
. It may take some time until the Rear-
View monitor is displayed after the shift
lever has been shifted to “R”from
another position or to another position
from “R”. Objects may be distorted
momentarily until the RearView monitor
screen is displayed completely.
. When the temperature is extremely high
or low, the screen may not clearly
display objects. This is not a malfunc-
tion.
. When strong light directly enters the
camera, objects may not be displayed
clearly. This is not a malfunction.
. Vertical lines may be seen in objects on
the screen. This is due to strong
reflected light from the bumper. This
Page 231 of 522

4-48Monitor, climate, audio, phone and voice recognition systems
AUDIO OPERATION PRECAUTIONS
Radio
Push the ignition switch to the ACC or ON
position and push the radio band select
button to turn on the radio. If you listen to
the radio with the engine not running, the
ignition switch should be pushed to the
ACC position.
Radio reception is affected by station
signal strength, distance from radio trans-
mitter, buildings, bridges, mountains and
other external influences. Intermittent
changes in reception quality normally are
caused by these external influences.
Using a cellular phone in or near the
vehicle may influence radio reception
quality.
Radio reception:
Your INFINITI radio system is equipped with
state-of-the-art electronic circuits to en-
hance radio reception. These circuits are
designed to extend reception range, and to
enhance the quality of that reception.
However there are some general character-
istics of both FM and AM radio signals that
can affect radio reception quality in a
moving vehicle, even when the finestequipment is used. These characteristics
are completely normal in a given reception
area, and do not indicate any malfunction
in your INFINITI radio system.
Reception conditions will constantly
change because of vehicle movement.
Buildings, terrain, signal distance and
interference from other vehicles can work
against ideal reception. Described below
are some of the factors that can affect your
radio reception.
Some cellular phones or other devices may
cause interference or a buzzing noise to
come from the audio system speakers.
Storing the device in a different location
may reduce or eliminate the noise.
SAA0306
FM radio reception:
Range: FM range is normally limited to 25
to 30 miles (40 to 48 km), with monaural
(single station) FM having slightly more
range than stereo FM. External influences
may sometimes interfere with FM station
reception even if the FM station is within
25 miles (40 km). The strength of the FM
signal is directly related to the distance
between the transmitter and receiver. FM
signals follow a line-of-sight path, exhibit-
ing many of the same characteristics as
light. For example they will reflect off
objects.
Fade and drift: As your vehicle moves away
AUDIO SYSTEM
Page 232 of 522

from a station transmitter, the signals will
tend to fade and/or drift.
Static and flutter: During signal interfer-
ence from buildings, large hills or due to
antenna position, usually in conjunction
with increased distance from the station
transmitter, static or flutter can be heard.
This can be reduced by lowering the treble
setting to reduce the treble response.
Multipath reception: Because of the reflec-
tive characteristics of FM signals, direct
and reflected signals reach the receiver at
the same time. The signals may cancel
each other, resulting in momentary flutter
or loss of sound.
AM radio reception:
AM signals, because of their low frequency,
can bend around objects and skip along
the ground. In addition, the signals can be
bounced off the ionosphere and bent back
to earth. Because of these characteristics.
AM signals are also subject to interference
as they travel from transmitter to receiver.
Fading: Occurs while the vehicle is passing
through freeway underpasses or in areas
with many tall buildings. It can also occur
for several seconds during ionospheric
turbulence even in areas where no obsta-cles exist.
Static: Caused by thunderstorms, electrical
power lines, electric signs and even traffic
lights.
Satellite radio reception:
When the satellite radio is used for the first
time or the 12-volt battery has been
replaced, the satellite radio may not work
properly. This is not a malfunction. Wait
more than 10 minutes with the satellite
radio ON and the vehicle outside of any
metal or large building for the satellite
radio to receive all of the necessary data.
The satellite radio mode requires an active
SiriusXM Satellite Radio subscription. The
satellite radio is not available in Alaska,
Hawaii and Guam.
The satellite radio performance may be
affected if cargo carried on the roof blocks
the satellite radio signal.
If possible, do not put cargo near the
satellite antenna.
A build up of ice on the satellite radio
antenna can affect satellite radio perfor-
mance. Remove the ice to restore satellite
radio reception.
SAA0480
Compact Disc (CD) player
. Do not force a compact disc into the CD
insert slot. This could damage the CD
and/or CD player.
. Trying to load a CD with the CD door
closed could damage the CD and/or CD
Monitor, climate, audio, phone and voice recognition systems4-49
Page 245 of 522

4-62Monitor, climate, audio, phone and voice recognition systems
SAA2957
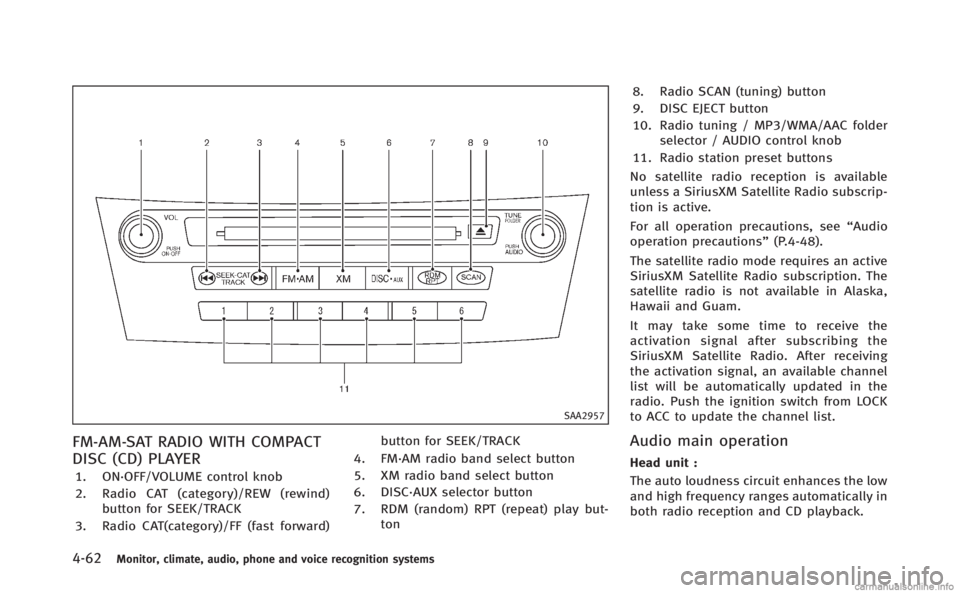
FM-AM-SAT RADIO WITH COMPACT
DISC (CD) PLAYER
1. ON·OFF/VOLUME control knob
2. Radio CAT (category)/REW (rewind)button for SEEK/TRACK
3. Radio CAT(category)/FF (fast forward) button for SEEK/TRACK
4. FM·AM radio band select button
5. XM radio band select button
6. DISC·AUX selector button
7. RDM (random) RPT (repeat) play but- ton 8. Radio SCAN (tuning) button
9. DISC EJECT button
10. Radio tuning / MP3/WMA/AAC folder
selector / AUDIO control knob
11. Radio station preset buttons
No satellite radio reception is available
unless a SiriusXM Satellite Radio subscrip-
tion is active.
For all operation precautions, see “Audio
operation precautions” (P.4-48).
The satellite radio mode requires an active
SiriusXM Satellite Radio subscription. The
satellite radio is not available in Alaska,
Hawaii and Guam.
It may take some time to receive the
activation signal after subscribing the
SiriusXM Satellite Radio. After receiving
the activation signal, an available channel
list will be automatically updated in the
radio. Push the ignition switch from LOCK
to ACC to update the channel list.
Audio main operation
Head unit :
The auto loudness circuit enhances the low
and high frequency ranges automatically in
both radio reception and CD playback.
Page 246 of 522

ON·OFF/Volume control:
Push the ignition switch to the ACC or ON
position, and then push the ON·OFF button
while the system is off to turn on the last
audio source, which was playing immedi-
ately before the system was turned off.
While the system is on, pushing the
ON·OFF button turns the system off.
Turn the VOL control knob to adjust the
volume.
Adjusting tone quality and speaker bal-
ance:
To adjust Bass, Treble, Balance and Fade,
push the Audio control knob. When the
display shows the setting you want to
change (Bass, Treble, Balance and Fade),
rotate the Audio control knob to set the
desired setting. For the other setting
methods, see“How to use SETTING button”
(P.4-16).
This vehicle has some sound effect func-
tions as follows:
. Speed Sensitive Vol.
. Precision Phased Audio (if so equipped)
. BOSE
®Centerpoint®2 (if so equipped)
. BOSE®AudioPilotTM2 (if so equipped)
. Surround effect (if so equipped) For more details, see
“How to use SETTING
button” (P.4-16).
Switching the display:
Pushing the DISC·AUX button will switch
the displays as follows:
. Models with navigation system
iPod
®/USB ?CD/DVD ?Bluetooth®
Audio ?iPod®/USB
. Models without navigation system
iPod
®/USB ?CD ?iPod®/USB
Linking Intelligent Key (models with navi-
gation system):
The audio settings can be memorized for
each Intelligent Key. For more details, see
“Setting memory function” (P.3-29).
FM-AM-SAT radio operation
When the radio band select button is
pushed while the ignition switch is in the
ACC or ON position, the radio will come on
at the channel last played.
The last channel played will also come on
when the ON·OFF button is pushed to ON.
If another audio source is playing when the
radio band select button is turned to ON,
the audio source will automatically be
turned off and the last radio channel played will come on.
When the stereo broadcast signal is weak,
the radio will automatically change from
stereo to monaural reception.
radio (FM·AM) band select :
Pushing the XM radio band select button
will change the band as follows:
AM ?FM1 ?FM2 ?AM
radio (XM) band select:
Pushing the XM radio band select button
will change the band as follows:
XM1 ?XM2 ?XM3 ?XM1
The satellite radio is not available in
Alaska, Hawaii and Guam.
TUNE (Tuning) : . For AM and FM radio
Turn the radio TUNE knob for manual
tuning.
. For SiriusXM Satellite Radio
Turn the radio TUNE knob to seek
channels from all of the categories
when any category is not selected.
Monitor, climate, audio, phone and voice recognition systems4-63
Page 247 of 522

4-64Monitor, climate, audio, phone and voice recognition systems
SEEK tuning/CATEGORY (CAT):
. For AM and FM radio
Push the SEEK button
orto
tune from low to high or high to low
frequencies and to stop at the next
broadcasting station.
. SiriusXM Satellite Radio
Push the SEEK button
orto
tune to the first channel of the next or
previous category.
During satellite radio reception, the follow-
ing notices will be displayed under certain
conditions.
. NO SIGNAL (No signal is received while
the SAT tuner is connected.)
. OFF AIR (Broadcasting signed off)
. CHECK ANTENNA (Antenna connection
error)
. LOADING (When the initial setting is
performed)
. UPDATING (When the satellite radio
subscription is not active)
SCAN tuning:
Push the SCAN tuning button to tune from
low to high frequencies and stop at each
broadcasting station/channel for 5 sec- onds. Pushing the button again during this
5 seconds period will stop SCAN tuning
and the radio will remain tuned to that
station/channel.
If the SCAN tuning button is not pushed
within 5 seconds, SCAN tuning moves to
the next station/channel.
toStation memory operations:
12 stations/channels can be set for the FM
band (6 each for FM1 and FM2), 18 for
SiriusXM Satellite Radio (6 each for XM1,
XM2 and XM3) and 6 stations can be set
for the AM band.
1. Choose the radio band using the radio band select button.
2. Tune to the desired station/channel using the
, SCAN button or the
radio TUNE knob.
3. Push and hold the desired station preset button
tountil the radio
mutes.
4. The station indicator will then come on and the sound will resume. Memorizing
is now complete.
5. Other buttons can be set in the same manner.
If the 12-volt battery cable is disconnected, or if the fuse opens, the radio memory will
be erased. In that case, reset the desired
stations/channels.
Menu (SiriusXM Satellite Radio) (models
with navigation system):
When the
“Menu”key on the display is
selected while the SiriusXM Satellite Radio
is being played, the menu list will be
displayed.
The following items are available.
. Preset List
Displays the preset channel list. If 1 of
the 6 preset stations listed is touched
and held, the current station will be
stored as the new preset.
. Customize Channel List
Selects specific channels to skip while
using the TUNE, SEEK/CATEGORY or
Menu-Categories feature.
. Favorite Artists & Songs
Stores the current artist or song that is
being played. Touch the “Alert”key to
be reminded when the stored artist or
song is playing on a station while
listening to SiriusXM Satellite Radio.
. Categories
Selecting a category will go to the first
channel in that category as defined by