Page 186 of 458

file.
.
(Previous)
Select the “
”key to display the
previous file.
Setting the Image Viewer:
The Image Viewer setting display will
appear when selecting the “Settings”key
on the full screen display. The following
settings are available for the full screen
display.
. Slideshow Speed
Select the “Slideshow Speed” key.
From the following display, select the
changing time from 5, 10, 30, 60
seconds or “No Auto Change”.
. Slideshow Order
Select the “Slideshow Order” key. From
the following display, select “Random”
or “Order List”. For “Order List”, the
image order is the order of the files as
stored on the USB memory.
Operating tips:
. Only files that meet the following
conditions will be displayed.
— Image type: JPEG
— File Extensions: *.jpg, *jpeg —
Maximum Resolution: 2048 61536
pixels
— Maximum Size: 2-MB
— Colors: 32768 (15-bit)
— Maximum File Name lengths: 253-
Bytes
— Maximum Folders: 500
— Maximum Images per Folder: 1024
. If an electronic device (such as a digital
camera) is directly connected to the
vehicle using a USB cable, no image
will be displayed on the screen.
. If the file name is too long, some file
names may not be entirely displayed.
. When the total number of characters in
the file name exceeds 100 or if 1 file
name in a directory exceeds 100
characters, all files will show a shor-
tened 8-character version. The image
will still be displayed when selected. The system is designed as an aid to the
driver in situations such as slot parking or
parallel parking.
When the shift lever is shifted into the R
(Reverse) position, the monitor display
shows view to the rear of the vehicle.
WARNING
.
The RearView Monitor is a convenience
but it is not a substitute to check behind
the vehicle when backing up.
. The driver is always responsible for
safety during parking and other maneu-
vers.
. Objects viewed in the RearView Monitor
differ from actual distance because a
wide-angle lens is used. Objects in the
RearView Monitor will appear visually
opposite like ones viewed in the inside
and outside mirrors.
. Make sure that the trunk is securely
closed when backing up.
. Underneath the bumper and the corner
areas of the bumper cannot be viewed on
the RearView monitor because of its
monitoring range limitation.
Monitor, climate, audio, phone and voice recognition systems4-23
REARVIEW MONITOR (if so equipped)
Page 187 of 458

4-24Monitor, climate, audio, phone and voice recognition systems
.Do not put anything on the RearView
camera. The rearview camera is installed
above the license plate.
. When washing the vehicle with high-
pressure water, be sure not to spray it
around the camera. Otherwise, water
may enter the camera unit causing water
condensation on the lens, a malfunction,
fire or an electric shock.
. Do not strike the camera. It is a precision
instrument. Otherwise, it may malfunc-
tion or cause damage resulting in a fire
or an electric shock.
CAUTION
Do not scratch the camera lens when
cleaning dirt or snow from the cover.
SAA1896
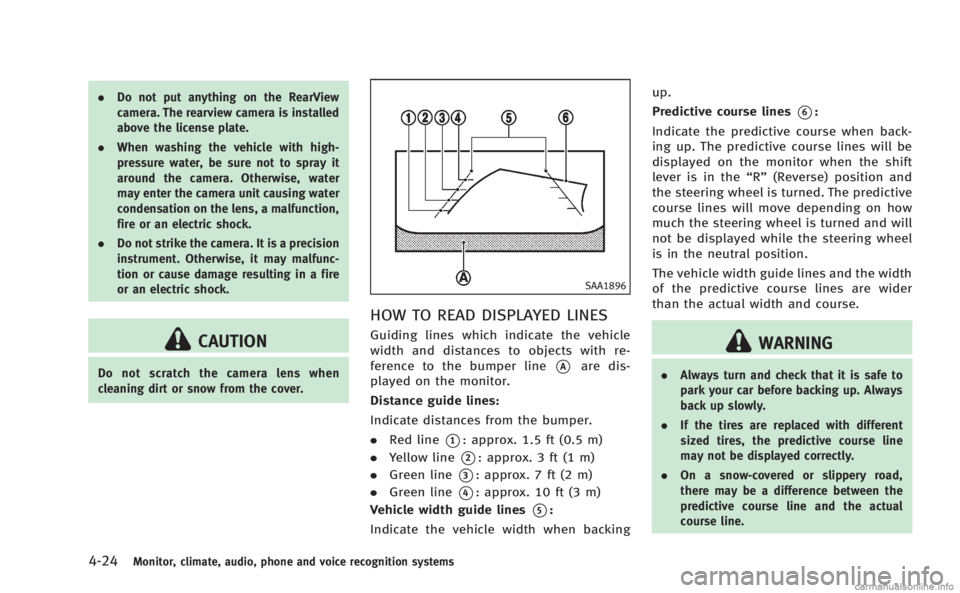
HOW TO READ DISPLAYED LINES
Guiding lines which indicate the vehicle
width and distances to objects with re-
ference to the bumper line
*Aare dis-
played on the monitor.
Distance guide lines:
Indicate distances from the bumper.
. Red line
*1: approx. 1.5 ft (0.5 m)
. Yellow line
*2: approx. 3 ft (1 m)
. Green line
*3: approx. 7 ft (2 m)
. Green line
*4: approx. 10 ft (3 m)
Vehicle width guide lines
*5:
Indicate the vehicle width when backing up.
Predictive course lines
*6:
Indicate the predictive course when back-
ing up. The predictive course lines will be
displayed on the monitor when the shift
lever is in the “R”(Reverse) position and
the steering wheel is turned. The predictive
course lines will move depending on how
much the steering wheel is turned and will
not be displayed while the steering wheel
is in the neutral position.
The vehicle width guide lines and the width
of the predictive course lines are wider
than the actual width and course.
WARNING
. Always turn and check that it is safe to
park your car before backing up. Always
back up slowly.
. If the tires are replaced with different
sized tires, the predictive course line
may not be displayed correctly.
. On a snow-covered or slippery road,
there may be a difference between the
predictive course line and the actual
course line.
Page 188 of 458

.The displayed lines will appear slightly
off to the right because the rearview
camera is not installed in the rear center
of the vehicle.
. The distance guide line and the vehicle
width guide line should be used as a
reference only when the vehicle is on a
level paved surface. The distance viewed
on the monitor is for reference only and
may be different from the actual distance
between the vehicle and displayed ob-
jects.
. When backing up the vehicle up a hill,
objects viewed in the monitor are further
than they appear. When backing up the
vehicle down a hill, objects viewed in the
monitor are closer than they appear. Use
the inside mirror or glance over your
shoulder to properly judge distances to
other objects.
SAA1897
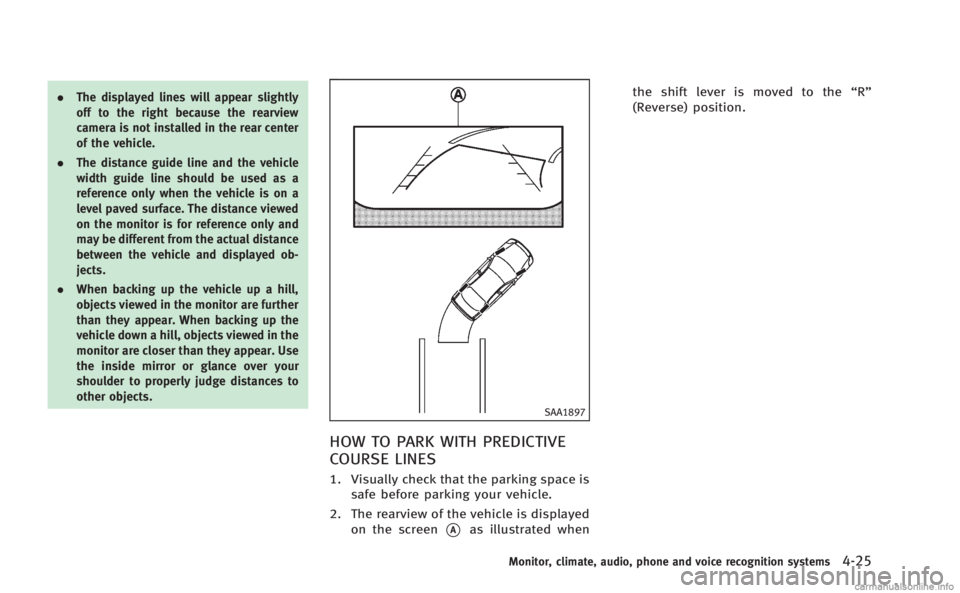
HOW TO PARK WITH PREDICTIVE
COURSE LINES
1. Visually check that the parking space is
safe before parking your vehicle.
2. The rearview of the vehicle is displayed on the screen
*Aas illustrated when the shift lever is moved to the
“R”
(Reverse) position.
Monitor, climate, audio, phone and voice recognition systems4-25
Page 192 of 458

SAA2404
Models with navigation system
SAA2606
Models without navigation system
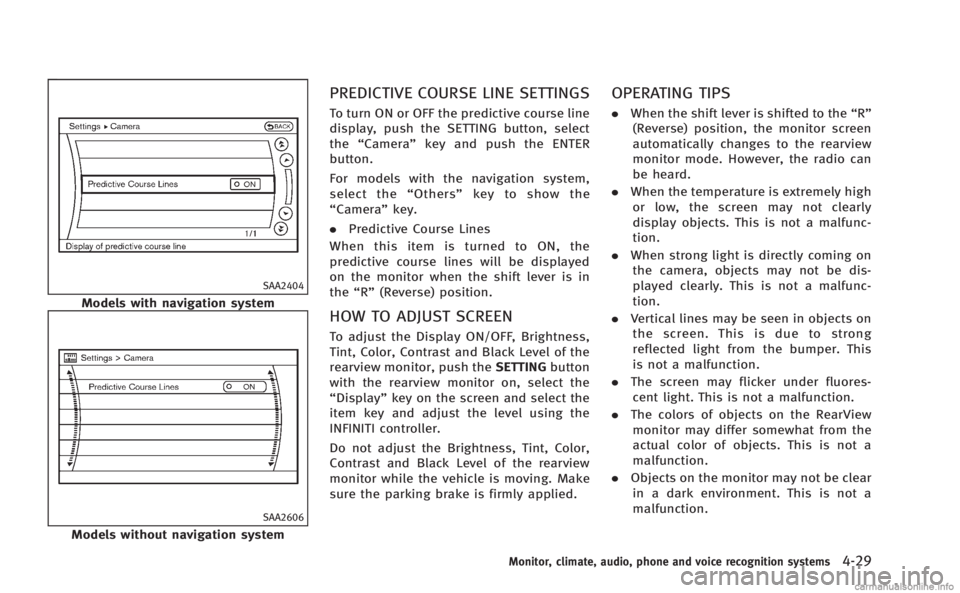
PREDICTIVE COURSE LINE SETTINGS
To turn ON or OFF the predictive course line
display, push the SETTING button, select
the“Camera” key and push the ENTER
button.
For models with the navigation system,
select the “Others” key to show the
“Camera” key.
. Predictive Course Lines
When this item is turned to ON, the
predictive course lines will be displayed
on the monitor when the shift lever is in
the “R” (Reverse) position.
HOW TO ADJUST SCREEN
To adjust the Display ON/OFF, Brightness,
Tint, Color, Contrast and Black Level of the
rearview monitor, push the SETTINGbutton
with the rearview monitor on, select the
“Display” key on the screen and select the
item key and adjust the level using the
INFINITI controller.
Do not adjust the Brightness, Tint, Color,
Contrast and Black Level of the rearview
monitor while the vehicle is moving. Make
sure the parking brake is firmly applied.
OPERATING TIPS
. When the shift lever is shifted to the “R”
(Reverse) position, the monitor screen
automatically changes to the rearview
monitor mode. However, the radio can
be heard.
. When the temperature is extremely high
or low, the screen may not clearly
display objects. This is not a malfunc-
tion.
. When strong light is directly coming on
the camera, objects may not be dis-
played clearly. This is not a malfunc-
tion.
. Vertical lines may be seen in objects on
the screen. This is due to strong
reflected light from the bumper. This
is not a malfunction.
. The screen may flicker under fluores-
cent light. This is not a malfunction.
. The colors of objects on the RearView
monitor may differ somewhat from the
actual color of objects. This is not a
malfunction.
. Objects on the monitor may not be clear
in a dark environment. This is not a
malfunction.
Monitor, climate, audio, phone and voice recognition systems4-29