2014 Hyundai Sonata low beam
[x] Cancel search: low beamPage 192 of 665

3-96
Convenient features of your vehicle
Low Beam Indicator
Light (if equipped)
This indicator light illuminates:
•When the headlights are on.
High Beam Indicator
Light
This indicator light illuminates:
•When the headlights are on and in
the high beam position
•When the turn signal lever is pulled
into the Flash-to-Pass position.
Light ON Indicator
Light
This indicator light illuminates:
•When the tail lights or headlights
are on.
Front Fog Indicator
Light (if equipped)
This indicator light illuminates:
•When the front fog lights are on.
Rear Fog Indicator
Light (if equipped)
This indicator light illuminates:
•When the rear fog lights are on.
Cruise
Indicator Light
(if equipped)
This indicator light illuminates:
•When the cruise control system is
enabled.
For more details, refer to “Cruise
Control System” in chapter 5.
Cruise SET Indicator
Light (if equipped)
This indicator light illuminates:
•When the cruise control speed is
set.
For more details, refer to “Cruise
Control System” in chapter 5.
SET
CRUISE
■Type A■Type B
Page 195 of 665
3-99
Convenient features of your vehicle
3
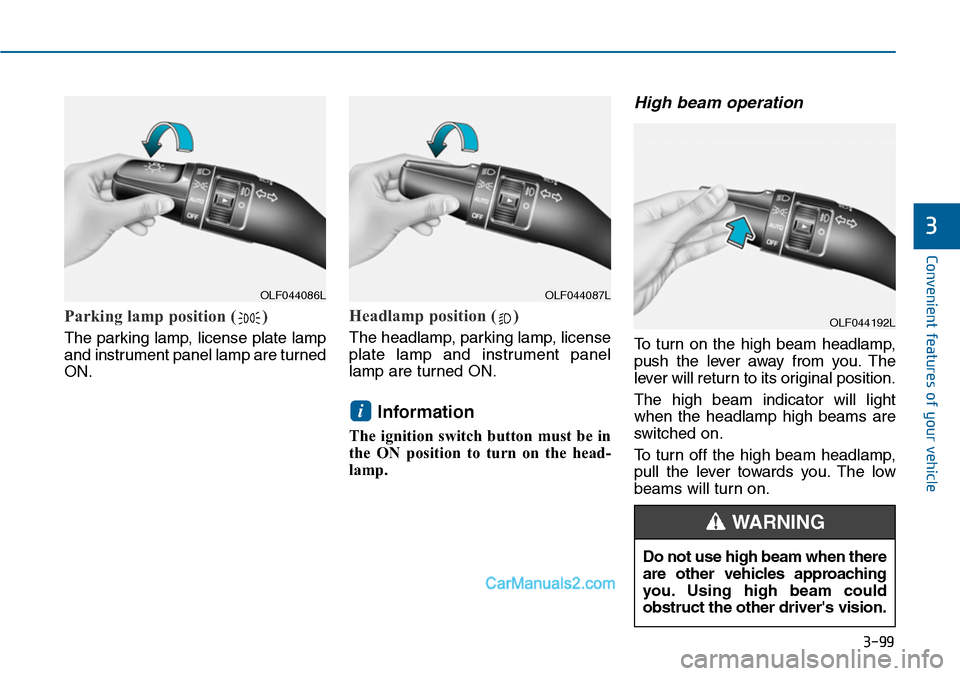
Parking lamp position ( )
The parking lamp, license plate lamp
and instrument panel lamp are turned
ON.
Headlamp position ( )
The headlamp, parking lamp, license
plate lamp and instrument panel
lamp are turned ON.
Information
The ignition switch button must be in
the ON position to turn on the head-
lamp.
High beam operation
To t u r n o n t h e h i g h b e a m h e a d l a m p ,
push the lever away from you. The
lever will return to its original position.
The high beam indicator will light
when the headlamp high beams are
switched on.
To turn off the high beam headlamp,
pull the lever towards you. The low
beams will turn on.
i
OLF044086LOLF044087L
OLF044192L
Do not use high beam when there
are other vehicles approaching
you. Using high beam could
obstruct the other driver's vision.
WARNING
Page 199 of 665
3-103
Convenient features of your vehicle
3
If the driver gets out of the vehicle
through other doors (except dri-
ver's door), the battery saver func-
tion does not operate and the
headlamp delay function does not
turn off automatically. Therefore, It
causes the battery to be dis-
charged. In this case, make sure to
turn off the lamp before getting out
of the vehicle.
Daytime running light (DRL)
(if equipped)
The Daytime Running Lights (DRL)
can make it easier for others to see
the front of your vehicle during the
day, especially after dawn and before
sunset.
The DRL system will turn the dedi-
cated lamp OFF when:
1. The headlights or front fog lights
are in the ON position.
2. The parking switch is in the ON
position.
3. The engine is turned off.
Headlight leveling device
(if equipped)
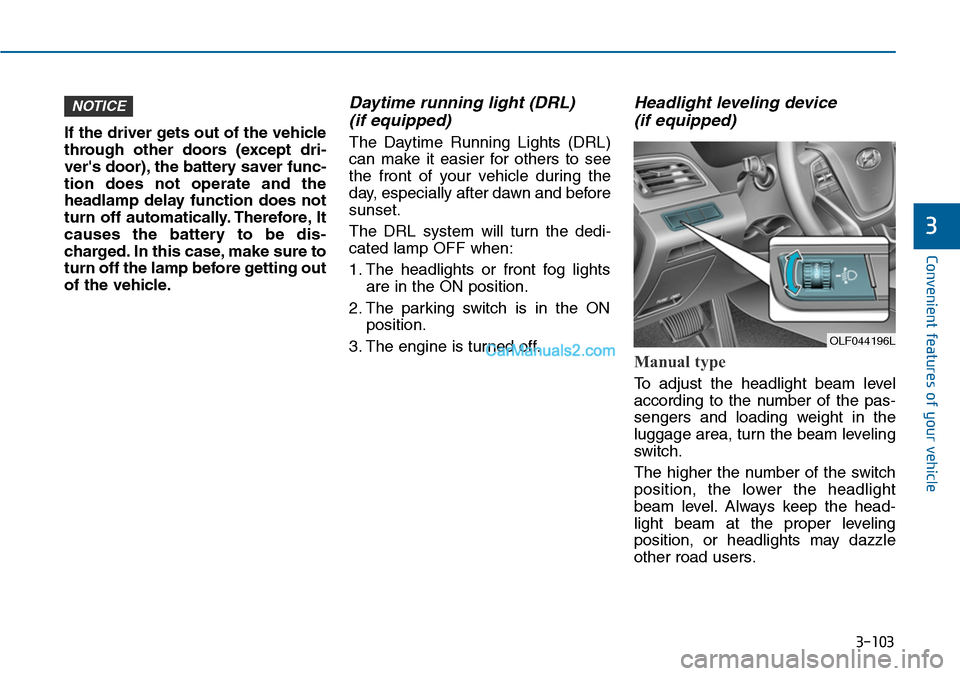
Manual type
To adjust the headlight beam level
according to the number of the pas-
sengers and loading weight in the
luggage area, turn the beam leveling
switch.
The higher the number of the switch
position, the lower the headlight
beam level. Always keep the head-
light beam at the proper leveling
position, or headlights may dazzle
other road users.
NOTICE
OLF044196L
Page 200 of 665
3-104
Convenient features of your vehicle
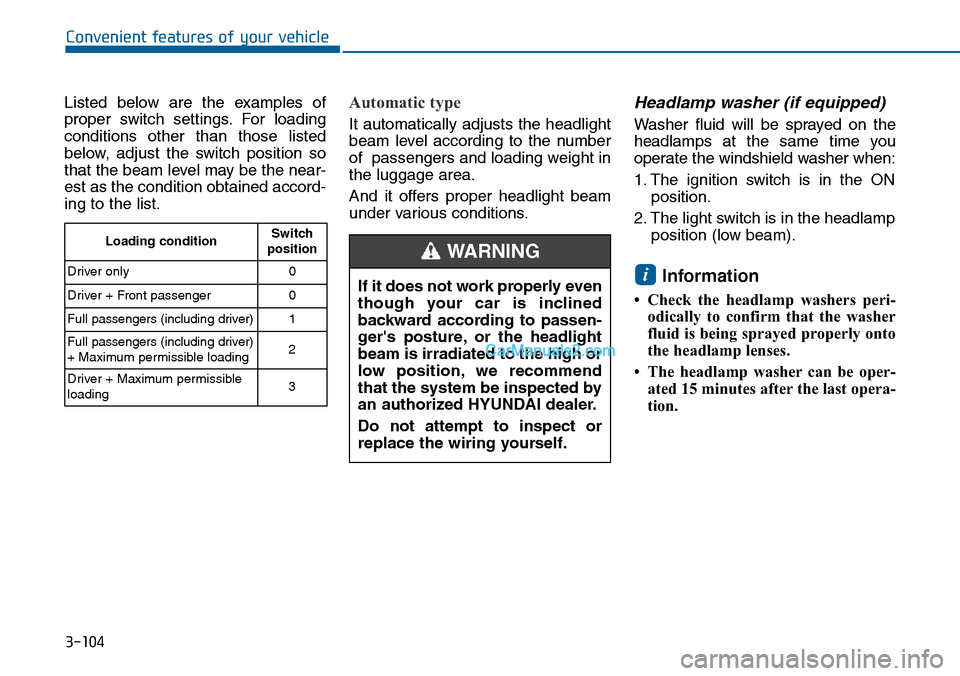
Listed below are the examples of
proper switch settings. For loading
conditions other than those listed
below, adjust the switch position so
that the beam level may be the near-
est as the condition obtained accord-
ing to the list.
Automatic type
It automatically adjusts the headlight
beam level according to the number
of passengers and loading weight in
the luggage area.
And it offers proper headlight beam
under various conditions.
Headlamp washer (if equipped)
Washer fluid will be sprayed on the
headlamps at the same time you
operate the windshield washer when:
1. The ignition switch is in the ON
position.
2. The light switch is in the headlamp
position (low beam).
Information
• Check the headlamp washers peri-
odically to confirm that the washer
fluid is being sprayed properly onto
the headlamp lenses.
• The headlamp washer can be oper-
ated 15 minutes after the last opera-
tion.
i
Loading conditionSwitchposition
Driver only 0
Driver + Front passenger 0
Full passengers (including driver) 1
Full passengers (including driver)+ Maximum permissible loading2
Driver + Maximum permissibleloading 3
If it does not work properly even
though your car is inclined
backward according to passen-
ger's posture, or the headlight
beam is irradiated to the high or
low position, we recommend
that the system be inspected by
an authorized HYUNDAI dealer.
Do not attempt to inspect or
replace the wiring yourself.
WARNING
Page 629 of 665
7-72
Maintenance
LIGHT BULBS
Use only the bulbs of the specified
wattage.
After heavy driving, rain or wash-
ing, headlamp and tail lamp lens-
es could appear frosty. This condi-
tion is caused by the temperature
difference between the lamp
inside and outside. This is similar
to the condensation on your win-
dows inside your vehicle during
the rain and doesn’t indicate a
problem with your vehicle. If the
water leaks into the lamp bulb cir-
cuitry, we recommend that the
system be checked by an author-
ized HYUNDAI dealer.
❈Traffic Change (For Europe)
The low beam light distribution is
asymmetric. If you go abroad to a
country with opposite traffic direc-
tion, this asymmetric part will dazzle
oncoming car driver. To prevent daz-
zle, ECE regulation demand several
technical solutions (ex. automatic
change system, adhesive sheet,
down aiming). These headlamps are
designed not to dazzle opposite driv-
ers. So, you need not change your
headlamps in a country with oppo-
site traffic direction.
NOTICE
Be sure to replace the burned-
out bulb with one of the same
wattage rating. Otherwise, it
may cause damage to the fuse
or electric wiring system.
CAUTION
If you don’t have necessary
tools, the correct bulbs and the
expertise, consult an authorized
HYUNDAI dealer. In many cases,
it is difficult to replace vehicle
light bulbs because other parts
of the vehicle must be removed
before you can get to the bulb.
This is especially true if you
have to remove the headlamp
assembly to get to the bulb(s).
Removing/installing the head-
lamp assembly can result in
damage to the vehicle.
CAUTION
Working on the lights
Prior to working on the light, firm-
ly apply the parking brake,
ensure that the Engine Start/Stop
button is turned to the OFF posi-
tion and turn off the lights to
avoid sudden movement of the
vehicle and burning your fingers
or receiving an electric shock.
WARNING
Page 631 of 665
7-74
Maintenance
•Always handle them carefully, and
avoid scratches and abrasions. If
the bulbs are lit, avoid contact with
liquids.
•Never touch the glass with bare
hands. Residual oil may cause the
bulb to overheat and burst when lit.
•A bulb should be operated only
when installed in a headlamp.
•If a bulb becomes damaged or
cracked, replace it immediately
and carefully dispose of it.
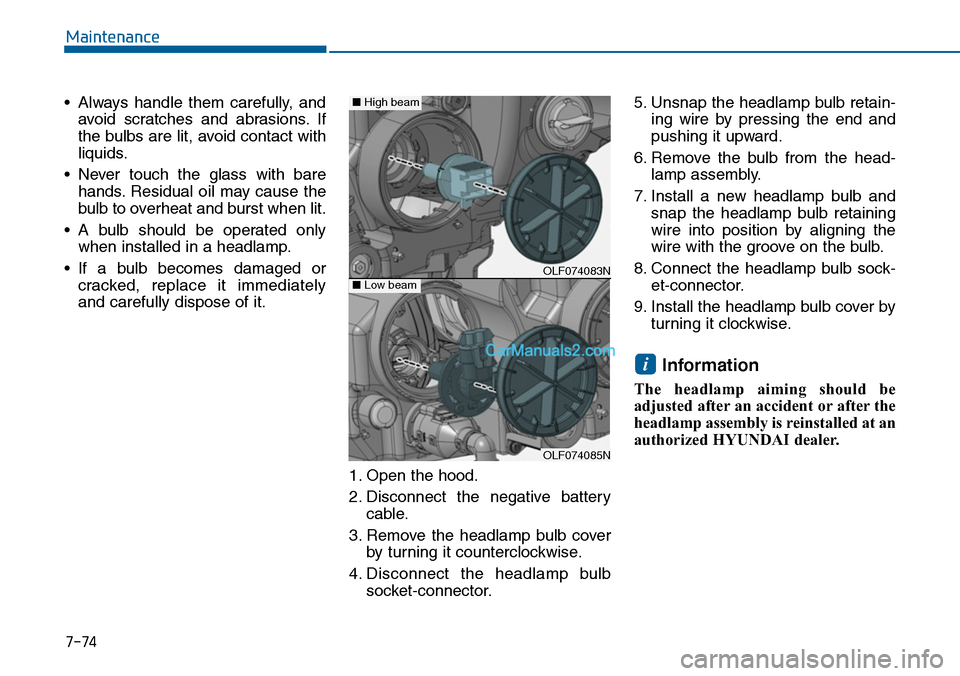
1. Open the hood.
2. Disconnect the negative battery
cable.
3. Remove the headlamp bulb cover
by turning it counterclockwise.
4. Disconnect the headlamp bulb
socket-connector.
5. Unsnap the headlamp bulb retain-
ing wire by pressing the end and
pushing it upward.
6. Remove the bulb from the head-
lamp assembly.
7. Install a new headlamp bulb and
snap the headlamp bulb retaining
wire into position by aligning the
wire with the groove on the bulb.
8. Connect the headlamp bulb sock-
et-connector.
9. Install the headlamp bulb cover by
turning it clockwise.
Information
The headlamp aiming should be
adjusted after an accident or after the
headlamp assembly is reinstalled at an
authorized HYUNDAI dealer.
i
OLF074083N
OLF074085N
■Low beam
■High beam
Page 633 of 665
Headlamp and front fog lamp
aiming (For Europe)
Headlamp aiming
1. Inflate the tires to the specified
pressure and remove any loads
from the vehicle except the driver,
spare tire, and tools.
2. The vehicle should be placed on a
flat floor.
3. Draw vertical lines (Vertical lines
passing through respective head
lamp centers) and a horizontal line
(Horizontal line passing through
center of head lamps) on the
screen.
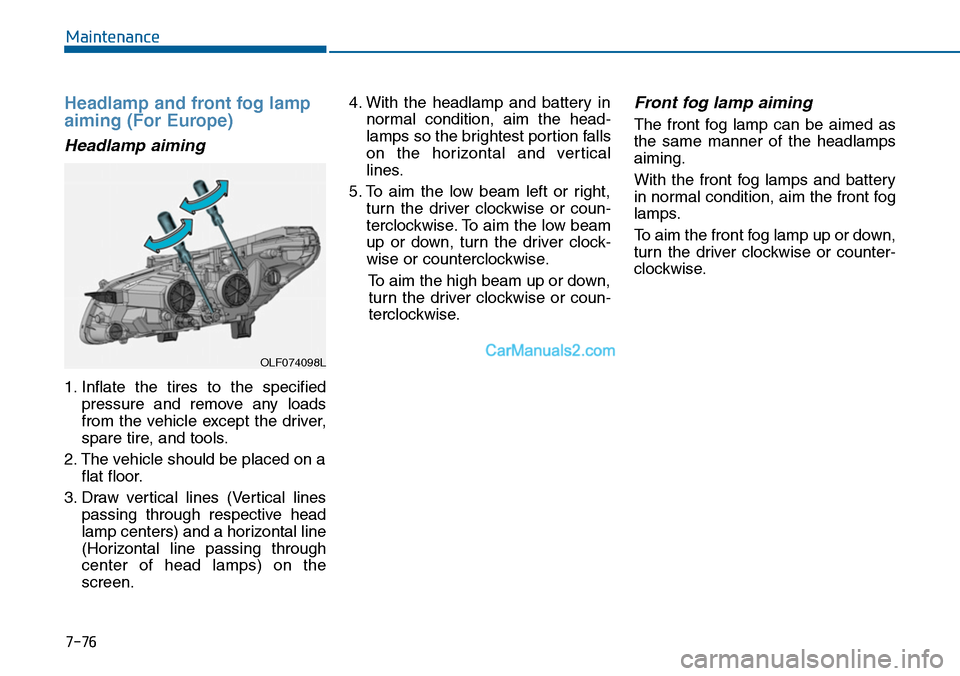
4. With the headlamp and battery in
normal condition, aim the head-
lamps so the brightest portion falls
on the horizontal and vertical
lines.
5. To aim the low beam left or right,
turn the driver clockwise or coun-
terclockwise. To aim the low beam
up or down, turn the driver clock-
wise or counterclockwise.
To aim the high beam up or down,
turn the driver clockwise or coun-
terclockwise.
Front fog lamp aiming
The front fog lamp can be aimed as
the same manner of the headlamps
aiming.
With the front fog lamps and battery
in normal condition, aim the front fog
lamps.
To aim the front fog lamp up or down,
turn the driver clockwise or counter-
clockwise.
7-76
Maintenance
OLF074098L
Page 634 of 665
7-77
7
Maintenance
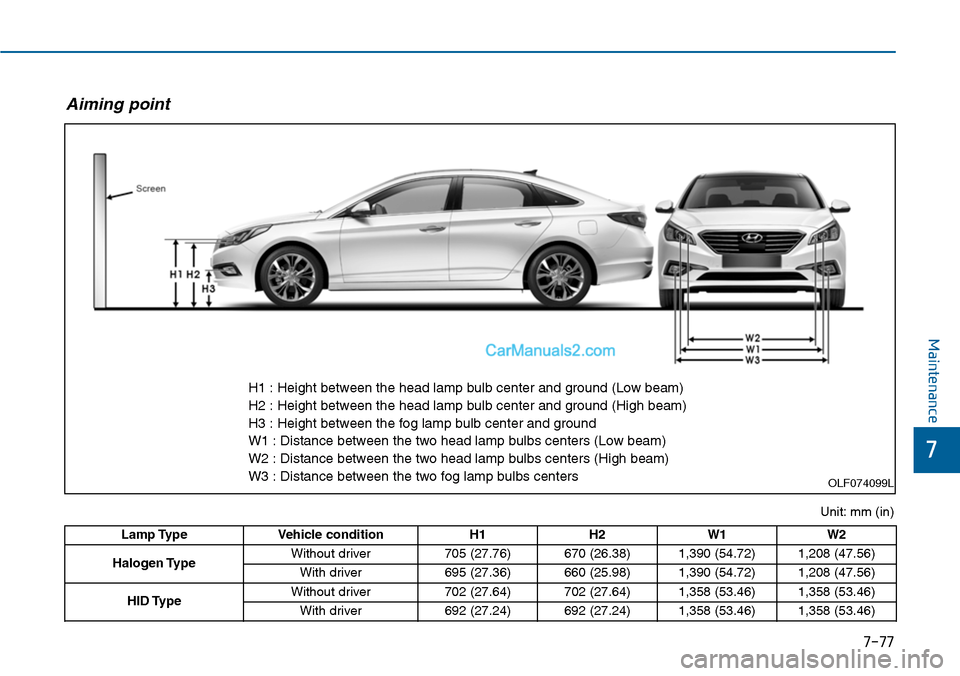
Lamp Type Vehicle condition H1 H2 W1 W2
Halogen TypeWithout driver 705 (27.76) 670 (26.38) 1,390 (54.72) 1,208 (47.56)
With driver 695 (27.36) 660 (25.98) 1,390 (54.72) 1,208 (47.56)
HID TypeWithout driver 702 (27.64) 702 (27.64) 1,358 (53.46) 1,358 (53.46)
With driver 692 (27.24) 692 (27.24) 1,358 (53.46) 1,358 (53.46)
Unit: mm (in)
Aiming point
H1 : Height between the head lamp bulb center and ground (Low beam)
H2 : Height between the head lamp bulb center and ground (High beam)
H3 : Height between the fog lamp bulb center and ground
W1 : Distance between the two head lamp bulbs centers (Low beam)
W2 : Distance between the two head lamp bulbs centers (High beam)
W3 : Distance between the two fog lamp bulbs centersOLF074099L