Page 201 of 665

3-105
Convenient features of your vehicle
3
Welcome system (if equipped)
Welcome light (if equipped)
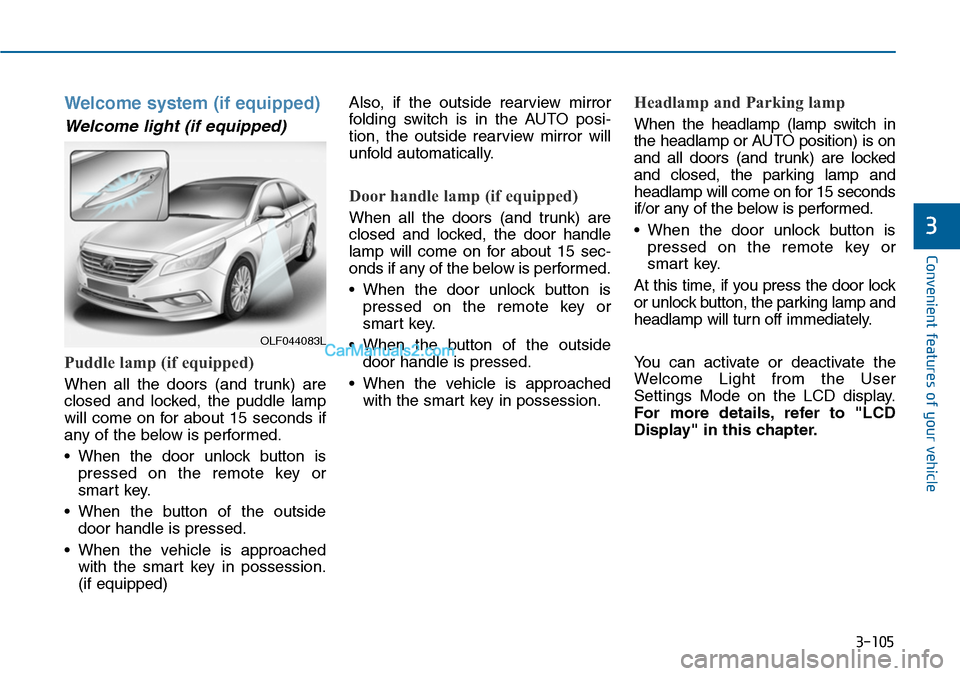
Puddle lamp (if equipped)
When all the doors (and trunk) are
closed and locked, the puddle lamp
will come on for about 15 seconds if
any of the below is performed.
•When the door unlock button is
pressed on the remote key or
smart key.
•When the button of the outside
door handle is pressed.
•When the vehicle is approached
with the smart key in possession.
(if equipped)
Also, if the outside rearview mirror
folding switch is in the AUTO posi-
tion, the outside rearview mirror will
unfold automatically.
Door handle lamp (if equipped)
When all the doors (and trunk) are
closed and locked, the door handle
lamp will come on for about 15 sec-
onds if any of the below is performed.
•When the door unlock button is
pressed on the remote key or
smart key.
•When the button of the outside
door handle is pressed.
•When the vehicle is approached
with the smart key in possession.
Headlamp and Parking lamp
When the headlamp (lamp switch in
the headlamp or AUTO position) is on
and all doors (and trunk) are locked
and closed, the parking lamp and
headlamp will come on for 15 seconds
if/or any of the below is performed.
•When the door unlock button is
pressed on the remote key or
smart key.
At this time, if you press the door lock
or unlock button, the parking lamp and
headlamp will turn off immediately.
Yo u c a n a c t i v a t e o r d e a c t i v a t e t h e
Welcome Light from the User
Settings Mode on the LCD display.
For more details, refer to "LCD
Display" in this chapter.
OLF044083L
Page 242 of 665

3-146
Convenient features of your vehicle
•For maximum defrosting, set the
temperature control to the extreme
right/hot position and the fan speed
control to the highest speed.
•If warm air to the floor is desired
while defrosting or defogging, set the
mode to the floor-defrost position.
•Before driving, clear all snow and
ice from the windshield, rear win-
dow, outside rear view mirrors, and
all side windows.
•Clear all snow and ice from the
hood and air inlet in the cowl grill to
improve heater and defroster effi-
ciency and to reduce the probabili-
ty of fogging up inside of the wind-
shield.
Manual climate control system
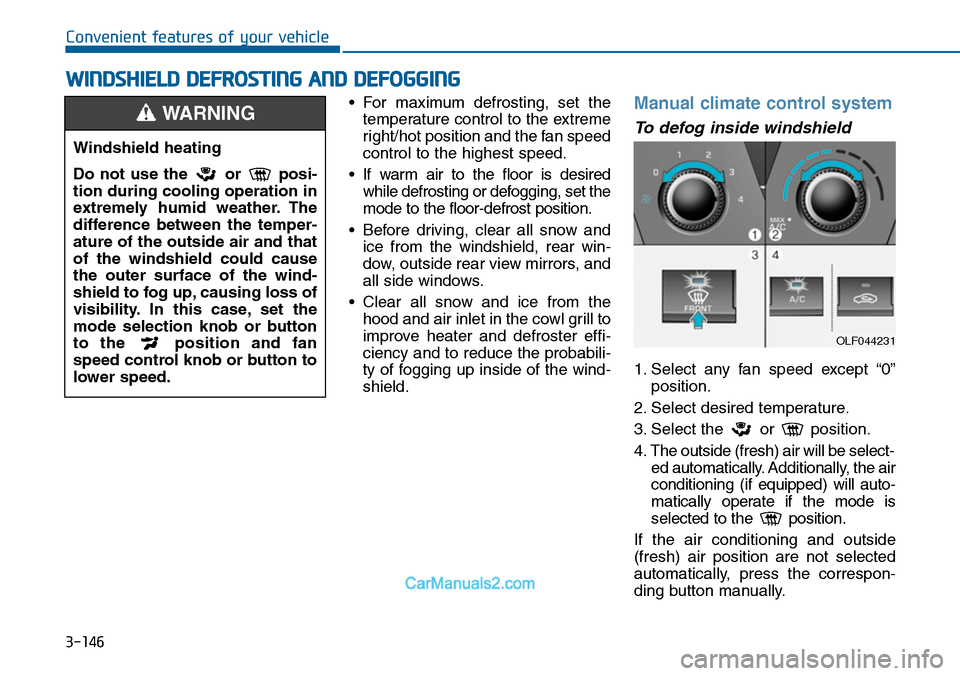
To defog inside windshield
1. Select any fan speed except “0”
position.
2. Select desired temperature.
3. Select the or position.
4. The outside (fresh) air will be select-
ed automatically. Additionally, the air
conditioning (if equipped) will auto-
matically operate if the mode is
selected to the position.
If the air conditioning and outside
(fresh) air position are not selected
automatically, press the correspon-
ding button manually.
WWINDSHIELD DEFROSTING AND DEFOGGING
Windshield heating
Do not use the or posi-
tion during cooling operation in
extremely humid weather. The
difference between the temper-
ature of the outside air and that
of the windshield could cause
the outer surface of the wind-
shield to fog up, causing loss of
visibility. In this case, set the
mode selection knob or button
to the position and fan
speed control knob or button to
lower speed.
WARNING
OLF044231
Page 249 of 665
3-153
Convenient features of your vehicle
3
Multi box (if equipped)
To open the cover, press the cover
and it will slowly open. To close the
cover, press the cover and it will
slowly close.
For the safety of the passengers,
when the cover is closed, the cover
locks if the vehicle shakes by sudden
acceleration and braking.
To unlock the cover, press the cover
twice.
•Do not keep objects except
sunglasses inside the sun-
glass holder. Such objects can
be thrown from the holder in
the event of a sudden stop or
an accident, possibly injuring
the passengers in the vehicle.
•Do not open the sunglass
holder while the vehicle is
moving. The rear view mirror
of the vehicle can be blocked
by an open sunglass holder.
•Do not put the glasses forcibly
into a sunglass holder. It may
cause personal injury if you
try to open it forcibly when the
glasses are jammed in holder.
WARNING
OLF044279
Page 252 of 665

3-156
Convenient features of your vehicle
Sunvisor
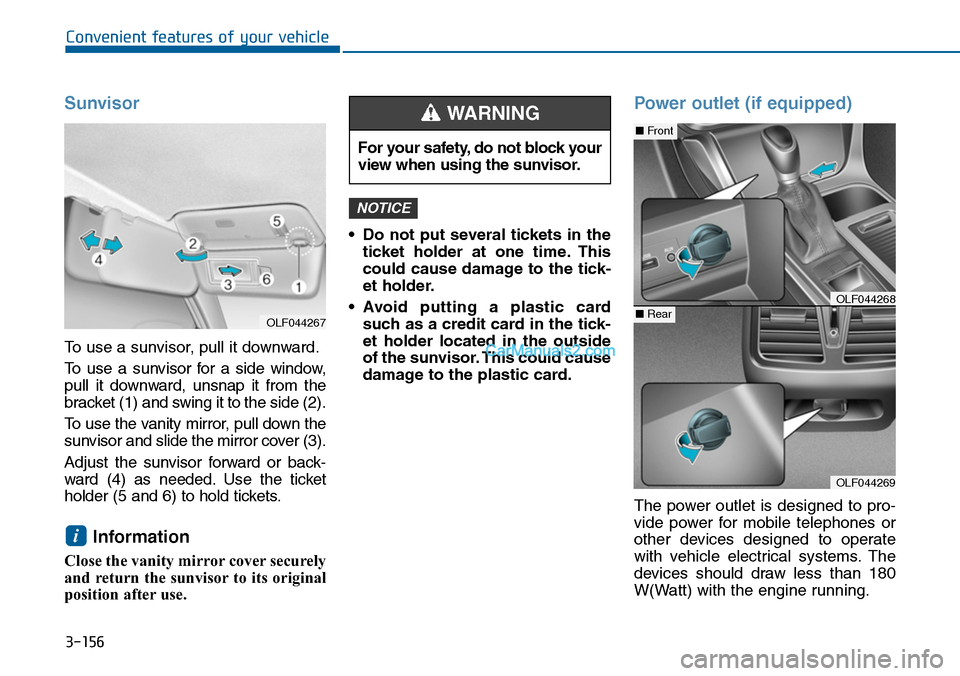
To use a sunvisor, pull it downward.
To u s e a s u n v i s o r f o r a s i d e w i n d o w ,
pull it downward, unsnap it from the
bracket (1) and swing it to the side (2).
To u s e t h e v a n i t y m i r r o r , p u l l d o w n t h e
sunvisor and slide the mirror cover (3).
Adjust the sunvisor forward or back-
ward (4) as needed. Use the ticket
holder (5 and 6) to hold tickets.
Information
Close the vanity mirror cover securely
and return the sunvisor to its original
position after use.
•Do not put several tickets in the
ticket holder at one time. This
could cause damage to the tick-
et holder.
•Avoid putting a plastic card
such as a credit card in the tick-
et holder located in the outside
of the sunvisor. This could cause
damage to the plastic card.
Power outlet (if equipped)
The power outlet is designed to pro-
vide power for mobile telephones or
other devices designed to operate
with vehicle electrical systems. The
devices should draw less than 180
W(Watt) with the engine running.
NOTICE
i
For your safety, do not block your
view when using the sunvisor.
WARNING
OLF044269
■Front
■RearOLF044268
OLF044267
Page 452 of 665

5-3
Driving your vehicle
5
Before entering the vehicle
•Be sure all windows, outside mir-
ror(s), and outside lights are clean
and unobstructed.
•Remove frost, snow, or ice.
•Visually check the tires for uneven
wear and damage.
•Check under the vehicle for any
sign of leaks.
•Be sure there are no obstacles
behind you if you intend to back up.
Before starting
•Make sure the hood, the trunk, and
the doors are securely closed and
locked.
•Adjust the position of the seat and
steering wheel.
•Adjust the inside and outside
rearview mirrors.
•Verify all the lights work.
•Fasten your seatbelt.Check that all
passengers have fastened their
seatbelts.
•Check the gauges and indicators in
the instrument panel and the mes-
sages on the instrument display
when the ignition switch is in the
ON position.
•Check that any items you are car-
rying are stored properly or fas-
tened down securely.
BEFORE DRIVING
To reduce the risk of SERIOUS
INJURY or DEATH, take the fol-
lowing precautions:
•ALWAYS wear your seat belt.
All passengers must be prop-
erly belted whenever the vehi-
cle is moving. For more infor-
mation, refer to “Seat Belts” in
chapter 2.
•Always drive defensively.
Assume other drivers or
pedestrians may be careless
and make mistakes.
•Stay focused on the task of
driving. Driver distraction can
cause accidents.
•Leave plenty of space
between you and the vehicle
in front of you.
WARNING
Page 510 of 665
5-61
Driving your vehicle
5
BSD (Blind Spot Detection) /
LCA (Lane Change Assist)
Operating conditions
To operate:
Press the BSD switch with the
Ignition switch in the ON position.
The indicator illuminates on the
switch. If vehicle speed exceeds
30km/h (20 mph) the system will acti-
vate.
To cancel:
Press the BSD switch again. The
indicator on the switch will go off.
When the system is not used, turn the
system off by turning off the switch.
Information
• If the engine is turned off and on,
the system returns to the previous
state.
• When the system is turned on, the
warning light will illuminate for 3
seconds on the outside rearview
mirror.
Warning type
The system will activate when:
1.The system is on.
2.Vehicle speed is above about 30
km/h (20 mph).
3.Other vehicles are detected in the
rear side.
i
OLF054037R
■Left-hand drive
■Right-hand driveOLF054037
Page 511 of 665
5-62
Driving your vehicle
First stage alert
If a vehicle is detected within the
boundary of the system, a warning
light will illuminate on the outside
rearview mirror and the head up dis-
play.
If the detected vehicle is not in warn-
ing range, the warning will turn off
according to driving conditions.
OLF054051N
■ Left side
■ Right side
OLF054052N
■ Left side
OLF054053N
■ Right side
Second stage alert
The second stage alarm will activate when:
1. The first stage alert is on.
2. The turn signal light is on to change a lane.
When the second stage alert is activated, a warning light will blink on the
outside rearview mirror.
If you turn off the turn signal light, the second stage alert will be deacti-
vated.
Page 513 of 665

5-64
Driving your vehicle
RCTA (Rear Cross Traffic Alert)
Operating conditions
To operate:
Go to the User Settings Mode
(Driving Assist) and select RCTA
(Rear Cross Traffic Alert) on the LCD
display (For more details, refer to
"LCD Display" in chapter 3.).The
system will turn on and standby to
activate. The system will activate
when vehicle speed is below 10km/h
(6.2mph) with the shift lever in R
(Reverse).
Information
The RCTA (Rear Cross Traffic Alert)
detecting range is about 0.5m ~ 20m.
A vehicle will be detected if the vehicle
speed is 4km/h ~ 36km/h within the
detecting range. However, the detect-
ing range may change under different
conditions. Always pay attention to
the surroundings.
Warning type
If the vehicle detected by the sensors
approaches your vehicle, the warn-
ing chime will sound, the warning
light on the outside rearview mirror
will blink and a message will appear
on the LCD display.
Information
• If the detected vehicle is out of the
sensing range of your vehicle, move
the vehicle away from the detected
object slowly; the warning will be
cancelled.
• The system may not operate proper-
ly due to other factors or circum-
stances. Always pay attention to
your surrounding.
• If your vehicle's left or right side
bumper is blinded by barrier or
vehicles, the system sensing ability
may be reduced.
i
i
• Type A■ Left
■ Right
• Type B
• Type A• Type B
OLF054221N/OLF054219N
OLF054222N/OLF054218N