Page 117 of 665

3-21
Convenient features of your vehicle
3
Theft-alarm system (For Brazil)
Intrusion/tilt sensor ON/OFF con-
dition (For Brazil, if equipped)
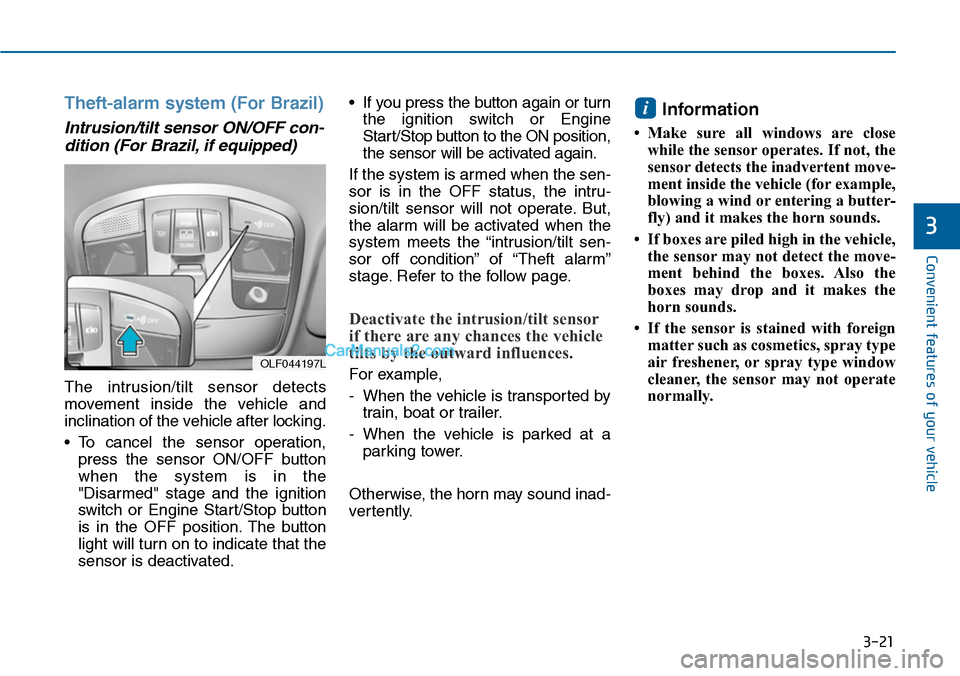
The intrusion/tilt sensor detects
movement inside the vehicle and
inclination of the vehicle after locking.
•To cancel the sensor operation,
press the sensor ON/OFF button
when the system is in the
"Disarmed" stage and the ignition
switch or Engine Star t/Stop button
is in the OFF position. The button
light will turn on to indicate that the
sensor is deactivated.
•If you press the button again or turn
the ignition switch or Engine
Start/Stop button to the ON position,
the sensor will be activated again.
If the system is armed when the sen-
sor is in the OFF status, the intru-
sion/tilt sensor will not operate. But,
the alarm will be activated when the
system meets the “intrusion/tilt sen-
sor off condition” of “Theft alarm”
stage. Refer to the follow page.
Deactivate the intrusion/tilt sensor
if there are any chances the vehicle
tilts by the outward influences.
For example,
-When the vehicle is transported by
train, boat or trailer.
-When the vehicle is parked at a
parking tower.
Otherwise, the horn may sound inad-
ver tently.
Information
•Make sure all windows are close
while the sensor operates. If not, the
sensor detects the inadvertent move-
ment inside the vehicle (for example,
blowing a wind or entering a butter-
fly) and it makes the horn sounds.
• If boxes are piled high in the vehicle,
the sensor may not detect the move-
ment behind the boxes. Also the
boxes may drop and it makes the
horn sounds.
• If the sensor is stained with foreign
matter such as cosmetics, spray type
air freshener, or spray type window
cleaner, the sensor may not operate
normally.
i
OLF044197L
Page 123 of 665

3-27
Convenient features of your vehicle
3
Tilt steering / Telescope steering
Information
After adjustment, sometimes the lock-
release lever may not lock the steering
wheel.
It is not a malfunction. This occurs
when two gears engage. In this case,
adjust the steering wheel again and
then lock the steering wheel.
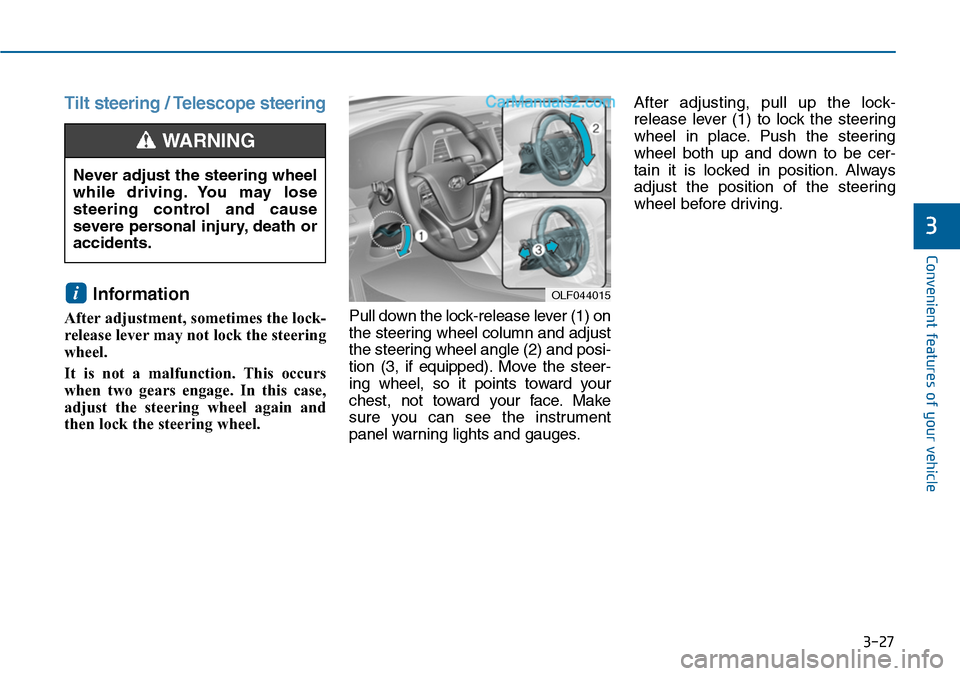
Pull down the lock-release lever (1) on
the steering wheel column and adjust
the steering wheel angle (2) and posi-
tion (3, if equipped). Move the steer-
ing wheel, so it points toward your
chest, not toward your face. Make
sure you can see the instrument
panel warning lights and gauges.
After adjusting, pull up the lock-
release lever (1) to lock the steering
wheel in place. Push the steering
wheel both up and down to be cer-
tain it is locked in position. Always
adjust the position of the steering
wheel before driving.
i
Never adjust the steering wheel
while driving. You may lose
steering control and cause
severe personal injury, death or
accidents.
WARNING
OLF044015
Page 125 of 665

3-29
Convenient features of your vehicle
3
MIRRORS
Inside rearview mirror
Before you start driving, adjust the
rearview mirror to the center on the
view through the rear window.
When cleaning the mirror, use a
paper towel or similar material
dampened with glass cleaner. Do
not spray glass cleaner directly on
the mirror as that may cause the
liquid cleaner to enter the mirror
housing.
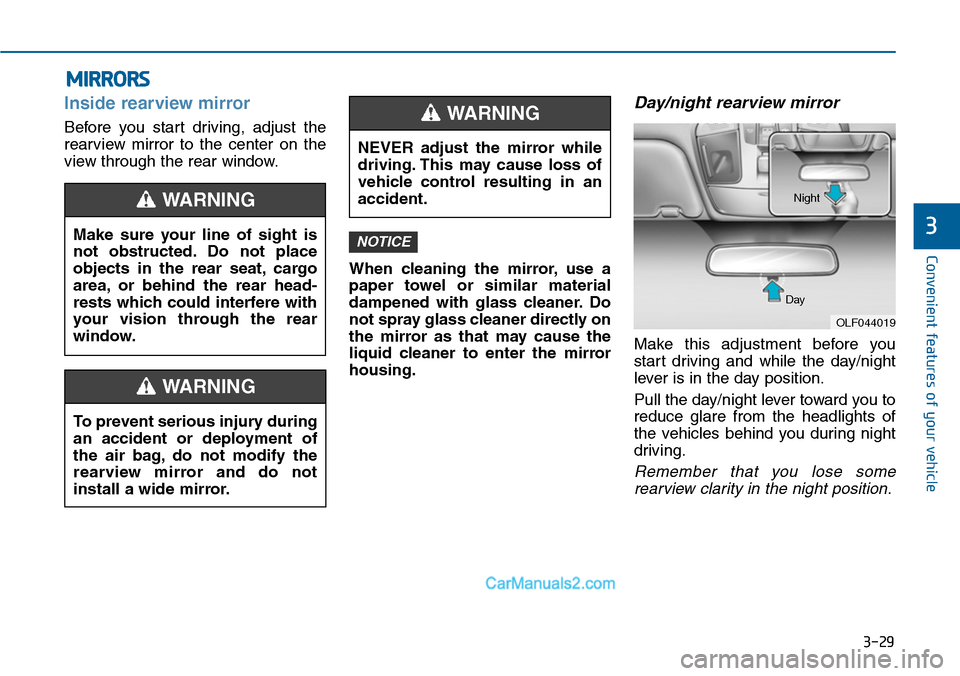
Day/night rearview mirror
Make this adjustment before you
start driving and while the day/night
lever is in the day position.
Pull the day/night lever toward you to
reduce glare from the headlights of
the vehicles behind you during night
driving.
Remember that you lose some
rearview clarity in the night position.
NOTICEMake sure your line of sight is
not obstructed. Do not place
objects in the rear seat, cargo
area, or behind the rear head-
rests which could interfere with
your vision through the rear
window.
WARNING
To prevent serious injury during
an accident or deployment of
the air bag, do not modify the
rearview mirror and do not
install a wide mirror.
WARNING
NEVER adjust the mirror while
driving. This may cause loss of
vehicle control resulting in an
accident.
WARNING
OLF044019
Day
Night
Page 128 of 665
3-32
Convenient features of your vehicle
After adjustment, move the lever (1)
to the middle to prevent inadvertent
adjustment.
•The mirrors stop moving when
they reach the maximum adjust-
ing angles, but the motor contin-
ues to operate while the switch
is pressed. Do not press the
switch longer than necessary,
the motor may be damaged.
•Do not attempt to adjust the out-
side rearview mirror by hand or
the motor may be damaged.
Folding the outside rearview
mirror
Manual type
To fold the outside rearview mirror,
grasp the housing of the mirror and
then fold it toward the rear of the
vehicle.
Electric type (if equipped)
Left:The mirror will unfold.
Right:The mirror will fold.
NOTICE
OLF044026
OLF044027L
OLF044027R
■Left-hand drive
■Right-hand drive
Page 156 of 665
3-60
Convenient features of your vehicle
Engine Coolant Temperature
gauge
This gauge indicates the tempera-
ture of the engine coolant when the
ignition switch or Engine Start/Stop
button is in the ON position.
If the gauge pointer moves
beyond the normal range area
toward the "130 or H" position, it
indicates overheating that may
damage the engine.
Do not continue driving with an
overheated engine. If your vehicle
overheats, refer to "If the Engine
Overheats" in chapter 6.
Fuel Gauge
This gauge indicates the approxi-
mate amount of fuel remaining in the
fuel tank.
NOTICE
OLF044107
OLF044107L
■Except Europe• Type A• Type B
• Type B
■For Europe• Type ANever remove the radiator cap
when the engine is hot. The
engine coolant is under pressure
and could severe burns. Wait
until the engine is cool before
adding coolant to the reservoir.
WARNING
OLF044108
OLF044108L
■Except Europe• Type A• Type B
• Type B
■For Europe• Type A
Page 184 of 665

3-88
Convenient features of your vehicle
Parking Brake & Brake
Fluid Warning Light
This warning light illuminates:
•Once you set the ignition switch
switch or the Engine Star t/Stop
button to the ON position.
- It illuminates for approximately 3
seconds
- It remains on if the parking brake
is applied.
•When the parking brake is applied.
•When the brake fluid level in the
reservoir is low.
- If the warning light illuminates
with the parking brake released, it
indicates the brake fluid level in
reservoir is low.
If the brake fluid level in the reser-
voir is low:
1. Drive carefully to the nearest safe
location and stop your vehicle.
2. With the engine stopped, check the
brake fluid level immediately and
add fluid as required (For more
details, refer to “Brake Fluid” in
chapter 7).Then check all brake
components for fluid leaks. If any
leak on brake system is still found,
the warning light remains on, or the
brakes do not operate properly, do
not drive the vehicle.
In this case, we recommend that
you have the vehicle towed to an
authorized HYUNDAI dealer and
inspected.
Dual-diagonal braking system
Yo u r v e h i c l e i s e q u i p p e d w i t h d u a l -
diagonal braking systems. This
means you still have braking on two
wheels even if one of the dual sys-
tems should fail.
With only one of the dual systems
working, more than normal pedal
travel and greater pedal pressure are
required to stop the vehicle.
Also, the vehicle will not stop in as
short a distance with only a portion
of the brake system working.
If the brakes fail while you are driv-
ing, shift to a lower gear for addition-
al engine braking and stop the vehi-
cle as soon as it is safe to do so.
Page 195 of 665
3-99
Convenient features of your vehicle
3
Parking lamp position ( )
The parking lamp, license plate lamp
and instrument panel lamp are turned
ON.
Headlamp position ( )
The headlamp, parking lamp, license
plate lamp and instrument panel
lamp are turned ON.
Information
The ignition switch button must be in
the ON position to turn on the head-
lamp.
High beam operation
To t u r n o n t h e h i g h b e a m h e a d l a m p ,
push the lever away from you. The
lever will return to its original position.
The high beam indicator will light
when the headlamp high beams are
switched on.
To turn off the high beam headlamp,
pull the lever towards you. The low
beams will turn on.
i
OLF044086LOLF044087L
OLF044192L
Do not use high beam when there
are other vehicles approaching
you. Using high beam could
obstruct the other driver's vision.
WARNING
Page 196 of 665

3-100
Convenient features of your vehicle
To flash the high beam headlamp,
pull the lever towards you, then
release the lever. The high beams
will remain ON as long as you hold
the lever towards you.
Turn signals and lane change
signals
To signal a turn, push down on the
lever for a left turn or up for a right
turn in position (A). To signal a lane
change, move the turn signal lever
slightly and hold it in position (B).The
lever will return to the OFF position
when released or when the turn is
completed.
If an indicator stays on and does not
flash or if it flashes abnormally, one of
the turn signal bulbs may be burned
out and will require replacement.
One-touch turn signal function
(if equipped)
To activate an one-touch turn signal
function, move the turn signal lever
slightly and then release it. The lane
change signals will blink 3, 5 or 7
times.
Yo u c a n a c t i v a t e / d e a c t i v a t e t h e O n e
Touch Turn Signal function or choose
the number of blinking (3, 5, or 7)
from the User Settings Mode on the
LCD display.For more details, refer
to "LCD Display" in this chapter.
OLF044088L
OLF044091L