Page 662 of 711
777
Maintenance
DescriptionSymbol Fuse ratingProtected Component
A/CON 17.5AE/R Fuse & Relay Box (RLY. 4/14), A/C Control Module
Cluster Ionizer, Diesel Box (RLY. 3/4)
WIPER RR15ARear Wiper Relay, Rear Wiper Motor, Multifunction Switch
SMART KEY 125ASmart Key Control Module
S/HEATER FRT20ADriver/Passenger Climate Control Seat Control Module
Driver/Passenger Seat Warmer Module
A/CON 27.5AA/C Control Module
C/LIGHTER20AFront Power Outlet & Cigarette Lighter, Luggage Power Outlet
WIPER FRT15AMultifunction Switch, E/R Fuse & Relay Box (RLY. 9/11)
RR BLOWER20AICM Relay Box (Rear Blower Relay)
P/WDW RH25ADriver/Passenger Safety Power Window Module, Driver/Passenger Door Module,
Rear Power Window Switch RH, Rear Safety Power Window Module RH
RR DEFOGGER10AA/C Control Module
BRAKE SWITCH7.5ASmart Key Control Module, Stop Lamp Switch
SUNROOF 120ASunroof
Page 672 of 711

787
Maintenance
LIGHT BULBS
Use only the bulbs of the specified
wattage.
✽NOTICE
After heavy, driving rain or wash-
ing, headlight and taillight lenses
could appear frosty. This condition
is caused by the temperature differ-
ence between the lamp inside and
outside. This is similar to the con-
densation on your windows inside
your vehicle during the rain and
doesn’t indicate a problem with
your vehicle. If the water leaks into
the lamp bulb circuitry, we recom-
mend that the system be checked by
an authorized HYUNDAI dealer.WARNING - Working on
the lights
Prior to working on the light,
firmly apply the parking brake,
ensure that the ignition switch
is turned to the “LOCK” position
and turn off the lights to avoid
sudden movement of the vehi-
cle and burning your fingers or
receiving an electric shock.
CAUTION
Be sure to replace the burned-
out bulb with one of the same
wattage rating. Otherwise, it
may cause damage to the fuse
or electric wiring system.
CAUTION
If you don’t have necessary
tools, the correct bulbs and the
expertise, consult an authorized
HYUNDAI dealer. In many cases,
it is difficult to replace vehicle
light bulbs because other parts
of the vehicle must be removed
before you can get to the bulb.
This is especially true if you
have to remove the headlight
assembly to get to the bulb(s).
Removing/installing the head-
light assembly can result in
damage to the vehicle.
Page 674 of 711

789
Maintenance
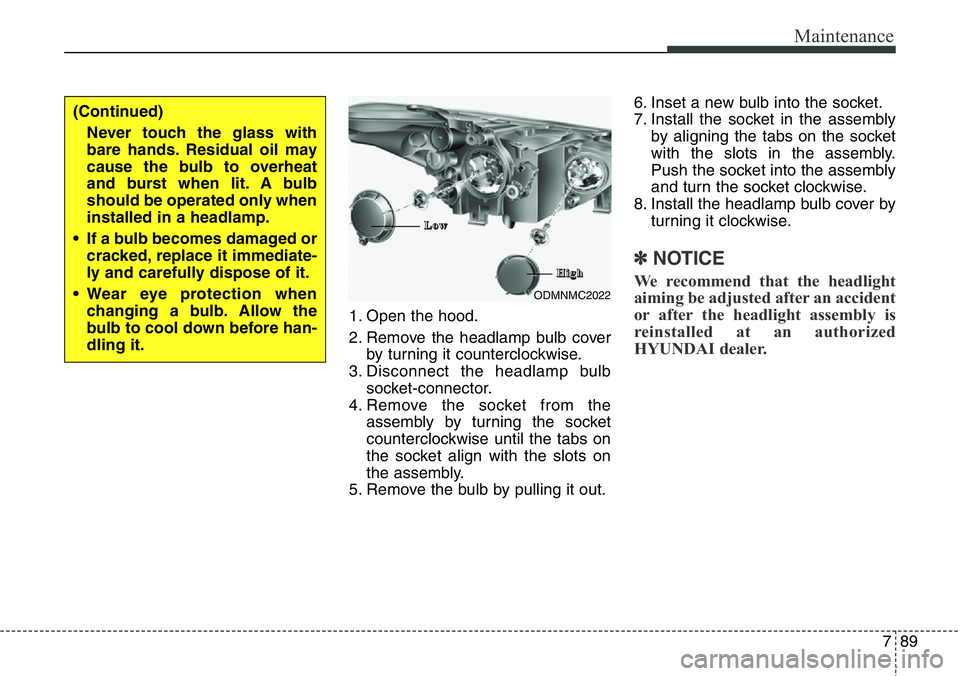
1. Open the hood.
2. Remove the headlamp bulb cover
by turning it counterclockwise.
3. Disconnect the headlamp bulb
socket-connector.
4. Remove the socket from the
assembly by turning the socket
counterclockwise until the tabs on
the socket align with the slots on
the assembly.
5. Remove the bulb by pulling it out.6. Inset a new bulb into the socket.
7. Install the socket in the assembly
by aligning the tabs on the socket
with the slots in the assembly.
Push the socket into the assembly
and turn the socket clockwise.
8. Install the headlamp bulb cover by
turning it clockwise.
✽NOTICE
We recommend that the headlight
aiming be adjusted after an accident
or after the headlight assembly is
reinstalled at an authorized
HYUNDAI dealer.ODMNMC2022
(Continued)
Never touch the glass with
bare hands. Residual oil may
cause the bulb to overheat
and burst when lit. A bulb
should be operated only when
installed in a headlamp.
• If a bulb becomes damaged or
cracked, replace it immediate-
ly and carefully dispose of it.
• Wear eye protection when
changing a bulb. Allow the
bulb to cool down before han-
dling it.
L L
o o
w w
H H
i i
g g
h h
Page 676 of 711

791
Maintenance
5. Install the new bulb-socket into the
housing by aligning the tabs on
the socket with the slots in the
housing. Push the socket into the
housing and turn the socket clock-
wise.
6. Connect the power connector to
the socket.
7. Reinstall the front bumper under
cover.Headlamp (HID type), position
(LED), turn signal, and front fog
lamp bulb, daytime running,
cornering lamp replacement
If the light bulb does not operate, we
recommend that the system be
checked by an authorized HYUNDAI
dealer.
✽NOTICE
HID lamps have superior perform-
ance vs. halogen bulbs. HID lamps
are estimated by the manufacturer
to last twice as long or longer than
halogen bulbs depending on their
frequency of use. They will probably
require replacement at some point
in the life of the vehicle. Cycling the
headlamps on and off more than
typical use will shorten HID lamps
life. HID lamps do not fail in the
same manner as halogen incandes-
cent lamps. If a headlamp goes out
after a period of operation but will
immediately relight when the head-
lamp switch is cycled it is likely the
HID lamp needs to be replaced. HID
lighting components are more com-
plex than conventional halogen
bulbs thus have higher replacement
cost.
WARNING - HID
Headlamp low beam
(if equipped)
Do not attempt to replace or
inspect the low beam (XENON
bulb) due to electric shock dan-
ger. If the low beam (XENON
bulb) is not working, we recom-
mend that the system be
checked by an authorized
HYUNDAI dealer.
Page 677 of 711

Maintenance
92 7
Headlight and front fog light
aiming (for Europe)
Headlight aiming
Without AFLS
1. Inflate the tires to the specified
pressure and remove any loads
from the vehicle except the driver,
spare tire, and tools.
2. The vehicle should be placed on a
flat floor.
3. Draw vertical lines (Vertical lines
passing through respective head
lamp centers) and a horizontal line
(Horizontal line passing through
center of head lamps) on the
screen.4. With the head lamp and battery in
normal condition, aim the head
lamps so the brightest portion falls
on the horizontal and vertical
lines.
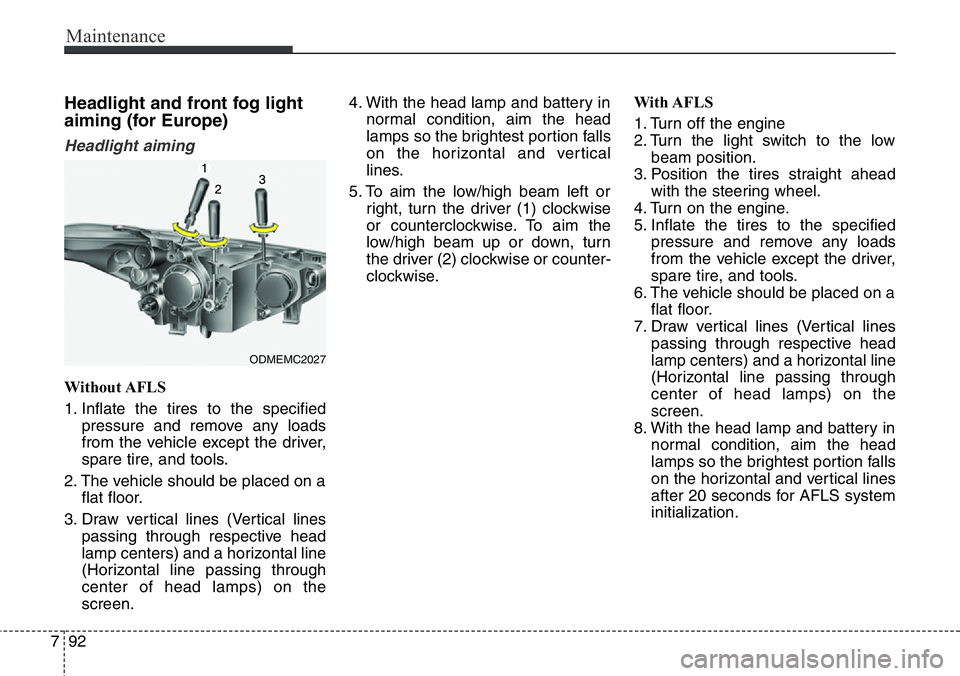
5. To aim the low/high beam left or
right, turn the driver (1) clockwise
or counterclockwise. To aim the
low/high beam up or down, turn
the driver (2) clockwise or counter-
clockwise.With AFLS
1. Turn off the engine
2. Turn the light switch to the low
beam position.
3. Position the tires straight ahead
with the steering wheel.
4. Turn on the engine.
5. Inflate the tires to the specified
pressure and remove any loads
from the vehicle except the driver,
spare tire, and tools.
6. The vehicle should be placed on a
flat floor.
7. Draw vertical lines (Vertical lines
passing through respective head
lamp centers) and a horizontal line
(Horizontal line passing through
center of head lamps) on the
screen.
8. With the head lamp and battery in
normal condition, aim the head
lamps so the brightest portion falls
on the horizontal and vertical lines
after 20 seconds for AFLS system
initialization.
ODMEMC2027
Page 678 of 711
793
Maintenance
9. To aim the low beam left or right,
turn the driver (1) clockwise or
counterclockwise. To aim the low
beam up or down, turn the driver
(2) clockwise or counterclockwise.
To aim the high beam up or down,
turn the driver (3) clockwise or
counterclockwise.Front fog light aiming
The front fog lamp can be aimed as
the same manner of the head lamps
aiming.
With the front fog lamps and battery
normal condition, aim the front fog
lamps. To aim the front fog lamp up
or down, turn the driver clockwise or
counterclockwise.
ODMEMC2028
Page 682 of 711
797
Maintenance
ODMEMC2024
Front fog light
1. Turn the front fog lamp on with the driver (75 kg) aboard.
2. The cut-off line should be projected in the allowable range (shaded region).
Page 683 of 711
Maintenance
98 7
Side repeater lamp replace-
ment
If the light bulb does not operate, we
recommend that the system be
checked by an authorized HYUNDAI
dealer.
Rear combination lamp bulb
replacement
(1) Stop/tail lamp
(2) Tail lamp
(3) Rear turn signal lamp
(4) Back-up lamp
Outside lamp
Rear turn signal lamp and stop/tail
lamp
1. Turn off the engine.
2. Open the tailgate.
3. Loosen the lamp assembly retain-
ing screws with a cross-tip screw-
driver.
4. Remove the rear combination
lamp assembly from the body of
the vehicle.
ODM072033
ODMEMC2007
■Type A
■Type BODM072034
ODM072031