Page 165 of 711
Features of your vehicle
64 4
Transaxle Shift Indicator
Automatic Transaxle Shift
Indicator (if equipped)
This indicator displays which auto-
matic transaxle shift lever is selected.
•Park :P
• Reverse : R
• Neutral : N
•Drive :D
• Sports Mode : 1, 2, 3, 4, 5, 6
Automatic Transaxle Shift
Indicator (if equipped, For Europe)
In the Sports Mode, this indicator
informs which gear is desired while
driving to save fuel.
• Shifting up :▲
2, ▲
3, ▲
4, ▲
5, ▲
6
• Shifting down :
▼1,
▼2,
▼3,
▼4,
▼5For example
: Indicates that shifting up to the
3rd gear is desired (currently
the shift lever is in the 2nd or 1st
gear).
: Indicates that shifting down to
the 3rd gear is desired (current-
ly the shift lever is in the 4th, 5th,
or 6th gear).
When the system is not working prop-
erly, the indicator is not displayed.
ODMEDI2907/OVF041049 ■Type A
■Type BODMEDI3908/OVF041048 ■Type A
■Type B
Page 166 of 711
465
Features of your vehicle
Manual Transaxle Shift Indicator
(if equipped)
This indicator informs which gear is
desired while driving to save fuel.
• Shifting up :▲
2, ▲
3, ▲
4, ▲
5, ▲
6
• Shifting down :
▼1,
▼2,
▼3,
▼4,
▼5For example
: Indicates that shifting up to the
3rd gear is desired (currently
the shift lever is in the 2nd or 1st
gear).
: Indicates that shifting down to
the 3rd gear is desired (current-
ly the shift lever is in the 4th, 5th,
or 6th gear).
When the system is not working prop-
erly, the indicator is not displayed.
ODMEDI2908/OVF041048 ■Type A
■Type B
Page 167 of 711
Features of your vehicle
66 4
LCD Modes
LCD DISPLAY
Modes SymbolExplanationType AType B
Trip Computer
This mode displays driving information like the tripmeter,
fuel economy, and so on.
For more details, refer to “Trip Computer” in this chapter.
Serviceoror
This mode informs of service interval (mileage or days) and
warning messages related to TPMS, washer fluid, or active
hood lift system.
User SettingsOn this mode, you can change settings of the doors, lamps,
and so on.
LDWS
(if equipped)-or
This mode displays the state of the Lane Departure Warning
System (LDWS).
For more details, refer to “Lane Departure Warning System
(LDWS)” in chapter 5.
A/V
(if equipped)-This mode displays the state of the A/V system.
Turn By Turn
(if equipped)-This mode displays the state of the navigation.
❈For controlling the LCD modes, refer to "LCD Display Control" in this chapter.
Page 171 of 711
Features of your vehicle
70 4
Settings
Language (if equipped)
Choose the language you prefer
within the LCD display.
Temperature Unit
Convert the temperature unit from °C
to °F or from °F to °C.
Welcome Sound
If this item is checked, the welcome
sound function will be activated.
Shift Indicator (if equipped)
If this item is checked, the shift indi-
cator function will be activated.
For more details, refer to “Instrument
Cluster” in this chapter.
Seat Easy Access (if equipped)
If this item is checked, the driver’s
seat will automatically move forward
or rearward for the driver to enter or
exit the vehicle comfortably.AVG Fuel Eco Reset
• Auto Reset:
The average fuel economy will
reset automatically when refueling.
• Manual Reset:
The average fuel economy will not
reset automatically whenever refu-
eling.
For more details, refer to “Trip
Computer” in this chapter.
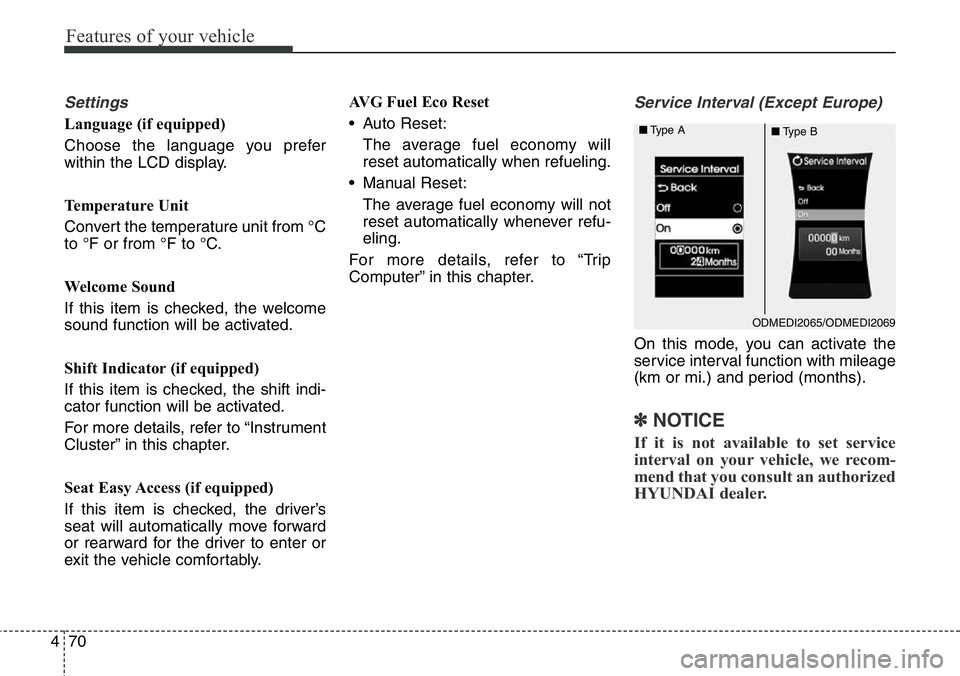
Service Interval (Except Europe)
On this mode, you can activate the
service interval function with mileage
(km or mi.) and period (months).
✽NOTICE
If it is not available to set service
interval on your vehicle, we recom-
mend that you consult an authorized
HYUNDAI dealer.
ODMEDI2065/ODMEDI2069 ■Type A
■Type B
Page 182 of 711
481
Features of your vehicle
✽NOTICE
• The average vehicle speed is not
displayed if the driving distance is
less than 50 meters (0.03 miles) or
the driving time is less than 10 sec-
onds since the ignition switch or
Engine Start/Stop button is turned
to ON.
• Even if the vehicle is not in motion,
the average vehicle speed keeps
going while the engine is running.
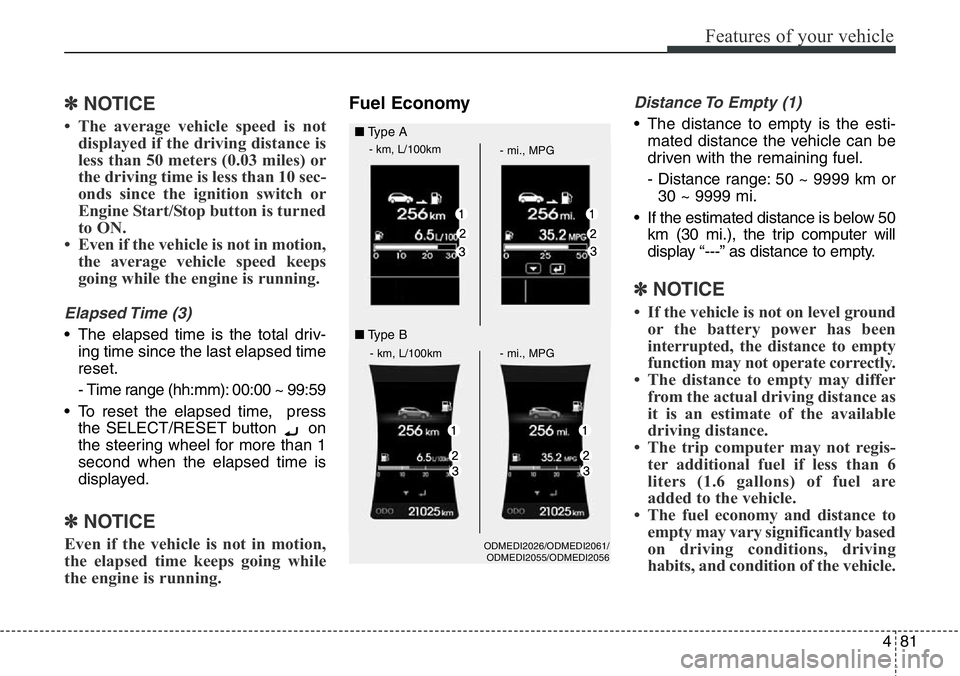
Elapsed Time (3)
• The elapsed time is the total driv-
ing time since the last elapsed time
reset.
- Time range (hh:mm): 00:00 ~ 99:59
• To reset the elapsed time, press
the SELECT/RESET button on
the steering wheel for more than 1
second when the elapsed time is
displayed.
✽NOTICE
Even if the vehicle is not in motion,
the elapsed time keeps going while
the engine is running.
Fuel EconomyDistance To Empty (1)
• The distance to empty is the esti-
mated distance the vehicle can be
driven with the remaining fuel.
- Distance range: 50 ~ 9999 km or
30 ~ 9999 mi.
• If the estimated distance is below 50
km (30 mi.), the trip computer will
display “---” as distance to empty.
✽NOTICE
• If the vehicle is not on level ground
or the battery power has been
interrupted, the distance to empty
function may not operate correctly.
• The distance to empty may differ
from the actual driving distance as
it is an estimate of the available
driving distance.
• The trip computer may not regis-
ter additional fuel if less than 6
liters (1.6 gallons) of fuel are
added to the vehicle.
• The fuel economy and distance to
empty may vary significantly based
on driving conditions, driving
habits, and condition of the vehicle.
ODMEDI2026/ODMEDI2061/
ODMEDI2055/ODMEDI2056
■Type A
- km, L/100km
- mi., MPG
- km, L/100km - mi., MPG
■Type B
Page 473 of 711
Driving your vehicle
24 5
D (Drive)
This is the normal forward driving
position. The transaxle will automati-
cally shift through a 6-gear
sequence, providing the best fuel
economy and power.
For extra power when passing anoth-
er vehicle or climbing grades,
depress the accelerator pedal fully
(more than 80%) until the kick down
mechanism works with a clicking
noise, at which time the transaxle will
automatically downshift to the next
lower gear.
✽NOTICE
• Always come to a complete stop
before shifting into D (Drive).
• A clicking noise heard from the
kick down mechanism by depress-
ing the accelerator pedal fully is a
normal condition.
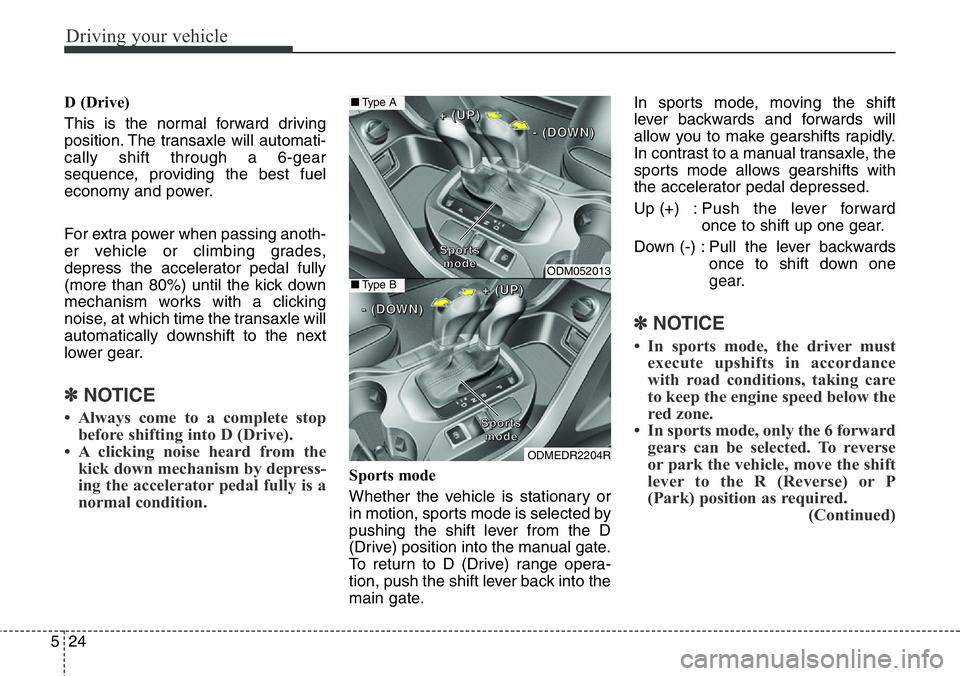
Sports mode
Whether the vehicle is stationary or
in motion, sports mode is selected by
pushing the shift lever from the D
(Drive) position into the manual gate.
To return to D (Drive) range opera-
tion, push the shift lever back into the
main gate.In sports mode, moving the shift
lever backwards and forwards will
allow you to make gearshifts rapidly.
In contrast to a manual transaxle, the
sports mode allows gearshifts with
the accelerator pedal depressed.
Up (+) : Push the lever forward
once to shift up one gear.
Down (-) : Pull the lever backwards
once to shift down one
gear.
✽NOTICE
• In sports mode, the driver must
execute upshifts in accordance
with road conditions, taking care
to keep the engine speed below the
red zone.
• In sports mode, only the 6 forward
gears can be selected. To reverse
or park the vehicle, move the shift
lever to the R (Reverse) or P
(Park) position as required.
(Continued)
ODM052013
ODMEDR2204R
S S
p p
o o
r r
t t
s s
m m
o o
d d
e e
+ +
( (
U U
P P
) )
- -
( (
D D
O O
W W
N N
) )
S S
p p
o o
r r
t t
s s
m m
o o
d d
e e
+ +
( (
U U
P P
) )
- -
( (
D D
O O
W W
N N
) )
■Type A
■Type B
Page 558 of 711
What to do in an emergency
8 6
TIRE PRESSURE MONITORING SYSTEM (TPMS) (IF EQUIPPED)
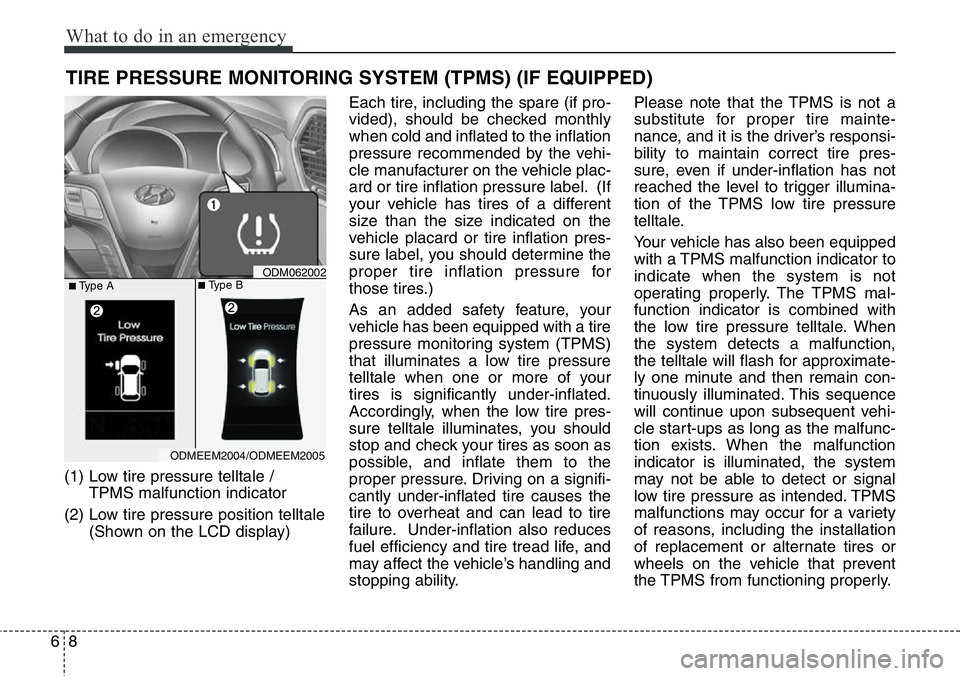
(1) Low tire pressure telltale /
TPMS malfunction indicator
(2) Low tire pressure position telltale
(Shown on the LCD display)Each tire, including the spare (if pro-
vided), should be checked monthly
when cold and inflated to the inflation
pressure recommended by the vehi-
cle manufacturer on the vehicle plac-
ard or tire inflation pressure label. (If
your vehicle has tires of a different
size than the size indicated on the
vehicle placard or tire inflation pres-
sure label, you should determine the
proper tire inflation pressure for
those tires.)
As an added safety feature, your
vehicle has been equipped with a tire
pressure monitoring system (TPMS)
that illuminates a low tire pressure
telltale when one or more of your
tires is significantly under-inflated.
Accordingly, when the low tire pres-
sure telltale illuminates, you should
stop and check your tires as soon as
possible, and inflate them to the
proper pressure. Driving on a signifi-
cantly under-inflated tire causes the
tire to overheat and can lead to tire
failure. Under-inflation also reduces
fuel efficiency and tire tread life, and
may affect the vehicle’s handling and
stopping ability.Please note that the TPMS is not a
substitute for proper tire mainte-
nance, and it is the driver’s responsi-
bility to maintain correct tire pres-
sure, even if under-inflation has not
reached the level to trigger illumina-
tion of the TPMS low tire pressure
telltale.
Your vehicle has also been equipped
with a TPMS malfunction indicator to
indicate when the system is not
operating properly. The TPMS mal-
function indicator is combined with
the low tire pressure telltale. When
the system detects a malfunction,
the telltale will flash for approximate-
ly one minute and then remain con-
tinuously illuminated. This sequence
will continue upon subsequent vehi-
cle start-ups as long as the malfunc-
tion exists. When the malfunction
indicator is illuminated, the system
may not be able to detect or signal
low tire pressure as intended. TPMS
malfunctions may occur for a variety
of reasons, including the installation
of replacement or alternate tires or
wheels on the vehicle that prevent
the TPMS from functioning properly.
ODMEEM2004/ODMEEM2005
ODM062002■Type A■Type B
Page 597 of 711
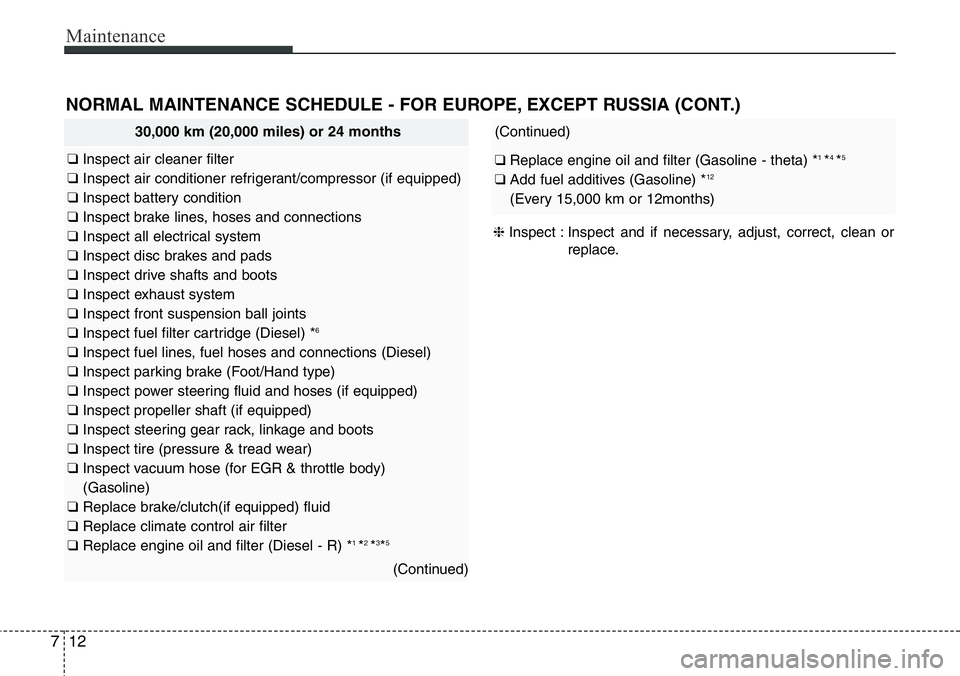
Maintenance
12 7
NORMAL MAINTENANCE SCHEDULE - FOR EUROPE, EXCEPT RUSSIA (CONT.)
30,000 km (20,000 miles) or 24 months
❑ Inspect air cleaner filter
❑ Inspect air conditioner refrigerant/compressor (if equipped)
❑ Inspect battery condition
❑ Inspect brake lines, hoses and connections
❑ Inspect all electrical system
❑ Inspect disc brakes and pads
❑ Inspect drive shafts and boots
❑ Inspect exhaust system
❑ Inspect front suspension ball joints
❑ Inspect fuel filter cartridge (Diesel) *
6
❑ Inspect fuel lines, fuel hoses and connections (Diesel)
❑ Inspect parking brake (Foot/Hand type)
❑ Inspect power steering fluid and hoses (if equipped)
❑ Inspect propeller shaft (if equipped)
❑ Inspect steering gear rack, linkage and boots
❑ Inspect tire (pressure & tread wear)
❑ Inspect vacuum hose (for EGR & throttle body)
(Gasoline)
❑ Replace brake/clutch(if equipped) fluid
❑ Replace climate control air filter
❑ Replace engine oil and filter (Diesel - R) *
1 *2 *3*5
(Continued)
(Continued)
❑ Replace engine oil and filter (Gasoline - theta) *1 *4 *5
❑ Add fuel additives (Gasoline) *12
(Every 15,000 km or 12months)
❈Inspect : Inspect and if necessary, adjust, correct, clean or
replace.