2014 HYUNDAI IX35 warning lights
[x] Cancel search: warning lightsPage 971 of 1534
Maintenance
106
7
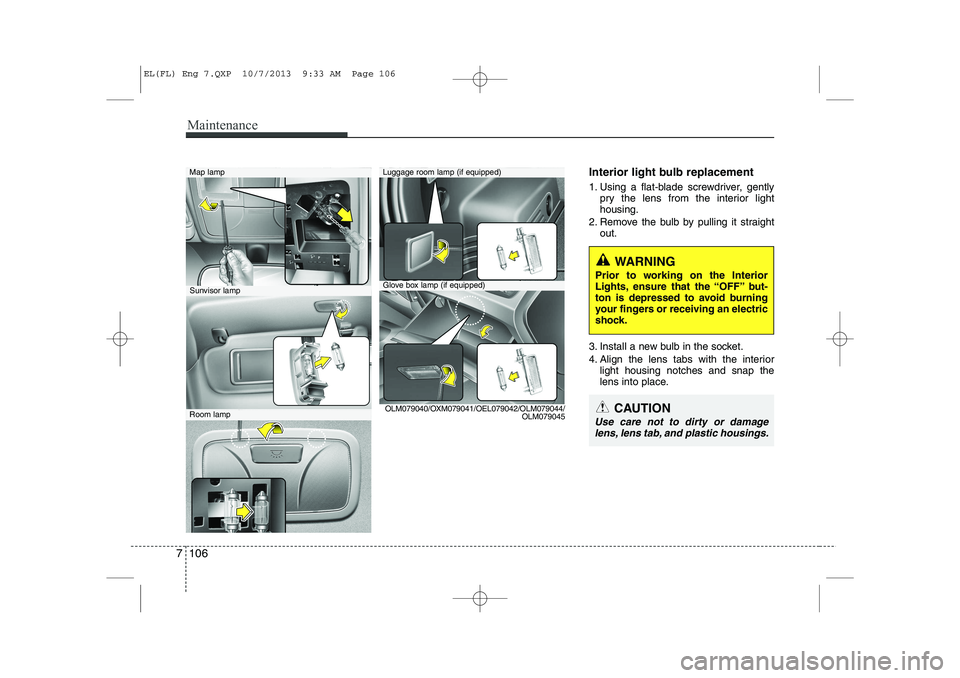
Interior light bulb replacement
1. Using a flat-blade screwdriver, gently
pry the lens from the interior light housing.
2. Remove the bulb by pulling it straight out.
3. Install a new bulb in the socket.
4. Align the lens tabs with the interior light housing notches and snap the
lens into place.Map lamp
Glove box lamp (if equipped)
Luggage room lamp (if equipped)
Sunvisor lamp
Room lamp OLM079040/OXM079041/OEL079042/OLM079044/
OLM079045
WARNING
Prior to working on the Interior
Lights, ensure that the “OFF” but-
ton is depressed to avoid burning
your fingers or receiving an electric
shock.
CAUTION
Use care not to dirty or damage lens, lens tab, and plastic housings.
EL(FL) Eng 7.QXP 10/7/2013 9:33 AM Page 106
Page 1024 of 1534
Safety features of your vehicle
18
3
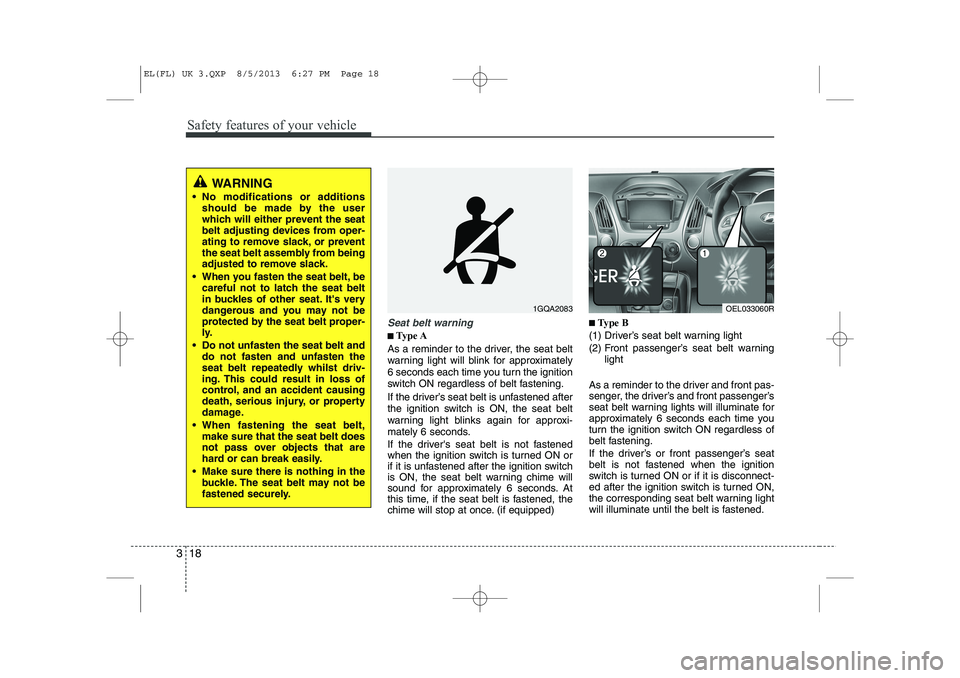
Seat belt warning
■■
Type A
As a reminder to the driver, the seat belt
warning light will blink for approximately
6 seconds each time you turn the ignition
switch ON regardless of belt fastening.
If the driver’s seat belt is unfastened after
the ignition switch is ON, the seat belt
warning light blinks again for approxi-
mately 6 seconds.
If the driver's seat belt is not fastened
when the ignition switch is turned ON or
if it is unfastened after the ignition switch
is ON, the seat belt warning chime will
sound for approximately 6 seconds. At
this time, if the seat belt is fastened, the
chime will stop at once. (if equipped) ■
■
Type B
(1) Driver’s seat belt warning light
(2) Front passenger’s seat belt warning light
As a reminder to the driver and front pas-
senger, the driver’s and front passenger’s
seat belt warning lights will illuminate for
approximately 6 seconds each time you
turn the ignition switch ON regardless of
belt fastening.
If the driver’s or front passenger’s seat
belt is not fastened when the ignition
switch is turned ON or if it is disconnect-
ed after the ignition switch is turned ON,
the corresponding seat belt warning light
will illuminate until the belt is fastened.
1GQA2083
WARNING
No modifications or additions should be made by the user
which will either prevent the seat
belt adjusting devices from oper-
ating to remove slack, or prevent
the seat belt assembly from being
adjusted to remove slack.
When you fasten the seat belt, be careful not to latch the seat belt
in buckles of other seat. It's very
dangerous and you may not be
protected by the seat belt proper-
ly.
Do not unfasten the seat belt and do not fasten and unfasten the
seat belt repeatedly whilst driv-
ing. This could result in loss of
control, and an accident causing
death, serious injury, or property
damage.
When fastening the seat belt, make sure that the seat belt does
not pass over objects that are
hard or can break easily.
Make sure there is nothing in the buckle. The seat belt may not be
fastened securely.
OEL033060R
EL(FL) UK 3.QXP 8/5/2013 6:27 PM Page 18
Page 1078 of 1534
47
Features of your vehicle
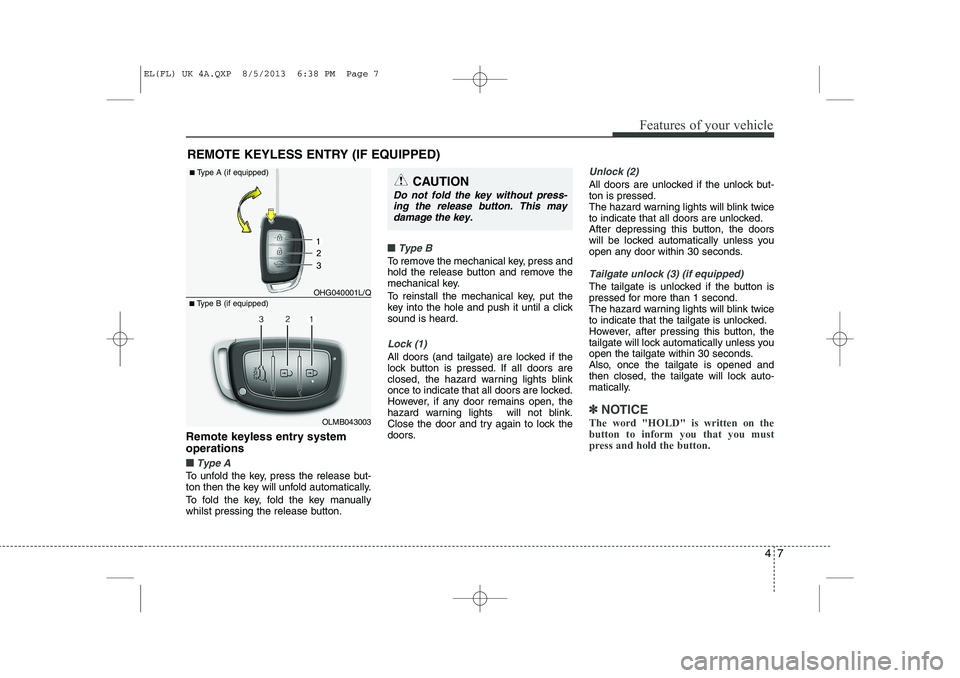
Remote keyless entry system operations
■■Type A
To unfold the key, press the release but-
ton then the key will unfold automatically.
To fold the key, fold the key manually
whilst pressing the release button.
■■Type B
To remove the mechanical key, press and
hold the release button and remove the
mechanical key.
To reinstall the mechanical key, put the
key into the hole and push it until a clicksound is heard.
Lock (1)
All doors (and tailgate) are locked if the
lock button is pressed. If all doors are
closed, the hazard warning lights blink
once to indicate that all doors are locked.
However, if any door remains open, the
hazard warning lights will not blink.
Close the door and try again to lock the
doors.
Unlock (2)
All doors are unlocked if the unlock but- ton is pressed.
The hazard warning lights will blink twice
to indicate that all doors are unlocked.
After depressing this button, the doors
will be locked automatically unless you
open any door within 30 seconds.
Tailgate unlock (3) (if equipped)
The tailgate is unlocked if the button is
pressed for more than 1 second.
The hazard warning lights will blink twice
to indicate that the tailgate is unlocked.
However, after pressing this button, the
tailgate will lock automatically unless you
open the tailgate within 30 seconds.
Also, once the tailgate is opened and
then closed, the tailgate will lock auto-
matically.
✽✽NOTICE
The word "HOLD" is written on the button to inform you that you must
press and hold the button.
REMOTE KEYLESS ENTRY (IF EQUIPPED)
CAUTION
Do not fold the key without press- ing the release button. This may
damage the key.
OLMB043003
■
Type B (if equipped) OHG040001L/Q
■
Type A (if equipped)
EL(FL) UK 4A.QXP 8/5/2013 6:38 PM Page 7
Page 1081 of 1534
Features of your vehicle
10
4
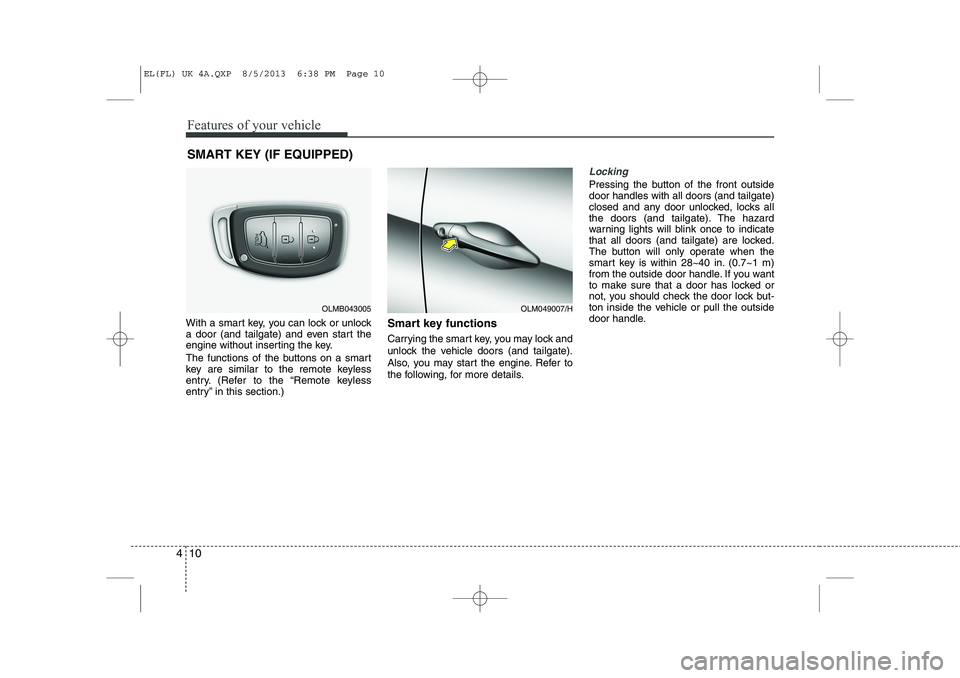
With a smart key, you can lock or unlock
a door (and tailgate) and even start the
engine without inserting the key.
The functions of the buttons on a smart
key are similar to the remote keyless
entry. (Refer to the “Remote keyless
entry” in this section.) Smart key functions
Carrying the smart key, you may lock and
unlock the vehicle doors (and tailgate).
Also, you may start the engine. Refer to
the following, for more details.
Locking
Pressing the button of the front outside door handles with all doors (and tailgate)
closed and any door unlocked, locks all
the doors (and tailgate). The hazard
warning lights will blink once to indicate
that all doors (and tailgate) are locked.
The button will only operate when the
smart key is within 28~40 in. (0.7~1 m)
from the outside door handle. If you want
to make sure that a door has locked or
not, you should check the door lock but-
ton inside the vehicle or pull the outside
door handle.
SMART KEY (IF EQUIPPED)
OLM049007/HOLMB043005
EL(FL) UK 4A.QXP 8/5/2013 6:38 PM Page 10
Page 1082 of 1534
411
Features of your vehicle
Even though you press the button, the
doors will not lock and the chime sounds
3 seconds if any of the following occurs:
The smart key is in the vehicle.
The engine start/stop button is in theACC or ON position.
Any door except the tailgate is opened.Unlocking
Pressing the button of the front outside door handles with all doors (and tailgate)
closed and locked, unlocks all the doors
(and tailgate). The hazard warning lights
will blink twice to indicate that all doors
(and tailgate) are unlocked. The button
will only operate when the smart key is
within 28~40 in. (0.7~1 m) from the out-
side door handle.
When the smart key is recognized in the
area of 28~40 in. (0.7~1 m) from the front
outside door handle, other people canalso open a door without possession of
the smart key.
Tailgate unlocking
If you are within 28 ~ 40 in. (0.7 ~ 1 m)
from the outside tailgate handle, with
your smart key in possession, the tail-
gate will unlock and open when you
press the tailgate handle switch.
The hazard warning lights will blink twice
to indicate that the tailgate is unlocked.
Also, once the tailgate is opened and
then closed, the tailgate will lock auto-
matically.
Start-up
You can start the engine without inserting
the key. For detailed information refer to
“Starting the engine with a smart key” insection 5.
EL(FL) UK 4A.QXP 8/5/2013 6:38 PM Page 11
Page 1084 of 1534
413
Features of your vehicle
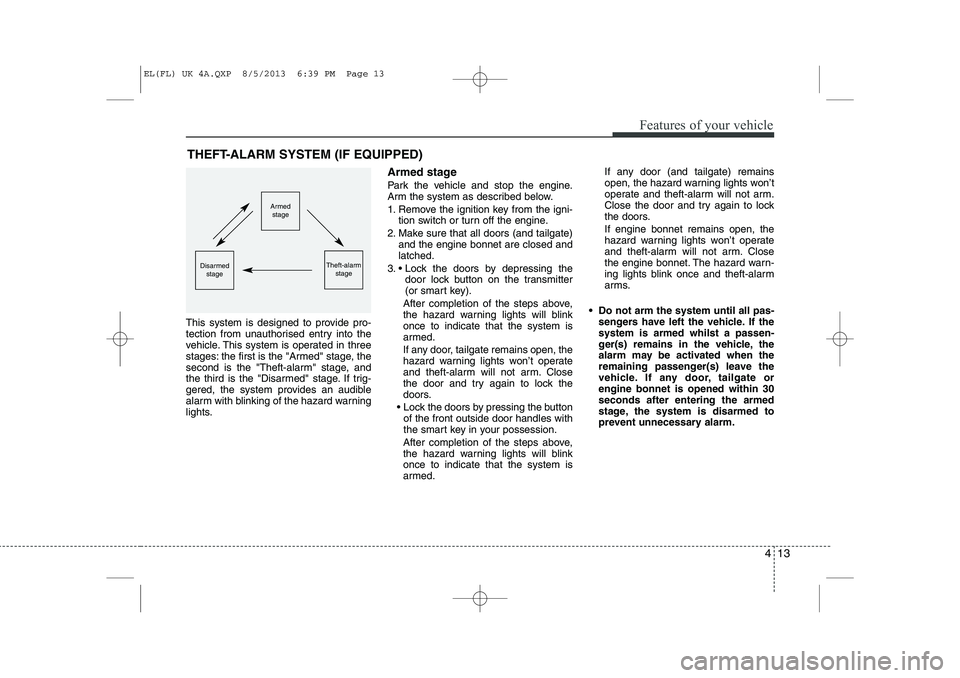
This system is designed to provide pro-
tection from unauthorised entry into the
vehicle. This system is operated in three
stages: the first is the "Armed" stage, the
second is the "Theft-alarm" stage, and
the third is the "Disarmed" stage. If trig-
gered, the system provides an audible
alarm with blinking of the hazard warning
lights.Armed stage
Park the vehicle and stop the engine.
Arm the system as described below.
1. Remove the ignition key from the igni-
tion switch or turn off the engine.
2. Make sure that all doors (and tailgate) and the engine bonnet are closed and latched.
3. Lock the doors by depressing the door lock button on the transmitter
(or smart key).
After completion of the steps above,
the hazard warning lights will blinkonce to indicate that the system is
armed.
If any door, tailgate remains open, the
hazard warning lights won’t operate
and theft-alarm will not arm. Close
the door and try again to lock the
doors.
Lock the doors by pressing the button of the front outside door handles with
the smart key in your possession.
After completion of the steps above,
the hazard warning lights will blinkonce to indicate that the system is
armed. If any door (and tailgate) remains
open, the hazard warning lights won’t
operate and theft-alarm will not arm.
Close the door and try again to lock
the doors. If engine bonnet remains open, the
hazard warning lights won’t operate
and theft-alarm will not arm. Close
the engine bonnet. The hazard warn-
ing lights blink once and theft-alarm
arms.
Do not arm the system until all pas- sengers have left the vehicle. If thesystem is armed whilst a passen-
ger(s) remains in the vehicle, the
alarm may be activated when the
remaining passenger(s) leave the
vehicle. If any door, tailgate orengine bonnet is opened within 30seconds after entering the armed
stage, the system is disarmed to
prevent unnecessary alarm.
THEFT-ALARM SYSTEM (IF EQUIPPED)
Armed
stage
Theft-alarm stageDisarmedstage
EL(FL) UK 4A.QXP 8/5/2013 6:39 PM Page 13
Page 1085 of 1534
Features of your vehicle
14
4
Theft-alarm stage
The alarm will be activated if any of the
following occurs whilst the system is
armed.
A front or rear door is opened without
using transmitter (or smart key).
The tailgate is opened without using transmitter (or smart key).
The engine bonnet is opened.The siren will sound and the hazard
warning lights will blink continuously for
27 seconds, unless the system is dis-
armed. To turn off the system, unlock the
doors with the transmitter. (or smart key) Disarmed stage
The system will be disarmed when:
Transmitter
- The door unlock button is pressed.
- The engine is started.
- The ignition switch is in the “ON” posi-
tion for 30 seconds or more.
Smart key
- The door unlock button is pressed.
- The button of the front outside door ispressed whilst carrying the smart key.
- The engine is started.
After the doors are unlocked, the hazard
warning lights will blink twice to indicate
that the system is disarmed.
After pressing the unlock button, if anydoor (or tailgate) is not opened within 30
seconds, the system will be rearmed.
✽✽ NOTICE - Immobiliser system
Page 1106 of 1534
435
Features of your vehicle
Tilt steering
A tilt steering wheel allows you to adjust
the steering wheel before you drive. You
can also raise it to give your legs more
room when you exit and enter the vehicle(if equipped).
The steering wheel should be positioned
so that it is comfortable for you to drive,
whilst permitting you to see the instru-
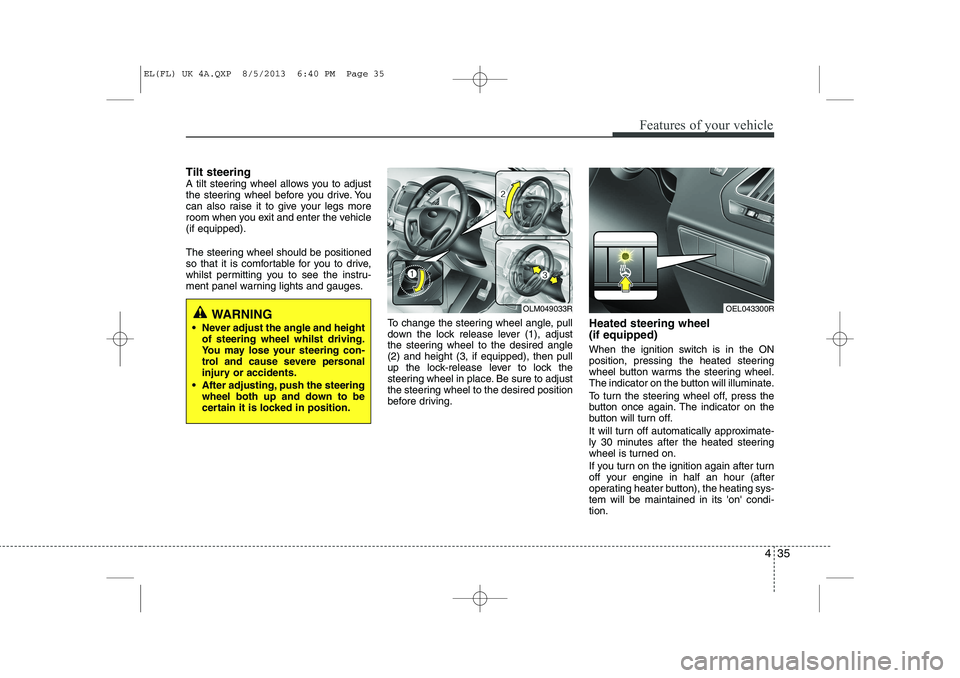
ment panel warning lights and gauges.To change the steering wheel angle, pull
down the lock release lever (1), adjust
the steering wheel to the desired angle(2) and height (3, if equipped), then pull
up the lock-release lever to lock the
steering wheel in place. Be sure to adjust
the steering wheel to the desired position
before driving.Heated steering wheel (if equipped)
When the ignition switch is in the ON
position, pressing the heated steering
wheel button warms the steering wheel.
The indicator on the button will illuminate.
To turn the steering wheel off, press the
button once again. The indicator on the
button will turn off.
It will turn off automatically approximate-
ly 30 minutes after the heated steering
wheel is turned on.
If you turn on the ignition again after turn
off your engine in half an hour (after
operating heater button), the heating sys-tem will be maintained in its 'on' condi-tion.
WARNING
Never adjust the angle and height of steering wheel whilst driving.
You may lose your steering con-
trol and cause severe personal
injury or accidents.
After adjusting, push the steering wheel both up and down to be
certain it is locked in position.OLM049033ROEL043300R
EL(FL) UK 4A.QXP 8/5/2013 6:40 PM Page 35