Page 936 of 1534
771
Maintenance
Checking tire inflation pressure
Check your tires once a month or
more.
Also, check the tire pressure of the
spare tire.
How to check
Use a good quality gage to check tire
pressure. You can not tell if your tires
are properly inflated simply by look-
ing at them. Radial tires may look
properly inflated even when they're
underinflated.
Check the tire's inflation pressure
when the tires are cold. - "Cold"
means your vehicle has been sitting
for at least three hours or driven nomore than 1.6 km (1 mile).Remove the valve cap from the tire
valve stem. Press the tire gage firm-
ly onto the valve to get a pressure
measurement. If the cold tire inflationpressure matches the recommendedpressure on the tire and loading
information label, no further adjust-
ment is necessary. If the pressure is
low, add air until you reach the rec-ommended amount.
If you overfill the tire, release air by pushing on the metal stem in the
center of the tire valve. Recheck the
tire pressure with the tire gage. Be
sure to put the valve caps back on
the valve stems. They help prevent
leaks by keeping out dirt and mois-
ture.
WARNING
Inspect your tires frequently for proper inflation as well as
wear and damage. Always use
a tire pressure gauge.
Tires with too much or too little pressure wear unevenly caus-
ing poor handling, loss of vehi-
cle control, and sudden tirefailure leading to accidents,
injuries, and even death. Therecommended cold tire pres-
sure for your vehicle can be
found in this manual and onthe tire label located on the dri-
ver's side center pillar.
Worn tires can cause acci- dents. Replace tires that are
worn, show uneven wear, or
are damaged.
Remember to check the pres- sure of your spare tire.
HYUNDAI recommends that
you check the spare every
time you check the pressure
of the other tires on your vehi-
cle.
EL(FL) Eng 7.QXP 10/7/2013 9:31 AM Page 71
Page 937 of 1534
Maintenance
72
7
Tire rotation
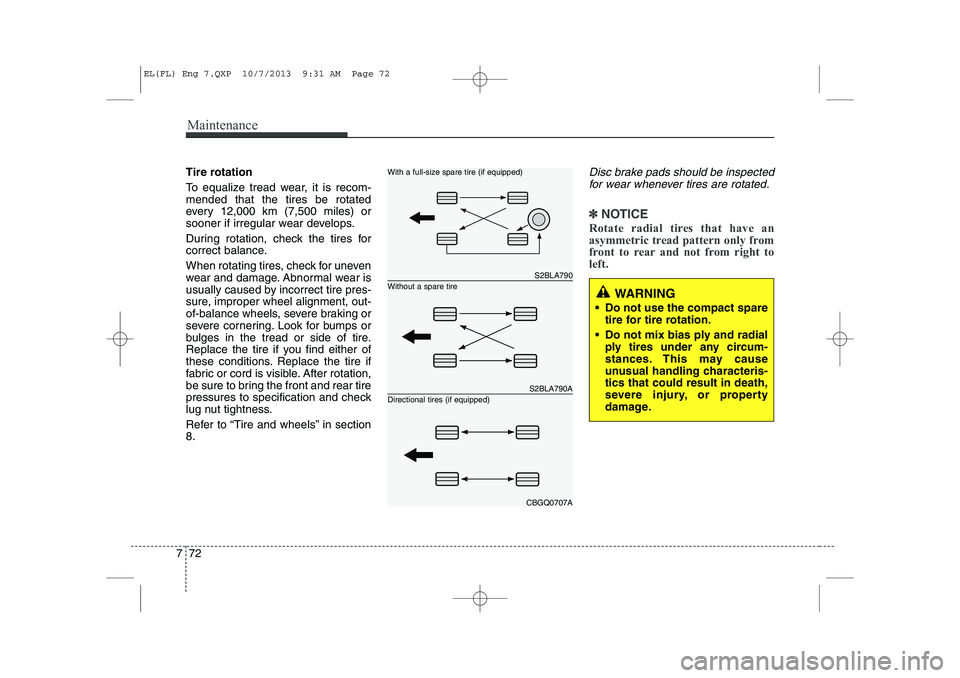
To equalize tread wear, it is recom- mended that the tires be rotated
every 12,000 km (7,500 miles) or
sooner if irregular wear develops.
During rotation, check the tires for
correct balance.
When rotating tires, check for uneven
wear and damage. Abnormal wear is
usually caused by incorrect tire pres-
sure, improper wheel alignment, out-
of-balance wheels, severe braking or
severe cornering. Look for bumps or
bulges in the tread or side of tire.
Replace the tire if you find either of
these conditions. Replace the tire if
fabric or cord is visible. After rotation,
be sure to bring the front and rear tire
pressures to specification and check
lug nut tightness.
Refer to “Tire and wheels” in section 8.Disc brake pads should be inspected
for wear whenever tires are rotated.
✽✽ NOTICE
Rotate radial tires that have an
asymmetric tread pattern only from
front to rear and not from right toleft.
WARNING
Do not use the compact spare tire for tire rotation.
Do not mix bias ply and radial ply tires under any circum-
stances. This may cause
unusual handling characteris-tics that could result in death,
severe injury, or property
damage.
S2BLA790
S2BLA790A
CBGQ0707A
Without a spare tire
With a full-size spare tire (if equipped) Directional tires (if equipped)
EL(FL) Eng 7.QXP 10/7/2013 9:31 AM Page 72
Page 939 of 1534
Maintenance
74
7
Compact spare tire replacement
(if equipped)
A compact spare tire has a shorter
tread life than a regular size tire.
Replace it when you can see the
tread wear indicator bars on the tire.The replacement compact spare tire
should be the same size and design
tire as the one provided with your
new vehicle and should be mountedon the same compact spare tire
wheel. The compact spare tire is notdesigned to be mounted on a regular
size wheel, and the compact spare
tire wheel is not designed for mount-
ing a regular size tire. Wheel replacement
When replacing the metal wheels for
any reason, make sure the new
wheels are equivalent to the original
factory units in diameter, rim widthand offset.
(Continued)
The use of any other tire size
or type may seriously affect
ride, handling, ground clear-
ance, stopping distance, body
to tire clearance, snow tire
clearance, and speedometer
reliability.
It is best to replace all four tires at the same time. If that
is not possible, or necessary,
then replace the two front or
two rear tires as a pair.Replacing just one tire can
seriously affect your vehicle’shandling.
The ABS works by comparing the speed of the wheels. Tire
size can affect wheel speed.
When replacing tires, all 4
tires must use the same size
originally supplied with the
vehicle. Using tires of a differ-
ent size can cause the ABS
(Anti-lock Brake System) and
ESP (Electronic Stability
Program) (if equipped) to
work irregularly.
WARNING
A wheel that is not the correct
size may adversely affect wheel
and bearing life, braking and
stopping abilities, handling
characteristics, ground clear-
ance, body-to-tire clearance,
snow chain clearance,speedometer and odometer cal-
ibration, headlight aim and
bumper height.
EL(FL) Eng 7.QXP 10/7/2013 9:31 AM Page 74
Page 941 of 1534
Maintenance
76
7
S 180 km/h (112 mph)
T 190 km/h (118 mph)
H 210 km/h (130 mph)
V 240 km/h (149 mph) Z Above 240 km/h (149 mph)
Maximum Speed
Speed
Rating
Symbol
102 - Load Index, a numerical code
associated with the maximum
load the tire can carry.
H - Speed Rating Symbol. See the speed rating chart in this section
for additional information.
Wheel size designation
Wheels are also marked with impor-
tant information that you need if you
ever have to replace one. The follow-
ing explains what the letters and
numbers in the wheel size designa-tion mean.
Example wheel size designation: 7.0JX18
7.0 - Rim width in inches. J - Rim contour designation.
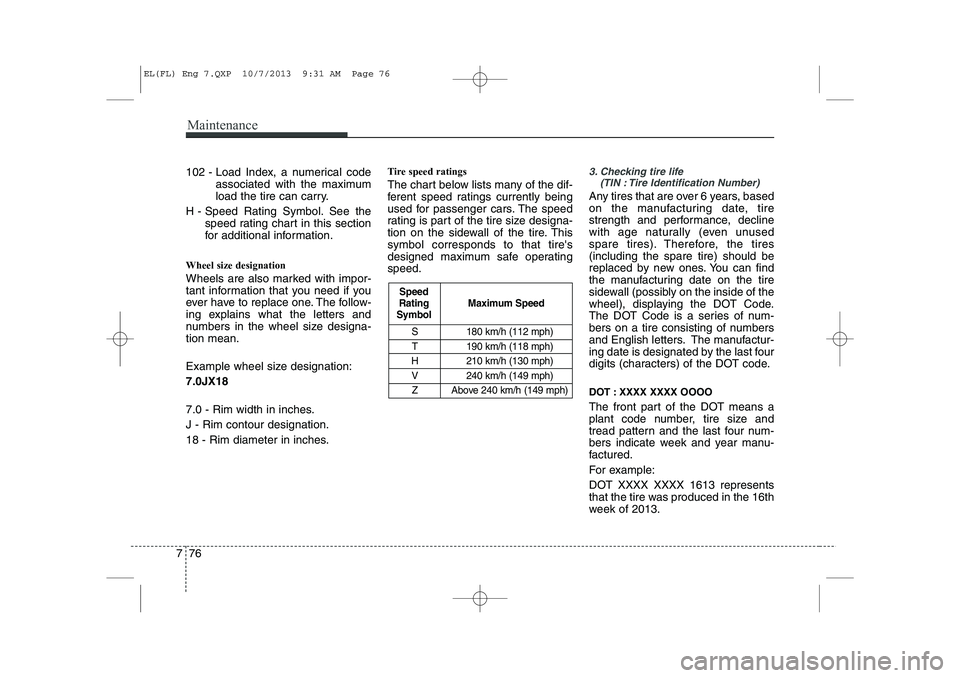
18 - Rim diameter in inches. Tire speed ratings
The chart below lists many of the dif-
ferent speed ratings currently being
used for passenger cars. The speed
rating is part of the tire size designa-
tion on the sidewall of the tire. Thissymbol corresponds to that tire's
designed maximum safe operatingspeed.3. Checking tire life
(TIN : Tire Identification Number)
Any tires that are over 6 years, based
on the manufacturing date, tire
strength and performance, decline
with age naturally (even unused
spare tires). Therefore, the tires(including the spare tire) should be
replaced by new ones. You can find
the manufacturing date on the tire
sidewall (possibly on the inside of the
wheel), displaying the DOT Code.
The DOT Code is a series of num-
bers on a tire consisting of numbers
and English letters. The manufactur-
ing date is designated by the last four
digits (characters) of the DOT code.
DOT : XXXX XXXX OOOO
The front part of the DOT means a
plant code number, tire size and
tread pattern and the last four num-
bers indicate week and year manu-
factured.
For example:
DOT XXXX XXXX 1613 represents
that the tire was produced in the 16th
week of 2013.
EL(FL) Eng 7.QXP 10/7/2013 9:31 AM Page 76
Page 961 of 1534

Maintenance
96
7
Front fog light bulbs (if equipped)
1. Remove the front bumper under cover.
2. Reach your hand into the back of the
front bumper.
3. Disconnect the power connector from the socket.
4. Remove the bulb-socket from the housing by turning the socket counter
clockwise until the tabs on the socketalign with the slots on the housing.
5. Install the new bulb-socket into the housing by aligning the tabs on the
socket with the slots in the housing.
Push the socket into the housing and
turn the socket clockwise.
6. Connect the power connector to the socket.
7. Reinstall the front bumper under cover. Headlight and front fog light aim-
ing (for Europe)
Headlight aiming
1. Inflate the tires to the specified pres-
sure and remove any loads from the
vehicle except the driver, spare tire,
and tools.
2. The vehicle should be placed on a flat floor.
3. Draw vertical lines (Vertical lines pass- ing through respective head lamp cen-
ters) and a horizontal line (Horizontalline passing through center of headlamps) on the screen. 4. With the head lamp and battery in nor-
mal condition, aim the head lamps so
the brightest portion falls on the hori-
zontal and vertical lines.
5. To aim the low/high beam left or right, turn the driver (2) clockwise or coun-
terclockwise. To aim the low/high beam
up or down, turn the driver (1) clock-
wise or counterclockwise.
OEL073257
EL(FL) Eng 7.QXP 10/7/2013 9:32 AM Page 96
Page:
< prev 1-8 9-16 17-24