2014 HYUNDAI IX35 display
[x] Cancel search: displayPage 155 of 1534

483
Features of your vehicle
When more than two objects aresensed at the same time, warning indi-
cator is displayed all.
When more than two objects are sensed at the same time, the closest
one will be warned by warning sound.
Whilst reversing, if the front and rear sensor recognizes an object at the
same distance, the rear will be warnedfirst.Types of warning sound
When driving forward
When an object is 100 cm to 61 cm (39 in. to 24 in.) from the bumper:
Buzzer beeps intermittently.
When an object is 60 cm to 31 cm (23 in. to 12 in.) from the bumper:
Buzzer beeps more frequently.
When an object is within 30 cm (11 in.) of the bumper:
Buzzer sounds continuously.
When driving rearward or the shift lever is in N position
When an object is 120 cm to 61 cm (47.2 in. to 24 in.) from the bumper:
Buzzer beeps intermittently.
When an object is 60 cm to 31 cm (23 in. to 12 in.) from the bumper:
Buzzer beeps more frequently.
When an object is within 30 cm (11 in.) of the bumper:
Buzzer sounds continuously.CAUTION
This system can only sense
objects within the range and loca-
tion of the sensors;
It can not detect objects in otherareas where sensors are notinstalled. Also, small or slim
objects, such as poles or objectslocated between sensors may not be detected by the sensors.
Always visually check behind thevehicle when reversing.
Be sure to inform any drivers of the vehicle that may be unfamiliarwith the system regarding thesystems capabilities and limita-
tions.
EL(FL) Aust 4a.QXP 7/26/2013 2:35 PM Page 83
Page 159 of 1534

487
Features of your vehicle
The rearview camera will activate when
the back-up light is ON with the ignition
switch ON and the shift lever in the R
(Reverse) position.This system is a supplemental system
that shows behind the vehicle through the
rearview display mirror whilst backing-up.
Type B
The rearview camera may be turned off
by pressing the ON/OFF button when the
rearview camera is activated.
To turn the camera on again, press the
ON/OFF button again when the ignition
switch is on and the shift lever in R
(Reverse). Also, the camera will turn on
automatically whenever the ignition
switch is turned off and on again.The hazard warning flasher should be
used whenever you find it necessary tostop the car in a hazardous location.
When you must make such an emer-
gency stop, always pull off the road as far
as possible.
The hazard warning lights are turned on
by pushing in the hazard switch. This
causes all turn signal lights to blink. The
hazard warning lights will operate even
though the key is not in the ignition
switch.
To turn the hazard warning lights off,
push the switch a second time.
REARVIEW CAMERA (IF EQUIPPED)
WARNING
This system is a supplementary function only. It is the responsibil-
ity of the driver to always check
the inside/outside rearview mirror
and the area behind the vehicle
before and whilst backing upbecause there is a dead zone that
can't see through the camera.
Always keep the camera lens clean. If lens is covered with for-
eign matter, the camera may not
operate normally.
HAZARD WARNING FLASHER
OLM049081
OEL043084R
OEL049083R
■Type BOEL049082R
■Type A
Rear view display
Rear view display
EL(FL) Aust 4a.QXP 7/26/2013 2:35 PM Page 87
Page 185 of 1534

4 113
Features of your vehicle
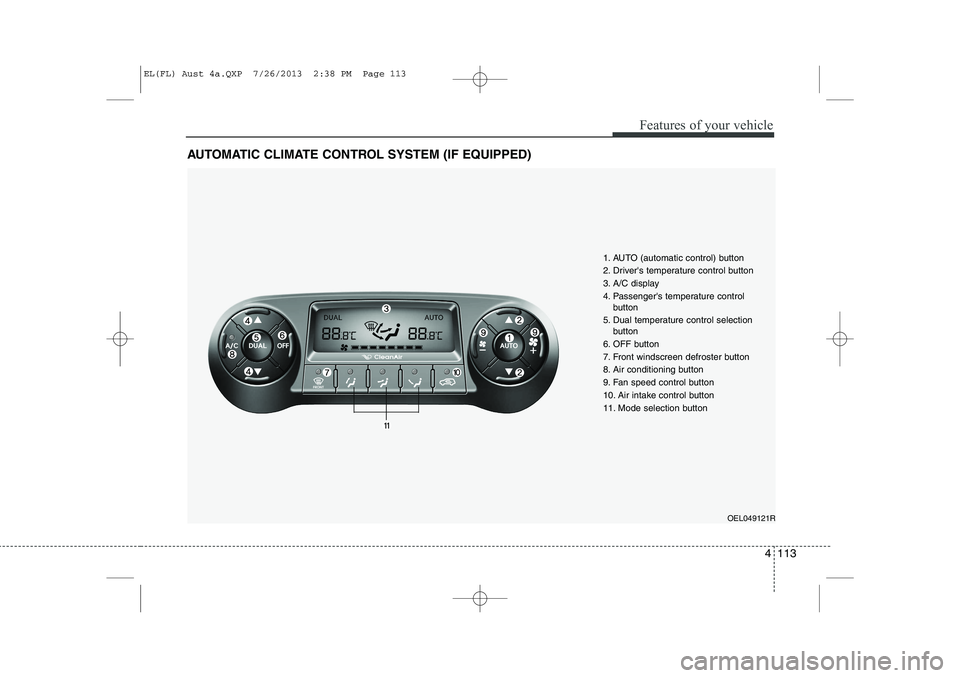
AUTOMATIC CLIMATE CONTROL SYSTEM (IF EQUIPPED)
OEL049121R
1. AUTO (automatic control) button
2. Driver's temperature control button
3. A/C display
4. Passenger's temperature control
button
5. Dual temperature control selection button
6. OFF button
7. Front windscreen defroster button
8. Air conditioning button
9. Fan speed control button
10. Air intake control button
11. Mode selection button
EL(FL) Aust 4a.QXP 7/26/2013 2:38 PM Page 113
Page 189 of 1534

4 117
Features of your vehicle
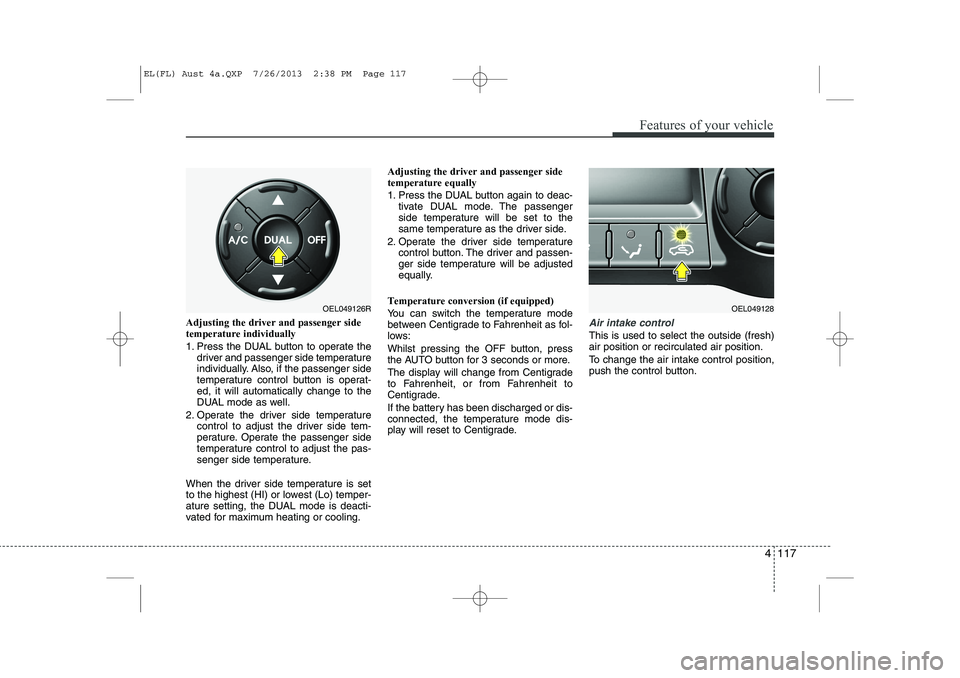
Adjusting the driver and passenger side temperature individually
1. Press the DUAL button to operate thedriver and passenger side temperature
individually. Also, if the passenger side
temperature control button is operat-ed, it will automatically change to the
DUAL mode as well.
2. Operate the driver side temperature control to adjust the driver side tem-
perature. Operate the passenger side
temperature control to adjust the pas-
senger side temperature.
When the driver side temperature is set
to the highest (HI) or lowest (Lo) temper-
ature setting, the DUAL mode is deacti-
vated for maximum heating or cooling. Adjusting the driver and passenger sidetemperature equally
1. Press the DUAL button again to deac-
tivate DUAL mode. The passenger
side temperature will be set to the
same temperature as the driver side.
2. Operate the driver side temperature control button. The driver and passen-
ger side temperature will be adjusted
equally.
Temperature conversion (if equipped)
You can switch the temperature mode
between Centigrade to Fahrenheit as fol-
lows:
Whilst pressing the OFF button, press
the AUTO button for 3 seconds or more.
The display will change from Centigrade
to Fahrenheit, or from Fahrenheit to
Centigrade.
If the battery has been discharged or dis-
connected, the temperature mode dis-
play will reset to Centigrade.Air intake control
This is used to select the outside (fresh) air position or recirculated air position.
To change the air intake control position,
push the control button.
OEL049126ROEL049128
EL(FL) Aust 4a.QXP 7/26/2013 2:38 PM Page 117
Page 201 of 1534

4 129
Features of your vehicle
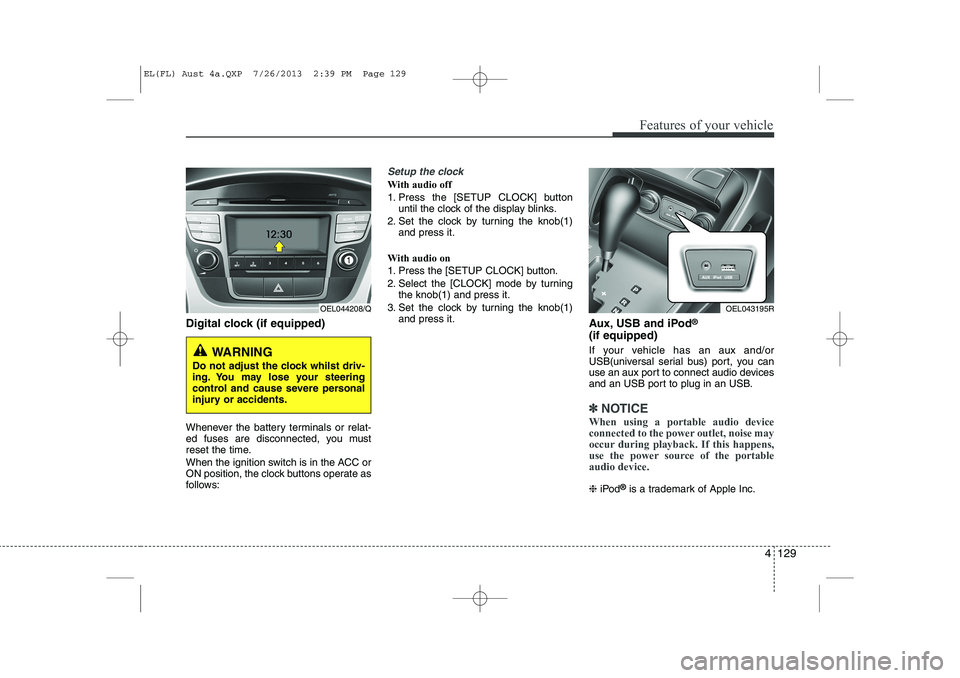
Digital clock (if equipped)
Whenever the battery terminals or relat-
ed fuses are disconnected, you must
reset the time.
When the ignition switch is in the ACC or
ON position, the clock buttons operate as
follows:
Setup the clock
With audio off
1. Press the [SETUP CLOCK] buttonuntil the clock of the display blinks.
2. Set the clock by turning the knob(1) and press it.
With audio on
1. Press the [SETUP CLOCK] button.
2. Select the [CLOCK] mode by turning the knob(1) and press it.
3. Set the clock by turning the knob(1) and press it. Aux, USB and iPod®
(if equipped)
If your vehicle has an aux and/or
USB(universal serial bus) port, you can
use an aux port to connect audio devices
and an USB port to plug in an USB.
✽✽ NOTICE
When using a portable audio device
connected to the power outlet, noise may
occur during playback. If this happens,
use the power source of the portableaudio device.
❈ iPod ®
is a trademark of Apple Inc.
OEL044208/Q
WARNING
Do not adjust the clock whilst driv-
ing. You may lose your steering
control and cause severe personal
injury or accidents.
OEL043195R
EL(FL) Aust 4a.QXP 7/26/2013 2:39 PM Page 129
Page 224 of 1534

519
Driving your vehicle
For smooth operation, depress the brakepedal when shifting from N (Neutral) to aforward or reverse gear.Transaxle ranges
The indicator lights in the instrument
cluster displays the shift lever position
when the ignition switch is in the ONposition.
P (Park)
Always come to a complete stop before
shifting into P (Park). This position locks
the transaxle and prevents the frontwheels from rotating.
WARNING - Automatic
transaxle
Always check the surrounding areas near your vehicle for peo-
ple, especially children, before
shifting a vehicle into D (Drive) or
R (Reverse).
Before leaving the driver’s seat, always make sure the shift lever
is in the P (Park) position; then
set the parking brake fully and
shut the engine off. Unexpected
and sudden vehicle movementcan occur if these precautions
are not followed in the order iden-tified.
CAUTION
To avoid damage to your
transaxle, do not accelerate the
engine in R (Reverse) or any for-ward gear position with thebrakes on.
When stopped on an upgrade, do not hold the vehicle stationarywith engine power. Use the serv- ice brake or the parking brake.
Do not shift from N (Neutral) or P (Park) into D (Drive), or R
(Reverse) when the engine isabove idle speed.
EL(FL) Aust 5.QXP 7/26/2013 2:08 PM Page 19
Page 274 of 1534

569
Driving your vehicle
If you do decide to pull a trailer
(For New Zealand)
Here are some important points if you
decide to pull a trailer:
Do not do any towing with your car dur-ing its first 2,000 km (1,200 miles) in
order to allow the engine to properly
run in. Failure to heed this caution may
result in serious engine or transaxle
damage.
When towing a trailer, be sure to con- sult an authorised HYUNDAI dealer for
further information on additional
requirements such as a towing kit, etc.
Always drive your vehicle at a moder- ate speed (less than 100 km/h (60mph)).
On a long uphill grade, do not exceed 70 km/h (45 mph) or the posted speed
limit, whichever is lower. Towing Capacity Note
The recommended towing capacity of this vehicle will be provided with the Genuine
HYUNDAI Approved Tow Bar.
To enquire about the towing capacity of this vehicle, please visit
www
.hyundai.co.nz, or call us on 0800 HYUNDAI.
To enquire about Genuine HYUNDAI parts and accessories (including the Genuine HYUNDAI Approved Tow Bar and its availability for purchase) please con-
sult your nearest authorised HYUNDAI dealer/service agent, call us on 0800
HYUNDAI or visit www
.hyundai.co.nz.
It is the owner's responsibility to ensure that any tow bar used is compatible with and
suitable for their vehicle, and is within the towing capacity of their vehicle. Your
HYUNDAI vehicle should not be used to tow heavy loads beyond the recommended
towing capacities displayed on www
.hyundai.co.nzas it is not designed for such use.
Subject to applicable law, HYUNDAI Motors New Zealand Ltd shall not be liable for
any losses, damages, costs, expenses (including but not limited to consequential and
indirect losses, personal injury and deaths) caused by towing which is not in compli-
ance with instructions set out in the owner's manual.
WARNING
HYUNDAI DO NOT recommend the use of load levelling devices of any type.
The use of a load levelling devices may place undue stress on the chassis
causing chassis or mounting point failure.
EL(FL) Aust 5.QXP 7/26/2013 2:10 PM Page 69
Page 341 of 1534

747
Maintenance
S 180 km/h (112 mph)T 190 km/h (118 mph)
H 210 km/h (130 mph)
V 240 km/h (149 mph) Z Above 240 km/h (149 mph)
Maximum Speed
Speed
Rating
Symbol
98 - Load Index, a numerical code
associated with the maximum
load the tyre can carry.
H - Speed Rating Symbol. See the speed rating chart in this section
for additional information.
Wheel size designation
Wheels are also marked with impor-
tant information that you need if you
ever have to replace one. The follow-
ing explains what the letters and
numbers in the wheel size designa-tion mean.
Example wheel size designation: 6.5JX18
6.5 - Rim width in inches. J - Rim contour designation.
18 - Rim diameter in inches. Tyre speed ratings
The chart below lists many of the dif-
ferent speed ratings currently being
used for passenger cars. The speed
rating is part of the tyre size desig-
nation on the sidewall of the tyre.This symbol corresponds to that
tyre's designed maximum safe oper-ating speed.3. Checking tyre life
(TIN : Tyre Identification Number)
Any tyres that are over 6 years,
based on the manufacturing date,
tyre strength and performance,
decline with age naturally (even
unused spare tyres). Therefore, thetyres (including the spare tyre)
should be replaced by new ones. You
can find the manufacturing date on
the tyre sidewall (possibly on the
inside of the wheel), displaying the
DOT Code. The DOT Code is a
series of numbers on a tyre consist-
ing of numbers and English letters.
The manufacturing date is designat-
ed by the last four digits (characters)
of the DOT code.
DOT : XXXX XXXX OOOO
The front part of the DOT means a
plant code number, tyre size and
tread pattern and the last four num-
bers indicate week and year manu-
factured.
For example:
DOT XXXX XXXX 1613 represents
that the tyre was produced in the
16th week of 2013.
EL(FL) Aust 7.QXP 7/26/2013 2:24 PM Page 47