Page 481 of 546

7-45
7
Maintenance
Tire rotation
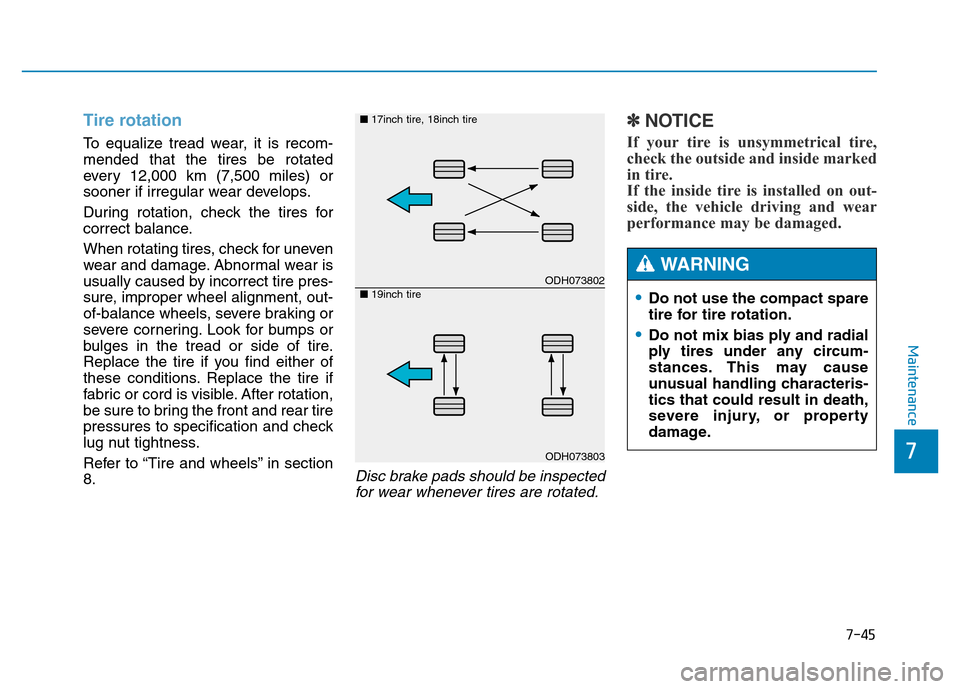
To equalize tread wear, it is recom-
mended that the tires be rotated
every 12,000 km (7,500 miles) or
sooner if irregular wear develops.
During rotation, check the tires for
correct balance.
When rotating tires, check for uneven
wear and damage. Abnormal wear is
usually caused by incorrect tire pres-
sure, improper wheel alignment, out-
of-balance wheels, severe braking or
severe cornering. Look for bumps or
bulges in the tread or side of tire.
Replace the tire if you find either of
these conditions. Replace the tire if
fabric or cord is visible. After rotation,
be sure to bring the front and rear tire
pressures to specification and check
lug nut tightness.
Refer to “Tire and wheels” in section
8.
Disc brake pads should be inspected
for wear whenever tires are rotated.
✽NOTICE
If your tire is unsymmetrical tire,
check the outside and inside marked
in tire.
If the inside tire is installed on out-
side, the vehicle driving and wear
performance may be damaged.
•Do not use the compact spare
tire for tire rotation.
•Do not mix bias ply and radial
ply tires under any circum-
stances. This may cause
unusual handling characteris-
tics that could result in death,
severe injury, or property
damage.
WARNING ODH073802
ODH073803 ■17inch tire, 18inch tire
■19inch tire
Page 487 of 546

7-51
7
Maintenance
4. Tire ply composition and
material
The number of layers or plies of rub-
ber-coated fabric are in the tire. Tire
manufacturers also must indicate the
materials in the tire, which include
steel, nylon, polyester, and others.
The letter "R" means radial ply con-
struction; the letter "D" means diago-
nal or bias ply construction; and the
letter "B" means belted-bias ply con-
struction.
5. Maximum permissible infla-
tion pressure
This number is the greatest amount
of air pressure that should be put in
the tire. Do not exceed the maximum
permissible inflation pressure. Refer
to the Tire and Loading Information
label for recommended inflation
pressure.
6. Maximum load rating
This number indicates the maximum
load in kilograms and pounds that
can be carried by the tire. When
replacing the tires on the vehicle,
always use a tire that has the same
load rating as the factory installed
tire.
7. Uniform tire quality grading
Quality grades can be found where
applicable on the tire sidewall
between tread shoulder and maxi-
mum section width.
For example:
TREADWEAR 200
TRACTION AA
TEMPERATURE A
Tread wear
The tread wear grade is a compara-
tive rating based on the wear rate of
the tire when tested under controlled
conditions on a specified govern-
ment test course. For example, a tire
graded 150 would wear one-and-a-
half times (1½) as well on the gov-
ernment course as a tire graded 100.
The relative performance of tires
depends upon the actual conditions
of their use, however, and may
depart significantly from the norm
because of variations in driving
habits, service practices and differ-
ences in road characteristics and cli-
mate.
These grades are molded on the
side-walls of passenger vehicle tires.
The tires available as standard or
optional equipment on your vehicles
may vary with respect to grade.
Page 489 of 546

7-53
7
Maintenance
Low aspect ratio tire
(if equipped)
Low aspect ratio tires, whose aspect
ratio is lower than 50, are provided
for sporty looks.
Because the low aspect ratio tires
are optimized for handling and brak-
ing, it may be more uncomfortable to
ride in and there is more noise com-
pare with normal tires.Because the sidewall of the low
aspect ratio tire is shorter than
the normal, the wheel and tire of
the low aspect ratio tire is easi-
er to be damaged. So, follow the
instructions below.
- When driving on a rough road
or off road, drive cautiously
because tires and wheels may
be damaged. And after driving,
inspect tires and wheels.
- When passing over a pothole,
speed bump, manhole, or curb
stone, drive slowly so that the
tires and wheels are not dam-
aged.
- If the tire is impacted, we rec-
ommend that you inspect the
tire condition or contact an
authorized HYUNDAI dealer.
- To prevent damage to the tire,
inspect the tire condition and
pressure every 3,000km.
CAUTION
•It is not easy to recognize the
tire damage with your own
eyes. But if there is the slight-
est hint of tire damage, even
though you cannot see the
tire damage with your own
eyes, have the tire checked or
replaced because the tire
damage may cause air leak-
age from the tire.
•If the tire is damaged by driv-
ing on a rough road, off road,
pothole, manhole, or curb
stone, it will not be covered by
the warranty.
•You can find out the tire infor-
mation on the tire sidewall.
CAUTION
Page 497 of 546

7-61
7
Maintenance
Fuse NameSymbolFuse ratingCircuit Protected
Module 410A
LKAS Module, Steering Tilt & Telescopic Module, ECS Unit, Crash Pad Switch,
Tire Pressure Monitoring Module, Smart Parking Assist Control Module,
Console Switch LH/RH, Blind Spot Detection Radar LH/RH
Electric Parking Brake Switch, Rear Parking Assist Sensor LH/RH,
Rear Parking Assist Sensor (Center)
Module 510A
Multipurpose Check Connector, A/V & Navigation Head Unit, Electro Chromic Mirror,
A/C Control Module, I-Box, AMP, Driver/Passenger CCS Module, Rear CCS Module LH/RH,
Driver/Passenger Seat Warmer Control Module, Rear Seat Warmer Control Module LH/RH,
Driver IMS Control Module, Driver Power Seat Switch
Module 1010ABCM
Multi
Media 210AKeyboard, I-Box, Front Monitor, Rear Audio Switch, Rear Monitor LH/RH
Memory 110ASteering Tilt & Telescopic Module, External Buzzer, BCM, A/C Control Module,
Tire Pressure Monitoring Module, Analog Clock, Head-Up Display,
Instrument Cluster
Smart Key 110AStart/Stop Button Switch
Module 810ABCM, Smart Key Control Module
A/CON10AMetal Core Block (PCB #1 - Blower Relay), Ionizer,
Co2 Sensor, A/C Control Module
Passenger
P/Door15APassenger Door Latch
Door Lamp10ADriver/Passenger Door Module, Rear Door Module LH/RH
Driver’s side fuse panel
Page 517 of 546

7-81
7
Maintenance
Headlamp and front fog lamp
aiming - For Europe
Headlamp aiming
1. Inflate the tires to the specified
pressure and remove any loads
from the vehicle except the driver,
spare tire, and tools.
2. The vehicle should be placed on a
flat floor.
3. Draw vertical lines (Vertical lines
passing through respective head
lamp centers) and a horizontal line
(Horizontal line passing through
center of head lamps) on the
screen.4. With the headlamp and battery in
normal condition, aim the head-
lamps so the brightest portion falls
on the horizontal and vertical
lines.
5. To aim the low beam left or right,
turn the driver clockwise or coun-
terclockwise. To aim the low beam
up or down, turn the driver clock-
wise or counterclockwise.
To aim the high beam up or down,
turn the driver clockwise or coun-
terclockwise.
Front fog lamp aiming
The front fog lamp can be aimed as
the same manner of the headlamps
aiming.
With the front fog lamps and battery
in normal condition, aim the front fog
lamps.
To aim the front fog lamp up or down,
turn the driver clockwise or counter-
clockwise.
ODH073059L
ODH073060L
Page 536 of 546

8
Specifications & Consumer information
8
Specifications & Consumer information
8
Dimensions ..............................................................8-2
Engine ......................................................................8-2
Luggage volume .....................................................8-2
Bulb wattage ...........................................................8-3
Air conditioning system ........................................8-3
Tires and wheels ....................................................8-4
Tire load and speed capacity ..............................8-5
Gross vehicle weight .............................................8-5
Recommended lubricants and capacities ...........8-6
Recommended SAE viscosity number ..........................8-8
Vehicle identification number (VIN) ....................8-9
Vehicle certification label .....................................8-9
TIRE specification and pressure label ..............8-10
Engine number .....................................................8-10
Air conditioner compressor label ......................8-10
Refrigerant label ..................................................8-11
Declaration of conformity ..................................8-11
Page 539 of 546
8-4
Specifications & Consumer information
TIRES AND WHEELS
Item Tire size Wheel sizeInflation pressure, bar (kPa, psi)
Wheel lug nut torque
kg•m (lb•ft, N•m) Normal load *1Maximum load
Front Rear Front Rear
Full size tire225/55R17 7.0JX17 2.3 (230, 33) 2.3 (230, 33) 2.3 (230, 33) 2.3 (230, 33)
9~11
(65~79, 88~107) 245/45R18 8.0JX18 2.3 (230, 33) 2.3 (230, 33) 2.3 (230, 33) 2.3 (230, 33)
245/40R19 8.5JX19 2.3 (230, 33) - 2.3 (230, 33) -
275/35R199.0JX19-2.4 (240, 35)-2.4 (240, 35)
Compact spare tire
(if equipped)T135/90D174.0TX174.2 (420, 60)4.2 (420, 60)4.2 (420, 60)4.2 (420, 60)
T135/80R184.0TX184.2 (420, 60)4.2 (420, 60)4.2 (420, 60)4.2 (420, 60)
T135/70R194.0TX194.2 (420, 60)4.2 (420, 60)4.2 (420, 60)4.2 (420, 60)
When replacing tires, use the same size originally supplied with the vehicle.
Using tires of a different size can damage the related parts or not work properly.
CAUTION
*1 : Normal load : Up to 3 persons
Page 545 of 546
8-10
Specifications & Consumer information
The tires supplied on your new vehi-
cle are chosen to provide the best
performance for normal driving.
The tire label located on the driver's
side center pillar gives the tire pres-
sures recommended for your vehicle.
The engine number is stamped on
the engine block as shown in the
drawing.A compressor label informs you the
type of compressor your vehicle is
equipped with such as model, suppli-
er part number, production number,
refrigerant (1) and refrigerant oil (2).
TIRE SPECIFICATION AND
PRESSURE LABELENGINE NUMBER
ODH083005L
ODH083003
ODH083007L
■Lambda Engine
■Tau Engine
OHC081001
AIR CONDITIONER
COMPRESSOR LABEL