2014 HYUNDAI GENESIS G80 ignition
[x] Cancel search: ignitionPage 113 of 432

Features of your vehicle
34 4
DRIVER POSITION MEMORY SYSTEM (IF EQUIPPED)
D120000AEN
A driver position memory system is pro-
vided to store and recall the driver seat,
outside rearview mirror and steering
wheel positions with a simple button
operation. By saving the desired positions
into the system memory, different drivers
can reposition the driver seat, outside
rearview mirror and steering wheel based
upon their driving preference. If the bat-
tery is disconnected, the position memo-
ry will be lost and the driving positions
should be restored in the system.
✽ ✽
NOTICE
The buzzer sounds 10 times if there is a
malfunction of the memory system.
Have the driver position memory system
checked by an authorized HYUNDAI
dealer.
Storing positions into memory
using the buttons on the door
D120101ABH
Storing driver’s seat positions
1. Shift the shift lever into P while the
ignition switch is ON.
2. Adjust the driver seat, outside
rearview mirror and steering wheel to
positions comfortable for the driver.
3. Press SET button on the control panel.
The system will beep once.
4. Press one of the memory buttons (1 or
2) within 5 seconds after pressing the
SET button. The system will beep
twice when memory has been suc-
cessfully stored.
WARNING
Never attempt to operate the driv-
er position memory system while
the vehicle is moving.
This could result in loss of con-
trol, and an accident causing
death, serious injury, or property
damage.
Do not adjust the seat while wear-
ing seat belts. Moving the seat
cushion forward may cause
strong pressure on the abdomen.
OBH048035
Page 114 of 432

435
Features of your vehicle
D120102ABH
Recalling positions from memory
1. Shift the shift lever into P while the
ignition switch is ON.
2. To recall the position in memory, press
the desired memory button (1 or 2).
The system will beep once, then the
driver seat, outside rearview mirror
and steering wheel will automatically
adjust to the stored positions.
Adjusting one of the control knobs for the
driver seat, outside rearview mirror and
steering wheel while the system is recall-
ing the stored positions will cause the
movement for that component to stop
and move in the direction that the control
knob is moved. Other components will
continue to the recalled position.
D120300BBH
Easy access function
(if equipped)
With the shift lever in the P position, the
system will move the steering wheel
upward and driver’s seat rearward auto-
matically so you can comfortably enter
and exit the vehicle.
Without smart key system
- It will move the steering wheel away
from the driver and the driver’s seat
rearward when the ignition key is
removed.
-
It will move the steering wheel toward
the driver and the driver’s seat for-
ward when the ignition key is inserted.
With smart key system
- It will move the steering wheel away
from the driver and the driver’s seat
rearward when the engine start/stop
button is turned to the OFF position.
- It will move the steering wheel toward
the driver and the driver’s seat for-
ward when the engine start/stop but-
ton is turned to the ACC position.
✽ ✽
NOTICE
You can activate or deactivate the easy
access function in the INFO menu of
DIS (Driver Information System, if
equipped) as follows;
• Seat easy access
• Steering easy access
If you want detailed informations, refer
to the DIS manual supplied separately.
WARNING
Use caution when recalling adjust-
ment memory while sitting in the
vehicle. Push the seat position con-
trol knob to the desired position
immediately if the seat moves too
far in any direction.
Page 115 of 432

Features of your vehicle
36 4
D120400BBH
Reverse parking aid function
(if equipped)
When you shift the shift lever to the R
(Reverse) position, the outside rearview
mirror(s) will move downward to aid
reverse parking. According to the posi-
tion of the outside rearview mirror switch
(1), the outside rearview mirror(s) will
operate as follows:Left/Right: When the remote control
outside rearview mirror
switch is selected to the
left/right position, both out-
side rearview mirrors will
move downward.
Neutral: When the remote control out-
side rearview mirror switch is
placed in the middle position,
the outside rearview mirrors
will not operate.
✽ ✽
NOTICE
The outside rearview mirrors will auto-
matically revert to their original posi-
tions under the following conditions:
1. Ignition switch is turned to the LOCK
or ACC position.
2. Shift lever is moved to any position
except R.
3. Remote control outside rearview mir-
ror switch is placed in the middle
position.
OBH048036N
Page 119 of 432

Features of your vehicle
40 4
Automatic-Dimming Night Vision
Safety™ (NVS®) Mirror
The NVS®Mirror in your vehicle is the
most advanced way to reduce annoying
glare in the rearview mirror during any
driving situation. For more information
regarding NVS
®mirrors and other appli-
cations, please refer to the Gentex web-
site:
www.gentex.com
✽ ✽
NOTICE
The NVS®Mirror automatically reduces
glare during driving conditions based
upon light levels monitored in front of
the vehicle and from the rear of the vehi-
cle. These light sensors are visible
through openings in the front and rear
of the mirror case. Any object that
obstructs either light sensor will
degrade the automatic dimming control
feature.
Automatic-dimming function
Your mirror will automatically dim upon
detecting glare from the vehicles travel-
ing behind you. The auto-dimming func-
tion can be controlled by the Dimming
ON/OFF Button:
1. Pressing and hold the button for 3
seconds turns the autodimming func-
tion OFF which is indicated by the
green Status Indicator LED turning off.
2. Pressing and hold the button for 3
seconds again turns the auto-dimming
function ON which is indicated by the
green Status Indicator LED turning on.
The mirror defaults to the ON position
each time the vehicle is started.Z-Nav™ Compass Display
The NVS™ Mirror in your vehicle is also
equipped with a Z-Nav™ Compass that
shows the vehicle Compass heading in
the Display Window using the 8 basic
cardinal headings (N, NE, E, SE, etc.).
Compass function
The Compass can be turned ON and
OFF and will remember the last state
when the ignition is cycled. To turn the
display feature ON/OFF:
1. Press and release the button within
1 second to turn the display feature
OFF.
2. Press and release the button again
within 1 second to turn the display
back ON.
Additional options can be set with press
and hold sequences of the button and
are detailed below.
There is a difference between magnetic
north and true north. The compass in the
mirror can compensate for this difference
when it knows the Magnetic Zone in
which it is operating. This is set either by
the dealer or by the user. The operating
Zone Numbers for North America are
shown in the figure on the following sec-
tion.
Page 126 of 432

447
Features of your vehicle
D140202ABH
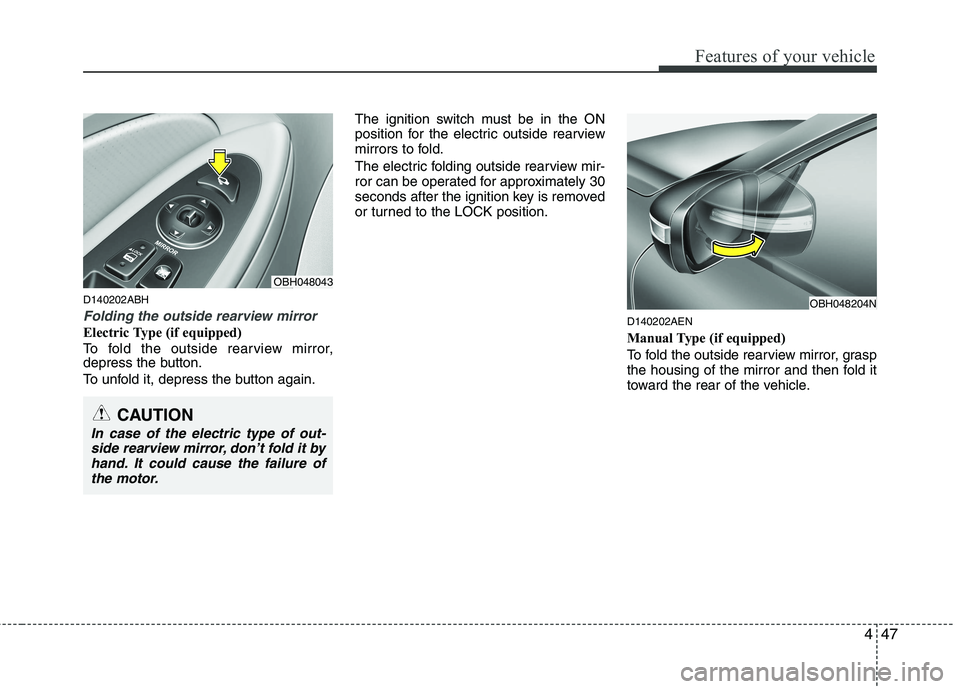
Folding the outside rearview mirror
Electric Type (if equipped)
To fold the outside rearview mirror,
depress the button.
To unfold it, depress the button again.The ignition switch must be in the ON
position for the electric outside rearview
mirrors to fold.
The electric folding outside rearview mir-
ror can be operated for approximately 30
seconds after the ignition key is removed
or turned to the LOCK position.D140202AEN
Manual Type (if equipped)
To fold the outside rearview mirror, grasp
the housing of the mirror and then fold it
toward the rear of the vehicle.
OBH048204N
OBH048043
CAUTION
In case of the electric type of out-
side rearview mirror, don’t fold it by
hand. It could cause the failure of
the motor.
Page 130 of 432

451
Features of your vehicle
D150203AUN
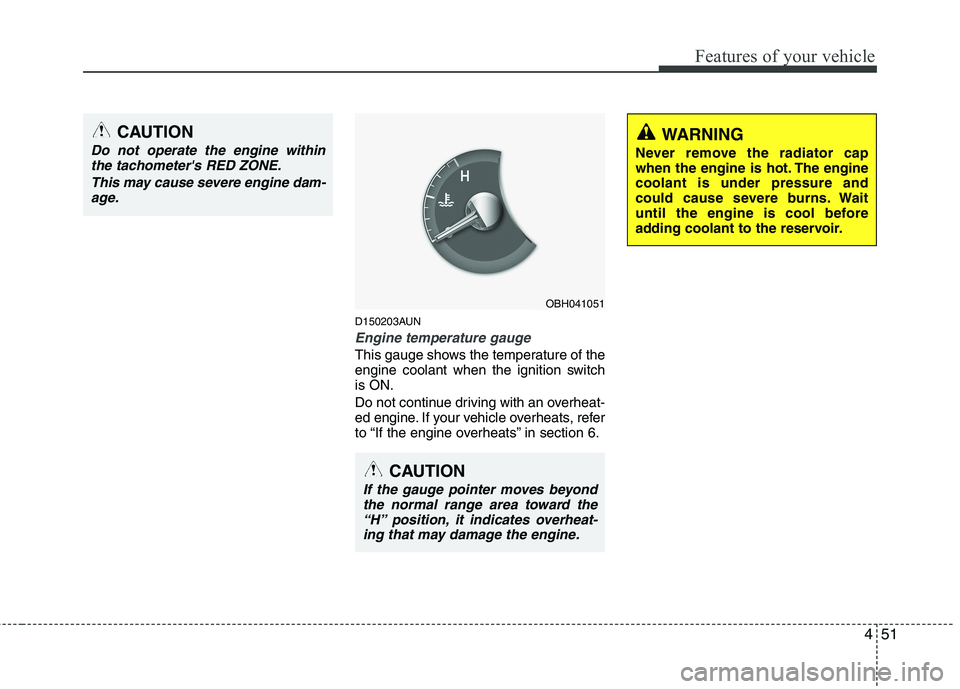
Engine temperature gauge
This gauge shows the temperature of the
engine coolant when the ignition switch
is ON.
Do not continue driving with an overheat-
ed engine. If your vehicle overheats, refer
to “If the engine overheats” in section 6.
OBH041051
CAUTION
If the gauge pointer moves beyond
the normal range area toward the
“H” position, it indicates overheat-
ing that may damage the engine.
CAUTION
Do not operate the engine within
the tachometer's RED ZONE.
This may cause severe engine dam-
age.WARNING
Never remove the radiator cap
when the engine is hot. The engine
coolant is under pressure and
could cause severe burns. Wait
until the engine is cool before
adding coolant to the reservoir.
Page 131 of 432

Features of your vehicle
52 4
D150204BBH
Fuel gauge
The fuel gauge indicates the approxi-
mate amount of fuel remaining in the fuel
tank.
The fuel tank capacity is given in sec-
tion 8.The fuel gauge is supplemented by
a low fuel warning light, which will illumi-
nate when the fuel tank is near empty.
On inclines or curves, the fuel gauge
pointer may fluctuate or the low fuel
warning light may come on earlier than
usual due to the movement of fuel in the
tank.
D150206ABH-EU
Trip computer
The trip computer is a microcomputer-
controlled driver information system that
displays information related to driving,
including odometer, tripmeter, elapsed
time, average speed, average fuel con-
sumption (if equipped), instant fuel con-
sumption and distance to empty on the
display when the ignition switch is in the
ON position. All stored driving informa-
tion (except odometer) is reset if the bat-
tery is disconnected.WARNING- Fuel gauge
Running out of fuel can expose
vehicle occupants to danger.
You must stop and obtain addition-
al fuel as soon as possible after the
warning light comes on or when the
gauge indicator comes close to the
E level.
CAUTION
Avoid driving with a very low fuel
level. If you run out of fuel, it could
cause the engine to misfire and
result in excessive loading of the
catalytic converter.OBH041052
Page 134 of 432

455
Features of your vehicle
Average speed (MPH or km/h)
This mode calculates the average speed
of the vehicle since the last average
speed reset.
Even if the vehicle is not in motion, the
average speed is calculated while the
engine is running.
Pressing the RESET button for more
than 1 second, when the average speed
is being displayed, clears the average
speed to zero (---). If the ignition switch is
turned to OFF for more than 2 hours, it
will be reset automatically.Elapsed time
This mode indicates the total time trav-
eled since the last driving time reset.
Even if the vehicle is not in motion, the
driving time is calculated while the
engine is running.
The meter’s working range is from
0:00~99:59.
Pressing the RESET button for more
than 1 second, when the driving time is
being displayed, clears the driving time to
zero (0:00). If the ignition switch is turned
to OFF for more than 2 hours, it will be
reset automatically.Average fuel consumption (if equipped)
(MPG orl/100 km)
This mode calculates the average fuel
consumption from the total fuel used and
the distance since the last average con-
sumption reset. The total fuel used is cal-
culated from the fuel consumption input.
For an accurate calculation, begin driving
the vehicle for several miles.
Pressing the RESET button for more than
1 second, when the average fuel con-
sumption is being displayed, clears the
average fuel consumption to zero (----).
If the vehicle speed exceeds 1.6 MPH (1
km/h) after refueled more than 1.6 gal-
lons (6 l), the average fuel consumption
will be cleared to zero (---).
OBH042059N
Type IType II
OBH042060L
Type IType II
OBH042333N
Type IType II