2014 HYUNDAI GENESIS G80 ignition
[x] Cancel search: ignitionPage 301 of 432

Driving your vehicle
62 5
E120200AUN
Use high quality ethylene glycol
coolant
Your vehicle is delivered with high quality
ethylene glycol coolant in the cooling
system. It is the only type of coolant that
should be used because it helps prevent
corrosion in the cooling system, lubri-
cates the water pump and prevents
freezing. Be sure to replace or replenish
your coolant in accordance with the
maintenance schedule in section 7.
Before winter, have your coolant tested to
assure that its freezing point is sufficient
for the temperatures anticipated during
the winter.
E120300AEN
Check battery and cables
Winter puts additional burdens on the
battery system. Visually inspect the bat-
tery and cables as described in section
7. The level of charge in your battery can
be checked by an authorized HYUNDAI
dealer or a service station.
E120400ABH
Change to "winter weight" oil if
necessary
In some climates it is recommended that
a lower viscosity "winter weight" oil be
used during cold weather. See section 8
for recommendations. If you aren't sure
what weight oil you should use, consult
an authorized HYUNDAI dealer.
E120500AUN
Check spark plugs and ignition
system
Inspect your spark plugs as described in
section 7 and replace them if necessary.
Also check all ignition wiring and compo-
nents to be sure they are not cracked,
worn or damaged in any way.
WARNING- Tire chains
The use of chains may adversely
affect vehicle handling.
Do not exceed 20 mph (30 km/h)
or the chain manufacturer’s rec-
ommended speed limit, whichev-
er is lower.
Drive carefully and avoid bumps,
holes, sharp turns, and other
road hazards, which may cause
the vehicle to bounce.
Avoid sharp turns or locked-
wheel braking.
CAUTION
Chains that are the wrong size or
improperly installed can damage
your vehicle's brake lines, sus-
pension, body and wheels.
Stop driving and retighten the
chains any time you hear them
hitting the vehicle.
Page 312 of 432

63
What to do in an emergency
2. When the car is stopped, turn on your
emergency hazard flashers, set the
parking brake and put the shift lever in
P.
3. Have all passengers get out of the car.
Be sure they all get out on the side of
the car that is away from traffic.
4. When changing a flat tire, follow the
instruction provided later in this sec-
tion.
F020300AEN
If engine stalls while driving
1. Reduce your speed gradually, keeping
a straight line. Move cautiously off the
road to a safe place.
2. Turn on your emergency flashers.
3. Try to start the engine again. If your
vehicle will not start, contact an
authorized HYUNDAI dealer or seek
other qualified assistance.
F030100BBH
If engine doesn't turn over or
turns over slowly
1. Be sure the shift lever is in N (Neutral)
or P (Park) and the emergency brake
is set.
2. Check the battery connections to be
sure they are clean and tight.
3. Turn on the interior light. If the light
dims or goes out when you operate the
starter, the battery is discharged.
4. Check the starter connections to be
sure they are securely tightened.
5. Do not push or pull the vehicle to start
it. See instructions for "Jump starting".
F030200ABH
If engine turns over normally but
does not start
1. Check fuel level.
2. With the ignition switch in the LOCK
position, check all connectors at igni-
tion coils and spark plugs. Reconnect
any that may be disconnected or
loose.
3. If the engine still does not start, call an
authorized HYUNDAI dealer or seek
other qualified assistance.
IF THE ENGINE WILL NOT START
WARNING
If the engine will not start, do not
push or pull the car to start it. This
could result in a collision or cause
other damage.
Page 313 of 432

What to do in an emergency
4 6
EMERGENCY STARTING
F040000ABH
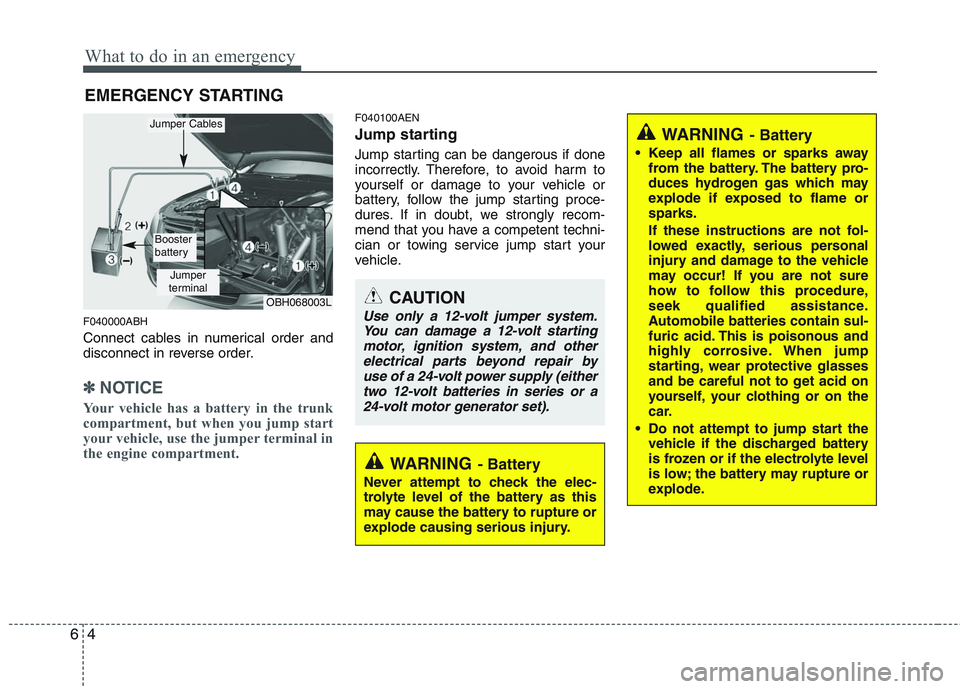
Connect cables in numerical order and
disconnect in reverse order.
✽ ✽
NOTICE
Your vehicle has a battery in the trunk
compartment, but when you jump start
your vehicle, use the jumper terminal in
the engine compartment.
F040100AEN
Jump starting
Jump starting can be dangerous if done
incorrectly. Therefore, to avoid harm to
yourself or damage to your vehicle or
battery, follow the jump starting proce-
dures. If in doubt, we strongly recom-
mend that you have a competent techni-
cian or towing service jump start your
vehicle.
CAUTION
Use only a 12-volt jumper system.
You can damage a 12-volt starting
motor, ignition system, and other
electrical parts beyond repair by
use of a 24-volt power supply (either
two 12-volt batteries in series or a
24-volt motor generator set).
WARNING- Battery
• Keep all flames or sparks away
from the battery. The battery pro-
duces hydrogen gas which may
explode if exposed to flame or
sparks.
If these instructions are not fol-
lowed exactly, serious personal
injury and damage to the vehicle
may occur! If you are not sure
how to follow this procedure,
seek qualified assistance.
Automobile batteries contain sul-
furic acid. This is poisonous and
highly corrosive. When jump
starting, wear protective glasses
and be careful not to get acid on
yourself, your clothing or on the
car.
Do not attempt to jump start the
vehicle if the discharged battery
is frozen or if the electrolyte level
is low; the battery may rupture or
explode.
WARNING- Battery
Never attempt to check the elec-
trolyte level of the battery as this
may cause the battery to rupture or
explode causing serious injury.
OBH068003L
Jumper
terminal
Jumper Cables
Booster
battery
Page 317 of 432

What to do in an emergency
8 6
Please note that the TPMS is not a
substitute for proper tire maintenance,
and it is the driver’s responsibility to
maintain correct tire pressure, even if
under-inflation has not reached the
level to trigger illumination of the
TPMS low tire pressure telltale.
Your vehicle has also been equipped
with a TPMS malfunction indicator to
indicate when the system is not oper-
ating properly. The TPMS malfunction
indicator is provided by a separate tell-
tale, which displays the symbol
"TPMS" when illuminated. When the
malfunction indicator is illuminated,
the system may not be able to detect
or signal low tire pressure as intended.
TPMS malfunctions may occur for a
variety of reasons, including the instal-
lation of replacement or alternate tires
or wheels on the vehicle that prevent
the TPMS from functioning properly.
Always check the TPMS malfunction
telltale after replacing one or more
tires or wheels on your vehicle to
ensure that the replacement or alter-
nate tires and wheels allow the TPMS
to continue to function properly.✽ ✽
NOTICE
If the TPMS, Low Tire Pressure tell-
tale does not illuminate for 3 sec-
onds when the ignition switch is
turned to the ON position or engine
is running, or if it remains illuminat-
ed after coming on for approximate-
ly 3 seconds, take your car to your
nearest authorized HYUNDAI deal-
er and have the system checked.
F060100ABH-EU
Low tire pressure tell-
tale
Low tire pressure posi-
tion telltale
When the tire pressure monitoring
system warning indicators are illumi-
nated, one or more of your tires is
significantly under-inflated. The low
tire pressure position telltale (supple-
mental) will indicate which tire is sig-
nificantly under-inflated by illuminat-
ing the corresponding position on the
LCD screen (if equipped).
If either telltale illuminates, immedi-
ately reduce your speed, avoid hard
cornering and anticipate increased
stopping distances. You should stop
and check your tires as soon as pos-
sible. Inflate the tires to the proper
pressure as indicated on the vehi-
cle’s placard or tire inflation pressure
label located on the driver’s side cen-
ter pillar outer panel. If you cannot
reach a service station or if the tire
cannot hold the newly added air,
replace the low pressure tire with the
compact spare tire.
Page 331 of 432

What to do in an emergency
22 6
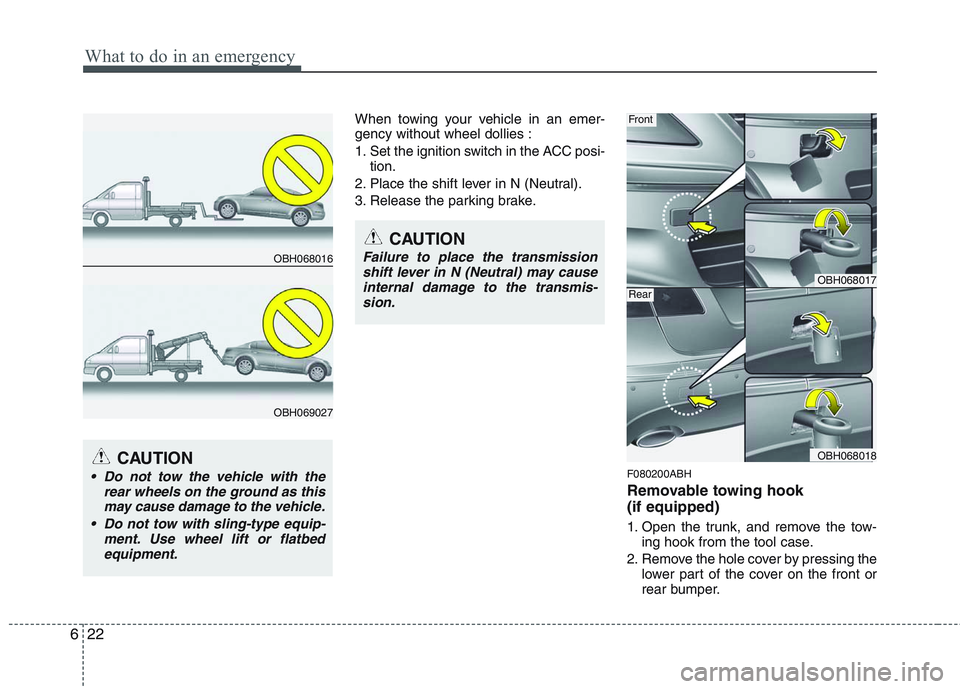
When towing your vehicle in an emer-
gency without wheel dollies :
1. Set the ignition switch in the ACC posi-
tion.
2. Place the shift lever in N (Neutral).
3. Release the parking brake.
F080200ABH
Removable towing hook
(if equipped)
1. Open the trunk, and remove the tow-
ing hook from the tool case.
2. Remove the hole cover by pressing the
lower part of the cover on the front or
rear bumper.
OBH068016
OBH069027
CAUTION
Do not tow the vehicle with the
rear wheels on the ground as this
may cause damage to the vehicle.
Do not tow with sling-type equip-
ment. Use wheel lift or flatbed
equipment.
CAUTION
Failure to place the transmission
shift lever in N (Neutral) may cause
internal damage to the transmis-
sion.
OBH068017
OBH068018
Front
Rear
Page 334 of 432

625
What to do in an emergency
F080301ABH
Emergency towing precautions
Place the transmission shift lever in N
(Neutral).
Release the parking brake.
Press the brake pedal with more force
than normal since you will have
reduced brake performance.
More steering effort will be required
because the power steering system
will be disabled.
If you are driving down a long hill, the
brakes may overheat and brake per-
formance will be reduced. Stop often
and let the brakes cool off.
CAUTION - Automatic
transmission
If the car is being towed with all
four wheels on the ground, it can
be towed only from the front. Be
sure that the transmission is in
neutral. Be sure the steering is
unlocked by placing the ignition
switch in the ACC position. A
driver must be in the towed vehi-
cle to operate the steering and
brakes.
To avoid serious damage to the
automatic transmission, limit the
vehicle speed to 10 mph (15 km/h)
and drive less than 1 mile (1.5
km) when towing.
Before towing, check the auto-
matic transmission for fluid leaks
under your vehicle. If the auto-
matic transmission fluid is leak-
ing, flatbed equipment or a tow-
ing dolly must be used.
Page 362 of 432

Maintenance
28 7
WIPER BLADES
G180100AUN
Blade inspection
✽
✽
NOTICE
Commercial hot waxes applied by auto-
matic car washes have been known to
make the windshield difficult to clean.
Contamination of either the windshield or
the wiper blades with foreign matter can
reduce the effectiveness of the wind-
shield wipers. Common sources of con-
tamination are insects, tree sap, and hot
wax treatments used by some commer-
cial car washes. If the blades are not wip-
ing properly, clean both the window and
the blades with a good cleaner or mild
detergent, and rinse thoroughly with
clean water.
G180200AUN
Blade replacement
When the wipers no longer clean ade-
quately, the blades may be worn or
cracked, and require replacement.
G180201ABH-EU
Front windshield wiper blade
For your convenience, move the wind-
shield wiper blades to the service posi-
tion as follows;
Remove the key from the ignition switch
or turn off the engine.
Move the wiper switch to the single wip-
ing (MIST) position within 20 seconds
and hold the switch until the wiper blade
is in the fully up position.
1JBA5122
CAUTION
To prevent damage to the wiper
blades, do not use gasoline,
kerosene, paint thinner, or other
solvents on or near them.
CAUTION
To prevent damage to the wiper
arms or other components, do not
attempt to move the wipers manual-
ly.
CAUTION
The use of a non-specified wiper
blade could result in wiper malfunc-
tion and failure.
OBH071041
Page 363 of 432

729
Maintenance
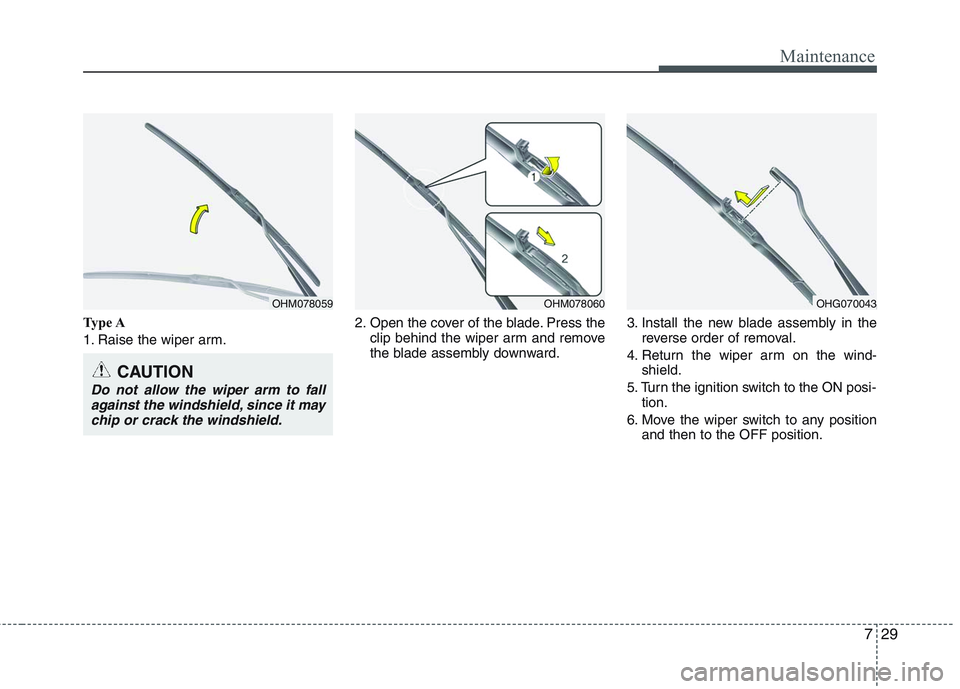
Type A
1. Raise the wiper arm.2. Open the cover of the blade. Press the
clip behind the wiper arm and remove
the blade assembly downward.3. Install the new blade assembly in the
reverse order of removal.
4. Return the wiper arm on the wind-
shield.
5. Turn the ignition switch to the ON posi-
tion.
6. Move the wiper switch to any position
and then to the OFF position.
OHM078059OHM078060
CAUTION
Do not allow the wiper arm to fall
against the windshield, since it may
chip or crack the windshield.
OHG070043