2014 Hyundai Equus warning
[x] Cancel search: warningPage 88 of 479
369
Safety features of your vehicle
Additional safety precautions
• All occupants should sit upright, fully
back in their seats with their seat
belts on and their feet on the floor.
•Passengers should not move out
of or change seats while the vehi-
cle is moving.A passenger who is
not wearing a seat belt during a
crash or emergency stop can be
thrown against the inside of the vehi-
cle, against other occupants, or out
of the vehicle.
•Each seat belt is designed to
restrain one occupant.If more
than one person uses the same seat
belt, they could be seriously injured
or killed in a collision.
•Do not use any accessories on
seat belts.Devices claiming to
improve occupant comfort or reposi-
tion the seat belt can reduce the pro-
tection provided by the seat belt and
increase the chance of serious
injury in a crash.
•Passengers should not place
hard or sharp objects between
themselves and the air bags.
Carrying hard or sharp objects on
your lap or in your mouth can result
in injuries if an air bag inflates.•Keep occupants away from the
air bag covers.All occupants
should sit upright, fully back in their
seats with their seat belts on and
their feet on the floor. If occupants
are too close to the air bag covers,
they could be injured if the air bags
inflate.
•Do not attach or place objects on
or near the air bag covers.Any
object attached to or placed on the
front or side air bag covers could
interfere with the proper operation of
the air bags.
•Do not modify the front seats.
Modification of the front seats could
interfere with the operation of the
supplemental restraint system sens-
ing components or side air bags.
•Do not place items under the
front seats.Placing items under
the front seats could interfere with
the operation of the supplemental
restraint system sensing compo-
nents and wiring harnesses.•Never hold an infant or child on
your lap.The infant or child could
be seriously injured or killed in the
event of a crash. All infants and chil-
dren should be properly restrained
in appropriate child safety seats or
seat belts in the rear seat.
WARNING
• Sitting improperly or out of
position can cause occupants
to be shifted too close to a
deploying air bag, strike the
interior structure or be thrown
from the vehicle resulting in
serious injury or death.
• Always sit upright with the
seatback in an upright posi-
tion, centered on the seat
cushion with your seat belt
on, legs comfortably extended
and your feet on the floor.
Page 89 of 479
Safety features of your vehicle
70 3
Adding equipment to or modifying
your air bag-equipped vehicle
If you modify your vehicle by chang-
ing your vehicle's frame, bumper sys-
tem, front end or side sheet metal or
ride height, this may affect the oper-
ation of your vehicle's air bag sys-
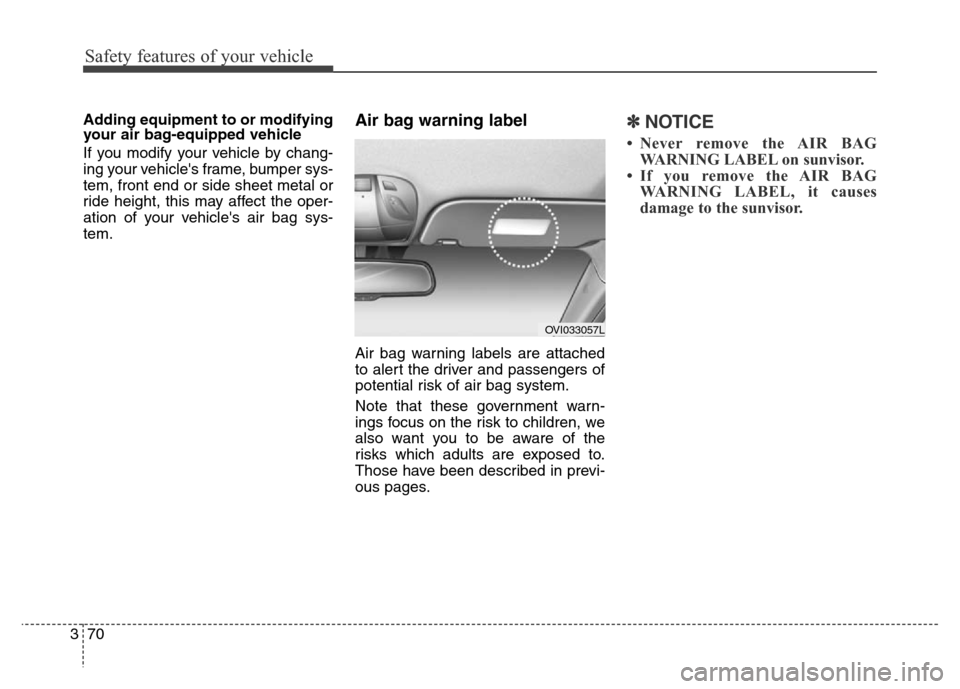
tem.Air bag warning label
Air bag warning labels are attached
to alert the driver and passengers of
potential risk of air bag system.
Note that these government warn-
ings focus on the risk to children, we
also want you to be aware of the
risks which adults are exposed to.
Those have been described in previ-
ous pages.
✽NOTICE
• Never remove the AIR BAG
WARNING LABEL on sunvisor.
• If you remove the AIR BAG
WARNING LABEL, it causes
damage to the sunvisor.
OVI033057L
Page 90 of 479

Features of your vehicle
Smart key . . . . . . . . . . . . . . . . . . . . . . . . . . . . . . . . . 4-4
• Smart key function . . . . . . . . . . . . . . . . . . . . . . . . . . . . 4-4
• Buttons on the smart key . . . . . . . . . . . . . . . . . . . . . . . 4-7
• Restrictions in handling keys . . . . . . . . . . . . . . . . . . . . 4-8
• Smart key precautions . . . . . . . . . . . . . . . . . . . . . . . . . 4-9
• Immobilizer system . . . . . . . . . . . . . . . . . . . . . . . . . . . 4-10
• Battery replacement . . . . . . . . . . . . . . . . . . . . . . . . . . 4-11
Theft-alarm system . . . . . . . . . . . . . . . . . . . . . . . . 4-13
Door locks . . . . . . . . . . . . . . . . . . . . . . . . . . . . . . . . 4-16
• From outside . . . . . . . . . . . . . . . . . . . . . . . . . . . . . . . . 4-16
• Power door latch . . . . . . . . . . . . . . . . . . . . . . . . . . . . . 4-17
• From inside . . . . . . . . . . . . . . . . . . . . . . . . . . . . . . . . . 4-17
• Child-protector rear door lock . . . . . . . . . . . . . . . . . 4-19
Trunk . . . . . . . . . . . . . . . . . . . . . . . . . . . . . . . . . . . . 4-20
• Non-powered trunk . . . . . . . . . . . . . . . . . . . . . . . . . . . 4-20
• Power trunk . . . . . . . . . . . . . . . . . . . . . . . . . . . . . . . . . 4-21
• Emergency trunk safety release . . . . . . . . . . . . . . . . . 4-26
Windows . . . . . . . . . . . . . . . . . . . . . . . . . . . . . . . . . 4-28
Hood. . . . . . . . . . . . . . . . . . . . . . . . . . . . . . . . . . . . . 4-33
Fuel filler lid . . . . . . . . . . . . . . . . . . . . . . . . . . . . . . 4-35
• Emergency fuel filler lid release. . . . . . . . . . . . . . . . . 4-37
Sunroof . . . . . . . . . . . . . . . . . . . . . . . . . . . . . . . . . . 4-38
• Sliding the sunroof . . . . . . . . . . . . . . . . . . . . . . . . . . . 4-39
• Tilting the sunroof . . . . . . . . . . . . . . . . . . . . . . . . . . . . 4-39
• Sunshade . . . . . . . . . . . . . . . . . . . . . . . . . . . . . . . . . . . 4-40• Resetting the sunroof . . . . . . . . . . . . . . . . . . . . . . . . . 4-41
Driver position memory system . . . . . . . . . . . . . . 4-42
Steering wheel . . . . . . . . . . . . . . . . . . . . . . . . . . . . . 4-44
• Power steering . . . . . . . . . . . . . . . . . . . . . . . . . . . . . . . 4-44
• Tilt/Telescopic steering . . . . . . . . . . . . . . . . . . . . . . . . 4-45
• Heated steering wheel . . . . . . . . . . . . . . . . . . . . . . . . . 4-45
• Horn . . . . . . . . . . . . . . . . . . . . . . . . . . . . . . . . . . . . . . . 4-46
Mirrors . . . . . . . . . . . . . . . . . . . . . . . . . . . . . . . . . . 4-47
• Inside rearview mirror . . . . . . . . . . . . . . . . . . . . . . . . 4-47
• Outside rearview mirror . . . . . . . . . . . . . . . . . . . . . . . 4-51
Instrument cluster . . . . . . . . . . . . . . . . . . . . . . . . . 4-55
• Instrument cluster control . . . . . . . . . . . . . . . . . . . . . 4-56
• LCD display control . . . . . . . . . . . . . . . . . . . . . . . . . . 4-57
• Gauges . . . . . . . . . . . . . . . . . . . . . . . . . . . . . . . . . . . . . 4-58
LCD display . . . . . . . . . . . . . . . . . . . . . . . . . . . . . . 4-63
• LCD modes. . . . . . . . . . . . . . . . . . . . . . . . . . . . . . . . . . 4-63
• Trip computer mode . . . . . . . . . . . . . . . . . . . . . . . . . . 4-64
• ASCC/LDWS mode . . . . . . . . . . . . . . . . . . . . . . . . . . . 4-64
• A/V mode . . . . . . . . . . . . . . . . . . . . . . . . . . . . . . . . . . . 4-64
• Turn by turn mode . . . . . . . . . . . . . . . . . . . . . . . . . . . 4-65
• Information mode . . . . . . . . . . . . . . . . . . . . . . . . . . . . 4-65
• User settings mode. . . . . . . . . . . . . . . . . . . . . . . . . . . . 4-68
• Warning messages . . . . . . . . . . . . . . . . . . . . . . . . . . . . 4-75
4
Page 91 of 479
Trip computer . . . . . . . . . . . . . . . . . . . . . . . . . . . . . 4-86
• Overview. . . . . . . . . . . . . . . . . . . . . . . . . . . . . . . . . . . . 4-86
• Trip A/B . . . . . . . . . . . . . . . . . . . . . . . . . . . . . . . . . . . . 4-87
• Fuel economy . . . . . . . . . . . . . . . . . . . . . . . . . . . . . . . . 4-88
Warning and indicator lights . . . . . . . . . . . . . . . . 4-90
• Warning lights . . . . . . . . . . . . . . . . . . . . . . . . . . . . . . . 4-90
• Indicator lights. . . . . . . . . . . . . . . . . . . . . . . . . . . . . . . 4-99
Head up display (HUD) . . . . . . . . . . . . . . . . . . . . 4-104
Parking assist system . . . . . . . . . . . . . . . . . . . . . . 4-107
• Operation . . . . . . . . . . . . . . . . . . . . . . . . . . . . . . . . . . 4-107
• Non-operational conditions . . . . . . . . . . . . . . . . . . . 4-109
• Self-diagnosis . . . . . . . . . . . . . . . . . . . . . . . . . . . . . . . 4-111
Rearview camera . . . . . . . . . . . . . . . . . . . . . . . . . 4-112
Parking guide system . . . . . . . . . . . . . . . . . . . . . . 4-113
Around view monitoring system . . . . . . . . . . . . . 4-116
Lighting . . . . . . . . . . . . . . . . . . . . . . . . . . . . . . . . . 4-117
• Battery saver function. . . . . . . . . . . . . . . . . . . . . . . . 4-117
• Headlamp escort function. . . . . . . . . . . . . . . . . . . . . 4-117
• Lighting control . . . . . . . . . . . . . . . . . . . . . . . . . . . . . 4-118
• High beam operation. . . . . . . . . . . . . . . . . . . . . . . . . 4-120
• Turn signals and lane change signals . . . . . . . . . . . 4-121
• Front fog light . . . . . . . . . . . . . . . . . . . . . . . . . . . . . . 4-122
• Rear fog light . . . . . . . . . . . . . . . . . . . . . . . . . . . . . . . 4-122
• Daytime running light . . . . . . . . . . . . . . . . . . . . . . . . 4-123
• Headlamp leveling device . . . . . . . . . . . . . . . . . . . . . 4-123
• Headlamp washer . . . . . . . . . . . . . . . . . . . . . . . . . . . 4-123
Wipers and washers . . . . . . . . . . . . . . . . . . . . . . . 4-124
• Windshield wipers . . . . . . . . . . . . . . . . . . . . . . . . . . . 4-124
• Windshield washers. . . . . . . . . . . . . . . . . . . . . . . . . . 4-125
Interior light . . . . . . . . . . . . . . . . . . . . . . . . . . . . . 4-127
• Front . . . . . . . . . . . . . . . . . . . . . . . . . . . . . . . . . . . . . . 4-127
• Rear . . . . . . . . . . . . . . . . . . . . . . . . . . . . . . . . . . . . . . 4-128
• Trunk room lamp . . . . . . . . . . . . . . . . . . . . . . . . . . . 4-129
• Door courtesy lamp . . . . . . . . . . . . . . . . . . . . . . . . . . 4-129
• Glove box lamp . . . . . . . . . . . . . . . . . . . . . . . . . . . . . 4-129
• Vanity mirror lamp . . . . . . . . . . . . . . . . . . . . . . . . . . 4-130
Welcome system . . . . . . . . . . . . . . . . . . . . . . . . . . 4-131
• Puddle lamp . . . . . . . . . . . . . . . . . . . . . . . . . . . . . . . . 4-131
• Headlight . . . . . . . . . . . . . . . . . . . . . . . . . . . . . . . . . . 4-131
• Interior light. . . . . . . . . . . . . . . . . . . . . . . . . . . . . . . . 4-131
Defroster . . . . . . . . . . . . . . . . . . . . . . . . . . . . . . . . 4-132
Automatic climate control system. . . . . . . . . . . . 4-133
Windshield defrosting and defogging . . . . . . . . . 4-148
Storage compartments . . . . . . . . . . . . . . . . . . . . . 4-152
• Center console storage . . . . . . . . . . . . . . . . . . . . . . . 4-152
• Glove box . . . . . . . . . . . . . . . . . . . . . . . . . . . . . . . . . . 4-152
• Sunglass holder . . . . . . . . . . . . . . . . . . . . . . . . . . . . . 4-153
• Rear console storage . . . . . . . . . . . . . . . . . . . . . . . . . 4-154
• Cool and warm box . . . . . . . . . . . . . . . . . . . . . . . . . . 4-154
4
Page 93 of 479
Features of your vehicle
4 4
Record your key number
The key code number
is stamped on the
key code tag
attached to the key
set. Should you lose your keys, we
recommend that you contact an
authorized HYUNDAI dealer.
Remove the key code tag and store it
in a safe place. Also, record the key
code number and keep it in a safe
and handy place, but not in the vehi-
cle.
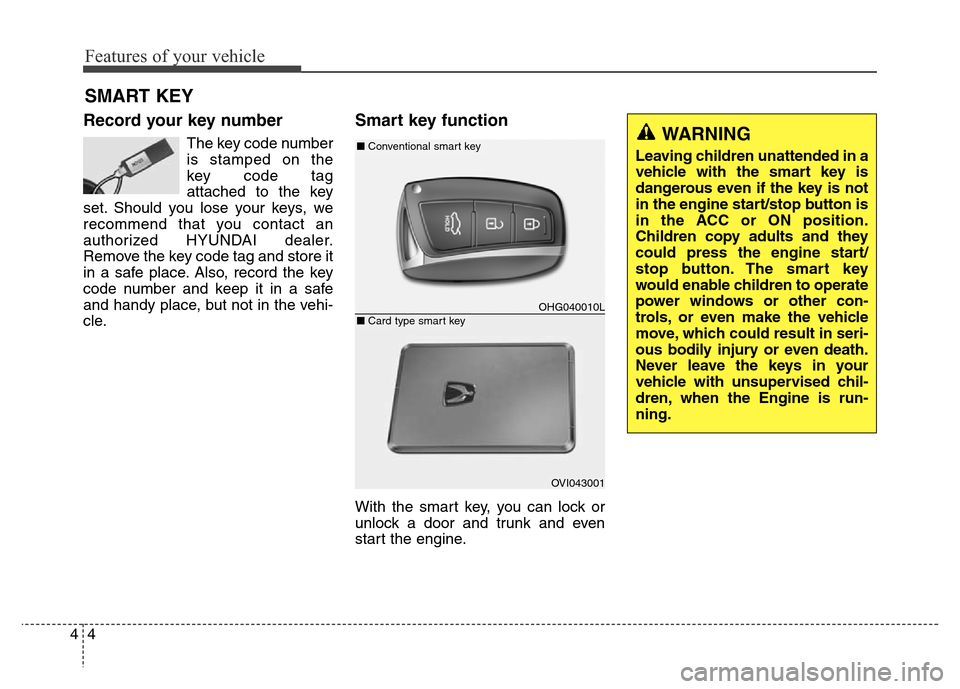
Smart key function
With the smart key, you can lock or
unlock a door and trunk and even
start the engine.
SMART KEY
OHG040010L
■Conventional smart key
OVI043001
■Card type smart key
WARNING
Leaving children unattended in a
vehicle with the smart key is
dangerous even if the key is not
in the engine start/stop button is
in the ACC or ON position.
Children copy adults and they
could press the engine start/
stop button. The smart key
would enable children to operate
power windows or other con-
trols, or even make the vehicle
move, which could result in seri-
ous bodily injury or even death.
Never leave the keys in your
vehicle with unsupervised chil-
dren, when the Engine is run-
ning.
Page 94 of 479
45
Features of your vehicle
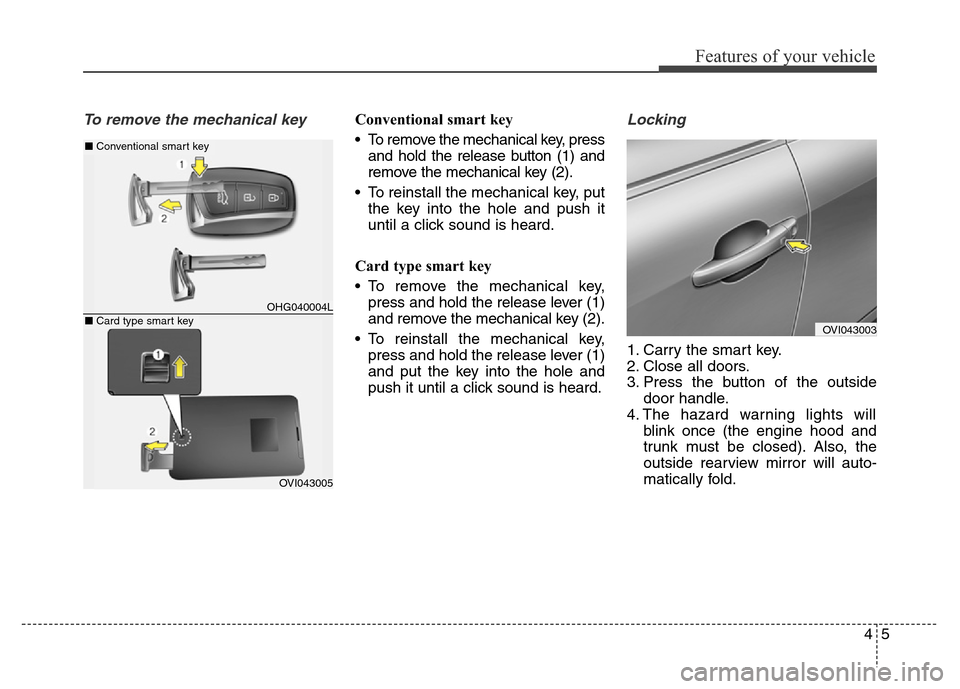
To remove the mechanical keyConventional smart key
• To remove the mechanical key, press
and hold the release button (1) and
remove the mechanical key (2).
• To reinstall the mechanical key, put
the key into the hole and push it
until a click sound is heard.
Card type smart key
• To remove the mechanical key,
press and hold the release lever (1)
and remove the mechanical key (2).
• To reinstall the mechanical key,
press and hold the release lever (1)
and put the key into the hole and
push it until a click sound is heard.Locking
1. Carry the smart key.
2. Close all doors.
3. Press the button of the outside
door handle.
4. The hazard warning lights will
blink once (the engine hood and
trunk must be closed). Also, the
outside rearview mirror will auto-
matically fold.
OHG040004L
■Conventional smart key
OVI043005
■Card type smart keyOVI043003
Page 95 of 479
Features of your vehicle
6 4
✽NOTICE
• The button will only operate when
the smart key is within 0.7 m (28
in.) from the outside door handle.
• Even though you press the outside
door handle button, the doors will
not lock and the chime will sound
for 3 seconds if any of following
occur:
- The smart key is in the vehicle.
- The engine start/stop button is
in ACC or ON position.
- Any door except the trunk is
opened.
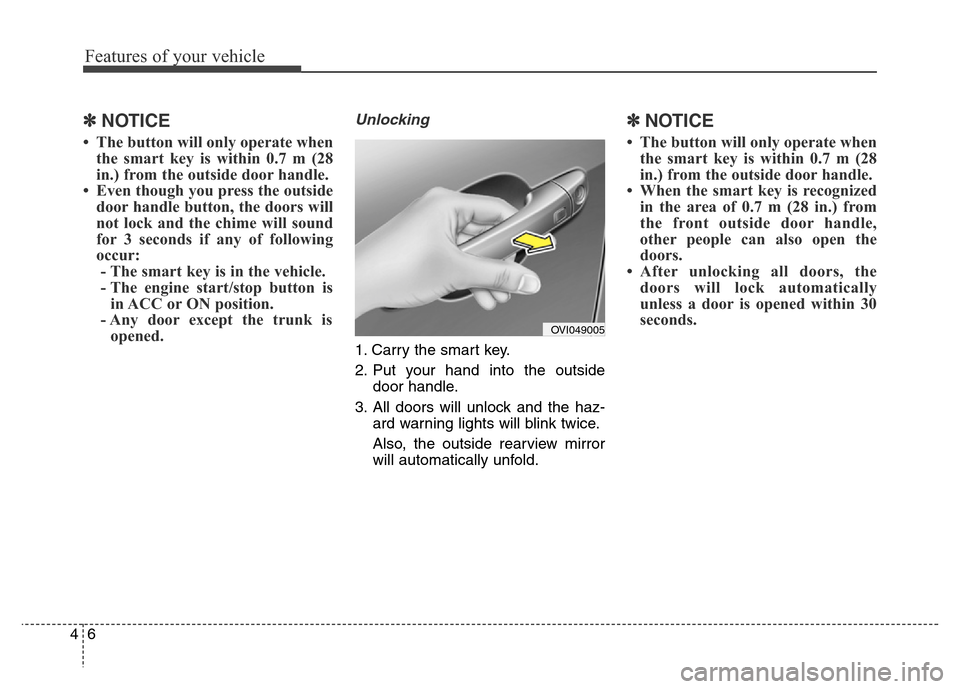
Unlocking
1. Carry the smart key.
2. Put your hand into the outside
door handle.
3. All doors will unlock and the haz-
ard warning lights will blink twice.
Also, the outside rearview mirror
will automatically unfold.
✽NOTICE
• The button will only operate when
the smart key is within 0.7 m (28
in.) from the outside door handle.
• When the smart key is recognized
in the area of 0.7 m (28 in.) from
the front outside door handle,
other people can also open the
doors.
• After unlocking all doors, the
doors will lock automatically
unless a door is opened within 30
seconds.
OVI049005
Page 96 of 479
47
Features of your vehicle
Trunk unlocking
Power trunk
1. Carry the smart key.
2. Press the trunk handle switch.
3. The trunk will unlock and open.
Non-powered trunk
1. Carry the smart key.
2. Press the trunk handle switch.
3. The trunk will unlock.
✽NOTICE
• Once the trunk is opened and then
closed, the trunk will lock auto-
matically.
• The button will only operate when
the smart key is within 0.7 m (28
in.) from the trunk handle.
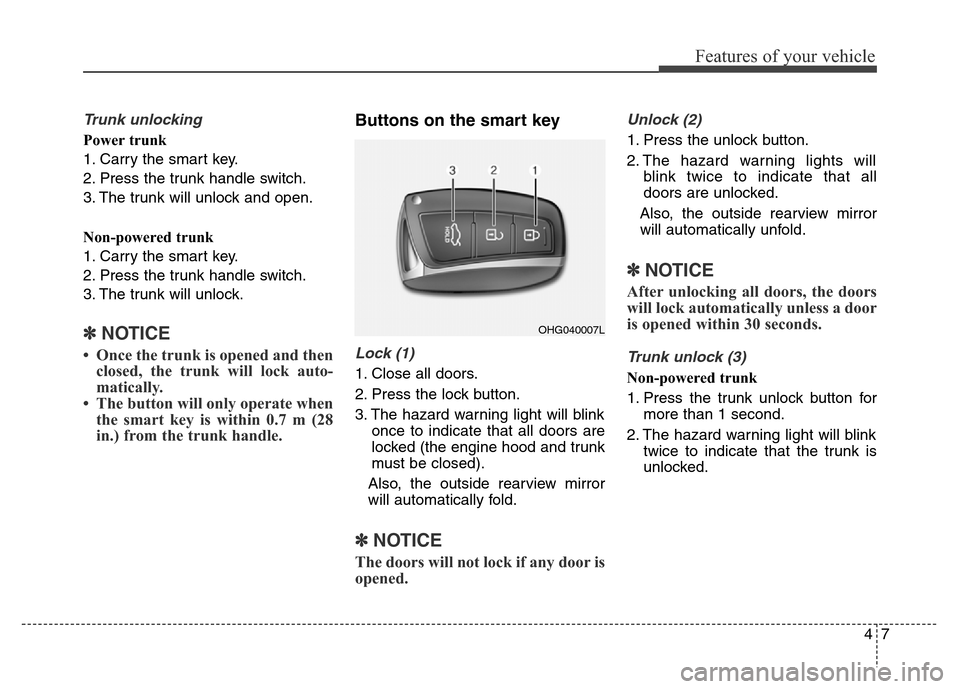
Buttons on the smart key
Lock (1)
1. Close all doors.
2. Press the lock button.
3. The hazard warning light will blink
once to indicate that all doors are
locked (the engine hood and trunk
must be closed).
Also, the outside rearview mirror
will automatically fold.
✽NOTICE
The doors will not lock if any door is
opened.
Unlock (2)
1. Press the unlock button.
2. The hazard warning lights will
blink twice to indicate that all
doors are unlocked.
Also, the outside rearview mirror
will automatically unfold.
✽NOTICE
After unlocking all doors, the doors
will lock automatically unless a door
is opened within 30 seconds.
Trunk unlock (3)
Non-powered trunk
1. Press the trunk unlock button for
more than 1 second.
2. The hazard warning light will blink
twice to indicate that the trunk is
unlocked.
OHG040007L