2014 Hyundai Elantra turn signal
[x] Cancel search: turn signalPage 18 of 668

INSTRUMENT PANEL OVERVIEW
OMD014002N
1. Instrument cluster ..............................4-51
2. Horn...................................................4-41
3. Driver’s front air bag ..........................3-47
4. Light control/Turn signals .........4-72, 4-75
5. Wiper/Washer ....................................4-81
6. Key ignition switch*/Engine start/stop button*..............5-5, 5-9
7. Cruise control switch* ........................5-43
8. Audio remote control* ......................4-121
9. Digital clock .....................................4-113
10. Audio controls* ...................4-135, 4-187
11. Hazard warning flasher switch ..........6-2
12. Climate control system ...........4-84, 4-94
13. Shift lever ...............................5-18, 5-22
14. Parking brake ..................................5-30
15. Passenger’s front air bag.................3-47
16. Glove box.......................................4-111
17. Seat warmer*...................................3-19
18. Cup holder .....................................4-115
* : if equipped
❈ The actual instrument panel in the vehicle may differ from the illustration.
25
Your vehicle at a glance
Page 70 of 668

Safety features of your vehicle
351
SRS warning light
The SRS (Supplement Restraint
System) air bag warning light on the
instrument panel displays the air bag
symbol depicted in the illustration. The
system checks the air bag electrical
system for malfunctions. The light indi-
cates that there is a potential problem
with your air bag system. During a moderate to severe frontal
collision, sensors will detect the vehi-
cle’s rapid deceleration. If the rate of
deceleration is high enough, the con-
trol unit will inflate the front air bags.
The front air bags help protect the
driver and front passenger by
responding to frontal impacts in
which seat belts alone cannot provide
adequate restraint.
Air bags are activated (able to
inflate if necessary) only when the
ignition switch is in the ON position.
Air bags inflate in the event of a severe frontal or side collision to
help protect the occupants from
serious physical injury.
There is no single speed at which the air bags will inflate. Generally,
air bags are designed to inflate
based upon the severity of a colli-
sion and its direction. These two
factors determine whether the sen-
sors produce an electronic deploy-
ment/inflation signal.
WARNING
If your SRS malfunctions, the
air bag may not inflate properly
during an accident increasing
the risk of serious injury or
death.
If any of the following condi-
tions occur, your SRS is mal-
functioning:
The light does not turn on for
approximately six seconds
when the ignition switch is
placed in the ON position.
The light stays on after illumi-
nating for approximately six
seconds.
The light comes on while the
vehicle is in motion.
The light blinks when the
engine is running.
Have an authorized HYUNDAI
dealer inspect the SRS as soon
as possible if any of these con-
ditions occur.
Page 130 of 668

Features of your vehicle
44
4
The auto-dimming function can be
controlled by pressing the ON/OFF
button:
1. Pressing the OFF button (7) turns
the auto-dimming function off
which is indicated by the green
Status Indicator LED turning off.
2. Pressing the ON button (6) again turns the auto-dimming function
on which is indicated by the green
Status Indicator LED turning on.
The mirror defaults to the ON posi-
tion each time the vehicle is started. Integrated HomeLink®Wireless
Control System
The HomeLink
®Wireless Control
System can replace up to three
hand-held radio-frequency (RF)
transmitters with a single built-in
device. This innovative feature will
learn the radio frequency codes of
most current transmitters to operate
devices such as gate operators,
garage door openers, entry door
locks, security systems, even home
lighting. Both standard and rolling
code-equipped transmitters can be
programmed by following the out-
lined procedures.
Additional HomeLink
®information
can be found at: www.homelink.com
or by calling 1-800-355-3515.
Retain the original transmitter of the
RF device you are programming for
use in other vehicles as well as for
future HomeLink
®programming. It is
also suggested that upon the sale of
the vehicle, the programmed
HomeLink
®buttons be erased for
security purposes.
WARNING
Before programming
HomeLink®to a garage door
opener or gate operator, make
sure people and objects are out
of the way of the device to pre-
vent potential harm or damage.
Do not use the HomeLink
®with
any garage door opener that
lacks the safety stop and
reverse features required by
U.S. federal safety standards
(this includes any garage door
opener model manufactured
before April 1, 1982). A garage
door that cannot detect an
object - signaling the door to
stop and reverse - does not
meet current U.S. federal safety
standards. Using a garage door
opener without these features
increases the risk of serious
injury or death.
Page 131 of 668

445
Features of your vehicle
Programming HomeLink®
Please note the following:
When programming a garage dooropener, it is advised to park the
vehicle outside of the garage.
It is recommended that a new bat- tery be placed in the hand-held
transmitter of the device being pro-
grammed to HomeLink
®for quicker
training and accurate transmission
of the radio-frequency signal.
Some vehicles may require the ignition switch to be placed in the
ACC (or "Accessories") position for
programming and/or operation of
HomeLink
®.
In the event that there are still pro- gramming difficulties or questions
after following the programming
steps listed below, contact
HomeLink
®at: www.homelink.com
or by calling 1-800-355-3515.
Rolling code programming
Rolling code devices which are
"code-protected" and manufactured
after 1996 may be determined by the
following:
Reference the device owner's manual for verification.
The handheld transmitter appears to program the HomeLink
®
Universal Transceiver but does not
activate the device.
Press and hold the trained HomeLink button. The device has
the rolling code feature if the indi-
cator light flashes rapidly and then
turns solid after 2 seconds. To train rolling code devices, follow
these instructions:
1. At the garage door opener receiv-
er (motor-head unit) in the garage,
locate the "learn" or "smart" but-
ton. This can usually be found
where the hanging antenna wire is
attached to the motor-head unit.
Exact location and color of the but-
ton may vary by garage door
opener brand. If there is difficulty
locating the training button, refer-
ence the device owner's manual or
please visit our Web site at
www.homelink.com.
2. Firmly press and release the "learn" or "smart" button (which
activates the "training light"). You
will have 30 seconds to initiate
step 3.
3. Return to the vehicle and firmly press, hold for two seconds and
then release the desired
HomeLink
®button. Repeat the
"press/hold/release" sequence a
second time to complete the pro-
gramming. (Some devices may
require you to repeat this
sequence a third time to complete
the programming.)
Page 155 of 668

469
Features of your vehicle
This indicator light illuminates for 2
seconds and goes off:
When the vehicle can not detect the
smart key which is in the vehicle
while the Engine Start/Stop Button is
ON.
In this case, have your vehicle
inspected by an authorized
HYUNDAI dealer.This indicator light blinks:
When the battery of the smart key
is weak.
- At this time, you can not start theengine. However, you can start
the engine if you press the Engine
Start/Stop Button with the smart
key. (For more details, refer to
“Starting the Engine” in section 5).
When there is a malfunction with the immobilizer system.
In this case, have your vehicle
inspected by an authorized
HYUNDAI dealer.Turn Signal Indicator
Light
This indicator light blinks:
When you turn the turn signal light
on.
If any of the following occurs, there
may be a malfunction with the turn
signal system. In this case, have your
vehicle inspected by an authorized
HYUNDAI dealer.
- The indicator light does not blinkbut illuminates.
- The indicator light blinks more rapidly.
- The indicator light does not illumi- nate at all.
Page 156 of 668

Features of your vehicle
70
4
High Beam Indicator
Light
This indicator light illuminates:
When the headlights are on and in the high beam position
When the turn signal lever is pulled into the Flash-to-Pass position.
Light ON Indicator Light
This indicator light illuminates:
When the parking lights or head-
lights are on.
Front Fog Indicator
Light (if equipped)
This indicator light illuminates:
When the front fog lights are on.
Cruise Indicator Light (if equipped)
This indicator light illuminates:
When the cruise control system is enabled.
For more details, refer to “Cruise
Control System” in chapter 5.
Cruise SET Indicator Light (if equipped)
This indicator light illuminates:
When the cruise control speed is set.
For more details, refer to “Cruise
Control System” in chapter 5.
CRUISE
SET
Page 161 of 668

475
Features of your vehicle
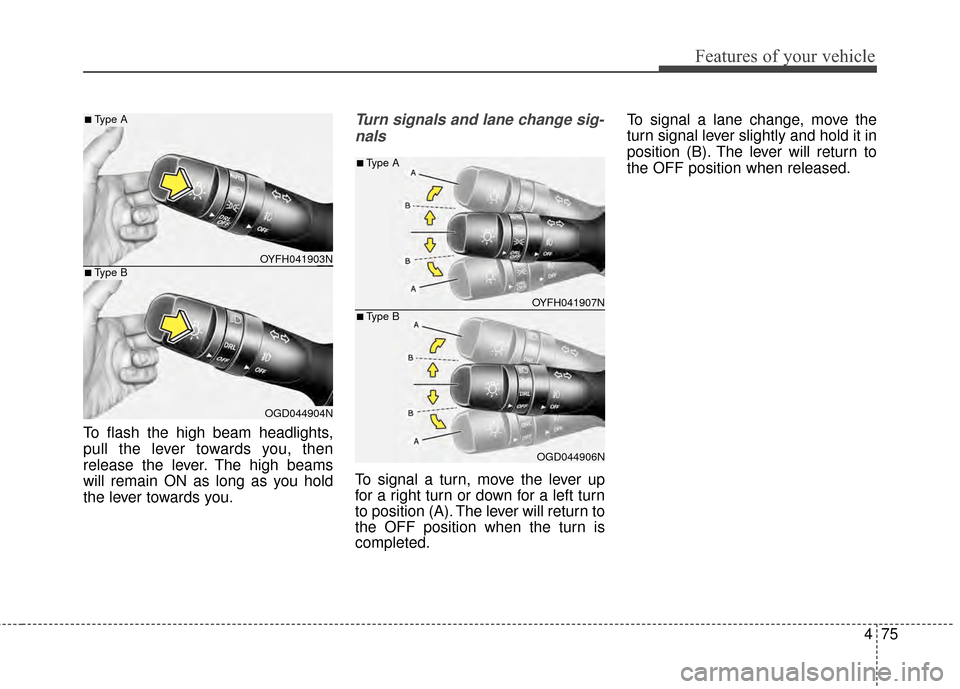
To flash the high beam headlights,
pull the lever towards you, then
release the lever. The high beams
will remain ON as long as you hold
the lever towards you.
Turn signals and lane change sig-nals
To signal a turn, move the lever up
for a right turn or down for a left turn
to position (A). The lever will return to
the OFF position when the turn is
completed. To signal a lane change, move the
turn signal lever slightly and hold it in
position (B). The lever will return to
the OFF position when released.
OYFH041903N
OGD044904N
■Type A
■Type B
OYFH041907N
OGD044906N
■Type A
■Type B
Page 162 of 668

Features of your vehicle
76
4
One-touch lane change function
To activate an one-touch lane
change function, move the turn sig-
nal lever slightly and then release it.
The lane change signals will blink 3
times.
✽ ✽
NOTICE
If the turn signal indicator stays on
and does not flash, or if it flashes
abnormally, a bulb may be burned
out or have a poor electrical connec-
tion in the circuit. The bulb may
require replacement.
Front fog light (if equipped)
Fog lights are used to provide
improved visibility when visibility is
poor due to fog, rain or snow, etc. Use
the switch next to the headlight switch
to turn the fog lights ON and OFF. The
fog lights will turn on when fog light
switch (1) is turned to ON after the
parking lights are turned on.
To turn off the fog lights, turn the
switch to the OFF position. You can use the fog lights only when
the headlights are on low beam.
When the headlight switch is in the
AUTO position, you can also use the
fog lights when the headlights turn
on automatically. The fog lights will
go OFF when the headlights turn
OFF.
CAUTION
When in operation, the fog
lights consume large amountsof vehicle electrical power. Onlyuse the fog lights when visibilityis poor.OYFH041905N
OGD044905N
■Type A
■Type B