Page 132 of 476
447
Features of your vehicle
CAUTION
If you press the steering mode
button while operating the
steering wheel, the LCD dis-
play will change, but the steer-
ing effort will not change
immediately. After operating
the steering wheel, the steer-
ing effort will change automat-
ically to the selected mode.
Be careful when changing the
steering mode while driving.
If there is a malfunction of the
electric power steering, the
FLEX STEER will not function.
Page 156 of 476

471
Features of your vehicle
Parking brake & brake
fluid warning light
Parking brake warning
This light is illuminated when the
parking brake is applied with the igni-
tion switch in the START or ON posi-
tion. The warning light should go off
when the parking brake is released.
Low brake fluid level warning
If the warning light remains on, it may
indicate that the brake fluid level in
the reservoir is low.
If the warning light remains on:
1. Drive carefully to the nearest safe
location and stop your vehicle.
2. With the engine stopped, check the
brake fluid level immediately and
add fluid as required. Then check all
brake components for fluid leaks.
3. Do not drive the vehicle if leaks are
found, the warning light remains on
or the brakes do not operate prop-
erly. Have the vehicle towed to any
authorized HYUNDAI dealer for a
brake system inspection and nec-
essary repairs.Your vehicle is equipped with a dual-
diagonal braking system. This means
you still have braking on two wheels
even if one of the brake circuits is
damaged or malfunctions. With only
one of the circuits working, more
than normal pedal travel and greater
pedal pressure are required to stop
the car. Also, the car will not stop in
as short a distance with only a por-
tion of the brake system working. If
the brakes fail while you are driving,
shift to a lower gear for additional
engine braking and stop the car as
soon as it is safe to do so.
To check bulb operation, check
whether the parking brake and brake
fluid warning light illuminates when the
ignition switch is in the ON position.
CAUTION
If the oil pressure warning light
stays on while the engine is run-
ning, serious engine damage may
result. The oil pressure warning
light comes on whenever there is
insufficient oil pressure. In nor-
mal operation, it should come on
when the ignition switch is turned
on, then go out when the engine
is started. If the oil pressure warn-
ing light stays on while the
engine is running, there is a seri-
ous malfunction.
If this happens, stop the car as
soon as it is safe to do so, turn
off the engine and check the oil
level. If the oil level is low, fill the
engine oil to the proper level
and start the engine again. If the
light stays on with the engine
running, turn the engine off
immediately. In any instance
where the oil light stays on
when the engine is running, the
engine should be checked by an
authorized HYUNDAI dealer
before the car is driven again.
WARNING
Driving the vehicle with a warn-
ing light on is dangerous. If the
brake warning light remains on,
have the brakes checked and
repaired immediately by an
authorized HYUNDAI dealer.
Page 161 of 476

Features of your vehicle
76 4
ESC OFF indicator
The ESC OFF indicator will illumi-
nate when the ignition switch is
turned ON, but should go off after
approximately 3 seconds. To switch
to the ESC OFF mode, press the
ESC OFF button. The ESC OFF indi-
cator will illuminate indicating the
ESC is deactivated.
Cruise indicator (if equipped)
CRUISE indicator
The indicator light illuminates when
the cruise control system is enabled.
The cruise control indicator in the
instrument cluster is illuminated
when the cruise control ON-OFF but-
ton on the steering wheel is pushed.
The indicator turns off when the
cruise control ON-OFF button is
pushed again. For more information
about the use of cruise control, refer
to “Cruise control system or Smart
cruise control system” in section 5.Cruise SET indicator
The indicator light illuminates when
the cruise function switch (SET- or
RES+) is ON.
The cruise SET indicator light in the
instrument cluster is illuminated
when the cruise control switch (SET-
or RES+) is pushed. The cruise SET
indicator does not illuminate when
the cruise control switch (CANCEL)
is pushed or the system is disen-
gaged.
CRUISE
SET
Page 166 of 476
481
Features of your vehicle
Check brake switch fuse
When the brake switch fuse is dis-
connected, the warning illuminates
for 10 seconds on the LCD display.
Replace the fuse with a new one. If
that is not possible you can start the
engine by pressing the engine
start/stop button for 10 seconds in
ACC.Low washer fluid (if equipped)
This indicator illuminates when the
washer fluid reservoir is nearly
empty. If you press the TRIP button
while the indicator is illuminated, the
LCD display mode is changed to the
trip mode for 4 seconds and then will
return to the low washer fluid mode.
Refill the washer fluid as soon as
possible.
Turn on fuse switch (mode switch)
The notice appears to inform the
driver to turn on the transportation
fuse switch in the instrument panel
under the steering wheel.
For more details, refer to “Fuses” in
section 7.
OGDE041205OGDE041207OGD042092N
Page 185 of 476
Features of your vehicle
100 4
MAX A/C-Level (B, D)
(if equipped)
To operate the MAX A/C, turn the fan
speed control knob to the right then
press the MAX A/C button. Air flow is
directed toward the upper body and
face.
In this mode, the air conditioning, the
recirculated air position and max
cool temperature will be selected
automatically.Instrument panel vents
The outlet vents can be opened or
closed separately using the thumb-
wheel.
Also, you can adjust the direction of
air delivered from these vents using
the vent control lever as shown.
Temperature control
The temperature control knob allows
you to control the temperature of the
air flowing from the ventilation sys-
tem. To change the air temperature
inside the vehicle, turn the knob to
the right for warm air or left for cool-
er air.
OGD041112OGD041116OGD041113
Page 194 of 476
4109
Features of your vehicle
Defrost-Level
Most of the air flow is directed to the
windshield with a small amount of air
directed to the side window
defrosters.Instrument panel vents
The outlet vents can be opened or
closed separately using the thumb-
wheel.
Also, you can adjust the direction of
air delivered from these vents using
the vent control lever as shown.Temperature control
The temperature will increase by
pushing the up button. Each push of
the button will cause the temperature
to increase by 1°F/0.5°C.
The temperature will decrease by
pushing the down button. Each push
of the button will cause the tempera-
ture to decrease by 1°F/0.5°C. When
set to the lowest temperature setting,
the air conditioning will operate con-
tinuously.
OGDE042122LOGD041113OGD041123
■Driver’s side■Passenger’s side
Page 216 of 476

4131
Features of your vehicle
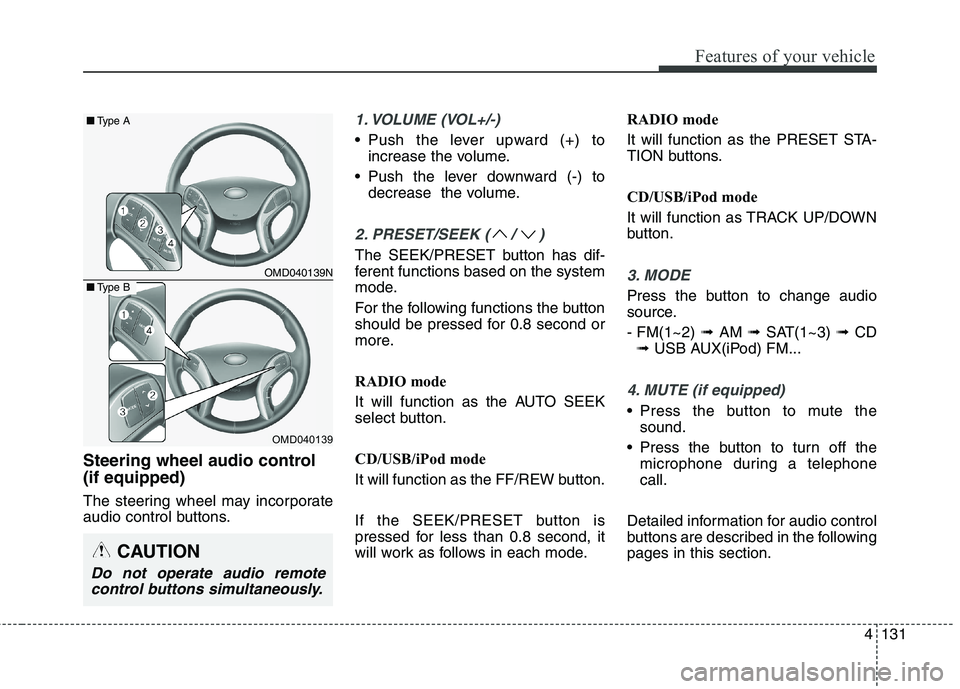
Steering wheel audio control
(if equipped)
The steering wheel may incorporate
audio control buttons.
1. VOLUME (VOL+/-)
• Push the lever upward (+) to
increase the volume.
Push the lever downward (-) to
decrease the volume.
2. PRESET/SEEK ( / )
The SEEK/PRESET button has dif-
ferent functions based on the system
mode.
For the following functions the button
should be pressed for 0.8 second or
more.
RADIO mode
It will function as the AUTO SEEK
select button.
CD/USB/iPod mode
It will function as the FF/REW button.
If the SEEK/PRESET button is
pressed for less than 0.8 second, it
will work as follows in each mode.RADIO mode
It will function as the PRESET STA-
TION buttons.
CD/USB/iPod mode
It will function as TRACK UP/DOWN
button.
3. MODE
Press the button to change audio
source.
- FM(1~2) ➟ AM ➟ SAT(1~3) ➟ CD
➟ USB AUX(iPod) FM...
4. MUTE (if equipped)
Press the button to mute the
sound.
Press the button to turn off the
microphone during a telephone
call.
Detailed information for audio control
buttons are described in the following
pages in this section.
OMD040139N
OMD040139
■Type A
■Type B
CAUTION
Do not operate audio remote
control buttons simultaneously.
Page 256 of 476

4171
Features of your vehicle
PHONE (IF EQUIPPED)
Before using the Bluetooth®Wireless
Technology enabled phone features
In order to use
Bluetooth®Wireless
Technology phone, you must first
pair and connect the
Bluetooth®
Wireless Technology mobile phone.
If the mobile phone is not paired or
connected, it is not possible to
enter Phone mode. Once a phone
is paired or connected, the guid-
ance screen will be displayed.
If Priority is set upon vehicle igni-
tion (IGN/ACC ON), the
Bluetooth®
Wireless Technology enabled
phone will be automatically con-
nected. Even if you are outside, the
Bluetooth®Wireless Technology
enabled phone will be automatical-
ly connected once you are in the
vicinity of the vehicle. If you do not
want automatic
Bluetooth®Wireless
Technology enabled phone con-
nection, set the
Bluetooth®Wireless
Technology power to OFF.
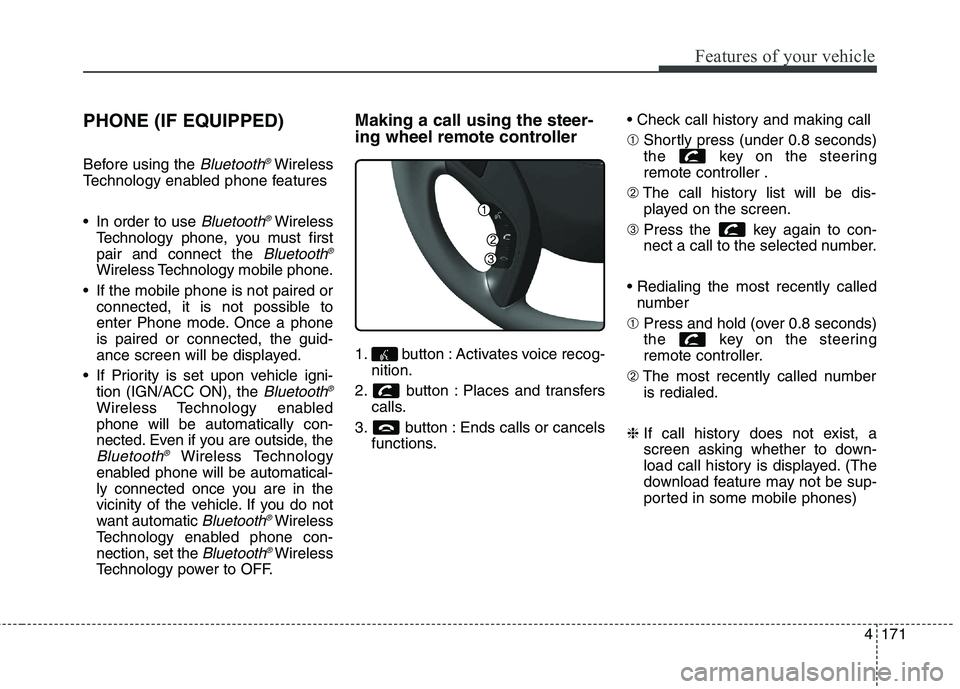
Making a call using the steer-
ing wheel remote controller
1. button : Activates voice recog-
nition.
2. button : Places and transfers
calls.
3. button : Ends calls or cancels
functions.
➀Shortly press (under 0.8 seconds)
the key on the steering
remote controller .
➁The call history list will be dis-
played on the screen.
➂Press the key again to con-
nect a call to the selected number.
number
➀Press and hold (over 0.8 seconds)
the key on the steering
remote controller.
➁The most recently called number
is redialed.
❈If call history does not exist, a
screen asking whether to down-
load call history is displayed. (The
download feature may not be sup-
ported in some mobile phones)