Page 146 of 488
145
uu Adjusting the Seats u Adjusting the Seat Positions
Controls
The driver’s and front passenger’s seats have active head restraints. In a rear impact,
an occupant properly secured by a seat belt will be pushed against the seat-back and
the head restraint will move forward. This reduces the distance between the
restraint and the occupant’s head, which helps reduce the likelihood of whiplash
and injuries to the neck and upper spine.
■Active Head Restraints1 Active Head Restraints
In order for the active head restraints to operate
properly:
•Do not hang any items on the head restraints, or
from the restraint legs.
•Do not place any objects between an occupant and
the seat-back.
•Install each restraint in its proper location.
After a collision, th e activated restraint should return
to its normal position. If the restraint does not return
to its normal position, or in the event of a severe
collision, have the vehicl e inspected by a dealer.
Page 147 of 488

146
uu Adjusting the Seats u Rear Seats
Controls
Rear Seats
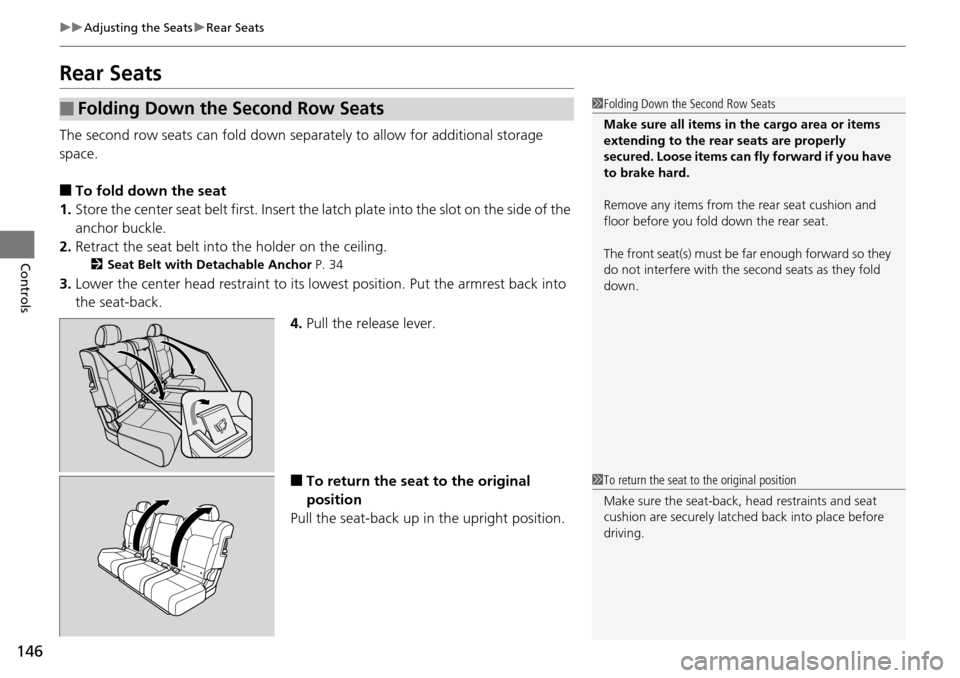
The second row seats can fold down separa tely to allow for additional storage
space.
■To fold down the seat
1. Store the
center seat belt first. Insert the latch plate into the slot on the side of the
anchor buckle.
2. Re
tract the seat belt into the holder on the ceiling.
2 Seat Belt with Detachable Anchor P. 34
3. Lower the center head restraint to its lo west position. Put the armrest back into
the seat-back.
4.Pull t
he release lever.
■To return the seat to the original
position
Pull the seat-back up in
the upright position.
■Folding Down the Second Row Seats1Folding Down the Second Row Seats
Make sure all items in the cargo area or items
extending to the rear seats are properly
secured. Loose items can fly forward if you have
to brake hard.
Remove any items from th e rear seat cushion and
floor before you fold down the rear seat.
The front seat(s) must be far enough forward so they
do not interfere with the second seats as they fold
down.
1 To return the seat to the original position
Make sure the seat-back, head restraints and seat
cushion are securely latche d back into place before
driving.
Page 148 of 488

Continued147
uu Adjusting the Seats u Rear Seats
Controls
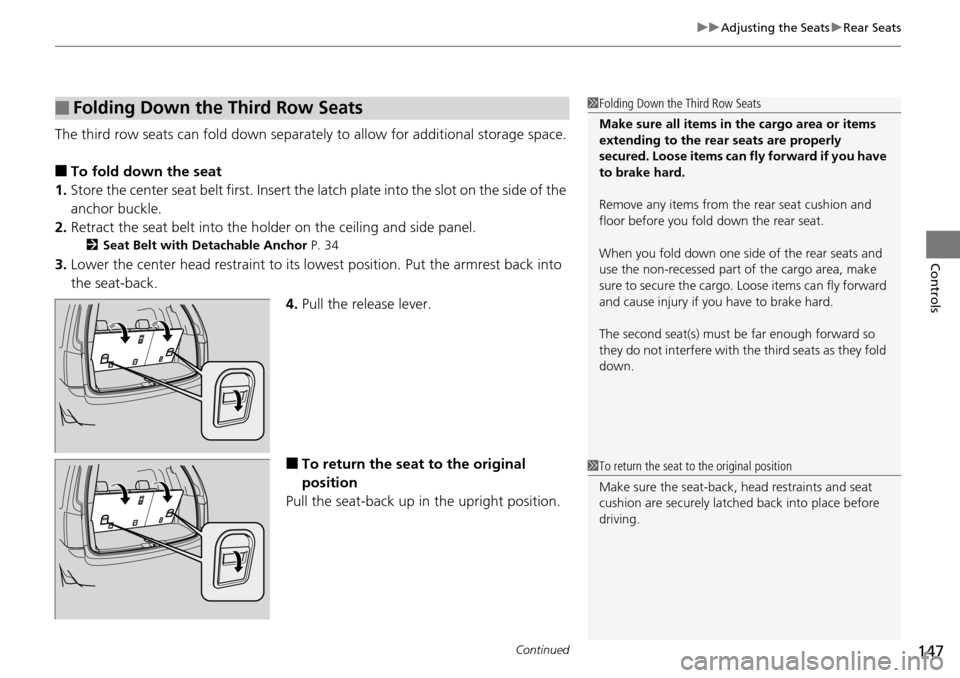
The third row seats can fold down separately to allow for additional storage space.
■To fold down the seat
1. Store the center seat belt
first. Insert the latch plate into the slot on the side of the
anchor buckle.
2. Retract the seat
belt into the holder on the ceiling and side panel.
2Seat Belt with Detachable Anchor P. 34
3. Lower the center head restraint to its lo west position. Put the armrest back into
the seat-back.
4.Pull
the release lever.
■To return the seat to the original
position
Pull the seat-back up in the upright position.
■Folding Down the Third Row Seats1 Folding Down the Third Row Seats
Make sure all items in the cargo area or items
extending to the rear seats are properly
secured. Loose items can fly forward if you have
to brake hard.
Remove any items from th e rear seat cushion and
floor before you fold down the rear seat.
When you fold down one side of the rear seats and
use the non-recessed part of the cargo area, make
sure to secure the cargo. Loose items can fly forward
and cause injury if you have to brake hard.
The second seat(s) must be far enough forward so
they do not interfere with the third seats as they fold
down.
1 To return the seat to the original position
Make sure the seat-back, head restraints and seat
cushion are securely latche d back into place before
driving.
Page 160 of 488
Continued159
uu Interior Lights/Interior Convenience Items u Interior Convenience Items
Controls
There are coat hooks near the third row seats.
Use the cargo net to store small and light
items.
■Coat Hooks1Coat Hooks
The coat hooks are not desi gned for large or heavy
items.
■Cargo Net *1Cargo Net *
NOTICE
To prevent damage, do not place more than 22 lbs
(10 kg) on this cargo net.
Make sure to use the cargo net securely hooked.
3 WARNING
Do not use this cargo net if the third row
seats are folded down.
Objects placed on the cargo net could be
thrown forward during a crash or sudden
stop and hurt someone.
* Not available on all models
Page 161 of 488
uu Interior Lights/Interior Convenience Items u Interior Convenience Items
160
Controls
Use the floor cargo hooks to secure luggage in
the cargo area.
There is a hook on the side of the cargo area.
■Cargo Hooks1 Cargo Hooks
NOTICE
Do not hang a large object or an object. Hanging
heavy or large objects may damage the hooks.
Hooks
■Grocery Hook
Hook
Page 276 of 488
275
uu General Information on the Audio System u Compatible iPod ® and USB Flash Drives
Features
Compatible iPod ® and USB Flash Drives
• Use a recommended USB flash drive of 256 MB or higher.
• Some digi
tal audio players may not be compatible.
• Some U
SB flash drives (e.g., a device with security lockout) may not work.
• Some software files may not allo
w for audio play or text data display.
• Some versio
ns of MP3, WMA, or AAC formats may be unsupported.
■iPod® Model Compatibility
Model
iPod classic ® 80GB/160GB
iPod classic ® 120GB
iPod classic ® 160GB (launch in 2009)
iPod ® (5th generation)
iPod nano ®
iPod touch ®
■USB Flash Drives
1iPod ® Model Compatibility
This system may not work with all software versions
of these devices.
1 USB Flash Drives
Files on the USB flash drive are played in their stored
order. This order may be different from the order
displayed on your PC or device.
Page 277 of 488

276
Features
HomeLink® Universal Transceiver *
The HomeLink ® Universal Transceiver can be pr ogrammed to operate up to three
remote controlled devices around your home , such as garage doors, lighting, or
home security systems.
Refer to the safety information that comes wi th you
r garage door opener to test that
the safety features are functioning properly. If you do not have the safety
information, contac t the manufacturer.
Before programming HomeLink, make sure th at
people and objects are out of the
way of the garage or gate to prevent potential injury or damage.
When programming a garage door opener, park
just outside the garage door’s
path.
Training HomeLink
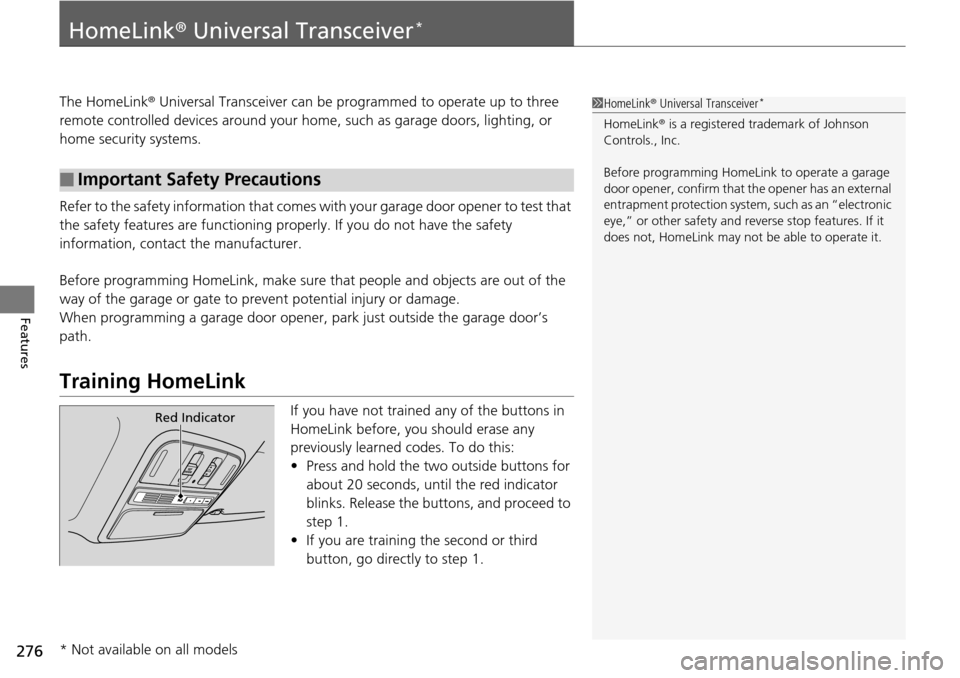
If you have not trained any of the buttons in
HomeLink before, you should erase any
previously learned codes. To do this:
• Press and
hold the two outside buttons for
about 20 seconds, until the red indicator
blinks. Release the bu ttons, and proceed to
step 1.
• If y
ou are training the second or third
button, go directly to step 1.
■Important Safety Precautions
1HomeLink ® Universal Transceiver *
HomeLink® is a registered tra demark of Johnson
Controls., Inc.
Before programming HomeLi nk to operate a garage
door opener, confirm that the opener has an external
entrapment protection system, such as an “electronic
eye,” or other safety and reverse stop features. If it
does not, HomeLink may not be able to operate it.
Red Indicator
* Not available on all models
Page 283 of 488
282
uu Bluetooth ® HandsFreeLink ® u HFL Menus
Features
Edit Speed DialStore Speed Dial
Delete Speed Dial
Store Voice Tag
Delete Voice Tag
Select a number from the Call
History, phonebook, or manual
entry to store as a speed dial
number.
Delete a previously stored speed dial
number.
Create a voice tag for a speed dial
number.
Delete a voice tag for a speed dial
number.
Security Code
Create a security code number for a paired phone.
Auto Answer
Auto Transfer
Set incoming calls to be automatically answered.
Set calls to automatically transfer from your phone
to HFL when you enter the vehicle.
System Clear
Clear the system of all paired phones, phonebook
entries, speed dials, and security codes.