Page 226 of 488
225
uu Audio System Basic Operation u Playing the XM ® Radio
Features
1. Press the button.
2. Press the AUDIO button, move to select AUDIO ME
NU.
3. Rota
te to select Mo de. Press .
4. Rota
te to select CH (channel mode) or CAT (category mode). Press .
5. Select
a channel using the TUNE (), SKIP , CATEGO RY, SCAN, or Preset
buttons.
1.Press the AUD
IO button, move to select
AUDIO MENU .
2. Ro
tate to select Ch annel List. Then
press .
3. Ro
tate to select a channel, then press
.
■To Play the XM ® Radio
■To Select a Channel from a List
1 Playing the XM ® Radio
In the channel mode, all available channels are
selectable. In the categor y mode, you can select a
channel within a ca tegory (Jazz, Rock, Classical, etc.).
You can store 12 XM ® stations in the preset buttons.
XM1 and XM2 let you store 6 stations each.
There may be instances when XM ® Radio does not
broadcast all the data fields (artist name, title). This
does not indicate a problem with your audio system.
Page 254 of 488

253
uu Rear Entertainment System * u Operating the System
Continued
Features
■System Controls and Menus for DVD
(Power) Button
Press to turn on the system.
DVD Button
Press to watch a DVD.
(Light) Button
Press to illuminate the buttons and bars for a few seconds.
SKIP Buttons
Press or to change chapters.
(Play/Pause) Button
Press to pause or play a DVD.
TITLE/SCROLL Button
Press to display the
status of the DVD
that is currently
playing.
MENU Button
The following options appear when you
play a DVD and press the
MENU button:
Top Menu
Menu
Play Mode Audio Subtitle
Angle
Search Title
Chapter
Repeat SETUP Button
The following options appear when you play a DVD and
press the
SETUP button:
Disp Adjust
( P. 259) Brightness
Contrast
Black Level
Color
CANCEL Button
Press to go back to the
previous display or operation. 3
, 4 , , and ENT Buttons
Use 3 , 4, , or to highlight a
menu item, and press the ENT Button
to make a selection.
Tint
Normal WideZoom
Full
Aspect Ratio
( P.
259)
PERSONAL SURROUND ( P. 259)
Language ( P. 259)
Rewind Button
Press and hold to reverse to chapters.
Fast-forward Button
Press and hold to fast forward to chapters.
NumInput
Page 258 of 488
257
uu Rear Entertainment System * u Operating the System
Continued
Features
■MENU button on the remote
Press the ME
NU button while the DVD is
playing to see the avai lable options. Use the
and buttons to highlight the option and
then press the ENT bu
tton.
Top Menu:
The top page of the DVD’s title menu appears.
The title menu also appears when
you press the MENU button while the DVD is in the slot not playing. Press the
CANCEL or MENU button to return.
Menu:
The DVD’s title menu appears.
Play Mode:
You can change the following three settings:
Audio - Select a language for audio that is available on the DVD. The sound
charac
teristics (Dolby Digita l, LPCM, MPEG Audio, etc) of that audio is also
displayed.
Subtitle - Select a subtitle that is available on the DVD.
Angle - Select a view angle that is availabl e on the
DVD. If the DVD currently playing
does not carry multiple angles, only one option Angle 1 comes on. Press the
CANCEL or MENU button to return.
Page 259 of 488
258
uu Rear Entertainment System * u Operating the System
Features
Search:
You can search for a DVD segm ent from the following methods.
Title Search - Select the title you want to play.
Chapter Search - Select the chapter you want to play.
NumInput:
Enter a two digit number, if issued to the DV D, to find
the segment you want to start
to play.
1. Select Nu
mInput to go to the number input screen.
2. Use the 3, 4 , , and buttons to input numbers.
u If y
ou want to delete a number, select DEL.
3. The cursor automatically goes
to ENT after you input two digits. Press the ENT
button to enter.
Repeat:
Highlight this option and press the ENT
button to change the repeat mode from
chapter repeat and title repeat, to repeat off.
Page 260 of 488

Continued259
uu Rear Entertainment System * u Operating the System
Features
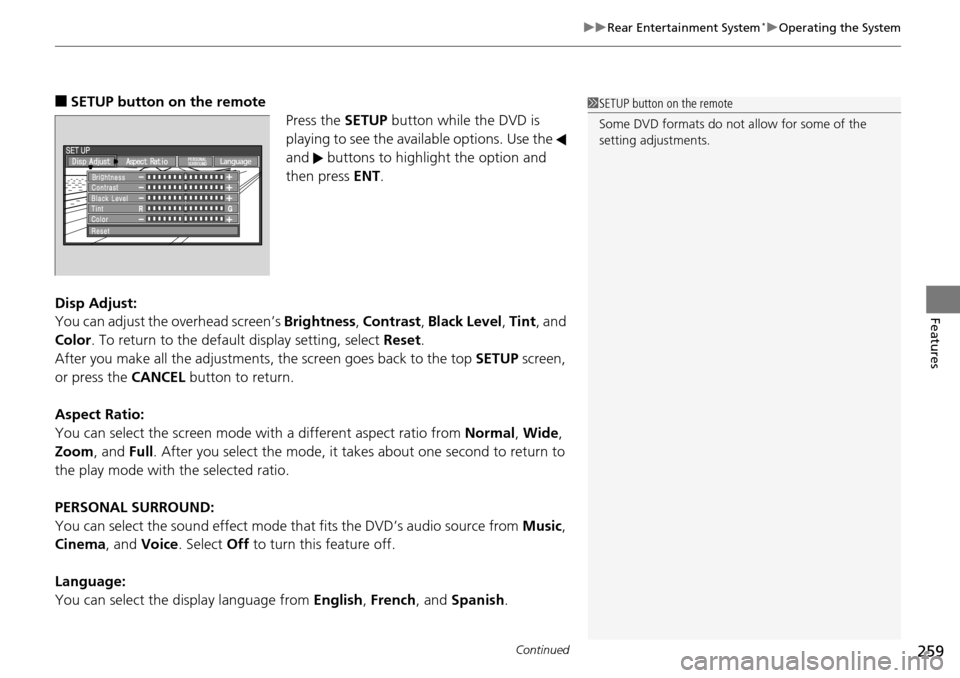
■SETUP button on the remote
Press the SE
TUP button while the DVD is
playing to see the avai lable options. Use the
and buttons to highlight the option and
then press ENT.
Disp Adjust:
You can adjust the overhe
ad screen’s Brightness , Contrast , Black Level , Tint , and
Color . To return to the default display setting, select Reset.
After you make all the adjustments, the screen goes back to the top SET
UP screen,
or press the CANCEL button to return.
Aspect Ratio:
You can select the screen mode wi th
a different aspect ratio from Normal, Wide ,
Zoom , and Full. After you select the mode, it t akes about one second to return to
the play mode with the selected ratio.
PERSONAL SURROUND:
You can select the sound effect mode th at
fits the DVD’s audio source from Music,
Cinema , and Voice . Select Off to turn this feature off.
Language:
You can select the display language from En
glish, French , and Spanish .
1SETUP button on the remote
Some DVD formats do not allow for some of the
setting adjustments.
Page 262 of 488

261
uu Rear Entertainment System * u Operating the System
Continued
Features
■System Controls and Menus for Audio
(Power) Button
Press to turn on the system.
AUX Button
Press to use a USB, iPod, auxiliary video (rear), or auxiliary audio (front). (Light) Button
Press to illuminate the buttons and bars for a few seconds.
SKIP Buttons
2 Audio System Basic Operation P. 175, 216
(Play/Pause) Button
Press to pause a playing CD.
SCROLL Button
Press to switch search mode on XM radio, and scroll titles on CD.
CANCEL Button
Press to go back to the previous
display or operation.
3
,4 , , and ENT Buttons
Use 3, 4 , , or to highlight a
menu item, and press the ENT Button
to make a selection.
CD/CDL Button *
Press to listen to a CD or CD library.
AM/FM Button
Press to listen to
AM or FM radio.
SETUP Button
2 SETUP button on the remote P. 259
XM Button
Press to listen
to XM radio.
MENU Button
Press to display audio menu for AM/FM radio, XM radio, or CD on the overhead screen.CD/HDD Button
*
Press to listen to a CD or hard disc drive.
Rewind Button
Press and hold to reverse the track.Fast-forward Button
Press and hold to fast-forward the track.
* Not available on all models
Page 277 of 488

276
Features
HomeLink® Universal Transceiver *
The HomeLink ® Universal Transceiver can be pr ogrammed to operate up to three
remote controlled devices around your home , such as garage doors, lighting, or
home security systems.
Refer to the safety information that comes wi th you
r garage door opener to test that
the safety features are functioning properly. If you do not have the safety
information, contac t the manufacturer.
Before programming HomeLink, make sure th at
people and objects are out of the
way of the garage or gate to prevent potential injury or damage.
When programming a garage door opener, park
just outside the garage door’s
path.
Training HomeLink
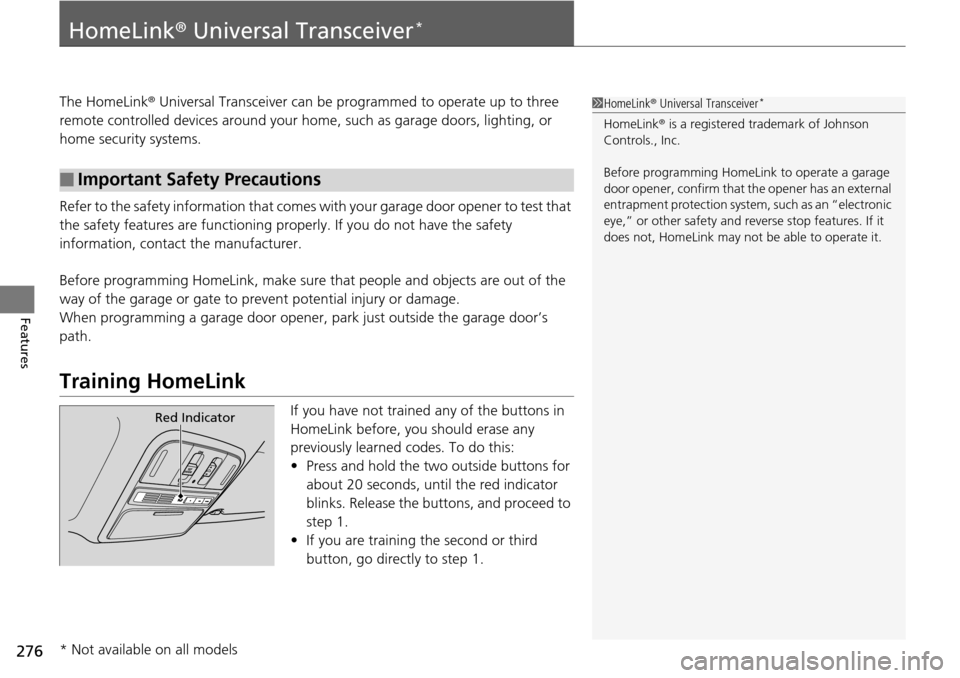
If you have not trained any of the buttons in
HomeLink before, you should erase any
previously learned codes. To do this:
• Press and
hold the two outside buttons for
about 20 seconds, until the red indicator
blinks. Release the bu ttons, and proceed to
step 1.
• If y
ou are training the second or third
button, go directly to step 1.
■Important Safety Precautions
1HomeLink ® Universal Transceiver *
HomeLink® is a registered tra demark of Johnson
Controls., Inc.
Before programming HomeLi nk to operate a garage
door opener, confirm that the opener has an external
entrapment protection system, such as an “electronic
eye,” or other safety and reverse stop features. If it
does not, HomeLink may not be able to operate it.
Red Indicator
* Not available on all models
Page 278 of 488

277
uu HomeLink ® Universal Transceiver * u Training HomeLink
Features
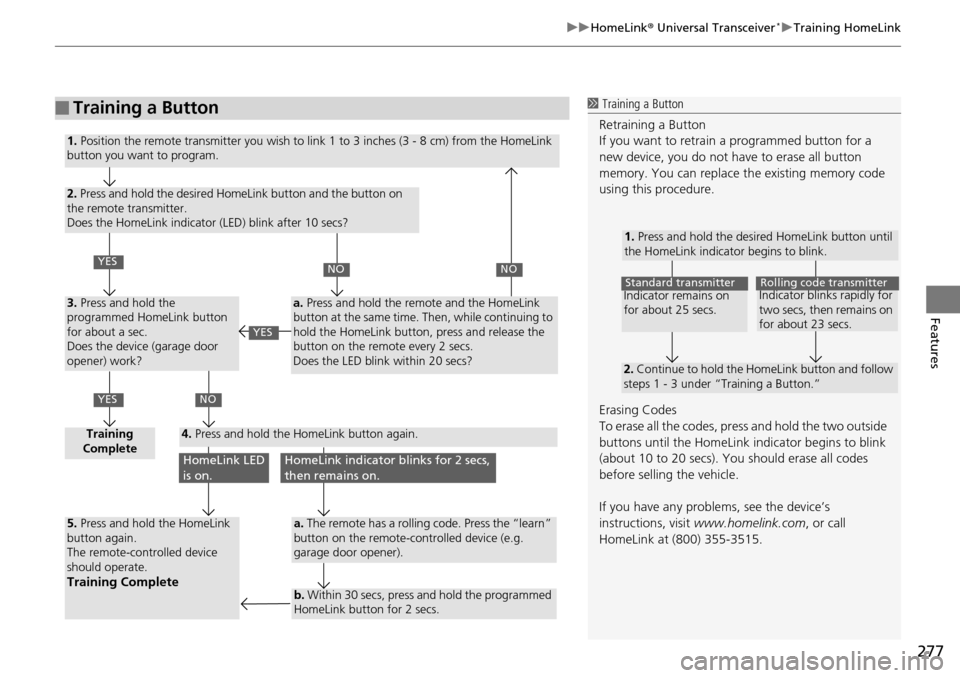
■Training a Button1 Training a Button
Retraining a Button
If you want to retrain a programmed button for a
new device, you do not ha ve to erase all button
memory. You can replace the existing memory code
using this procedure.
Erasing Codes
To erase all the codes, press and hold the two outside
buttons until the HomeLink i ndicator begins to blink
(about 10 to 20 secs). You should erase all codes
before selling the vehicle.
If you have any problems, see the device’s
instructions, visit www.homelink.com , or call
HomeLink at (800) 355-3515.
1. Press and hold the desired HomeLink button until
the HomeLink indicator begins to blink.
2. Continue to hold the HomeLink button and follow
steps 1 - 3 under “Training a Button.”
Indicator remains on
for about 25 secs.Standard transmitterIndicator blinks rapidly for
two secs, then remains on
for about 23 secs.Rolling code transmitter
1. Position the remote transmitter you wish to link 1 to 3 inches (3 - 8 cm) from the HomeLink
button you want to program.
2. Press and hold the desired HomeLink button and the button on
the remote transmitter.
Does the HomeLink indicator (LED) blink after 10 secs?
3. Press and hold the
programmed HomeLink button
for about a sec.
Does the device (garage door
opener) work?
Training
Complete4. Press and hold the HomeLink button again.
5. Press and hold the HomeLink
button again.
The remote-controlled device
should operate.
Training Complete
a. Press and hold the remote and the HomeLink
button at the same time. Then, while continuing to
hold the HomeLink button, press and release the
button on the remote every 2 secs.
Does the LED blink within 20 secs?
a. The remote has a rolling code. Press the “learn”
button on the remote-controlled device (e.g.
garage door opener).
b. Within 30 secs, press and hold the programmed
HomeLink button for 2 secs.
YES
YES
NONO
NO
HomeLink LED
is on.HomeLink indicator blinks for 2 secs,
then remains on.
YES