2014 HONDA PILOT transmission
[x] Cancel search: transmissionPage 342 of 488

341
uu Off-Highway Driving Guidelines u Avoiding Trouble
Driving
Avoiding Trouble
• Check Out Your Vehicle before you leave the pavement and make sure that all
scheduled maintenance has been completed. Pay special attention to the
condition of the tires, and check the tire pressures.
• Remember the route
you choose presents limits (too steep or bumpy), you have
limits (driving skill and comfort), and your vehicle has limits (traction, stability, and
power). Failing to recognize these limits will likely put you and your passengers in
a hazardous situation.
• Ac
celerating and Braking should be done slowly and gradually. Trying to start
or stop too fast can cause a loss of traction and you could lose control.
• Av
oiding Obstacles and Debris in the road reduces the likelihood of a rollover
or damage to your suspension or other components.
• Dri
ving on Slopes increasing your risk of a rollove r, particularly if you attempt to
drive across a slope that is too steep. Going straight or down a slope is usually the
safest. If you can’t clearly see all conditions or obstacles on a slope, walk it before
you drive it. If there is any doubt whether you can safely pass, don’t try it. Find
another route. If you get stuck when climbing, do not try to turn around. Back
down slowly following the same route you took up the hill.
• Cros
sing a Stream - Avoid driving through deep water. If you encounter water
in your route (a small stream or large pu ddle, for example), evaluate it carefully
before going ahead. Make sure it is shallow, flowing slowly, and has firm ground
underneath. If you are not sure of the depth or the ground, turn around and find
another route. Driving through deep water can also damage your vehicle. The
water can get into the transmission and di fferential, diluting the lubricant and
causing an eventual failure. It can also wash the grease out of the wheel bearings.
• If Yo
u Get Stuck , carefully go in the direction that you think will get you
unstuck. Do not spin the tires as this will only make things worse and could
damage the transmission. If you are unable to free yourself, your vehicle will need
to be towed. Front and rear tow ho oks are provided for this purpose.
Page 345 of 488

344
uu When Driving u Precautions While Driving
Driving
Precautions While Driving
Utility vehicles have a significantly higher rollover rate than other types of vehicles.
To prevent rollovers or loss of control:
• Take corne
rs at slower speeds than yo u would with a passenger vehicle.
• Av
oid sharp turns and abrupt maneuvers whenever possible.
•Do
not modify your vehicle in any way that you would raise the center of gravity.
•Never
carry more than 165 lbs (75 kg ) of cargo on the roof rack (Honda
accessory).
Avoid driving in deep water and on flooded roads. This can damage the engine,
driv
eline, or cause electrical component failure.
If there is a strong impact with something u
nder the vehicle, stop in a safe location.
Check the underside of the vehicle for damage or any fluid leaks.
■Driving Guidelines for Your Utility Vehicle
■In Rain
■Other Precautions
1 Driving Guidelines for Your Utility Vehicle
Failure to operate your vehi cle correctly might result
in a crash or a rollover. 2 Important Handling Information P. 26
2 Precautions While Driving P. 344
1Precautions While Driving
NOTICE
Do not operate the shift lever while pressing the
accelerator pedal. You could damage the
transmission.
If the ignition switch is turned to ACCESSORY
(
q
or
LOCK (
0
while driving, the e ngine will shut down
and all steering and brake pow er assist functions will
stop, making it difficult to control the vehicle.
Do not put the shift lever in
(
N
, as you will lose
engine braking (and acce leration) performance.
During the first 600 miles (1,000 km) of operation,
avoid sudden acceleration or full throttle operation so
as not to damage the engine or powertrain.
Avoid hard braking for the first 200 miles (300 km).
You should also follow this when the brake pads are
replaced.
Page 346 of 488

345
uu When Driving u Automatic Transmission
Driving
Automatic Transmission
The following conditions cause the engine to run at high revolutions, and increase
creeping:
• Immediately after the engine
starts.
• When t
he climate control system is in use.
Keep the brake pedal firmly depressed when stopped.
Quickly depressing the accelerator peda l
while driving uphill may cause the
transmission to drop to a lower gear, unex pectedly increasing vehicle speed. Depress
the accelerator pedal carefully, especi ally on slippery roads and curves.
■Creeping
■Kickdown
Page 347 of 488

346
uu When Driving u Shifting
Driving
Shifting
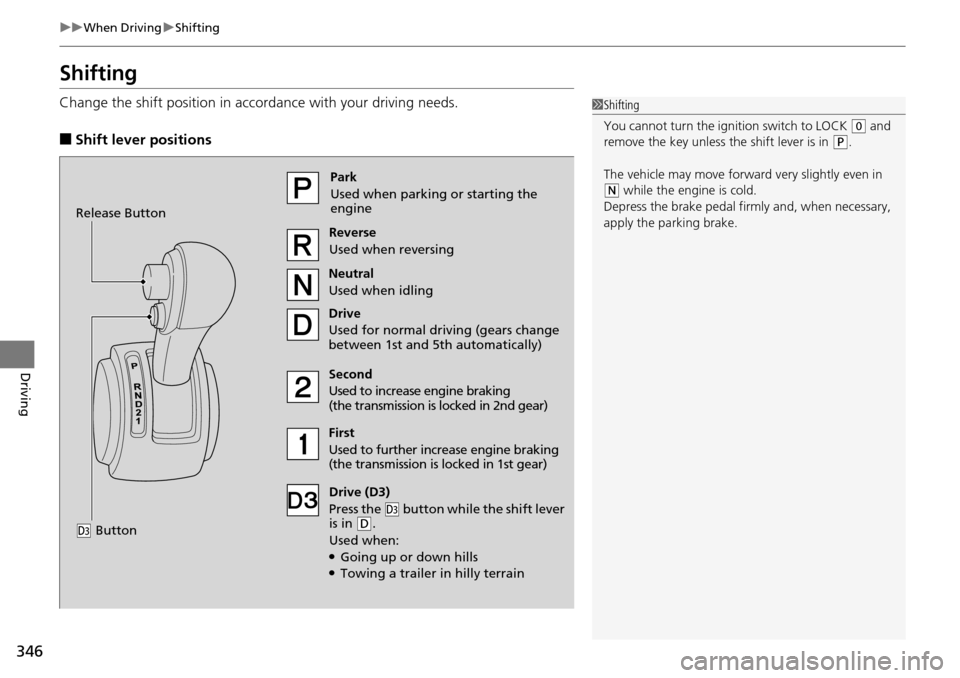
Change the shift positi on in accordance with your driving needs.
■Shift lever positions
1Shifting
You cannot turn the ignition switch to LOCK
(
0
and
remove the key unless the shift lever is in
(
P
.
The vehicle may move forward very slightly even in
(
N
while the engine is cold.
Depress the brake pe dal firmly and, when necessary,
apply the parking brake.Park
Used when parking or starting the
engine
Reverse
Used when reversing
Neutral
Used when idling
Drive
Used for normal driving (gears change
between 1st and 5th automatically)
Drive (D3)
Press the
(
d
button while the shift lever
is in (
D
.
Used when:
●Going up or down hills●Towing a trailer in hilly terrain
Second
Used to increase engine braking
(the transmission is locked in 2nd gear)
First
Used to further increase engine braking
(the transmission is locked in 1st gear)
Release Button
(
d
Button
Page 348 of 488

347
uu When Driving u Shifting
Driving
■Shift Lever Operation1Shift Lever Operation
NOTICE
When you change the shift lever from (
D
to (
R
and
vice versa, come to a complete stop and keep the
brake pedal depressed.
Operating the shift lever be fore the vehicle has come
to a complete standstill can damage the transmission.
Use the shift lever position indicator to check the
lever position befo re pulling away.
Whichever position the shift lever is in when driving,
a blinking D indicator indicates a transmission
problem.
Avoid sudden acceleration and have the transmission
checked by a dealer as soon as possible.
The fuel supply may be cut of f if you drive at engine
speeds in or over the tac hometer's red zone (engine
speed limit). If this happe ns, you may experience a
slight jolt.
It may not be possible to operate the shift lever if the
brake pedal is applied while the shift lever release
button is held down.
Depress the brake pedal first.
Tachometer's red zone
Shift Lever Position Indicator
Depress the brake pedal and press
the shift lever release button to shift.
Shift without pressing the shift lever
release button.
Press the shift lever release button
and shift.
Page 355 of 488

354
uu When Driving u VTM (Variable Torque Management)-4 r System *
Driving
VTM (Variable Torque Management)-4 r System *
Senses a traction loss caused by a road condition change, and automatically
transfers some power to the rear wheels.
Use the VTM-4 r
LOCK to increase more to rque to the rear wheels.
1. Stop
your vehicle with the engine running.
2.Move the shift lever to
(1
, (2
, or (R
.
3. Press the VTM-4r LOCK button.
u The
indicator in the button comes on.
Any of the following disengages the VTM-4 r LOCK
:
• Pressing the VTM-4r LOCK button again
.
• Moving the
shift lever to (D
or (d
.
• Turning the ignition switch
to the LOCK (0
position.
■To Engage the VTM-4 r LOCK
■To Disengage the VTM-4 r LOCK
1 VTM (Variable Torque Management)-4 r System *
NOTICE
Do not continuously spin the front tires of your
vehicle. Continuously spinning the front tires can
cause transmission or re ar differential damage.
1To Engage the VTM-4 r LOCK
Do not use the VTM-4r LOCK button on dry, paved
roads. Driving on dry, paved roads with VTM-4 r
LOCK on may damage the r ear differential when
making a turn. Strange noise and vibration can also
result.
The VTM-4 r LOCK can be used to help free your
vehicle from being stuck in mud, sand, or gravel.
When the lock is engaged, apply light pressure to the
accelerator pedal.
When more torque is applied, the rear tires are not
likely to spin. This is normal.
If you are not able to fr ee the vehicle, stop and
reverse direction.
As soon as this featur e is no longer needed,
disengage the VTM-4 r LOCK.
1 To Disengage the VTM-4 r LOCK
The VTM-4 r LOCK temporarily disengages when the
vehicle speed exceeds 18 mph (30 km/h). The
indicator in the button remains on.
* Not available on all models
Page 365 of 488

364
Driving
Parking Your Vehicle
When Stopped
1.Depress the brake pedal firmly with the shift lever in (D
.
2. Firmly apply the parking
brake.
3. Move the shift lever from
(D
to (P
.
4. Turn
off the engine.
Always set the parking brake firmly, in part icular
if you are parked on an incline.
1Parking Your Vehicle
Do not park your vehicle near flammable objects,
such as dry grass, oil, or timber.
Heat from the exhaust can cause a fire.
1 When Stopped
NOTICE
The following can dama ge the transmission:
•Depressing the accelerator and brake pedals
simultaneously.
•Holding the vehicle in place when facing uphill by
depressing the accelerator pedal.
•Moving the shift lever into (
P
before the vehicle
stops completely.
Raise the wiper arms when snow is expected.
Page 378 of 488

377
Maintenance
This chapter discusses basic maintenance.
Before Performing MaintenanceInspection and Maintenance ............ 378
Safety When Performing Maintenance..... 379Parts and Fluids Used in Maintenance Service ........................................... 380
Maintenance Minder™ ...............
..... 381
Maintenance Under the Hood
Maintenance Items Under the Hood ..... 389Opening the Hood ........................... 390
Recommended Engine Oil ................ 392
Oil Check ......................................... 393
Adding Engine Oil ............................ 394
Changing the Engine Oil and Oil Filter ..... 395
Engine Coolant ................................ 397
Transmission Fluid ............................ 399
Brake Fluid ....................................... 400
Power Steering Fluid ........................ 400
Refilling Window Wa s
her Fluid......... 401
Replacing Light Bulbs .... ................... 402Checking and Maintaining Wiper Blades.... 410Checking and Maintaining Tires
Checking Tires ................................. 414
Tire and Loading Information Label ...... 415Tire Labeling .................................... 415DOT Tire Quality Grading (U.S. Vehicles)....... 417Wear Indicators................................ 419 Tire Service Life ................................ 419
Tire and Wheel Replacement ........... 420
Tire Rotation .................................... 421
Winter Tires ..................................... 422
Battery .............
.................................. 423
Remote Transmitter Care
Replacing the Button Battery ........... 424
Remote Control and Wireless Headphone Care
*...........................425Climate Control System Maintenance..... 427Cleaning
Interior Care .................................... 428
Exterior Care.................................... 430
* Not available on all models