Page 28 of 327

27
Interface Settings
Clock Adjustment
System Setup
Clock AdjustmentHSETTINGS button
System Settings
Clock
Set the automatic adjustment of the system clock for daylight saving and
international time zones.
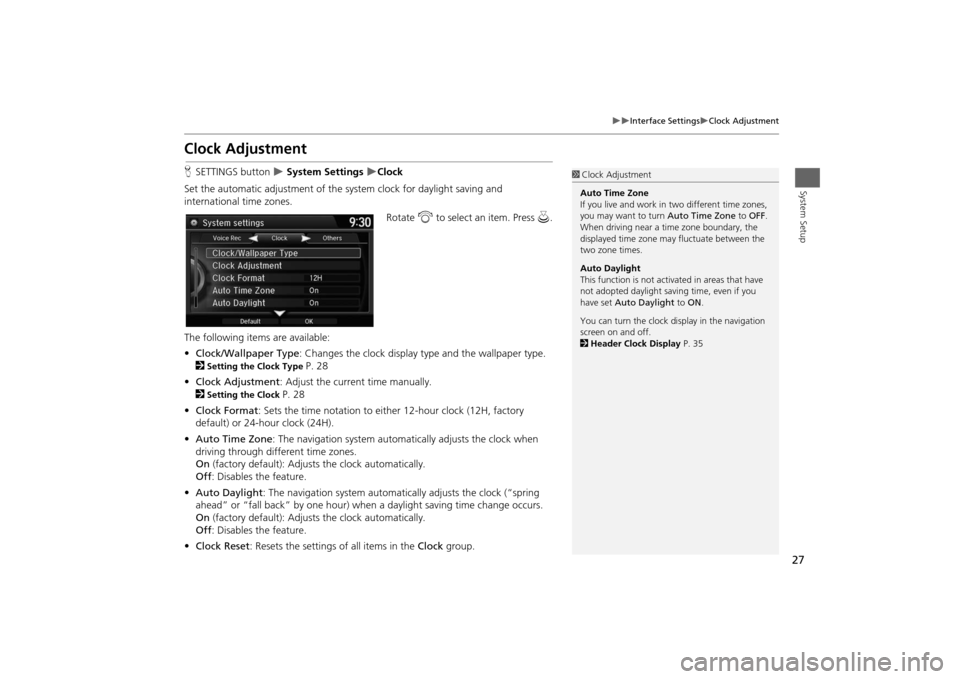
Rotate i to select an item. Press u.
The following items are available:
•Clock/Wallpaper Type: Changes the clock display type and the wallpaper type.
2
Setting the Clock Type
P. 28
•Clock Adjustment: Adjust the current time manually.
2
Setting the Clock
P. 28
•Clock Format: Sets the time notation to either 12-hour clock (12H, factory
default) or 24-hour clock (24H).
•Auto Time Zone: The navigation system automatically adjusts the clock when
driving through different time zones.
On (factory default): Adjusts the clock automatically.
Off: Disables the feature.
•Auto Daylight: The navigation system automatically adjusts the clock (“spring
ahead” or “fall back” by one hour) when a daylight saving time change occurs.
On (factory default): Adjusts the clock automatically.
Off: Disables the feature.
•Clock Reset: Resets the settings of all items in the Clock group.
1Clock Adjustment
Auto Time Zone
If you live and work in two different time zones,
you may want to turn Auto Time Zone to OFF.
When driving near a time zone boundary, the
displayed time zone may fluctuate between the
two zone times.
Auto Daylight
This function is not activated in areas that have
not adopted daylight saving time, even if you
have set Auto Daylight to ON.
You can turn the clock display in the navigation
screen on and off.
2Header Clock Display P. 35
Page 29 of 327
28
Interface Settings
Clock Adjustment
System Setup
HSETTINGS button System Settings Clock Clock/Wallpaper Type
Clock
1.Rotate i to select an option to
change the design. Press u.
2.Move r to select OK. Press u.
HSETTINGS button
System Settings
Clock
Clock Adjustment
1.Rotate i to select an item. Press
u.
2.Rotate i to select a minute. Press
u.
■Setting the Clock Type■Setting the Clock
Page 30 of 327

29
Interface Settings
Wallpaper Settings
System Setup
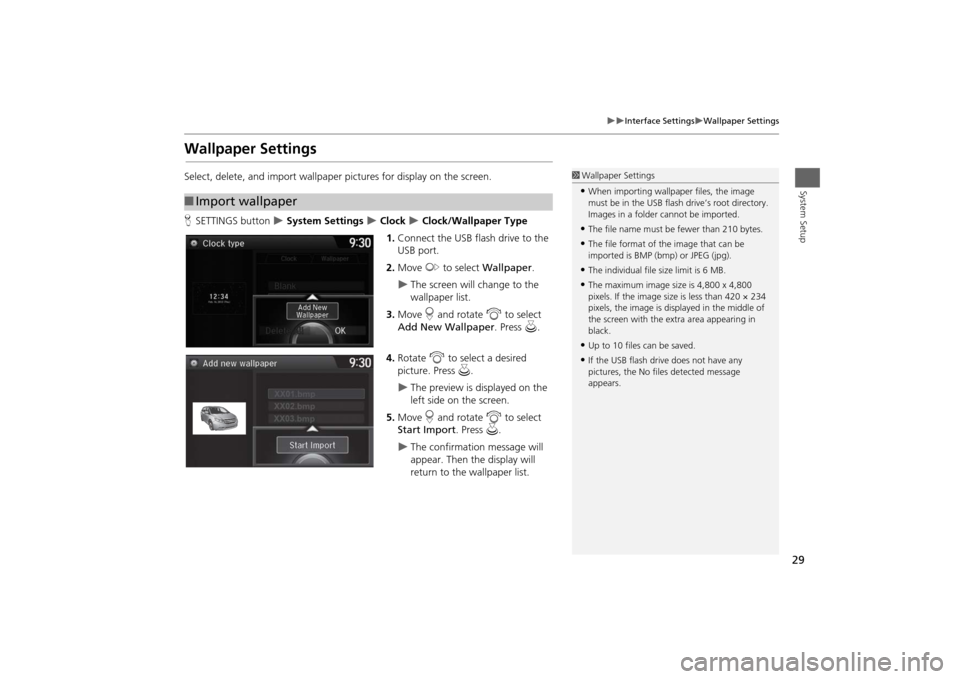
Wallpaper SettingsSelect, delete, and import wallpaper pictures for display on the screen.
HSETTINGS button
System Settings
Clock
Clock/Wallpaper Type
1.Connect the USB flash drive to the
USB port.
2.Move y to select Wallpaper.
The screen will change to the
wallpaper list.
3.Move r and rotate i to select
Add New Wallpaper. Press u.
4.Rotate i to select a desired
picture. Press u.
The preview is displayed on the
left side on the screen.
5.Move r and rotate i to select
Start Import. Press u.
The confirmation message will
appear. Then the display will
return to the wallpaper list.
■Import wallpaper
1Wallpaper Settings•When importing wallpaper files, the image
must be in the USB flash drive’s root directory.
Images in a folder cannot be imported.•The file name must be fewer than 210 bytes.•The file format of the image that can be
imported is BMP (bmp) or JPEG (jpg).•The individual file size limit is 6 MB.•The maximum image size is 4,800 x 4,800
pixels. If the image size is less than 420 × 234
pixels, the image is displayed in the middle of
the screen with the extra area appearing in
black.•Up to 10 files can be saved.•If the USB flash drive does not have any
pictures, the No files detected message
appears.
Page 31 of 327
30
Interface Settings
Wallpaper Settings
System Setup
HSETTINGS button
System Settings
Clock
Clock/Wallpaper Type
Wallpaper
1.Rotate i to select a desired
wallpaper. Press u.
The preview is displayed on the
left side on the screen.
The pop-up menu appears on
the screen.
2.Rotate i to select Set. Press u.
The display will return to the
wallpaper list.
■Select wallpaper
1Select wallpaper
From the pop-up menu, rotate to select Preview
and press to see a preview at full-size screen.
To go back to the previous screen, press to select
OK, or press the BACK button.
When the file size is large, it takes a while to be
previewed.
Page 32 of 327
31
Interface Settings
Wallpaper Settings
System Setup
HSETTINGS button
System Settings
Clock
Clock/Wallpaper Type
Wallpaper
1.Rotate i to select a previously
imported wallpaper that you want
to delete. Press u.
The preview is displayed on the
left side on the screen.
The pop-up menu appears on
the screen.
2.Rotate i to select Delete. Press
u.
The confirmation message will
appear.
3.Rotate i to select Yes. Press u.
The display will return to the
wallpaper list.
■Delete wallpaper
1Delete wallpaper
You cannot delete the factory default images.
Page 36 of 327
35
Interface Settings
Header Clock Display
System Setup
Header Clock DisplayHSETTINGS button
System Settings
Others
Header Clock Display
Selects whether the clock display comes on.
Rotate i to select an option. Press
u.
The following options are available:
•On (factory default): The system displays the clock in the navigation screen.
•Off: Disables the feature.
Page 72 of 327

71
Map
Color
System Setup
Illumination
controlPriority Operationa button
1
Selects Day, Night, or Off display mode. This button has
the highest priority and overrides all other display control
adjustments listed below.
Remember: Once you press this button, you assume full
manual control of the display mode until the power mode
is set to VEHICLE OFF (LOCK).
Sunlight sensor
(see your
Owner’s Manual
for location)2 If the sunlight sensor detects daylight and the headlights
are turned on, the system automatically overrides the
Night display and displays the Day display mode.
Remember: If desired, use the a button to override
this automatic choice.
Dash illumination
adjustment
buttons (see your
Owner’s Manual
for location)
3
When headlights are turned on, and you wish to have the
Day display mode, adjust the illumination to the full
brightness setting (beeps).
Remember: Adjust the dash brightness back to mid-range
to allow auto switching by sensing the headlights are on or
off.
Headlights
(Auto/On/Off)4 When turned on, the display changes to Night display
mode. The previous three controls listed above can
“cancel” this function.
Remember: Use the a button, or adjust the dash
illumination to full brightness, to set the display to your
desired choice.
Screen color
choice
N/A
The user can select the color of the screen that will be
displayed for the Day and Night display modes described
above.
Remember: For best contrast, ensure that the map color is
white for Day and black for Night.
Page 81 of 327

80
Map
Correct Vehicle Position
System Setup
Correct Vehicle PositionHSETTINGS button
Navi Settings
Map
Correct Vehicle Position
Manually adjust the current position of the vehicle as displayed on the map screen if
the position appears to be incorrect.
1.Put the vehicle in Park.
2.Rotate i to select Correct
Vehicle Position. Press u.
3.Scroll the map to position the
cursor over at your correct position.
Press u.
4.Rotate i to position the
arrowhead in the correct direction
the vehicle is facing.
5.Press u to select OK.
1Correct Vehicle Position
An apparent position error can occur where
buildings, tunnels, and other objects block or
reflect the GPS signals, forcing the system to use
“dead reckoning” to determine your location
and direction.
Using this function to adjust vehicle position is
not recommended. When the system reacquires
a GPS signal, it will automatically place the
vehicle in the correct location.
If you continually have to adjust the vehicle
position, you may have problems with the GPS
reception or there may be database errors.
2System Limitations P. 294