2014 HONDA FIT parking brake
[x] Cancel search: parking brakePage 186 of 289
185Driving
Parking Your VehicleWhen Stopped1.Depress the brake pedal firmly.
2.Firmly apply the parking brake.
3.Move the shift lever from
(D to
(P.
3.Move the shift lever to
(R.
4.Turn off the engine.
Always set the parking brake firmly, in particular if you are parked on an incline.
1Parking Your Vehicle
Do not park your vehicle near flammable objects,
such as dry grass, oil, or timber.
Heat from the exhaust can cause a fire.1When StoppedNOTICEThe following can damage the transmission:•Depressing the accelerator and brake pedals
simultaneously.•Holding the vehicle in place when facing uphill by
depressing the accelerator pedal.•Moving the shift lever into
(P before the vehicle
stops completely.
Raise the wiper arms when snow is expected.
Automatic transmission models
Automatic transmission modelsManual transmission models
Page 194 of 289
193
uuBefore Performing MaintenanceuSafety When Performing Maintenance
Maintenance
Safety When Performing MaintenanceSome of the most important safety precautions are given here.
However, we cannot warn you of every conceivable hazard that can arise in
performing maintenance. Only you can decide whether or not you should perform
a given task.
•To reduce the possibility of fire or explosion, keep cigarettes, sparks, and flames
away from the battery and all fuel related parts.
•Never leave rags, towels, or other flammable objects under the hood.
uHeat from the engine and exhaust can ignite them causing a fire.
•To clean parts, use a commercially available degreaser or parts cleaner, not
gasoline.
•Wear eye protection and protective clothing when working with the battery or
compressed air.
•Engine exhaust contains carbon monoxide, which is poisonous and can kill you.
uOnly operate the engine if there is sufficient ventilation.
•The vehicle must be in a stationary condition.
uMake sure your vehicle is parked on level ground, the parking brake is set, and
the engine is off.
•Be aware that hot parts can burn you.
uMake sure to let the engine and exhaust system cool thoroughly before
touching vehicle parts.
•Be aware that moving parts can injure you.
uDo not start the engine unless instructed, and keep your hands and limbs away
from moving parts.■Maintenance Safety■Vehicle Safety
1Safety When Performing Maintenance
3
WARNING
Improperly maintaining this vehicle or
failing to correct a problem before driving
can cause a crash in which you can be
seriously hurt or killed.
Always follow the inspection and
maintenance recommendations according
to the schedules in this owner’s manual.
3
WARNING
Failure to properly follow maintenance
instructions and precautions can cause you
to be seriously hurt or killed.
Always follow the procedures and
precautions in this owner’s manual.
Page 198 of 289

197
uuMaintenance Minder
TMuTo Use Maintenance Minder
TM
Continued
Maintenance
■Maintenance Service Items
1Maintenance Service Items•Independent of the Maintenance Minder
information, replace the brake fluid every 3 years.•Inspect idle speed every 160,000 miles (256,000
km).•Adjust the valves during services A, B, 1, 2, or 3 if
they are noisy.
Maintenance Minder Message Maintenance
Minder Indicator
Sub Items Main Item
*1: If a message SERVICE does not appear more than 12 months after the display is reset, change the
engine oil every year.
*2: Canadian A/T models only
# : See information on maintenance and emissions warranty.CODE
Maintenance Main Items
A
●Replace engine oil
*1
B
●Replace engine oil and oil filter●Inspect front and rear brakes/service as necessary●Check parking brake adjustment●Inspect tie rod ends, steering gearbox, and boots●Inspect suspension components●Inspect driveshaft boots●Inspect brake hoses and lines (Including ABS/VSA)●Inspect all fluid levels and condition of fluids●Inspect exhaust system
#
●Inspect fuel lines and connections
#
●Check expiration date for TRK bottle
*2
*3: If you drive in dusty conditions, replace the air cleaner element every 15,000 miles (24,000 km).
*4: If you drive primarily in urban areas that have high concentrations of soot in the air from industry and
from diesel-powered vehicles, replace every 15,000 miles (24,000 km).
*5: If you tow a Fit behind a motorhome, the transmission fluid must be changed every 2 years or 30,000
miles (48,000 km), whichever comes first. (For A/T only)CODE
Maintenance Sub Items
1
●Rotate tires
2
●Replace air cleaner element
*3
●Replace dust and pollen filter
*4
●Inspect drive belt
3●Replace transmission fluid
*5
4
●Replace spark plugs●Inspect valve clearance
5●Replace engine coolant
Page 201 of 289
200
uuMaintenance Under the HooduOpening the Hood
Maintenance
Opening the Hood
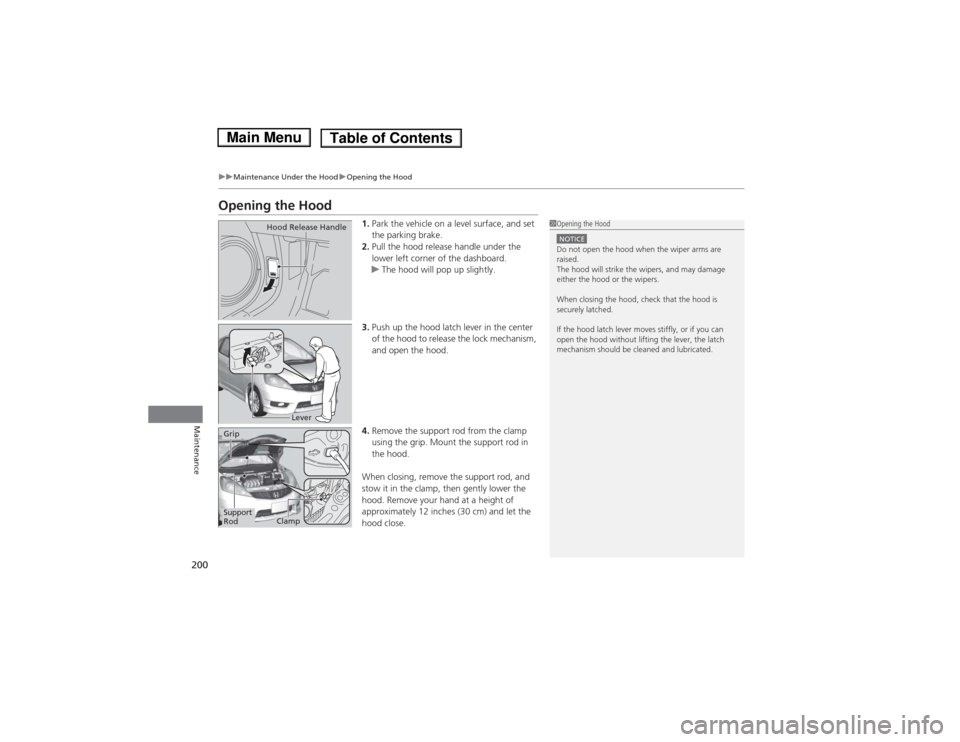
1.Park the vehicle on a level surface, and set
the parking brake.
2.Pull the hood release handle under the
lower left corner of the dashboard.
uThe hood will pop up slightly.
3.Push up the hood latch lever in the center
of the hood to release the lock mechanism,
and open the hood.
4.Remove the support rod from the clamp
using the grip. Mount the support rod in
the hood.
When closing, remove the support rod, and
stow it in the clamp, then gently lower the
hood. Remove your hand at a height of
approximately 12 inches (30 cm) and let the
hood close.
1Opening the HoodNOTICEDo not open the hood when the wiper arms are
raised.
The hood will strike the wipers, and may damage
either the hood or the wipers.
When closing the hood, check that the hood is
securely latched.
If the hood latch lever moves stiffly, or if you can
open the hood without lifting the lever, the latch
mechanism should be cleaned and lubricated.
Hood Release Handle
Lever
Support
RodGrip
Clamp
Page 240 of 289
239
Continued
Handling the Unexpected
If a Tire Goes FlatChanging a Flat Tire
*
If a tire goes flat while driving, grasp the steering wheel firmly, and brake gradually
to reduce speed. Then, stop in a safe place. Replace the flat tire with a compact
spare tire. Go to a dealer as soon as possible to have the full size tire repaired or
replaced.
1.Park the vehicle on firm, level, non-slippery surface and apply the parking brake.
2.Move the shift lever to
(P.
2.Move the shift lever to (R.
3.Turn on the hazard warning lights and turn the ignition switch to LOCK
(0.
1Changing a Flat Tire
*
Periodically check the tire pressure of the compact
spare. It should be set to the specified pressure.
Specified Pressure: 60 psi (420 kPa, 4.2 kgf/cm
2)
When driving with the compact spare tire, keep the
vehicle speed under 50 mph (80 km/h). Replace with
a full size tire as soon as possible.
The compact spare tire and wheel in your vehicle are
specifically for this model.
Do not use them with another vehicle.
Do not use another type of compact spare tire or
wheel with your vehicle.
Do not mount tire chains on a compact spare tire.
If a chain-mounted front tire goes flat, remove one of
the full-size rear tires and replace it with the compact
spare tire. Remove the flat front tire and replace it
with the full size tire that was removed from the rear.
Mount the tire chains on the front tire.
Do not use a puncture-repairing agent on a flat tire,
as it can damage the tire pressure sensor.
U.S. models only
Automatic transmission modelsManual transmission modelsAll models* Not available on all models
Page 246 of 289
245
uuIf a Tire Goes FlatuTemporarily Repairing a Flat Tire
Continued
Handling the Unexpected
Temporarily Repairing a Flat TireIf the tire has a large cut or is otherwise severely damaged, you will need to have the
vehicle towed. If the tire only has a small puncture, from a nail for instance, you can
use the tire repair kit so that you can drive to the nearest service station for a more
permanent repair.
If a tire goes flat while driving, grasp the steering wheel firmly, and brake gradually
to reduce speed. Then stop in a safe place.
1.Park the vehicle on firm, level, and non-slippery ground.
2.Put the shift lever in
(P.
3.Set the parking brake.
4.Turn on the hazard warning lights and turn the ignition switch to LOCK
(0.
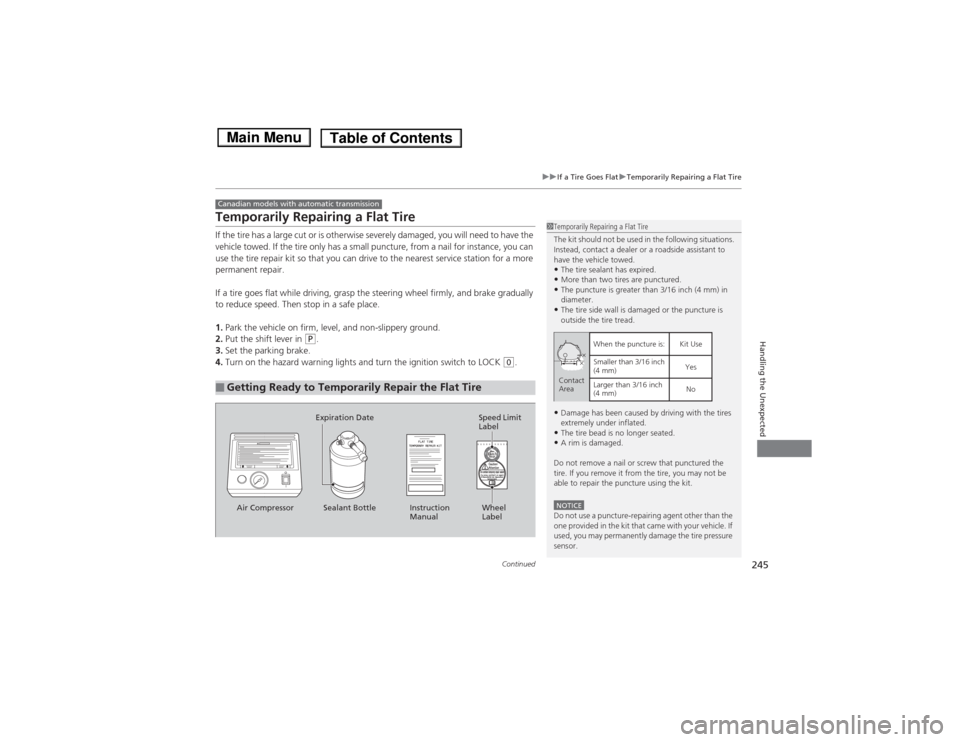
■Getting Ready to Temporarily Repair the Flat TireCanadian models with automatic transmission
1Temporarily Repairing a Flat Tire
The kit should not be used in the following situations.
Instead, contact a dealer or a roadside assistant to
have the vehicle towed.•The tire sealant has expired.•More than two tires are punctured.•The puncture is greater than 3/16 inch (4 mm) in
diameter.•The tire side wall is damaged or the puncture is
outside the tire tread.•Damage has been caused by driving with the tires
extremely under inflated.•The tire bead is no longer seated.•A rim is damaged.
Do not remove a nail or screw that punctured the
tire. If you remove it from the tire, you may not be
able to repair the puncture using the kit.NOTICEDo not use a puncture-repairing agent other than the
one provided in the kit that came with your vehicle. If
used, you may permanently damage the tire pressure
sensor.
When the puncture is:
Smaller than 3/16 inch
(4 mm)
Larger than 3/16 inch
(4 mm) Kit Use
Yes
No Contact
Area
Instruction
Manual Air Compressor Wheel
Label Sealant Bottle Expiration Date
Speed Limit
Label
Page 254 of 289
253Handling the Unexpected
Shift Lever Does Not MoveFollow the procedure below if you cannot move the shift lever out of the
(P
position.
1.Set the parking brake.
2.Remove the key from the ignition switch.
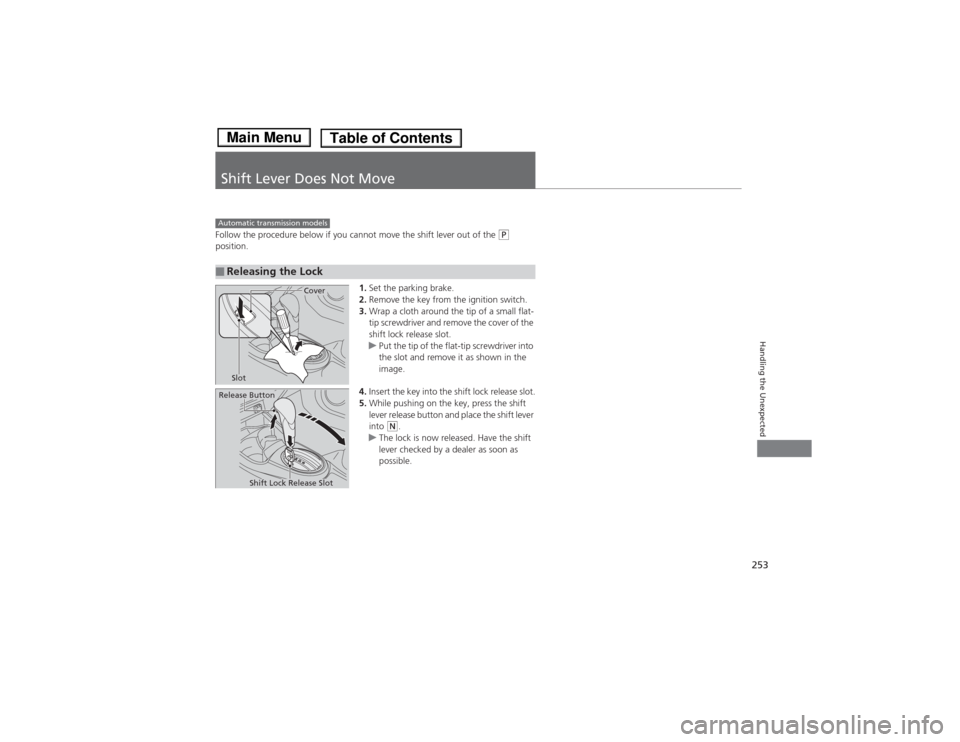
3.Wrap a cloth around the tip of a small flat-
tip screwdriver and remove the cover of the
shift lock release slot.
uPut the tip of the flat-tip screwdriver into
the slot and remove it as shown in the
image.
4.Insert the key into the shift lock release slot.
5.While pushing on the key, press the shift
lever release button and place the shift lever
into
(N.
uThe lock is now released. Have the shift
lever checked by a dealer as soon as
possible.
■Releasing the LockAutomatic transmission models
Slot
Cover
Release Button
Shift Lock Release Slot
Page 269 of 289

268Information
Specifications■Vehicle SpecificationsModel
Honda Fit
No. of Passengers:
Front 2
Rear 3
Total 5
Weights:Gross Vehicle
Weight Rating
U.S.: 3,512 lbs (1,594 kg)
Canada: 1,594 kg
Gross Axle Weight
Rating (Front)
U.S.: 1,921 lbs (872 kg)
Canada: 872 kg
Gross Axle Weight
Rating (Rear)
U.S.: 1,619 lbs (735 kg)
Canada: 735 kg
Air Conditioning:
Refrigerant Type HFC-134a (R-134a)
Charge Quantity 13.1 – 14.8 oz (370 – 420 g)
Lubricant Type SP-10
■Engine Specifications
■Fuel
■Battery
■Washer FluidDisplacement
91.3 cu-in (1,497 cm
3)
Spark PlugsNGK IZFR6K13
DENSO
SKJ20DR-M13
Fuel:
Type
Unleaded gasoline, Pump octane number
of 87 or higher
Fuel Tank Capacity 10.6 US gal (40 ℓ)
Capacity/Type
32AH(5)/40AH(20)
34AH(5)/40AH(20)
Tank Capacity
U.S.: 2.6 US qt (2.5 ℓ)
Canada: 4.8 US qt (4.5 ℓ)
■Light Bulbs*1: Sport models
*2: Not available on all modelsHeadlights (High/Low Beam)
60/55W (HB2)
Fog Lights
*1
55W (H11)
Parking/Side Marker Lights
3.8W (Amber)
Front Turn Signal Lights 21W (Amber)
Brake/Taillights
21/5W
Back-Up Lights 16W
Rear Turn Signal Lights
21W (Amber)
High-Mount Brake Light LED
Rear License Plate Light
5W
Cargo Area Light 5W
Center Console Light
*2
1.4W
Interior Lights
Map Lights
*2
8W
Ceiling Light 8W