Page 121 of 573

uuOperating the Switches Around the Steering WheeluLight Switches
120Controls
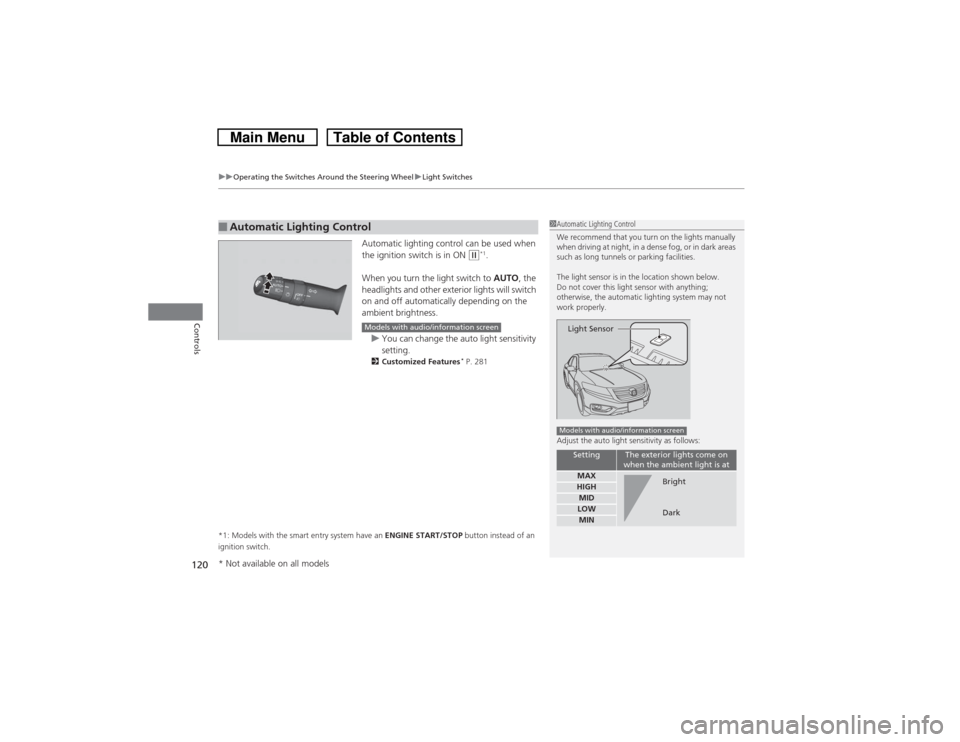
Automatic lighting control can be used when
the ignition switch is in ON
(w*1.
When you turn the light switch to AUTO, the
headlights and other exterior lights will switch
on and off automatically depending on the
ambient brightness.
uYou can change the auto light sensitivity
setting.
2Customized Features
* P. 281
*1: Models with the smart entry system have an ENGINE START/STOP button instead of an
ignition switch.
■Automatic Lighting Control
1Automatic Lighting Control
We recommend that you turn on the lights manually
when driving at night, in a dense fog, or in dark areas
such as long tunnels or parking facilities.
The light sensor is in the location shown below.
Do not cover this light sensor with anything;
otherwise, the automatic lighting system may not
work properly.
Adjust the auto light sensitivity as follows:
Setting
The exterior lights come on
when the ambient light is at
MAXHIGHMIDLOWMINLight SensorModels with audio/information screen
Bright
Dark
Models with audio/information screen
* Not available on all models
Page 131 of 573
130Controls
Adjusting the MirrorsInterior Rearview MirrorAdjust the angle of the rearview mirror when you are sitting in the correct driving
position.
When driving after dark, the automatic
dimming rearview mirror reduces the glare
from headlights behind you. Press the auto
button to turn this function on and off. When
activated, the auto indicator comes on.■Automatic Dimming Rearview Mirror
1Adjusting the Mirrors
Keep the inside and outside mirrors clean and
adjusted for best visibility.
Adjust the mirrors before you start driving.
2Adjusting the Seat Positions P. 133
Indicator Auto Button Sensor
1Automatic Dimming Rearview Mirror
The auto dimming function cancels when the shift
position is in
(R.
Page 140 of 573

139
uuAdjusting the SeatsuRear Seats
Continued
Controls
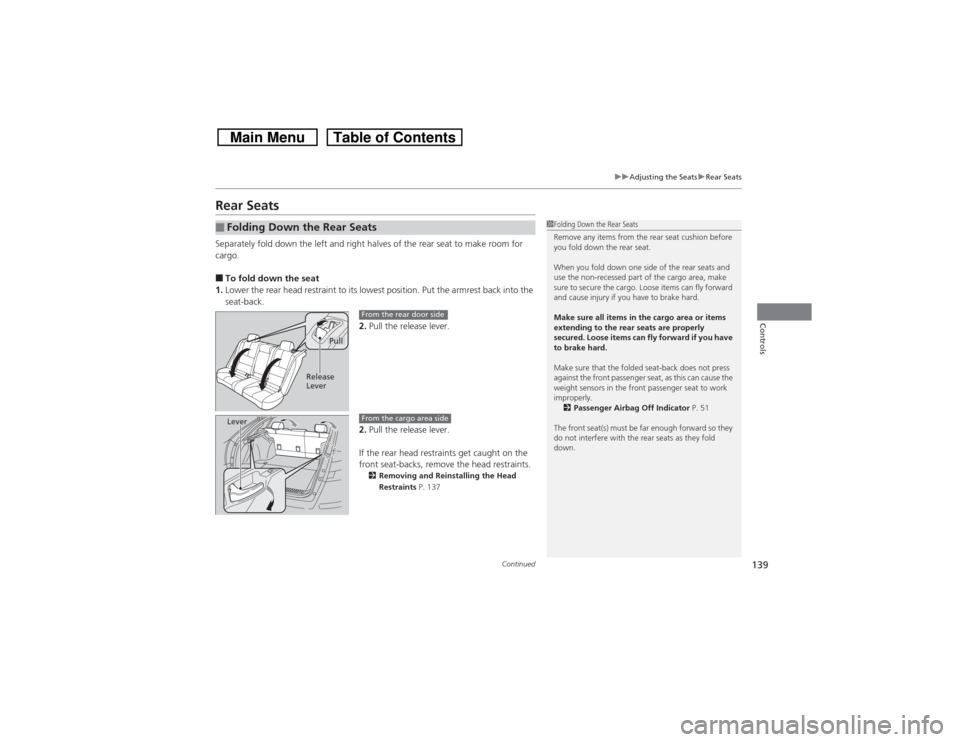
Rear SeatsSeparately fold down the left and right halves of the rear seat to make room for
cargo.■To fold down the seat
1.Lower the rear head restraint to its lowest position. Put the armrest back into the
seat-back.
2.Pull the release lever.
2.Pull the release lever.
If the rear head restraints get caught on the
front seat-backs, remove the head restraints.
2Removing and Reinstalling the Head
Restraints P. 137
■Folding Down the Rear Seats
1Folding Down the Rear Seats
Remove any items from the rear seat cushion before
you fold down the rear seat.
When you fold down one side of the rear seats and
use the non-recessed part of the cargo area, make
sure to secure the cargo. Loose items can fly forward
and cause injury if you have to brake hard.
Make sure all items in the cargo area or items
extending to the rear seats are properly
secured. Loose items can fly forward if you have
to brake hard.
Make sure that the folded seat-back does not press
against the front passenger seat, as this can cause the
weight sensors in the front passenger seat to work
improperly.
2Passenger Airbag Off Indicator P. 51
The front seat(s) must be far enough forward so they
do not interfere with the rear seats as they fold
down.
Pull
Release
Lever
From the rear door side
Lever
From the cargo area side
Page 162 of 573
161
uuClimate Control System
*uSynchronized Mode
Controls
Synchronized ModeYou can set the temperature synchronously for the driver side and the passenger
side in synchronized mode.
1.Press the SYNC button.
uThe system will switch to synchronized mode.
2.Adjust the temperature using driver’s side temperature control switch.
Press the SYNC button to return to dual mode.
1Synchronized Mode
When you press the button, the system changes
to synchronized mode.
When the system is in dual mode, the driver side
temperature and the passenger side temperature can
be set separately.
The system adjusts each temperature based on the
information of the sunlight sensor and the sun
position updated by the navigation system’s GPS.Models with navigation system
Models without audio/
information screen
Models with audio/
information screen
Page 163 of 573
162
uuClimate Control System
*uAutomatic Climate Control Sensors
Controls
Automatic Climate Control Sensors
The automatic climate control system is
equipped with sensors. Do not cover or spill
any liquid on them.
Sensor
Sensor
Page 413 of 573
412
uuBefore DrivinguDriving Preparation
Driving
•Be sure items placed on the floor behind the front seats cannot roll under the
seats.
uThey can interfere with the driver’s ability to operate the pedals, the operation
of the seats, or the operation of the sensors under the seats.
•Everyone in the vehicle must fasten their seat belt.
2Fastening a Seat Belt P. 35
•Make sure that the indicators in the instrument panel come on when you start the
vehicle, and go off soon after.
uAlways have a dealer check the vehicle if a problem is indicated.
2Indicators P. 70
Page 455 of 573

454Driving
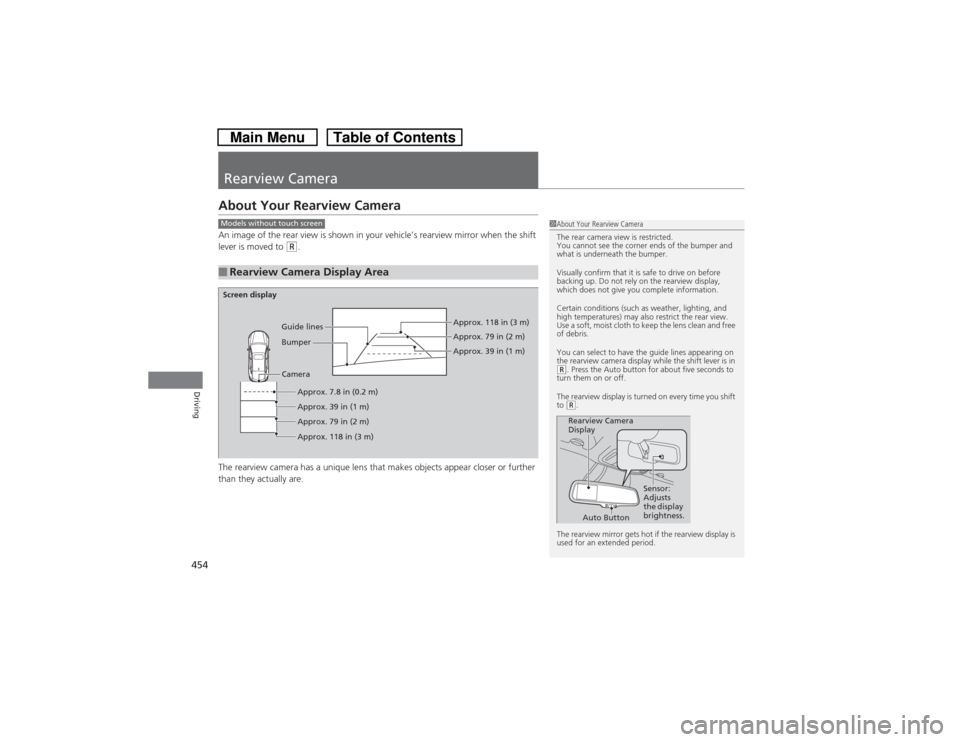
Rearview CameraAbout Your Rearview CameraAn image of the rear view is shown in your vehicle’s rearview mirror when the shift
lever is moved to
(R.
The rearview camera has a unique lens that makes objects appear closer or further
than they actually are.
■Rearview Camera Display Area
1About Your Rearview Camera
The rear camera view is restricted.
You cannot see the corner ends of the bumper and
what is underneath the bumper.
Visually confirm that it is safe to drive on before
backing up. Do not rely on the rearview display,
which does not give you complete information.
Certain conditions (such as weather, lighting, and
high temperatures) may also restrict the rear view.
Use a soft, moist cloth to keep the lens clean and free
of debris.
You can select to have the guide lines appearing on
the rearview camera display while the shift lever is in (R. Press the Auto button for about five seconds to
turn them on or off.
The rearview display is turned on every time you shift
to (R.
The rearview mirror gets hot if the rearview display is
used for an extended period.Rearview Camera
Display
Sensor:
Adjusts
the display
brightness.
Auto Button
Models without touch screenScreen display
Camera
Approx. 7.8 in (0.2 m)
Approx. 39 in (1 m)
Approx. 79 in (2 m)
Approx. 118 in (3 m)Approx. 118 in (3 m)
Approx. 79 in (2 m)
Approx. 39 in (1 m) Bumper Guide lines
Page 518 of 573

517
Continued
Handling the Unexpected
If a Tire Goes FlatChanging a Flat TireIf a tire goes flat while driving, grasp the steering wheel firmly, and brake gradually
to reduce speed. Then, stop in a safe place. Replace the flat tire with a compact
spare tire. Go to a dealer as soon as possible to have the full-size tire repaired or
replaced.
1.Park the vehicle on firm, level, and non-slippery surface and apply the parking
brake.
2.Move the shift lever to
(P.
3.Turn on the hazard warning lights and turn the ignition switch to LOCK
(0*1.
*1: Models with the smart entry system have an ENGINE START/STOP button instead of an
ignition switch.
1Changing a Flat Tire
Periodically check the tire pressure of the compact
spare. It should be set to the specified pressure.
Specified Pressure: 60 psi (420 kPa, 4.2 kgf/cm
2)
When driving with the compact spare tire, keep the
vehicle speed under 50 mph (80 km/h). Replace with
a full-size tire as soon as possible.
The compact spare tire and wheel in your vehicle are
specifically for this model.
Do not use them with another vehicle.
Do not use another type of compact spare tire or
wheel with your vehicle.
Do not mount tire chains on a compact spare tire.
If a chain-mounted front tire goes flat, remove one of
the full-size rear tires and replace it with the compact
spare tire. Remove the flat front tire and replace it
with the full-size tire that was removed from the rear.
Mount the tire chains on the front tire.
Do not use a puncture-repairing agent on a flat tire,
as it can damage the tire pressure sensor.