Page 429 of 573

428
uuWhen DrivinguShifting
Driving
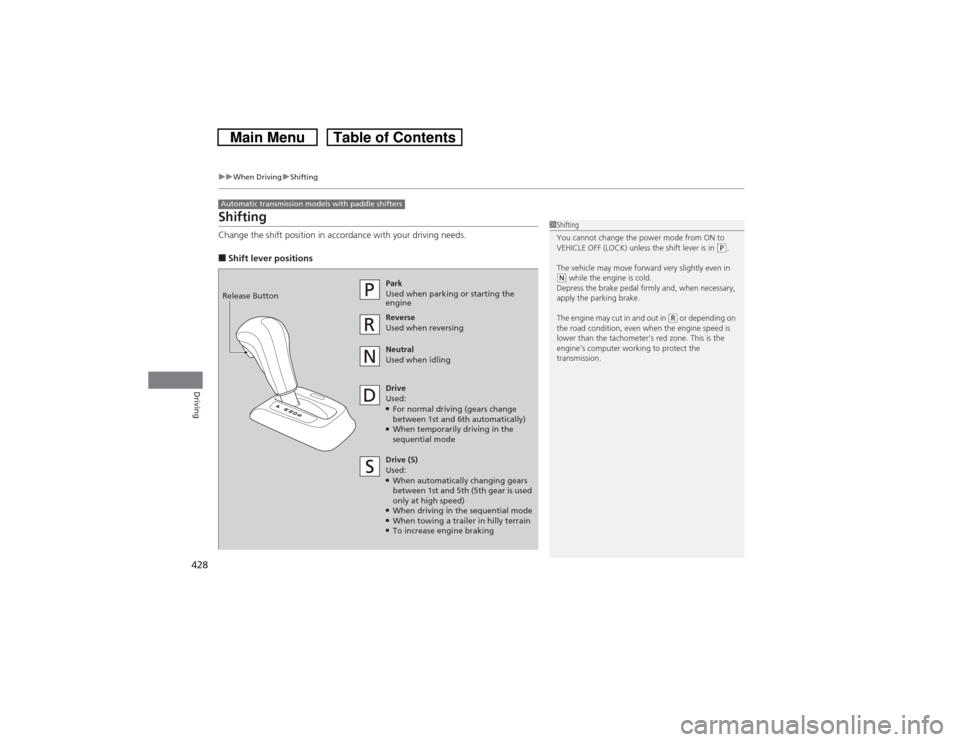
ShiftingChange the shift position in accordance with your driving needs.■Shift lever positionsAutomatic transmission models with paddle shifters
1Shifting
You cannot change the power mode from ON to
VEHICLE OFF (LOCK) unless the shift lever is in
(P.
The vehicle may move forward very slightly even in
(N while the engine is cold.
Depress the brake pedal firmly and, when necessary,
apply the parking brake.
The engine may cut in and out in
(R or depending on
the road condition, even when the engine speed is
lower than the tachometer’s red zone. This is the
engine’s computer working to protect the
transmission.
Park
Used when parking or starting the
engine
Reverse
Used when reversing
Neutral
Used when idling
Drive
Used:●For normal driving (gears change
between 1st and 6th automatically)●When temporarily driving in the
sequential mode Release ButtonDrive (S)
Used:●When automatically changing gears
between 1st and 5th (5th gear is used
only at high speed)●When driving in the sequential mode●When towing a trailer in hilly terrain●To increase engine braking
Page 441 of 573

uuWhen DrivinguLane Departure Warning (LDW)
*
440Driving
The system begins to search for lane markings when all the following conditions are met:
•The vehicle is traveling between 40 and 90 mph (64 and 145 km/h).
•The vehicle is on a straight or slightly curved road.
•The turn signals are off.
•The brake pedal is not depressed.
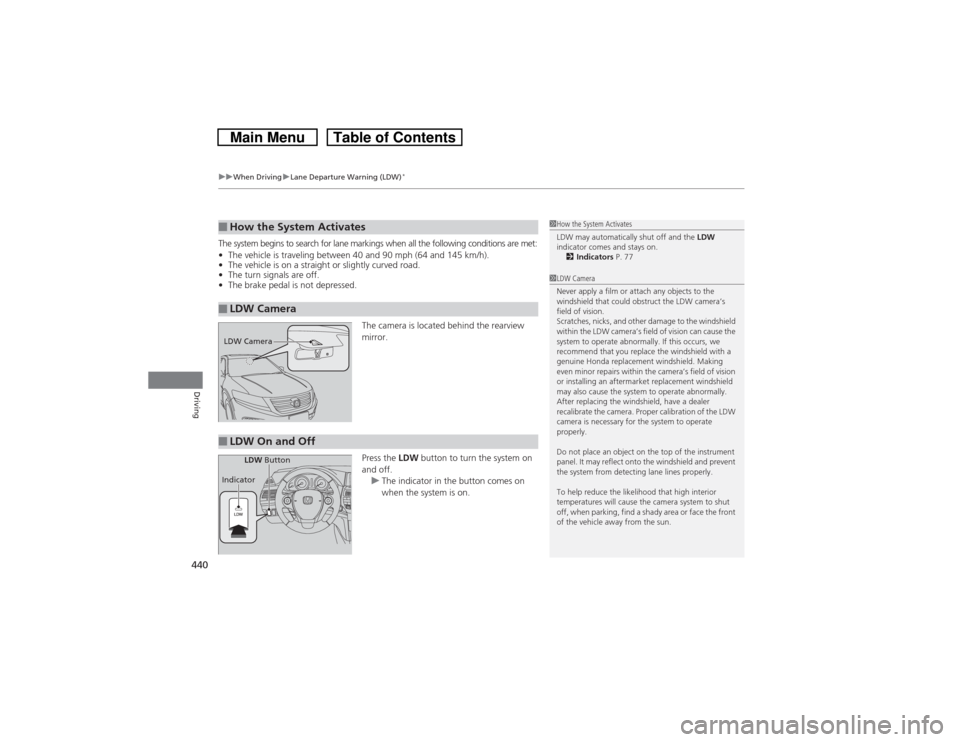
The camera is located behind the rearview
mirror.
Press the LDW button to turn the system on
and off.
uThe indicator in the button comes on
when the system is on.■How the System Activates■LDW Camera
1How the System Activates
LDW may automatically shut off and the LDW
indicator comes and stays on.
2Indicators P. 771LDW Camera
Never apply a film or attach any objects to the
windshield that could obstruct the LDW camera’s
field of vision.
Scratches, nicks, and other damage to the windshield
within the LDW camera’s field of vision can cause the
system to operate abnormally. If this occurs, we
recommend that you replace the windshield with a
genuine Honda replacement windshield. Making
even minor repairs within the camera’s field of vision
or installing an aftermarket replacement windshield
may also cause the system to operate abnormally.
After replacing the windshield, have a dealer
recalibrate the camera. Proper calibration of the LDW
camera is necessary for the system to operate
properly.
Do not place an object on the top of the instrument
panel. It may reflect onto the windshield and prevent
the system from detecting lane lines properly.
To help reduce the likelihood that high interior
temperatures will cause the camera system to shut
off, when parking, find a shady area or face the front
of the vehicle away from the sun.
LDW Camera■LDW On and Off
LDW Button
Indicator
Page 450 of 573
449
Continued
Driving
BrakingBrake SystemUse the parking brake to keep the vehicle stationary when parking.
To apply:
Pull the lever fully up without pressing the
release button.
To release:
1.Pull the lever slightly, and press and hold
the release button.
2.Lower the lever down all the way, then
release the button.■Parking Brake
1Parking BrakeNOTICERelease the parking brake fully before driving. The
rear brakes and axle can be damaged if you drive
with the parking brake applied.
If you start driving without fully releasing the parking
brake, a buzzer sounds as a warning.
Always apply the parking brake when parking.
Page 454 of 573
453Driving
Parking Your VehicleWhen Stopped1.Depress the brake pedal firmly.
2.Firmly apply the parking brake.
3.Move the shift lever from
(D to
(P.
4.Turn off the engine.
Always set the parking brake firmly, in particular if you are parked on an incline.
1Parking Your Vehicle
Do not park your vehicle near flammable objects,
such as dry grass, oil, or timber.
Heat from the exhaust can cause a fire.1When StoppedNOTICEThe following can damage the transmission:•Depressing the accelerator and brake pedals
simultaneously.•Holding the vehicle in place when facing uphill by
depressing the accelerator pedal.•Moving the shift lever into
(P before the vehicle
stops completely.
Raise the wiper arms when snow is expected.
Page 464 of 573

463
uuBefore Performing MaintenanceuSafety When Performing Maintenance
Maintenance
Safety When Performing MaintenanceSome of the most important safety precautions are given here.
However, we cannot warn you of every conceivable hazard that can arise in
performing maintenance. Only you can decide whether or not you should perform
a given task.
•To reduce the possibility of fire or explosion, keep cigarettes, sparks, and flames
away from the battery and all fuel related parts.
•Never leave rags, towels, or other flammable objects under the hood.
uHeat from the engine and exhaust can ignite them causing a fire.
•To clean parts, use a commercially available degreaser or parts cleaner, not
gasoline.
•Wear eye protection and protective clothing when working with the battery or
compressed air.
•Engine exhaust contains carbon monoxide, which is poisonous and can kill you.
uOnly operate the engine if there is sufficient ventilation.
•The vehicle must be in a stationary condition.
uMake sure your vehicle is parked on level ground, the parking brake is set, and
the engine is off.
•Be aware that hot parts can burn you.
uMake sure to let the engine and exhaust system cool thoroughly before
touching vehicle parts.
•Be aware that moving parts can injure you.
uDo not start the engine unless instructed, and keep your hands and limbs away
from moving parts.■Maintenance Safety■Vehicle Safety
1Safety When Performing Maintenance
3
WARNING
Improperly maintaining this vehicle or
failing to correct a problem before driving
can cause a crash in which you can be
seriously hurt or killed.
Always follow the inspection and
maintenance recommendations according
to the schedules in this owner’s manual.
3
WARNING
Failure to properly follow maintenance
instructions and precautions can cause you
to be seriously hurt or killed.
Always follow the procedures and
precautions in this owner’s manual.
Page 468 of 573

467
uuMaintenance Minder
TMuTo Use Maintenance Minder
TM
Continued
Maintenance
■Maintenance Service Items
1Maintenance Service Items•Independent of the Maintenance Minder
information, replace the brake fluid every 3 years.•Inspect idle speed every 160,000 miles (256,000
km).•Adjust the valves during services A, B, 1, 2, or 3 if
they are noisy.
Maintenance Minder
Message System Message
Indicator
Sub Items Main
Item
*1: If a message SERVICE does not appear more than 12 months after the display is reset, change the
engine oil every year.
# : See information on maintenance and emissions warranty.CODE
Maintenance Main Items
A
●Replace engine oil
*1
B
●Replace engine oil
*1 and oil filter
●Inspect front and rear brakes●Check parking brake adjustment●Inspect tie rod ends, steering gearbox, and boots●Inspect suspension components●Inspect driveshaft boots●Inspect brake hoses and lines (Including ABS/VSA)●Inspect all fluid levels and condition of fluids●Inspect exhaust system
#
●Inspect fuel lines and connections
#
*2: If you drive in dusty conditions, replace the air cleaner element every 15,000 miles (24,000 km).
*3: If you drive primarily in urban areas that have high concentrations of soot in the air from industry and
from diesel-powered vehicles, replace the dust and pollen filter every 15,000 miles (24,000 km).
*4: 4WD only
*5: 6-cylinder models
*6: If you drive regularly in very high temperatures (over 110°F, 43°C), in very low temperatures (under
-20°F, -29°C), or tow a trailer, replace every 60,000 miles (U.S.)/100,000 km (Canada).CODE
Maintenance Sub Items
1
●Rotate tires
2
●Replace air cleaner element
*2
●Replace dust and pollen filter
*3
●Inspect drive belt
3●Replace transmission and transfer
*4 fluid
4
●Replace spark plugs●Replace timing belt and inspect water pump
*5, *6
●Inspect valve clearance
5●Replace engine coolant
6
●Replace rear differential fluid
*4
Page 472 of 573
471
uuMaintenance Under the HooduOpening the Hood
Maintenance
Opening the Hood
1.Park the vehicle on a level surface, and set
the parking brake.
2.Pull the hood release handle under the
lower left corner of the dashboard.
uThe hood will pop up slightly.
3.Push up the hood latch lever in the center
of the hood to release the lock mechanism,
and open the hood.
4.Lift the hood up most of the way.
uThe hydraulic supports will lift it up the
rest of the way and hold it up.
When closing, lower it to approximately 12
inches (30 cm), then press down firmly with
your hands.
1Opening the HoodNOTICEDo not open the hood when the wiper arms are
raised.
The hood will strike the wipers, and may damage
either the hood or the wipers.
When closing the hood, check that the hood is
securely latched.
If the hood latch lever moves stiffly, or if you can
open the hood without lifting the lever, the latch
mechanism should be cleaned and lubricated.
Hood Release Handle
Pull
Lever
Page 518 of 573

517
Continued
Handling the Unexpected
If a Tire Goes FlatChanging a Flat TireIf a tire goes flat while driving, grasp the steering wheel firmly, and brake gradually
to reduce speed. Then, stop in a safe place. Replace the flat tire with a compact
spare tire. Go to a dealer as soon as possible to have the full-size tire repaired or
replaced.
1.Park the vehicle on firm, level, and non-slippery surface and apply the parking
brake.
2.Move the shift lever to
(P.
3.Turn on the hazard warning lights and turn the ignition switch to LOCK
(0*1.
*1: Models with the smart entry system have an ENGINE START/STOP button instead of an
ignition switch.
1Changing a Flat Tire
Periodically check the tire pressure of the compact
spare. It should be set to the specified pressure.
Specified Pressure: 60 psi (420 kPa, 4.2 kgf/cm
2)
When driving with the compact spare tire, keep the
vehicle speed under 50 mph (80 km/h). Replace with
a full-size tire as soon as possible.
The compact spare tire and wheel in your vehicle are
specifically for this model.
Do not use them with another vehicle.
Do not use another type of compact spare tire or
wheel with your vehicle.
Do not mount tire chains on a compact spare tire.
If a chain-mounted front tire goes flat, remove one of
the full-size rear tires and replace it with the compact
spare tire. Remove the flat front tire and replace it
with the full-size tire that was removed from the rear.
Mount the tire chains on the front tire.
Do not use a puncture-repairing agent on a flat tire,
as it can damage the tire pressure sensor.