Page 78 of 573

77
uuIndicatorsu
Continued
Instrument Panel
*1:Models with the smart entry system have an ENGINE START/STOP button instead of an ignition switch.Indicator
Name
On/Blinking
Explanation
Message
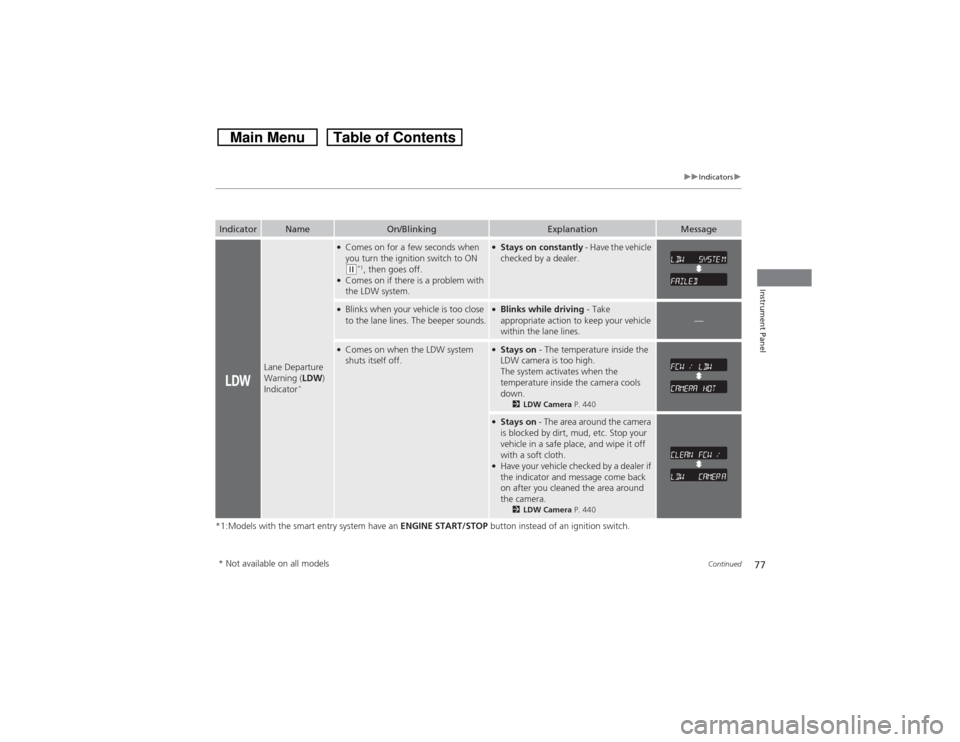
Lane Departure
Warning (LDW)
Indicator
*
●Comes on for a few seconds when
you turn the ignition switch to ON (w*1, then goes off.
●Comes on if there is a problem with
the LDW system.
●Stays on constantly - Have the vehicle
checked by a dealer.
●Blinks when your vehicle is too close
to the lane lines. The beeper sounds.
●Blinks while driving - Take
appropriate action to keep your vehicle
within the lane lines.
—
●Comes on when the LDW system
shuts itself off.
●Stays on - The temperature inside the
LDW camera is too high.
The system activates when the
temperature inside the camera cools
down.
2LDW Camera P. 440
●Stays on - The area around the camera
is blocked by dirt, mud, etc. Stop your
vehicle in a safe place, and wipe it off
with a soft cloth.●Have your vehicle checked by a dealer if
the indicator and message come back
on after you cleaned the area around
the camera.
2LDW Camera P. 440
* Not available on all models
Page 80 of 573

79
uuIndicatorsu
Continued
Instrument Panel
*1:Models with the smart entry system have an ENGINE START/STOP button instead of an ignition switch.Indicator
Name
On/Blinking
Explanation
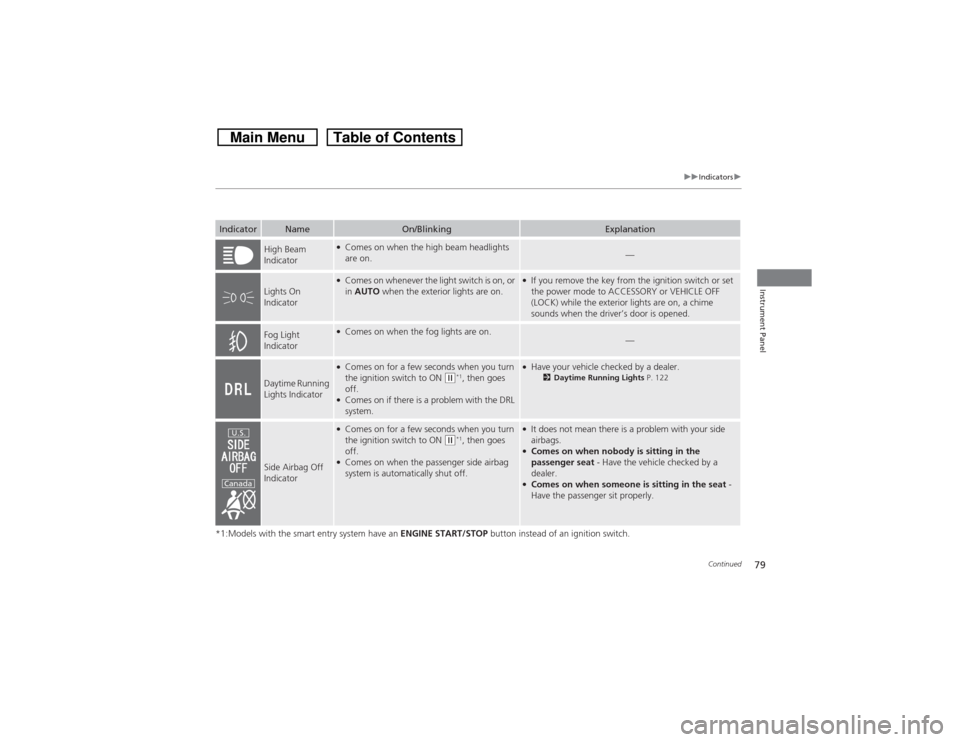
High Beam
Indicator
●Comes on when the high beam headlights
are on.
—
Lights On
Indicator
●Comes on whenever the light switch is on, or
in AUTO when the exterior lights are on.
●If you remove the key from the ignition switch or set
the power mode to ACCESSORY or VEHICLE OFF
(LOCK) while the exterior lights are on, a chime
sounds when the driver’s door is opened.
Fog Light
Indicator
●Comes on when the fog lights are on.
—
Daytime Running
Lights Indicator
●Comes on for a few seconds when you turn
the ignition switch to ON
(w*1, then goes
off.
●Comes on if there is a problem with the DRL
system.
●Have your vehicle checked by a dealer.
2Daytime Running Lights P. 122
Side Airbag Off
Indicator
●Comes on for a few seconds when you turn
the ignition switch to ON
(w*1, then goes
off.
●Comes on when the passenger side airbag
system is automatically shut off.
●It does not mean there is a problem with your side
airbags.●Comes on when nobody is sitting in the
passenger seat - Have the vehicle checked by a
dealer.●Comes on when someone is sitting in the seat -
Have the passenger sit properly.
U.S.
Canada
Page 81 of 573
80
uuIndicatorsu
Instrument Panel
*1:Models with the smart entry system have an ENGINE START/STOP button instead of an ignition switch.Indicator
Name
On/Blinking
Explanation
Immobilizer
System Indicator
●Comes on briefly when you turn the ignition
switch to ON
(w*1, then goes off.
●Comes on if the immobilizer system cannot
recognize the key information.
●Blinks - You cannot start the engine. Turn the ignition
switch to LOCK
(0*1, pull the key out, and then insert
the key and turn it to ON
(w*1 again.
●Repeatedly blinks - The system may be
malfunctioning. Have the vehicle checked by a dealer.●Do not attempt to alter this system or add other
devices to it. Electrical problems can occur.
Security System
Alarm Indicator
●Blinks when the security system alarm has
been set.
2Security System Alarm P. 107
Indicator
Page 82 of 573
81
uuIndicatorsu
Instrument Panel
*1:Models with the smart entry system have an ENGINE START/STOP button instead of an ignition switch.Indicator
Name
On/Blinking
Explanation
CRUISE MAIN
Indicator
●Comes on when you press the CRUISE
button.
2Cruise Control P. 432
CRUISE
CONTROL
Indicator
●Comes on if you have set a speed for cruise
control.
2Cruise Control P. 432
Washer Level
Indicator
*
●Comes on when washer fluid gets low.
●Refill washer fluid.
2Refilling Window Washer Fluid P. 483
Maintenance
Minder Indicator
●Comes on when you turn the ignition switch
to ON
(w*1, then goes off.
●Comes on when the scheduled maintenance
is due soon.
2Maintenance Minder
TM P. 465
* Not available on all models
Page 84 of 573

83Instrument Panel
Gauges and DisplaysGaugesGauges include the speedometer, tachometer, fuel gauge, and related indicators.
They are displayed when the ignition switch is in ON
(w*1.
Displays your driving speed in mph (U.S.) or km/h (Canada).
Shows the number of engine revolutions per minute.
Displays the amount of fuel left in the fuel tank.
Displays the temperature of the engine coolant.
*1: Models with the smart entry system have an ENGINE START/STOP button instead of an
ignition switch.■Speedometer■Tachometer■Fuel Gauge■Temperature Gauge
1Fuel GaugeNOTICEYou should refuel when the reading approaches .
Running out of fuel can cause the engine to misfire,
damaging the catalytic converter.
The actual amount of remaining fuel may differ from
the fuel gauge reading.
E
1Temperature GaugeNOTICEDriving with the temperature gauge pointer in the
upper zone can cause serious engine damage. Pull
safely to the side of the road and allow engine
temperature to return to normal.
2Overheating P. 532
Page 87 of 573

uuGauges and DisplaysuInformation Display
86Instrument Panel
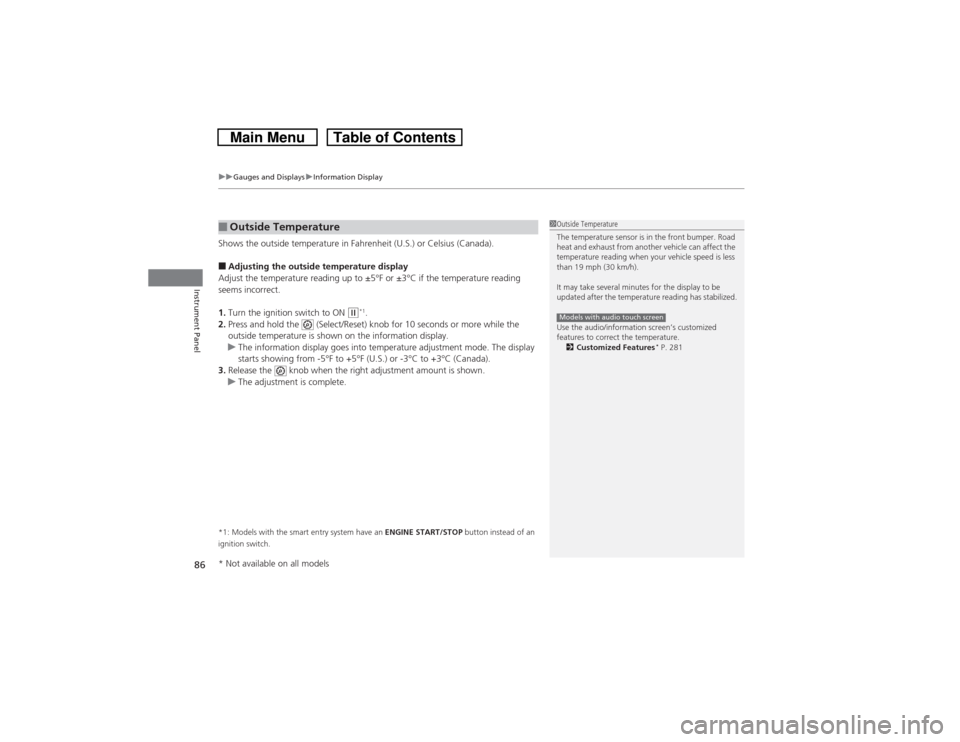
Shows the outside temperature in Fahrenheit (U.S.) or Celsius (Canada).■Adjusting the outside temperature display
Adjust the temperature reading up to ±5°F or ±3°C if the temperature reading
seems incorrect.
1.Turn the ignition switch to ON
(w*1.
2.Press and hold the (Select/Reset) knob for 10 seconds or more while the
outside temperature is shown on the information display.
uThe information display goes into temperature adjustment mode. The display
starts showing from -5°F to +5°F (U.S.) or -3°C to +3°C (Canada).
3.Release the knob when the right adjustment amount is shown.
uThe adjustment is complete.
*1: Models with the smart entry system have an ENGINE START/STOP button instead of an
ignition switch.■Outside Temperature
1Outside Temperature
The temperature sensor is in the front bumper. Road
heat and exhaust from another vehicle can affect the
temperature reading when your vehicle speed is less
than 19 mph (30 km/h).
It may take several minutes for the display to be
updated after the temperature reading has stabilized.
Use the audio/information screen’s customized
features to correct the temperature.
2Customized Features
* P. 281
Models with audio touch screen
* Not available on all models
Page 88 of 573

87
Controls
This chapter explains how to operate the various controls necessary for driving.
Setting the Clock................................ 88
Locking and Unlocking the Doors
Key Types and Functions .................... 91Low Smart Entry Remote Signal Strength
*.. 93
Locking/Unlocking the Doors from the
Outside ............................................ 94
Locking/Unlocking the Doors from the
Inside ............................................... 99
Childproof Door Locks ..................... 100
Auto Door Locking/Unlocking .......... 101
Opening and Closing the Tailgate... 105
Security System................................ 107
Immobilizer System .......................... 107
Security System Alarm ...................... 107Opening and Closing the Windows..... 110
Opening and Closing the Moonroof
.. 113
Operating the Switches Around the
Steering Wheel
Ignition Switch
*............................... 114
ENGINE START/STOP Button
*........... 115
Ignition Switch and Power Mode
Comparison ................................... 118
Turn Signals ..................................... 119
Light Switches.................................. 119
Fog Lights ........................................ 122
Daytime Running Lights ................... 122
Wipers and Washers ........................ 123
Brightness Control ........................... 125
Rear Defogger/Heated Door Mirror Button.. 126Driving Position Memory System
*.... 127Adjusting the Steering Wheel .......... 129
Adjusting the Mirrors....................... 130
Interior Rearview Mirror ................... 130
Power Door Mirrors ......................... 131
Adjusting the Seats.......................... 133
Adjusting the Seat Positions ............. 133
Interior Lights/Interior Convenience
Items................................................ 142
Interior Lights .................................. 142
Interior Convenience Items .............. 144
Heating and Cooling System
*......... 154
Using Vents, Heating and A/C.......... 154
Climate Control System
*.................. 157
Using Automatic Climate Control .... 157
Automatic Climate Control Sensors ... 162
* Not available on all models
Page 89 of 573

88Controls
Setting the ClockClockYou can adjust the time in the clock display with the ignition switch is in ON
(w*1.
■Using the Settings menu on the audio/information screen
1.Press and hold the DISP button.
2.Rotate to select Info Settings, then
press .
uRepeat the procedure to select Clock
Adjustment.
3.Rotate to change hour, then press .
4.Rotate to change minute, then press .■Using the audio touch screen
1.Select .
2.Select Clock.
3.Adjust the hours and minutes by selecting
/.
4.Select 12H or 24H.
5.Press Set to set the time.*1: Models with the smart entry system have an ENGINE START/STOP button instead of an
ignition switch.■Adjusting the Time
1Clock
The clock is automatically updated through the
navigation system, so the time does not need to be
adjusted.
These indications are used to show how to operate
the selector knob or the MENU/SEL (Selector) knob.
Rotate to select.
Press to enter.
You can customize the clock display to show the 12
hour clock or 24 hour clock.
2Customized Features
* P. 281
You can turn the clock display on and off.
2Customized Features* P. 281
Models with navigation systemModels without navigation systemModels with audio touch screen
Models without navigation systemModels with audio touch screen
3
4
* Not available on all models