Page 122 of 573
121
uuOperating the Switches Around the Steering WheeluLight Switches
Controls
The headlights, all other exterior lights, and the instrument panel lights turn off 15
seconds after you remove the key or set the power mode to VEHICLE OFF (LOCK),
take the remote with you, and close the driver’s door.
If you turn the ignition switch to LOCK
(0*1 with the headlight switch on, but do
not open the door, the lights turn off after 10 minutes (three minutes, if the switch
is in the AUTO position).
The lights turn on again when you unlock or open the driver’s door. If you unlock
the door, but do not open it within 15 seconds, the lights go off. If you open the
driver’s door, you will hear a lights on reminder chime.
*1: Models with the smart entry system have an ENGINE START/STOP button instead of an
ignition switch.■Automatic Lighting Off Feature
1Automatic Lighting Off Feature
You can change the headlight auto off timer setting.
2Customized Features
* P. 281
Models with smart entry system
* Not available on all models
Page 124 of 573

123
uuOperating the Switches Around the Steering WheeluWipers and Washers
Continued
Controls
Wipers and Washers
The windshield wipers and washers can be
used when the ignition switch is in ON
(w*1.
■MIST
The wipers run at high speed until you release
the lever.■Wiper switch (OFF, INT, LO, HI)
Change the wiper switch setting according to
the amount of rain.■Adjusting the delay
Turn the adjustment ring to adjust the wiper
delay.■Washer
Sprays while you pull the lever toward you.
When you release the lever, the wipers make
two or three more sweeps before stopping.
*1: Models with the smart entry system have an ENGINE START/STOP button instead of an
ignition switch.■Front Wiper/Washer
1Wipers and WashersNOTICEDo not use the wipers when the windshield is dry.
The windshield will get scratched, or the rubber
blades will get damaged.NOTICEIn cold weather, the blades may freeze to the
windshield, becoming stuck.
Operating the wipers in this condition may damage
the wipers. Use the defroster to warm the
windshield, then turn the wipers on.
Turn the washers off if no washer fluid comes out.
The pump may get damaged.
If the vehicle speeds up while the wipers are
operating intermittently, the length of the wipe
interval shortens. When the vehicle starts moving, the
wipers make a single sweep.
When the vehicle speeds up, the wiper operation’s
shortest delay setting ( ) and the LO setting become
the same.
Intermittent Time
Adjustment RingPull to
use
washer.MIST
INT: Low speed with
intermittent OFF
LO: Low speed wipe
HI: High speed wipe
Long delay
Short delay
Page 143 of 573
142Controls
Interior Lights/Interior Convenience ItemsInterior Lights
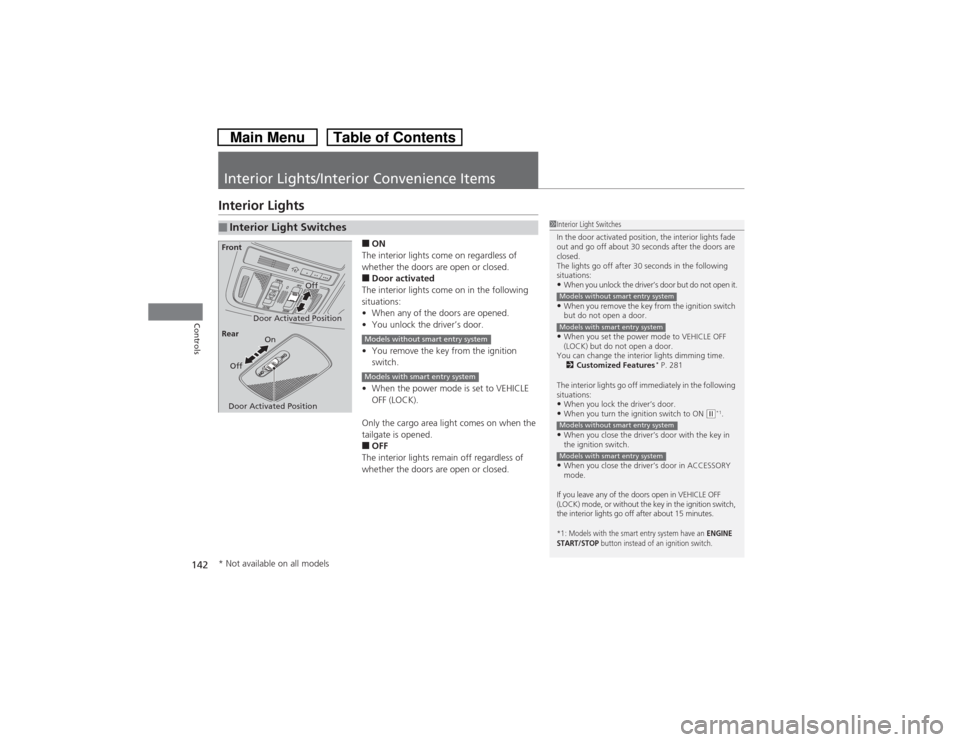
■ON
The interior lights come on regardless of
whether the doors are open or closed.■Door activated
The interior lights come on in the following
situations:
•When any of the doors are opened.
•You unlock the driver’s door.
•You remove the key from the ignition
switch.
•When the power mode is set to VEHICLE
OFF (LOCK).
Only the cargo area light comes on when the
tailgate is opened.■OFF
The interior lights remain off regardless of
whether the doors are open or closed.
■Interior Light Switches
1Interior Light Switches
In the door activated position, the interior lights fade
out and go off about 30 seconds after the doors are
closed.
The lights go off after 30 seconds in the following
situations:•When you unlock the driver’s door but do not open it.•When you remove the key from the ignition switch
but do not open a door.•When you set the power mode to VEHICLE OFF
(LOCK) but do not open a door.
You can change the interior lights dimming time.
2Customized Features
* P. 281
The interior lights go off immediately in the following
situations:
•When you lock the driver’s door.•When you turn the ignition switch to ON
(w*1.
•When you close the driver’s door with the key in
the ignition switch.•When you close the driver’s door in ACCESSORY
mode.
If you leave any of the doors open in VEHICLE OFF
(LOCK) mode, or without the key in the ignition switch,
the interior lights go off after about 15 minutes.*1: Models with the smart entry system have an
ENGINE
START/STOP
button instead of an ignition switch.
Models without smart entry systemModels with smart entry systemModels without smart entry systemModels with smart entry system
Door Activated Position
Off
FrontDoor Activated PositionOn
Off Rear
Models without smart entry systemModels with smart entry system
* Not available on all models
Page 166 of 573
165
uuAudio SystemuUSB Adapter Cable
Features
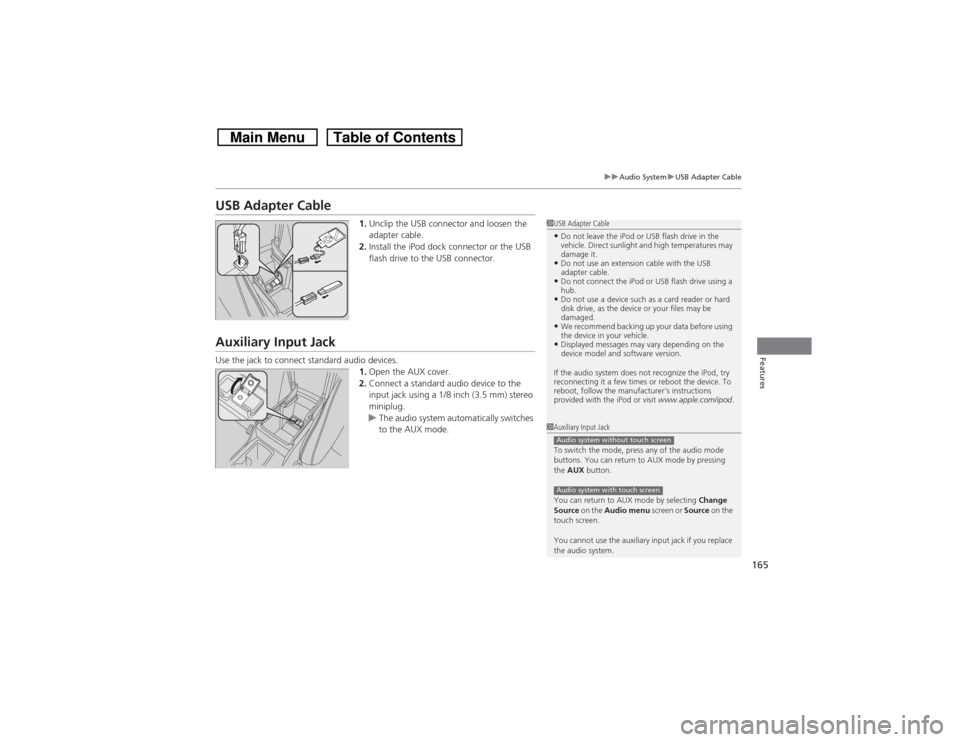
USB Adapter Cable
1.Unclip the USB connector and loosen the
adapter cable.
2.Install the iPod dock connector or the USB
flash drive to the USB connector.
Auxiliary Input JackUse the jack to connect standard audio devices.
1.Open the AUX cover.
2.Connect a standard audio device to the
input jack using a 1/8 inch (3.5 mm) stereo
miniplug.
uThe audio system automatically switches
to the AUX mode.
1USB Adapter Cable•Do not leave the iPod or USB flash drive in the
vehicle. Direct sunlight and high temperatures may
damage it.•Do not use an extension cable with the USB
adapter cable.•Do not connect the iPod or USB flash drive using a
hub.•Do not use a device such as a card reader or hard
disk drive, as the device or your files may be
damaged.•We recommend backing up your data before using
the device in your vehicle.•Displayed messages may vary depending on the
device model and software version.
If the audio system does not recognize the iPod, try
reconnecting it a few times or reboot the device. To
reboot, follow the manufacturer's instructions
provided with the iPod or visit www.apple.com/ipod.
1Auxiliary Input Jack
To switch the mode, press any of the audio mode
buttons. You can return to AUX mode by pressing
the AUX button.
You can return to AUX mode by selecting Change
Source on the Audio menu screen or Source on the
touch screen.
You cannot use the auxiliary input jack if you replace
the audio system.Audio system without touch screenAudio system with touch screen
Page 174 of 573
173
uuAudio System Basic OperationuPlaying a CD
Continued
Features
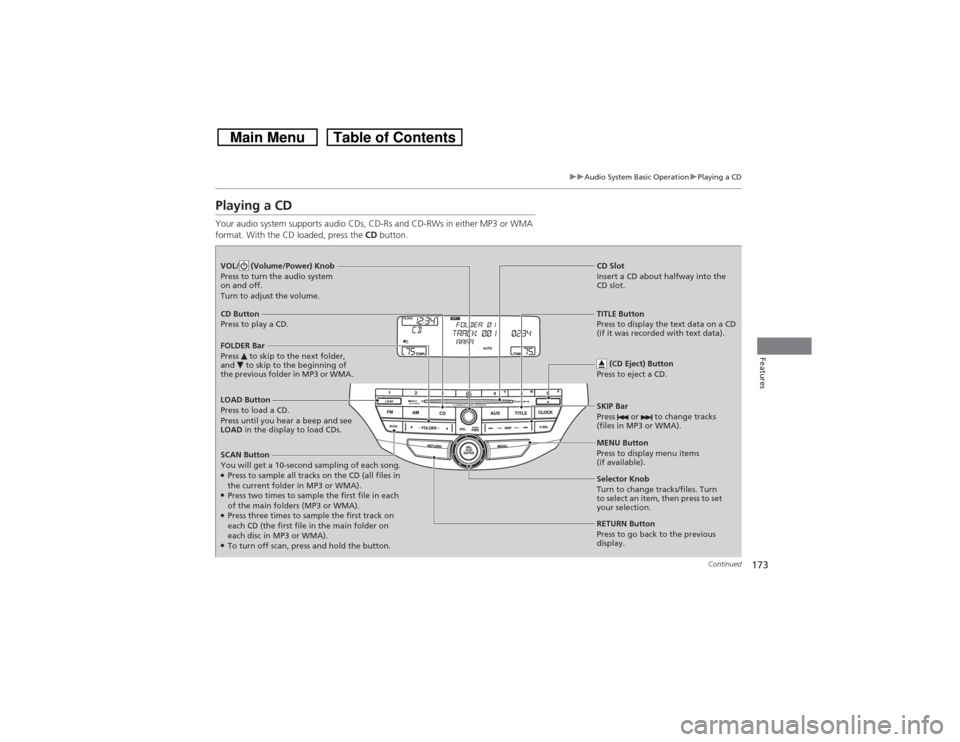
Playing a CDYour audio system supports audio CDs, CD-Rs and CD-RWs in either MP3 or WMA
format. With the CD loaded, press the CD button.LOAD Button
Press to load a CD.
Press until you hear a beep and see
LOAD in the display to load CDs.
SCAN Button
You will get a 10-second sampling of each song.●Press to sample all tracks on the CD (all files in
the current folder in MP3 or WMA).●Press two times to sample the first file in each
of the main folders (MP3 or WMA).●Press three times to sample the first track on
each CD (the first file in the main folder on
each disc in MP3 or WMA).●To turn off scan, press and hold the button. VOL/ (Volume/Power) Knob
Press to turn the audio system
on and off.
Turn to adjust the volume.
CD Slot
Insert a CD about halfway into the
CD slot.
SKIP Bar
Press or to change tracks
(files in MP3 or WMA).
CD Button
Press to play a CD.
(CD Eject) Button
Press to eject a CD.FOLDER Bar
Press to skip to the next folder,
and to skip to the beginning of
the previous folder in MP3 or WMA.
TITLE Button
Press to display the text data on a CD
(if it was recorded with text data).
MENU Button
Press to display menu items
(if available).
Selector Knob
Turn to change tracks/files. Turn
to select an item, then press to set
your selection.
RETURN Button
Press to go back to the previous
display.
Page 180 of 573
179
uuAudio System Basic OperationuPlaying a USB Flash Drive
Continued
Features
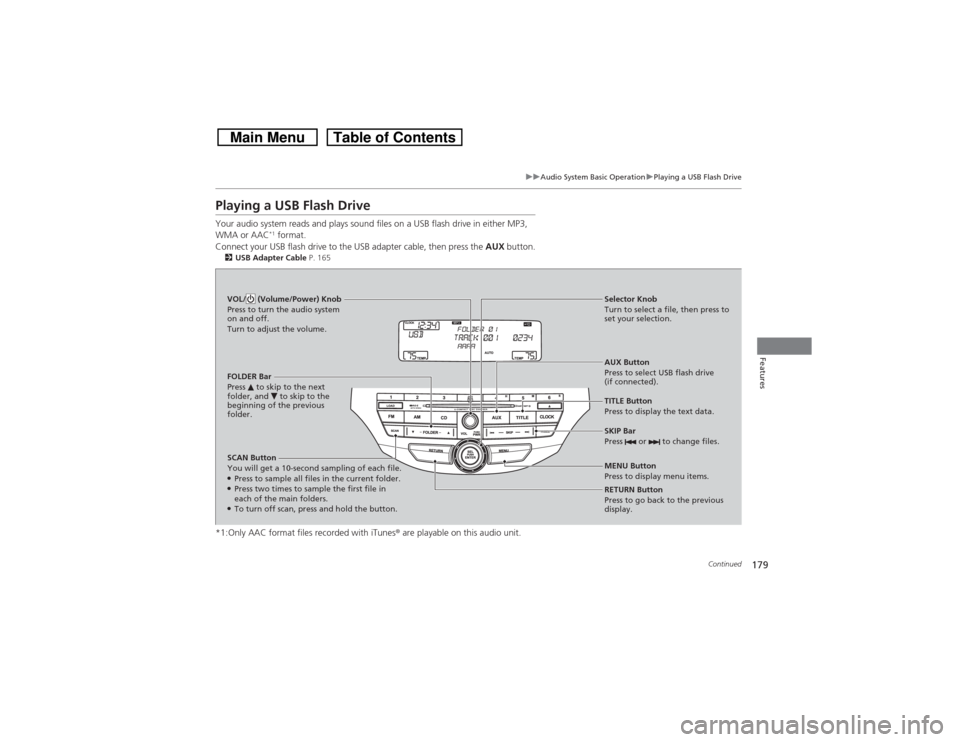
Playing a USB Flash DriveYour audio system reads and plays sound files on a USB flash drive in either MP3,
WMA or AAC
*1 format.
Connect your USB flash drive to the USB adapter cable, then press the AUX button.
2USB Adapter Cable P. 165*1:Only AAC format files recorded with iTunes® are playable on this audio unit.SCAN Button
You will get a 10-second sampling of each file.●Press to sample all files in the current folder.●Press two times to sample the first file in
each of the main folders.●To turn off scan, press and hold the button.RETURN Button
Press to go back to the previous
display. Selector Knob
Turn to select a file, then press to
set your selection.
AUX Button
Press to select USB flash drive
(if connected). VOL/ (Volume/Power) Knob
Press to turn the audio system
on and off.
Turn to adjust the volume.
SKIP Bar
Press or to change files.MENU Button
Press to display menu items. TITLE Button
Press to display the text data. FOLDER Bar
Press to skip to the next
folder, and to skip to the
beginning of the previous
folder.
Page 183 of 573
182Features
Audio System Basic OperationTo use the audio system function, the ignition switch must be in ACCESSORY
(q or
ON
(w*1.
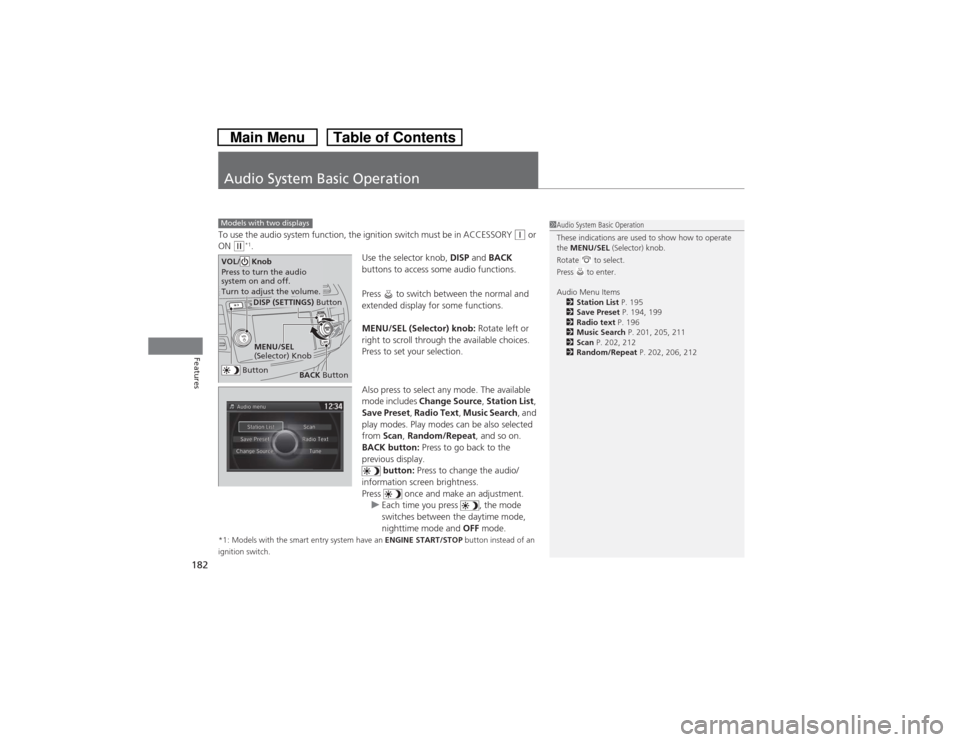
Use the selector knob, DISP and BACK
buttons to access some audio functions.
Press to switch between the normal and
extended display for some functions.
MENU/SEL (Selector) knob: Rotate left or
right to scroll through the available choices.
Press to set your selection.
Also press to select any mode. The available
mode includes Change Source, Station List,
Save Preset, Radio Text, Music Search, and
play modes. Play modes can be also selected
from Scan, Random/Repeat, and so on.
BACK button: Press to go back to the
previous display.
button: Press to change the audio/
information screen brightness.
Press once and make an adjustment.
uEach time you press , the mode
switches between the daytime mode,
nighttime mode and OFF mode.
*1: Models with the smart entry system have an ENGINE START/STOP button instead of an
ignition switch.Models with two displays
1Audio System Basic Operation
These indications are used to show how to operate
the MENU/SEL (Selector) knob.
Rotate to select.
Press to enter.
Audio Menu Items
2Station List P. 195
2Save Preset P. 194, 199
2Radio text P. 196
2Music Search P. 201, 205, 211
2Scan P. 202, 212
2Random/Repeat P. 202, 206, 212
Button
MENU/SEL
(Selector) KnobDISP (SETTINGS) Button
BACK Button
VOL/ Knob
Press to turn the audio
system on and off.
Turn to adjust the volume.
Page 185 of 573
uuAudio System Basic OperationuAudio with Touch Screen
184Features
Select to adjust the clock and screen settings.■Changing the Clock settings2Setting the Clock P. 88■Changing the Screen settings
1.Select Screen Settings.
2.Use
(+, (- or others to adjust the setting.
■Changing the Clock/Screen Settings
1Changing the Clock/Screen Settings
The followings are adjustable screen settings:•Brightness•Contrast•Black Level•Display
Changes between the daytime or nighttime
modes.•Beep
Mutes a beep that sounds every time you touch the
screen.•Fade Timer
Sets the screen black out timing.
Select .